Boundary and Annexation Survey
Boundary and Annexation Survey (BAS)
BAS Partnership Toolbox Pro How-to Guide
Boundary and Annexation Survey
OMB: 0607-0151
Boundary
and Annexation Survey
Partnership Toolbox Pro How-to Guide Instructions
for Participating in the Boundary and Annexation Survey Using the
Partnership Toolbox for ArcGIS Pro
Instructions
for Participating in the Boundary and Annexation Survey Using the
Partnership Toolbox for ArcGIS Pro

Last updated January 2026
Table of Contents
A. Key Dates for BAS Respondents vi
B. Adjacencies and Legal Disputes vi
Chapter 1 Getting Started with the Partnership Toolbox 1
1.2 Partnership Toolbox Requirements 1
1.3 New Incorporations and Disincorporations 2
Chapter 2 Creating A Submission 3
2.4 Create Changes Tool (Optional) 9
Chapter 3 Reviewing and Exporting a Submission 12
3.1 Required Attribute Information 12
3.2 Large Boundary Corrections 14
3.3 Boundary to Feature Relationships 15
3.5 CDP and Street Feature Changes 17
3.5.2 Street Feature Changes 19
Chapter 4 Troubleshooting Toolbox Issues 25
4.1 Output Geodatabase <filepath> does not exist or is not supported 25
4.3 Cannot zoom to extent of bas_county 25
4.4 Whole entity of boundary appearing in changes file 25
Chapter 5 Submit Changes to the Census Bureau 27
List of tables
Table 1: Feature Class Field Names Based on Geography Type 5
Table 2: COMPTYPE Codes and NAMELSAD 5
Table 3: Distinction Between the Types of Changes Allowed in the Project Setup Tool 8
Table 4: Required Attribution by Update Type 13
Table 5: Acceptable Field Inputs for Changes Submitted to BAS 13
List of Figures
Figure 1: Creating an ArcGIS Pro Project 3
Figure 2: Partnership BAS Tools Pro Toolbox Expanded Showing Four Tools 3
Figure 3: NAME Field in the Census Data vs Local Boundary Data 4
Figure 4: Appropriate Attribution for MCD or AIANNH Changes 4
Figure 5: Project Setup Window for Previously Downloaded Census Bureau Data 6
Figure 6: Partnership BAS Tools Pro Toolbox with Project Setup Selected 7
Figure 7: Project Setup Window for Legal Changes 8
Figure 8: View of Project Once Created 8
Figure 9: Partnership BAS Tools Pro Toolbox with Create Changes Tool Selected 9
Figure 10: Create Changes Window for Legal Changes 10
Figure 11: Create Changes Window for Non-Legal Changes 10
Figure 12: Project Geodatabase with Output from Create Changes Tool 10
Figure 13: Example of Large Boundary Corrections 14
Figure 14: Example of Small Spatial Corrections 15
Figure 15: Create Button from the Edit Tab, Features Group 16
Figure 16: Create Features Pane in ArcGIS Pro 17
Figure 17: Example of a Boundary Correction to Gardners Corner CDP 18
Figure 18: Partnership BAS Tools Pro Toolbox with Attribute Check Selected 20
Figure 19: Attribute Check Window for an Incorporated Place Change 21
Figure 20: Project Folder Showing an Attribute Check Error CSV File 21
Figure 21: Partnership BAS Tools Pro Toolbox with Export Submission Files Selected 21
Figure 22: Export Submission Files Window 22
Figure 23: Submission within the GOVID Project Folder in File Explorer 23
The Boundary and Annexation Survey (BAS) provides eligible governments, which include tribal, state, and general-purpose local governments, an opportunity to review the Census Bureau’s legal boundary data to confirm the Census Bureau has the correct boundary, name, and status information. BAS also allows participants to review and provide updates to census designated place (CDP) boundaries and linear features. Maintaining correct boundaries helps the Census Bureau assign appropriate housing and population counts to each government. Title 13, Section 6, United States Code authorizes this survey.
BAS fulfills the agency’s responsibility as part of the National Spatial Data Infrastructure, for which the Office of Management and Budget (OMB) Circular A–16 designates the Census Bureau as the lead federal agency for maintaining national data about legal government boundaries, as well as administrative and statistical boundaries. BAS supports the geospatial data steward responsibilities of the Geospatial Data Act, the Evidence Act, OMB E-Gov, the Federal Geographic Data Committee, Data.gov, GeoPlatform.gov, the National Map, the Geographic Names Information System, and the Geospatial One-Stop.
The Census Bureau uses the boundaries collected in BAS to tabulate data for various censuses and surveys including the decennial census, American Community Survey (ACS), and Population Estimates Program (PEP). It also uses the boundaries collected through BAS to support several other programs such as Congressional and State Legislative redistricting, the Economic Census, the Geographically Updated Population Certification Program, and the Special Census program.
January 1 Legal boundary changes must be in effect on or before this date to be reported in the current survey year.
March 1 First BAS deadline – Legal boundary changes returned by this date will be shown in the ACS and PEP data and in next year’s BAS materials.
May 31 Final BAS deadline – Legal boundary changes returned by this date will be shown in next year’s BAS materials. If time permits, boundary corrections returned by this date may also be shown.
The Census Bureau
will not make any boundary change that affects adjacent legal
governments without the appropriate documentation. Review any changes
that affect adjacent governments to determine if they are intentional
legal changes. If the Census Bureau discovers that an area of land is
in dispute between two or more jurisdictions, the Census Bureau will
not make any changes until the parties come to a written agreement,
or there is a documented final court decision regarding the dispute.
To learn more, contact the Census Bureau Legal Office at
1-301-763-2918.
For disputes involving tribal areas, the Census Bureau must defer to the Office of the Solicitor at the Department of the Interior for a legal opinion. Often complicated land issues require an extended period for resolution, and in those cases, the Census Bureau will retain the current boundary until a legal opinion is issued by the Solicitor's office.
For assistance in preparing the BAS submission or if issues arise with the BAS Partnership Toolbox, contact the Census Bureau at <geo.bas@census.gov> or 1-800-972-5651. When emailing <geo.bas@census.gov>, include the following details:
GOVID and Government Name.
Geography type.
Contact information.
Version of ArcGIS Pro in use.
Full text of the error message received as a screenshot or text (if applicable).
Screenshots of discrepancies (if applicable).
Additional resources
include a technical guide and videos that demonstrate the BAS
submission process. For background on Census Bureau geography and
technical details regarding the BAS submission, change types, and
shapefiles, see the BAS Technical Guide at:
<www.census.gov/programs-surveys/bas/information/respondent-guides.html>.
Videos of recorded demonstrations and informational sessions are
available on the BAS website at:
<www.census.gov/programs-surveys/bas/library/bas-videos.html>.
The BAS Partnership Toolbox was created to ease the burden of creating a BAS submission on BAS and Tribal BAS participants. This toolbox simplifies the update process by automating the download of data, change creation, sliver removal, attribution formatting and checks, and exporting files for submission. This allows the Census Bureau to easily process returned BAS files. This how-to guide will walk participants through all the above steps to create their digital submission in ArcGIS Pro.
Note: To standardize experiences across the Census Bureau’s Geographic Partnership Programs, your BAS ID is now your GOVID. This unique geographic identifier will help us keep track of program participation and proper contact information. The ID itself has not changed from last year.
Participation in BAS means that participants will provide the following to the Census Bureau:
A shapefile of boundary change polygons based off the current Census Bureau boundary. Submissions containing only a whole entity boundary shapefile of the current local data will not be accepted.
Legal documentation numbers, authorization types, and effective dates for all legal boundary changes (annexations and deannexations).
For tribal submissions, digital copies of the legal documentation for each requested change polygon. Acceptable documents include but are not limited to a Federal Register Notice, acceptance of conveyance and warranty deed, title status report, BIA certification or letter.
Current information for the BAS point of contact, the person updating the shapefiles, and the highest elected official (HEO) or tribal chair (TC) for the government.
Before running these tools, users will need the following:
ArcGIS Pro 3.0 or higher (not ArcGIS Desktop).
The BAS_Partnership_Toolbox_Pro.zip, which can be downloaded from the Census Bureau website at:
<www.census.gov/programs-surveys/bas/geographies/map-tools/arcmap-tools.html>.The GOVID for the government being processed. This can be found on the BAS Annual Response email or online at:
<www.census.gov/programs-surveys/bas/technical-documentation/code-lists.html>.A shapefile or feature class showing the legal boundary of the government.
Data in this layer must include the name of the government being processed formatted to agree with the Census Bureau’s naming convention for the same government as found in the NAME field or the NAMELSAD field. For minor civil division (MCD) and American Indian / Alaska Native / Native Hawaiian (AIANNH) changes, only the NAMELSAD field should be used.
Digital copies of the legal documentation to be submitted with the change polygons. This is required for tribal submissions and requested for all other submissions.
For tribal changes: acceptable documents include, but are not limited to, a Federal Register Notice, acceptance of conveyance and warranty deed, title status report, or BIA certification or letter.
For all other changes (optional): acceptable documents include, but are not limited to, ordinances, resolutions, changes to a local or state law, or court rulings.
(Optional) The BAS Partnership Shapefiles, which can be downloaded from the Census Bureau’s Partnership Shapefiles webpage. Be certain to select the version used for BAS (v2) and not the other versions that may appear on the page.
The shapefile download is automated in the Partnership Toolbox, but in instances where downloads are restricted or internet connectivity is limited, participants may find that pre-downloading these files is simpler and faster.
Newly incorporated governments are not required to use the toolbox to submit their new government information. However, to properly reflect the change, the Census Bureau requires the following information:
A copy of the official new incorporation papers, including date of incorporation.
A map indicating the boundaries of the new incorporation.
Contact information for the highest elected official and a contact for BAS.
Disincorporated governments should provide the Census Bureau with a copy of the official papers of disincorporation, including the effective date.
Submissions can be provided in a zip file through SWIM as described in Chapter 5, or by emailing copies of the documents to geo.bas@census.gov.
This chapter provides step-by-step instructions for using the BAS Partnership Toolbox to set up the workspace and create change polygons. For best results, use the toolbox in ArcGIS Pro 3.0 or higher. This toolbox will not work in ArcGIS Desktop.
After downloading the toolbox from the BAS website, locate the zip file in File Explorer.
Unzip the BAS_Partnership_Toolbox_Pro.zip to the C: drive or other preferred working folder. The folder location does not matter if it can be accessed from ArcGIS Pro and is not a cloud location. Inside there will be a folder called DBAS, containing all the necessary files to start a submission.
Do not attempt to change the file structure inside the DBAS folder. Moving folders or files from where they are located may cause issues later in the process.
Open ArcGIS Pro and select a new Map under the Blank Templates section of the splash screen. In the Name field, enter the GOVID for the entity. In the Location field, navigate to, and select the “…\DBAS\projects” folders. Select the box to Create a new folder for this project if it is not already selected. (Figure 1).
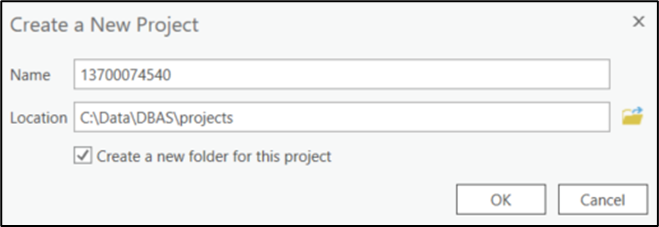
Figure 1: Creating an ArcGIS Pro Project
Once the new project opens, navigate to the Insert tab, select the Toolbox dropdown, then Add Toolbox. Navigate to the “…\DBAS\setup” folder and select the Partnership BAS Tools toolbox.
At this point, expand the Toolboxes folder in the Catalog pane and expand the Partnership BAS Tools Pro toolbox. Four tools should appear as shown in Figure 2.
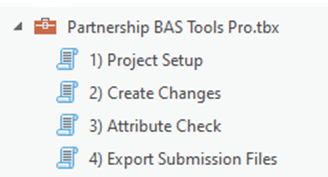
Figure 2: Partnership BAS Tools Pro Toolbox Expanded Showing Four Tools
Before any change creation work can be done, the local boundary shapefile must contain an attribute field with the name of the government or governments as they appear in Census Bureau records (Figure 3 and Figure 4). This includes matching capitalization, spacing, and in the case of MCDs and AIAs a descriptor of the geography (e.g., township, village, borough, etc.). If it is a new government or the legal name is changing, it does not need to agree though other attribution must be updated to reflect this change. Refer to Table 1 to see which feature class and field to use for each geography type.
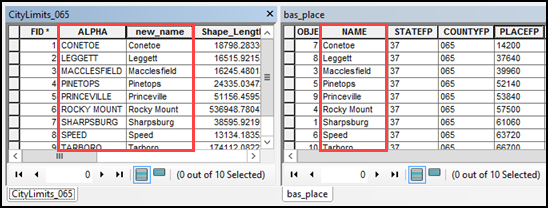
Figure 3: NAME Field in the Census Data vs Local Boundary Data
The bas_place layer on the right shows how the Census Bureau NAME field is populated for all the places in Edgecombe County, NC while the local places data on the left shows how local data may need to be manipulated to agree with the Census Bureau NAME field.
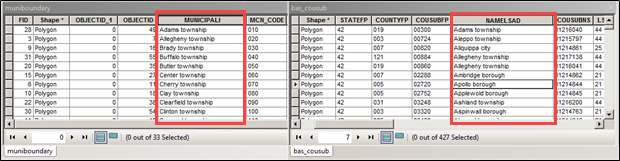
Figure 4: Appropriate Attribution for MCD or AIANNH Changes
The bas_cousub attribution on the right in the NAMELSAD field shows how the local MUNICIPALI field on the left should be formatted to ensure that the Create Changes tool works for the MCD changes in Butler County, PA. The bas_aial attribution appears in a similar way.
Table 1: Feature Class Field Names Based on Geography Type
GEOGRAPHY TYPE |
FEATURE CLASS |
FIELD |
Incorporated Place |
bas_place |
NAME |
County Subdivision (MCD) |
bas_cousub |
NAMELSAD |
County |
bas_county |
NAME |
Tribal |
bas_aial |
NAMELSAD |
The NAMELSAD field (Name and Legal/Statistical Area Description) is used to identify American Indian Areas in a standardized format. For Tribal BAS submissions, the value of NAMELSAD must match the reservation or trust land classification, which is indicated by the COMPTYPE attribute.
Each AIA type must use a properly formatted NAMELSAD value depending on whether the area is a reservation or off-reservation trust land.
The COMPTYPE field in your shapefile indicates the classification of the land feature. This value determines the correct formatting for the NAMELSAD field. Use Table 2 to ensure that each feature has the correct NAMELSAD value based on its COMPTYPE.
Table 2: COMPTYPE Codes and NAMELSAD
COMPTYPE |
Description |
NAMELSAD Formatting Based on COMPTYPE |
R |
Reservation |
[NAME] Reservation |
T |
Off-Reservation Trust Land |
[NAME] Off-Reservation Trust Land |
Examples:
If the COMPTYPE is R and the NAME is San Pasqual, the NAMELSAD is San Pasqual Reservation
If the COMPTYPE is T and the NAME is San Pasqual, the NAMELSAD is San Pasqual Off-Reservation Trust Land
The Project Setup tool gathers all the BAS partnership shapefile data needed to create changes from the Census Bureau website, creates an initial change file, and formats the map within the ArcGIS Pro project (.aprx) for the given BAS ID. Before using this tool, review sections 2.3.1 through 2.3.2 for additional guidance.
There are two ways
to use this tool. One that downloads the data from the Census Bureau
for the user (i.e., Data Downloader) and one that ingests a folder
with the Census Bureau data already downloaded. If the data is
already downloaded, unzip the downloaded pvs batch zip file (e.g.,
pvs_batch_from_<st>) to display the partnership shapefiles zip
files
(e.g., partnership_shapefiles_25v2_<st> and
partnership_shapefiles_25v2_<stcou>). The Project Setup tool
looks for these two partnership_shapefiles zip files when it runs.
To use previously downloaded Census Bureau data, select “No” under the Use Data Downloader? field and navigate or drag the folder into Path to Zip Files field as shown in Figure 5. Make sure the folder only contains the Census Bureau zip files to ensure there are no future data issues.
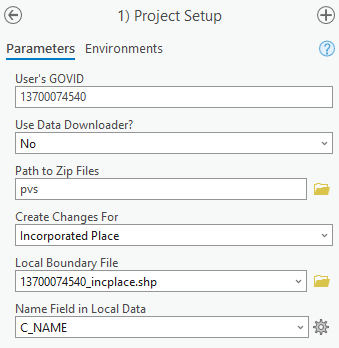
Figure 5: Project Setup Window for Previously Downloaded Census Bureau Data
The Project Setup tool allows the user to input a boundary file so that an initial set of changes can be created at the same time the Census Bureau data is being downloaded. The Census Bureau recommends using this opportunity to create changes for legal geographies. Available legal geographies are:
Incorporated Place.
County Subdivision (MCD).
County.
Tribal.
If a user does not have changes for a legal geography, they can select the non-legal geography option(s) they wish to submit. These include:
CDP.
Street Updates.
If the user has more than one change type for which they want to create changes, they will run the Project Setup tool and then create additional change feature classes with the Create Changes tool. Finally, to view what boundary the Census Bureau has on file before making any changes, select the Just Download My Data option.
Follow the steps below to run the Project Setup tool.
In the Partnership BAS Tools Pro toolbox, double-click on the Project Setup tool (Figure 6).

Figure 6: Partnership BAS Tools Pro Toolbox with Project Setup Selected
From the Project Setup window (Figure 7), enter the 11-digit BAS ID in the User’s GOVID field. This field should automatically populate if the project was set up using the steps laid out in section 2.1.
In the Use Data Downloader? field, select how to access the Census Bureau data:
To have the Census Bureau data downloaded automatically, select “Yes” under the Use Data Downloader? field then proceed to step 5.
To use previously downloaded Census Bureau data, select “No” under the Use Data Downloader? field then proceed to step 4.
The Path to Zip Files field will only take an input if No was selected earlier in the Use Data Downloader? field. Navigate or drag the folder into Path to Zip Files field. Make sure the folder only contains the Census Bureau zip files to ensure there are no future data issues. Refer to section 2.3.2 for more guidance.
Note: If an error message is returned when trying to use the automatic download, manually download the partnership files and try the tool that way. Use the guidance in Chapter 4 for additional troubleshooting steps. If an error still occurs, contact the Census Bureau using the format laid out in the Contact Us section.
Under the Create Changes For field, choose the type of changes to create from the dropdown options. Available inputs are listed in Table 3. If a legal geography is selected proceed to step 6. If a non-legal geography is selected or Just Download My Data is selected, proceed to step 8.
Table 3: Distinction Between the Types of Changes Allowed in the Project Setup Tool
LEGAL GEOGRAPHY |
NON-LEGAL GEOGRAPHY |
Incorporated Place |
CDP |
County Subdivision (MCD) |
Street Updates |
County |
|
Tribal |
|
In the Local Boundary File field, enter the path or navigate to the full boundary polygon.
For the Name Field in Local Data, type the name of the field (as it appears in the local data in the Catalog pane) containing the information matching the Census Bureau’s NAME or NAMELSAD field as appropriate from section 2.2.
Once all fields are complete, select OK.
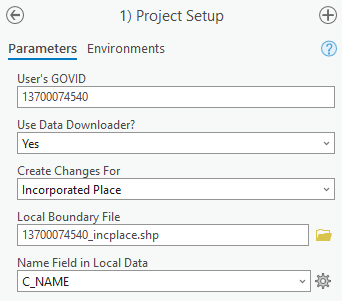
Figure 7: Project Setup Window for Legal Changes
Note: If a non-legal geography type was selected in the Create Changes For field, the last two fields will be blank and disabled. See section 2.4 for examples.
When this tool is complete, there should be reference and changes feature classes (i.e., bas<yy>_<GOVID>_changes_<geogtype>) in the project geodatabase (.gdb), an archive folder inside the project folder (visible in Figure 20), and a map in the project complete with reference data and the changes already formatted with suggested symbology (Figure 8).

Figure 8: View of Project Once Created
Note: The archive folder contains other Census Bureau data that may be useful as well.
At this point, there are a few different options for next steps.
To create changes, proceed to section 2.4.
To begin reviewing the changes, proceed to Chapter 3.
Execute the Create Changes tool to create change files for additional levels of geography. If changes only exist for one level of geography and they were already made in the previous step, proceed to Chapter 3.
If the local data is not already prepared, refer to section 2.2 before proceeding to create legal changes. To create changes for a non-legal geography, continue to step 2.
Double-click on the Create Changes tool (Figure 9).
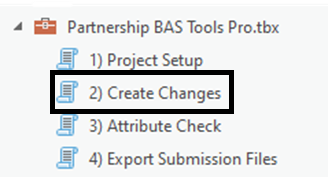
Figure 9: Partnership BAS Tools Pro Toolbox with Create Changes Tool Selected
To create changes for legal geographies, in the Create Changes window (Figure 10):
Enter the 11-digit GOVID in the User’s GOVID field if it is not already populated.
Under Create Changes For, choose the type of changes to create from the dropdown options:
Incorporated Place.
County Subdivision (MCD).
County.
Tribal.
In the Local Boundary File field, enter the path or navigate to the full boundary polygon.
For the Name Field in Local Data, enter the name of the field (as it appears in the Catalog pane) containing the information matching the Census Bureau’s NAME or NAMELSAD field as appropriate from section 2.2.
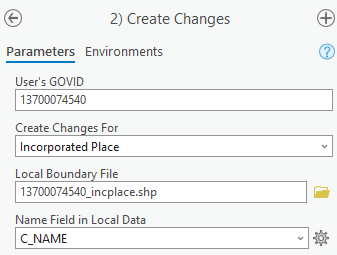
Figure 10: Create Changes Window for Legal Changes
To create non-legal changes, in the Create Changes window (Figure 11):
Enter the 11-digit GOVID in the User’s GOVID field.
Under Changes Being Processed, choose the type of changes to create from the dropdown options:
CDP.
Linear Features.
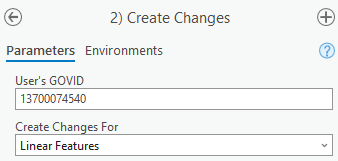
Figure 11: Create Changes Window for Non-Legal Changes
Select Run at the bottom of the window to execute the tool.
When the tool completes, the output is placed in the geodatabase under the submission feature dataset.
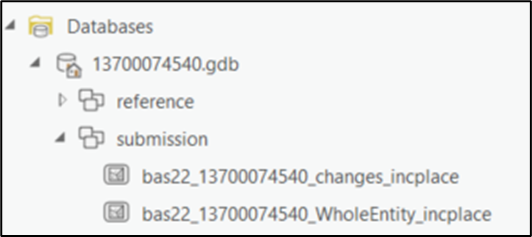
Figure 12: Project Geodatabase with Output from Create Changes Tool
Repeat steps for any other levels of geography that need changes created.
Note: The BAS year used in screenshots throughout this document may vary, however, functionality of the tools or actions being described remain the same.
At this point, a review of the created changes is necessary to ensure proper attribution is contained in each record. This chapter discusses the types of changes to update or remove from the submission based on current relationships within the Census Bureau data.
With editing enabled in the project, open the attribute table for the changes layer(s) to conduct a line-by-line review of the requested changes.
Review each change polygon for the following potential issues:
Required attribution information (section 3.1).
Large boundary corrections (section 3.2).
Boundary-to-Feature Relationships (section 3.3).
Corridors and Offsets (section 3.4).
Edit street and CDP changes as necessary (section 3.5).
Save the edits to the change feature classes.
Export the submission (section 3.7) and proceed to Chapter 4.
Note: The Census Bureau will
snap boundary changes to any linear feature that is correctly located
within 30 feet of the change. Additionally, changes that are less
than 30 feet at their widest point may not be incorporated into the
Master Address File/Topologically Integrated Geographic Encoding and
Referencing (MAF/TIGER) System due to system constraints. For more
information, refer to the BAS Technical Guide
at:
<www.census.gov/programs-surveys/bas/information/respondent-guides.html>.
It is important to review each change polygon and confirm that the correct attribute information is included. Without the correct attribute information, the Census Bureau will be unable to process and incorporate the changes into the MAF/TIGER System.
All changes are coded as a ”B” for Boundary Correction by the Create Changes tool. If there are legal changes in the file, navigate to the area of the change and select the change polygon.
Update the required fields for the selected change polygon. Refer to Table 4 for the required attributes that should be manually updated. Table 5 lists the acceptable values for each required field and expected values for fields that do not take a specific Census Bureau code.
Once the attribution is updated, save the edits, move to the next change polygon, and repeat the process in steps 1 and 2.
Once the known legal changes are complete, review the rest of the boundary changes using the guidance in sections 3.2, 3.3, and 3.4.
Table 4: Required Attribution by Update Type
UPDATE TYPE |
CHNG_TYPE |
NAME |
EFF_DATE |
AUTHTYPE |
DOCU |
AREA |
RELATE |
Annexation/ |
✓ |
✓ |
✓ |
✓ |
✓* |
✓* |
|
Deannexation/ |
✓ |
✓ |
✓ |
✓ |
✓* |
✓* |
|
Boundary Correction |
✓ |
✓ |
|
|
|
|
✓ |
Geographic Corridor |
✓ |
✓ |
|
|
|
|
✓ |
Geographic Offset |
✓ |
✓ |
|
|
|
|
✓ |
Disincorporation/ Remove Entity |
✓ |
✓ |
✓ |
✓ |
✓ |
|
|
New Incorporation/ Add Entity |
✓ |
✓ |
✓ |
✓ |
✓ |
|
|
Name Change |
✓ |
✓ |
✓ |
✓ |
✓ |
|
|
Note*: The AREA field is required for submissions in Georgia. The DOCU field is not required for submissions in Georgia.
Table 5: Acceptable Field Inputs for Changes Submitted to BAS
ATTRIBUTE FIELD |
ATTRIBUTE FIELD DESCRIPTION |
ALLOWABLE VALUE |
ALLOWABLE VALUE DESCRIPTION |
CHNG_TYPE |
Type of Area Update |
A |
Annexation/Addition |
CHNG_TYPE |
Type of Area Update |
D |
Deannexation/Deletion |
CHNG_TYPE |
Type of Area Update |
B |
Boundary Correction |
CHNG_TYPE |
Type of Area Update |
C |
Geographic Corridor |
CHNG_TYPE |
Type of Area Update |
F |
Geographic Offset |
CHNG_TYPE |
Type of Area Update |
X |
Disincorporation/Remove Entity |
CHNG_TYPE |
Type of Area Update |
E |
New Incorporation/Add Entity |
CHNG_TYPE |
Type of Area Update |
G |
Name Change |
EFF_DATE |
Effective date of legal change |
mm/dd/yyyy |
|
AUTHTYPE |
Type of Authorization |
O |
Ordinance |
AUTHTYPE |
Type of Authorization |
R |
Resolution |
AUTHTYPE |
Type of Authorization |
L |
Local Law |
AUTHTYPE |
Type of Authorization |
S |
State Level Action |
AUTHTYPE |
Type of Authorization |
E |
Executive Order (Tribal Submissions Only) |
AUTHTYPE |
Type of Authorization |
C |
BIA Certification (Tribal Submissions Only) |
AUTHTYPE |
Type of Authorization |
D |
Deed (Tribal Submissions Only) |
AUTHTYPE |
Type of Authorization |
X |
Other |
DOCU |
Supporting documentation number |
O-### |
Unique number or code assigned to the legal document; not required in the state of Georgia |
AREA |
Area of update in acres |
##.# |
Only required in the state of Georgia |
RELATE |
Relationship Description |
IN |
Area is added to the entity. |
RELATE |
Relationship Description |
OUT |
Area is removed from the entity. |
The Census Bureau will not accept large boundary corrections that substantially change the current boundary of a government without the appropriate legal documentation numbers and effective dates. These large boundary corrections (Figure 13) may be legal boundary changes that occurred in the past and were never reported to the Census Bureau.
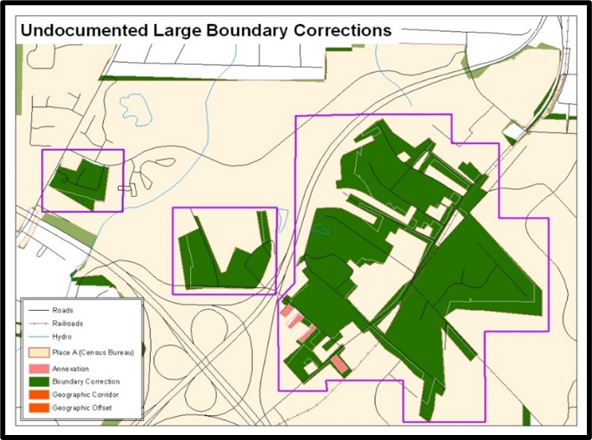
Figure 13: Example of Large Boundary Corrections
Without the appropriate documentation, the Census Bureau will not accept large boundary corrections.
If a large boundary correction is a result of a previous legal change:
Submit the appropriate legal documentation number and effective date (no matter how old), so the changes may be incorporated into the MAF/TIGER System. Refer to Table 4 and Table 5 and to the steps in section 3.1 to complete required attribution for legal changes.
If legal documentation cannot be provided for any reason, Contact Us to discuss submission options.
Note: There may be a few instances when large boundary corrections need to be made because of incorrect digitizing or where the boundary appears in the incorrect location due to other Census Bureau activities. If unsure how to proceed, Contact Us to discuss submission options.
Review all changes to ensure that the correct boundary-to-feature relationships are being created or maintained. The Census Bureau is aware that many governments base their legal boundaries on cadastral (parcel-based) right-of-way mapping; however, the Census Bureau bases maps on spatial data that is topologically integrated (see the BAS Technical Guide at: <www.census.gov/programs-surveys/bas/information/respondent-guides.html>). This helps establish a more accurate population count for governments.
The Census Bureau will not accept boundary corrections that dissolve the current relationship between an existing boundary and linear feature without specific instruction that the relationship is incorrect. The Census Bureau will not incorporate any boundary corrections that create a 30-foot, or less, gap or overlap between the existing linear feature and boundary into the MAF/TIGER System. Figure 14 shows an example of changes that will not be accepted.
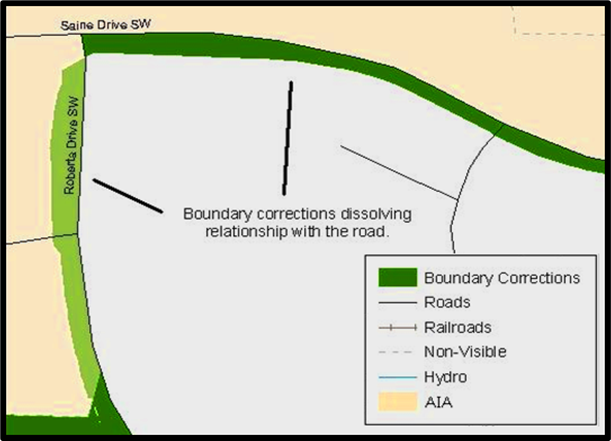
Figure 14: Example of Small Spatial Corrections
Boundary corrections smaller than 30 feet would dissolve the boundary to feature relationship with multiple streets. Incorporating these changes would affect the population counts for the area. Therefore, the Census Bureau will not accept these small, spatial boundary corrections.
If there are changes in the submission that would remove boundary-to-feature relationships, use the following information to determine if the change should be kept or deleted from the submission:
Changes that are based on cadastral data and are not legally required to accurately display the boundary can be deleted from the submission.
If the change is along a roadway and must be incorporated, mark it as an offset or corridor. Refer to section 3.4 to learn how to add corridors and offsets.
If the feature is incorrectly located, the change can remain in the submission. Note the incorrect feature in the JUSTIFY field.
The Census Bureau does not require places and AIAs to report rights-of-way. Geographic corridors are not essential to the mission of the Census Bureau, and the right-of-way should only be included if it is crucial to the place or AIA, or if state or local laws require it. For more information on appropriate uses of corridors and offsets, refer to the BAS Technical Guide at: <www.census.gov/programs-surveys/bas/information/respondent-guides.html>.
To add a corridor or offset to the submission:
Navigate to the change polygon and select it.
Using the Attribute table or the Attribute Window, change the CHNG_TYPE to the appropriate value. For a corridor, set it to “C” and set it to “F” for an Offset.
If this change is due to legal action, provide the AUTHTYPE, DOCU, EFF_DATE, and AREA as appropriate as well. Information on these required fields can be found in section 3.1.
Save the project.
CDPs and streets may be updated through BAS. The Census Bureau accepts updates to these areas in a similar manner to legal boundary changes. However, since they are not legal governments, no documentation or effective dates are required. If changes are made, save the project often to protect the completed work.
To create changes to CDPs, make sure to run the Create Changes tool with the CDP option selected. That action creates an empty feature class called bas<yy>_<GOVID>_changes_cdp.
Each CDP update must have the required attribution and corresponding change type populated (refer to Table 6) in the attribute table. The steps below document how to properly update a CDP layer.
Table 6: Required Attribution for CDP Changes
UPDATE TYPE |
CHNG_TYPE VALUE |
CHNG_TYPE |
NAME |
RELATE |
Boundary Correction |
B |
✓ |
✓ |
✓ |
Delete CDP |
X |
✓ |
✓ |
|
New CDP |
E |
✓ |
✓ |
|
Name Change |
G |
✓ |
✓ |
|
Note: The checkmark (✓) in the table denotes a required field for the four types of CDP changes.
From the Edit tab, select the Create button in the Features group (Figure 15). Navigate to the area to modify, add, or remove a CDP. Make sure the Create Features pane (Figure 16) is open as it should list all the appropriate types of CDP edits to potentially make.

Figure 15: Create Button from the Edit Tab, Features Group
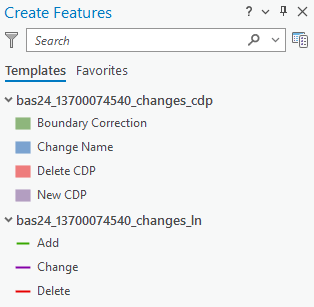
Figure 16: Create Features Pane in ArcGIS Pro
To modify the shape of an existing CDP, use the built-in editing tools to draw the difference between the boundaries. Select the Boundary Correction template for these changes and draw the areas that should be added or removed from the CDP. Once the polygon is complete, update the following fields in the attribute table:
Enter the feature name in the NAME field. Use the identify tool to get the name from the bas_cdp layer.
Complete the RELATE field to designate if the area is being added (IN) or removed (OUT) from the CDP.
Make sure the CHNG_TYPE field has the appropriate designator (B). If it does not, change it to B.
Note: To paste data into a specific data layer, use the Paste Special option in the Edit tab. This allows selection of a visible, editable layer to paste into, otherwise the paste action will paste the data into the same layer from which it was copied.
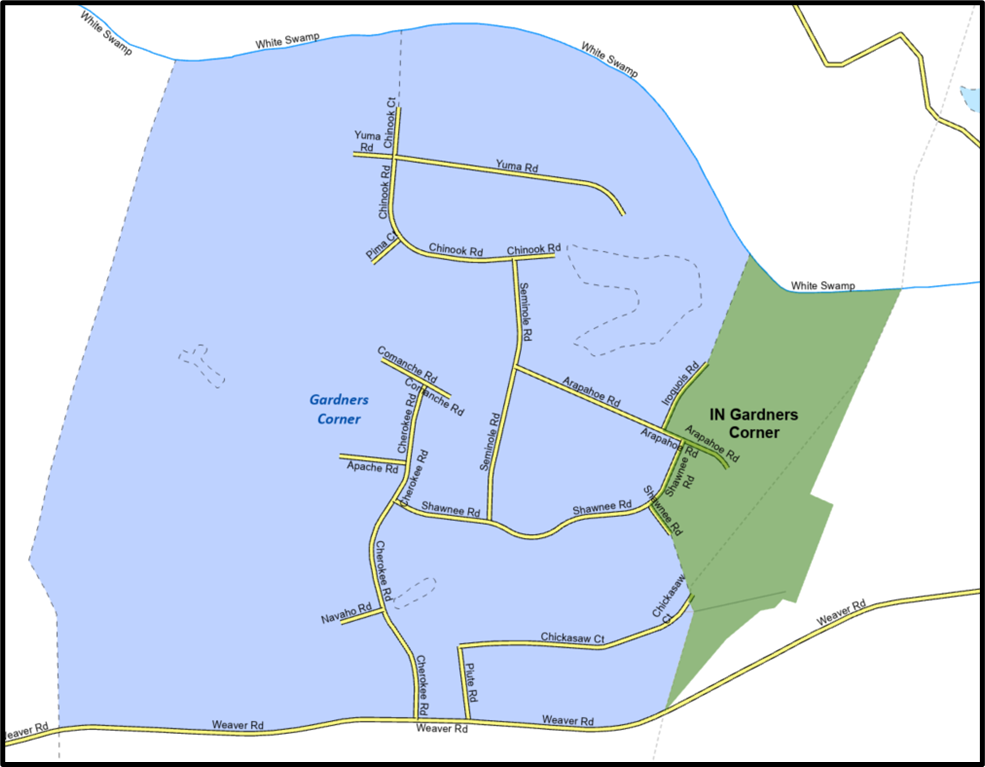
Figure 17: Example of a Boundary Correction to Gardners Corner CDP
To modify the name of an existing CDP:
Select the CDP from the bas_cdp layer. Copy and paste it into the
bas<yy>_<GOVID>_changes_cdp layer.Edit the attributes for the pasted change. Enter a “G” in the CHNG_TYPE field and enter the new name in the NAME field.
To add a new CDP:
Using the built-in ArcGIS Pro editing tools, draw the new boundaries using the New CDP template.
Edit the attributes for the new change. Enter the new name in the NAME field. Enter an ”E” in the CHNG_TYPE field if it is not already there.
To mark a CDP for deletion from Census Bureau data:
Select the CDP from the bas_cdp layer. Copy and paste it into the
bas<yy>_<GOVID>_changes_cdp layer.Edit the attributes for the pasted change. Enter an “X” in the CHNG_TYPE field.
The Census Bureau will accept street updates along with a regular BAS submission. To make street updates, make sure to run the Create Changes tool with Streets selected. That tool creates an empty feature class called bas<yy>_<GOVID>_changes_ln. There are multiple valid approaches to populating this layer with appropriate change data. Since these would include potential updates to local data sources, we cannot say which would be most appropriate for each individual user. The Census Bureau accepts the following street feature updates:
Adding named streets missing in the Census Bureau BAS Partnership Edges shapefile (PVS_25_v2_edges.shp). The new street adds must be named and exist on the ground or be under construction (no paper or planned streets).
Deletions for streets in the Census Bureau BAS Partnership Edges shapefile that do not exist or are in the incorrect location.
Reshapes for spatially inaccurate named streets in the Census Bureau BAS Partnership Edges shapefile.
Renames and MAF/TIGER Feature Class Code (MTFCC) reclassifications for streets with incorrect street names and/or MTFCC values in the Census Bureau BAS Partnership Edges shapefile.
Each street update must have the required attributes and corresponding change type populated as detailed in Table 7. If the correct attribution is not provided, the Census Bureau will not make the correction. The Census Bureau does not accept new street adds for driveways, parking lot roads, unnamed alleys and other types of unnamed or non-addressable streets. The steps below document how to properly update the street feature layer.
Table 7: Required Attribution for Street Updates
UPDATE TYPE |
CHNG_TYPE VALUE |
CHNG_TYPE |
TLID |
FULLNAME |
MTFCC |
Add Feature |
AL |
✓ |
|
✓ |
✓ |
Delete Feature |
DL |
✓ |
✓ |
|
|
Rename Feature |
CA |
✓ |
✓ |
✓ |
|
Feature MTFCC Reclassification |
CA |
✓ |
✓ |
|
✓ |
Note: The checkmark (✓) in the table denotes required fields for the street update types.
Three possible methods for adding street features include:
Loading the data (with or without a query) into the changes feature class so that individual fields can be mapped into the Census Bureau requested schema.
Tracing the local data source or create streets from imagery using the appropriate bas<yy>_<GOVID>_changes_ln template to create new records.
Copying and pasting data from the local streets data source.
To add streets, modify the attribution for the street using the preferred editing method:
Enter ”AL” in the CHNG_TYPE field (if it is not already populated) and enter the appropriate MAF/TIGER Feature Class Code in the MTFCC field. If the feature has a name, enter the name in the FULLNAME field.
If this is a new street (MTFCC starts with S), provide the name of the street in the FULLNAME field.
To modify or delete streets, copy and paste the records from the bas_edges feature class to change. This preserves the TIGER/Line ID (TLID) in the TLID field.
If a street feature that does not exist is in the Census Bureau’s MAF/TIGER System, mark the street for deletion by entering ”DL” in the CHNG_TYPE field.
If a street is in the incorrect location in the Census Bureau’s MAF/TIGER System, mark the street for deletion and re-add it in the correct location using the steps laid out above. Only do this work if the street is very far off or is in the wrong position relative to boundaries or other streets.
If a street has an incorrect name and/or MTFCC, enter “CA” in the CHNG_TYPE field. Populate the correct MTFCC in MTFCC and/or the correct name in FULLNAME.
This tool is used to verify that there are no inconsistencies with the data included in the submission. Run this tool during or after change polygons have been reviewed for spatial accuracy to produce a report of attribution errors. It can be run for all levels of geography that have changes since it is run on each individual change file.
Double-click on the Attribute Check tool.
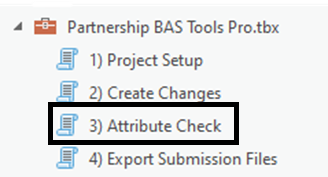
Figure 18: Partnership BAS Tools Pro Toolbox with Attribute Check Selected
In the Attribute Check window (Figure 19):
The Change File should be the change file located within the submission feature dataset for which to generate a report.
In Geography Type, choose the type of geography being worked on from the dropdown. The same options as the Create Changes tool are available here.
The last input is the optional check box for ”Includes Changes in Georgia”. This box only needs to be checked if responding in the state of Georgia.

Figure 19: Attribute Check Window for an Incorporated Place Change
Select Run at the bottom of the window to execute the tool.
There should now be a text file in the working folder called <geogtype>_errors.csv containing all the discrepancies identified in the change file that still need to be fixed (Figure 20).
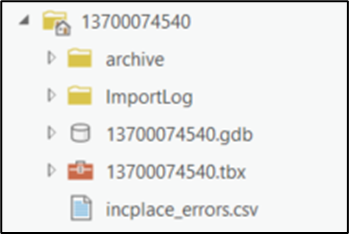
Figure 20: Project Folder Showing an Attribute Check Error CSV File
Correct any attribution errors identified in the error file. Use the tables in the previous sections to assist in correcting the errors that appear in the error CSV file.
After conducting a review of the changes file and the attribute error report, the finalized changes may be exported for submission to the Census Bureau using this tool. This tool can also be used to provide updated contact information with the submission.
Note: This tool does not submit the changes, it just makes a file for submission. Follow steps listed in Chapter 5 to submit the changes through the Secure Web Incoming Module (SWIM).
Double-click on the Export Submission Files tool.
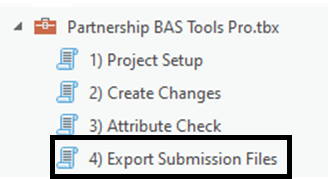
Figure 21: Partnership BAS Tools Pro Toolbox with Export Submission Files Selected
In the Export Submission Files tool window:
Enter the 11-digit GOVID into the User’s GOVID field.
Parcel data can be included as supplemental information in the Parcels field. This is an optional field that can be left blank.
Under Additional Files, drag in or navigate to any additional files to be included in the submission. This can include streets data, maps, legal documentation, or any other helpful supporting data. This is an optional field that can be left blank. There is no need to add the changes layers here as the tool will include them automatically based on the GOVID.
For BAS Contact, Entity Name, Contact Title or Department Name, Address, Email, and Phone Number, include contact information updates for the Census Bureau. These fields can be left blank if there are no updates. If someone other than the official BAS Contact prepared the submission, include that contact person’s information.
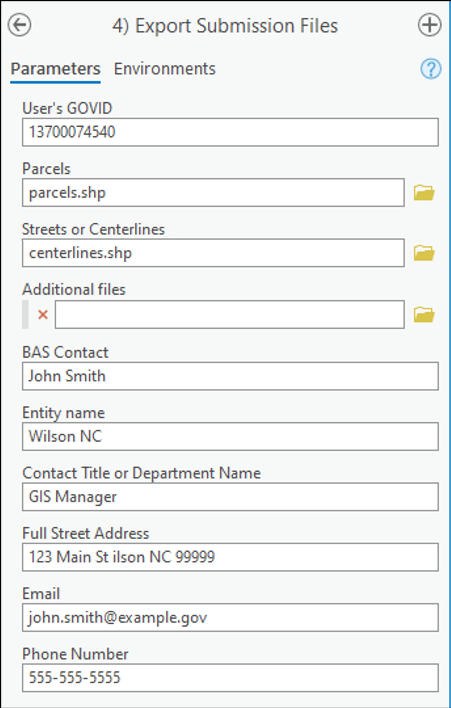
Figure 22: Export Submission Files Window
Select Run at the bottom of the window to execute the tool.
When the tool completes, a new browser window will open and load the SWIM webpage. The zip file containing the submission will be located inside the GOVID folder and named bastbx<yy>_<GOVID>_return.zip as shown in Figure 23.
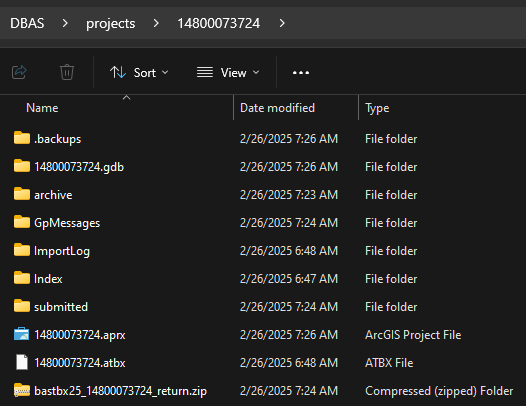
Figure 23: Submission within the GOVID Project Folder in File Explorer
This chapter identifies some of the common errors that have been reported and details how to proceed and/or resolve them.
This is the most common error users receive. Below are several options to resolve this issue.
Confirm that all the steps in section 2.1 were followed.
Remove any spaces from the file path. Esri does not support spaces in file paths or file names so remove them as often as possible when running geoprocessing tools.
Confirm there are no unsaved edits to the geodatabase in the project. This will lock the geodatabase for any geoprocessing tasks.
Run the tools from a local drive (C:\) instead of a network or cloud location. ArcGIS Pro can encounter problems when working on shared network drives or mapped locations.
Confirm the DBAS folder contains the project and setup folder and that the GOVID folder is within the project folder. The file structure, as originally downloaded, needs to be maintained for the tools to work properly.
Disable any organization settings in ArcGIS Pro to start any new map with a customized template map. This can cause pathing issues.
Provide the full text of the error message to help the Census Bureau troubleshoot the issues.
ERROR 000229: Cannot open …\DBAS\setup\lyrs\template_changes_incplace.lyrx means the lyr file from the \DBAS\setup\lyrs folder must be manually imported. There should be a lyr file that has the same name as the failed .lyrx file to use. Otherwise, the changes have been created and are ready to update.
If the following error appears, AttributeError: 'NoneType' object has no attribute 'camera', changes have been created and the project is ready; however, ArcGIS Pro encountered an error when trying to zoom to the area of interest. Users can manually zoom to the area by right-clicking on the bas_county layer and selecting Zoom to.
This occurs when the input NAME or NAMELSAD information does not match up with any records in the Census Bureau data. Confirm all capitalization, spacing, and naming is consistent with what the Census Bureau has in its data unless a name change is necessary. Refer to section 2.2 for more information.
An error like the one below may occur due to network settings or firewall restrictions. In this occurs, download the partnership shapefiles from the BAS website and use the offline mode of the toolbox as described in section 2.3.1.
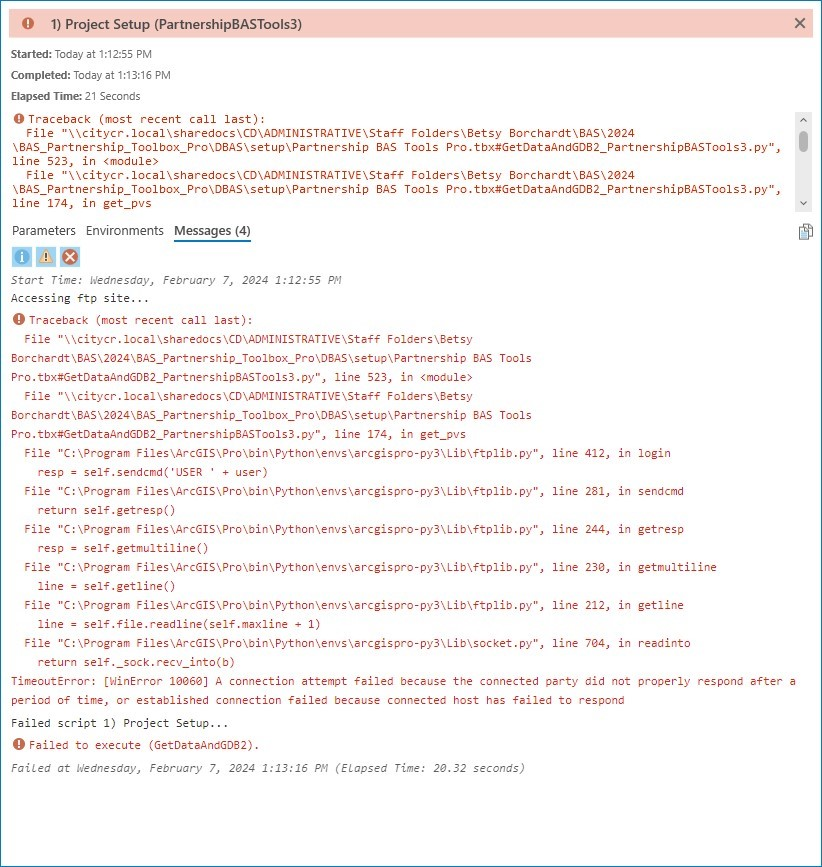
Figure 24: Example of FTP Failure Message
ArcGIS Pro includes a module named pandas and the Attribute Check tool uses it. If this error occurs, skip this tool and the Census Bureau will check the attributes upon receipt of the submission.
When adding the toolbox to the aprx, double-clicking on the toolbox will cause it to appear blank. Instead, use the left-button of the mouse to click once on the toolbox to select it, then select Add. The toolbox should now appear in the Catalog pane.
All participants must use the SWIM to submit their changes to the Census Bureau. Due to security requirements, the Census Bureau cannot accept submissions through File Transfer Protocol, email, or any protocol other than the SWIM site.
To upload and transmit update files to the Census Bureau, first access the SWIM user’s account.
Open a web browser window and enter the SWIM URL: <https://respond.census.gov/swim/>. SWIM runs on the two most recent versions of each of these major browsers:
Microsoft Edge®
Google Chrome®
Mozilla Firefox®
Apple Safari®
Users who already have a SWIM account should proceed to Step 4 to log in.
Users who do not have a SWIM account should select ”Register Account”.
Enter the 12-digit token provided by the Census Bureau.
Create a password following the five criteria below:
Username and password are case sensitive.
It must be at least eight characters in length.
It must have at least one upper case character.
It must have at least one lower case character.
It must have at least one number.
It must have at least one special character (valid characters are: #, !, $, &, ?, ~).
Complete the registration information form.
Log in to SWIM using the user’s email address and password.
Upload a BAS submission:
Select the “Start New Upload” button.
Select the “BAS” radio button.
Select the Entity type (State, Place, County, MCD, Tribal Area, or Consolidated City).
Select the State and corresponding entity from the dropdown lists.
Choose the “+ Add File” button.
Select the .zip file to upload.
Double-click on the .zip file to upload. Add additional .zip files in the same manner.
Add any additional information to the Comments field.
Choose “Next”. A “Thank You” screen appears.
Logout of SWIM.
For those having trouble accessing their SWIM account, here are some tips:
SWIM email addresses and password are case-sensitive.
Users who have forgotten their password may reset it by using the “Forgot your password?” link on the login page. Follow the prompts to enter the case-sensitive email address and provide the security answer. If the security answer is correct, SWIM sends a password reset link to the email account to use to reset the password. Once logged into SWIM, users can modify their password and security answer by selecting the ”Change Security” link at the top, right side of the page.
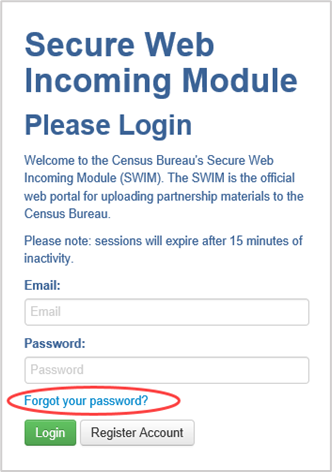
Figure 25: SWIM Login Screen and Password Reset Link
Users that cannot recover their password through the “Forgot your Password?” link should email <geo.bas@census.gov> with the subject line “SWIM Account Assistance” with a brief description of the issue.
SWIM accounts are specific to the user, not to the government, so do not share a SWIM account between multiple users. Governments may always request another account for a new BAS contact.
If a user has an existing SWIM account through another geographic partnership program such as Local Update of Census Addresses (LUCA) operation or the Participant Statistical Areas Program (PSAP), they may use that same account for BAS. There is no need to create another account.
![]()

| File Type | application/vnd.openxmlformats-officedocument.wordprocessingml.document |
| File Title | BAS Partnership Toolbox Pro How-to Guide |
| Author | U.S. Census Bureau |
| File Modified | 0000-00-00 |
| File Created | 2025-10-01 |
© 2026 OMB.report | Privacy Policy