Remote Psychoacoustic Test for Urban Air Mobility (UAM) Vehicle Noise Human Response, Phase 1
Remote Psychoacoustic Test for Urban Air Mobility (UAM) Vehicle Noise Human Response, Phase 1
Remote Psychoacoustic Test Application Description and Process flow (screenshots and text)
Remote Psychoacoustic Test for Urban Air Mobility (UAM) Vehicle Noise Human Response, Phase 1
OMB: 2700-0190
Remote Psychoacoustic Test – Application Description and Test Process Flow
This document details the steps that will be taken by test subjects in the Phase 1 (Feasibility) remotely administered psychoacoustic test of the UAM Vehicle Noise Human Response Study.
The flowchart in Figure 1 gives an overview of how test subjects will be guided through the Phase 1 remote psychoacoustic test. The green arrows indicate the normal flow of the test process. Orange arrows indicate where steps may be repeated. Red arrows lead to exiting the test. Test subjects will first login to the test using two-factor authentication. After watching an Introduction video, test subjects will have the option to exit the test at any point. They will then enter their computer and headphone information if they choose to. A calibration session is then held were test subjects adjust the volume on their computers. They then take a familiarization session where they just listen to a range of test sounds without responding to the sounds. After familiarization, if they choose not to repeat calibration, test subjects will be requested not to change the volume on their headphones for the remainder of the test. Test subjects then practice the mechanics of taking the psychoacoustic test with the help of a practice video. They then take the four main test sessions of the Phase 1 test with breaks between each session. Each session will play 21 sounds which are between 12 and 52 seconds long, with an average duration of approximately 23 seconds. Test subjects will exit the test after taking the post-test survey.
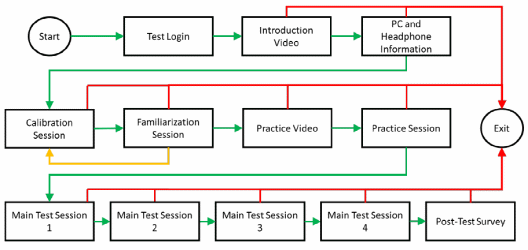
Figure 1. Flowchart of Phase 1 Remote Psychoacoustic Test.
The remainder of this document shows screenshots of the test application as the test subject navigates the test through the steps in Figure 1.
When test subjects click on an email link sent to them by test administrators to take the Phase 1 test, the Phase 1 test application will open on a web browser on their computer (Figure 2). They will first login to the test using their email address and provided password (Figure 3), which will be changed upon first login (not shown). Two-factor authentication with a code sent to the test subject’s phone number will complete the login (Figure 4).
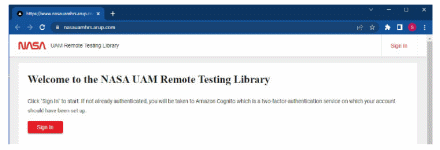
Figure 2. Sign in screen for Phase 1 remote test application.
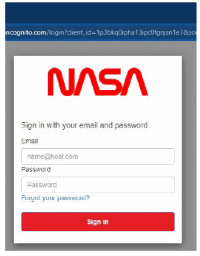
Figure 3. Phase 1 test application login.
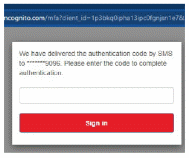
Figure 4. Two-factor authentication of Phase 1 test application.
After login, test subjects will be taken to the main remote test application page (Figure 5). Only the Phase 1 remote test will open when “Studies” is selected, but the remote test platform has been designed to allow for other studies to be selected in the future.

Figure 5. Main remote test application page.
After entering the test, the subject is asked to verify that they are the intended test subject (Figure 6). Each of the four items in Figure 6, “V1,” “V2,” “EXIT1,” and “EXIT2,” will be displayed on separate screens as the test subject navigates through them by clicking on the indicated radial buttons. Figure 6 is also given in “Verification-consent_text.pdf.”
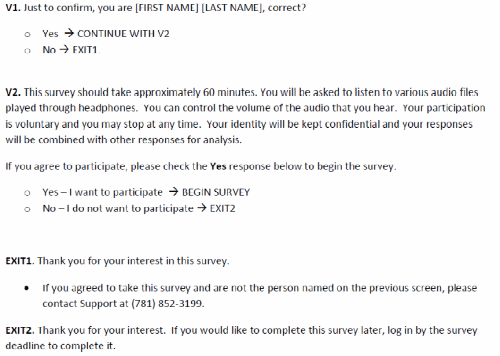
Figure 6. Verification.
Test subjects then proceed to the Introduction video (Figure 7). The Introduction video will be narrated PowerPoint slides that have been converted to an *.mp4 video, and the slides, along with the narration text, are given on “NASA_Introduction_Video_NASA_FINAL.pptx.”
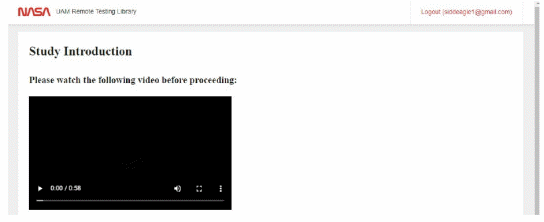
Figure 7. Introduction Video.
The beginning of the calibration session is given in Figure 8. Test subjects are requested to be in a quiet environment. They are the asked to provide the manufacturer and model of their computer and headphone (Figure 9). They may choose to not provide this information by checking “I don’t know.” Instructions are provided on how to adjust volume on computers for both Windows (Figure 10) and MacOS (Figure 11) users. The main calibration step then commences, which asks test subjects to rub their hands together (Figure 12) and compare the sound they hear with a recorded sound of hands being rubbed together (Figure 13). Test subjects are to adjust the volume on their computers until the sound they make with their hands closely matches the recorded sound. The computer volume level is then entered into the test application (Figure 13). After this calibration step, test subjects are asked not to adjust the volume on their computers for the remainder of the test (Figure 14).
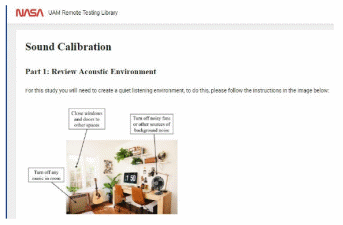
Figure 8. Beginning of Calibration session.
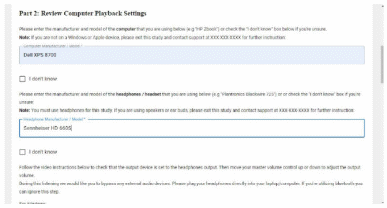
Figure 9. Calibration session, entering computer and headphone information.
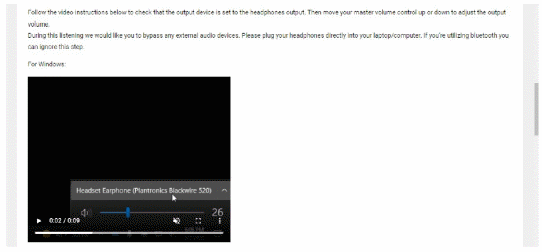
Figure 10. Instruction to adjust computer volume, Windows.
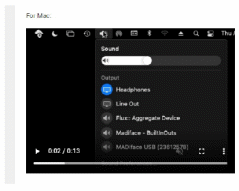
Figure 11. Instructions to adjust volume, MacOS.
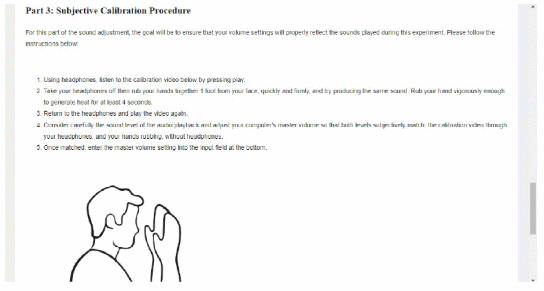
Figure 12. Main calibration step.
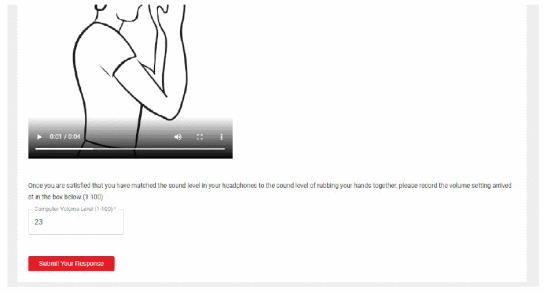
Figure 13. Finalizing calibration.

Figure 14. End of calibration.
After calibration, the Familiarization session lets test subjects listen to a variety of sounds that will be played in the main psychoacoustic test (Figure 15). Its purpose is to let test subjects understand the different types of sounds they will encounter, which helps them begin to form an individual method by which they choose to react to sounds instead of forming this method during the main test. After Familiarization, test subjects may redo the calibration, but if they choose to proceed, a reminder message is displayed during Familiarization, as seen in Figure 15, to not adjust the volume on their computers and headphones.
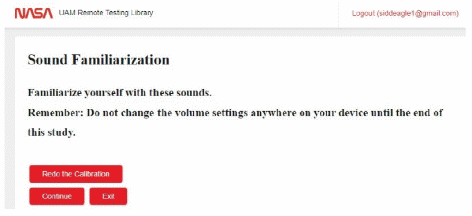
Figure 15. Familiarization session.
Test subjects proceed to the Practice session, where they first watch a video on the mechanics of taking the remote psychoacoustic test (Figure 16). Just like the Introduction video, the Practice video will be narrated PowerPoint slides converted into an *.mp4 video. Two slightly different Practice videos will be made. One video will be for test subjects who will are provided a contextual cue, and the other video will be for test subjects will not be provided contextual cue. See Supporting Statement, Part A, items 1 and 2, for further details on why the effect of setting/location context is being sought. The PowerPoint slides, “NASA_Practice_Session_Tutorial_Video_NASA_Context_Final.pptx,” give the Practice video
slides that will be narrated to the test subjects who will be provided a setting/location context. The PowerPoint slides, “NASA_Practice_Session_Tutorial_Video_NASA_No_Context_Final.pptx,” give the
Practice video slides that will be narrated to the test subjects who will not be provided a setting/location context.
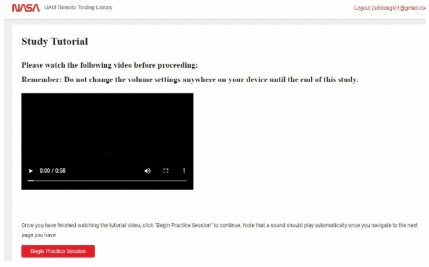
Figure 16. Practice video.
The Practice session will start with the first sound being played (Figure 17). After the sound has finished playing, test subjects select their annoyance rating of the sound by moving the slider to any point on the rating scale (Figure 18). The rating scale may be approximated as being continuous, but it is divided into 1001 intervals, with 100 intervals between tick marks. Numerical values for the annoyance ratings are between 1 and 11, meaning that each interval represents 0.01 annoyance ratings. Phrases indicating how annoying the subject finds a sound are given for even numbered annoyance ratings (e.g., an annoyance rating of 2 is “Not at all annoying,” and an annoyance rating of 10 is “Extremely annoying”). Once a test subject has selected an annoyance rating, they confirm their response and press the “Continue” button to proceed to the next sound in the session (Figure 19). After rating all the sounds in the Practice session, test subjects may continue to the Main Test (Figure 20).
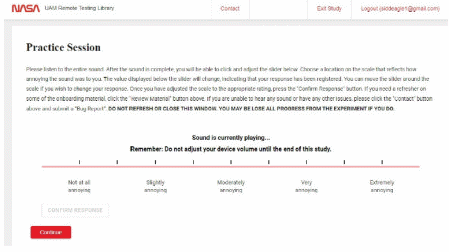
Figure 17. Practice session, sound is playing.
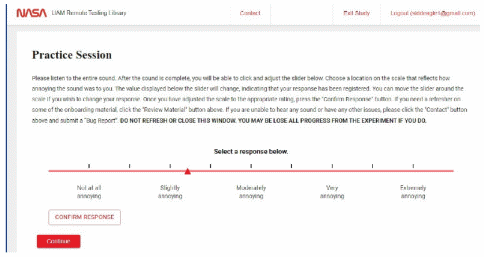
Figure 18. Practice session, sound has played, and response is requested.
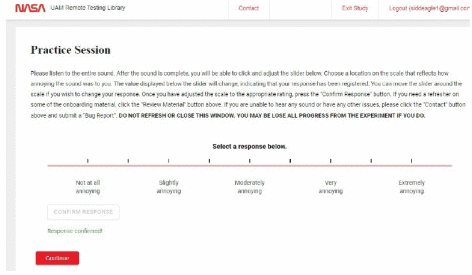
Figure 19. Practice session, response has been confirmed, continue to next sound requested

Figure 20. End of Practice session.
During the Practice Session as well as during the subsequent Main Test sessions, test subjects may contact support by selecting “Contact” at the top of the screen. When this selection is made, the window in Figure 21 appears. If test subjects choose not to report a technical bug, they are simply provided the contact support phone number. The support phone number, (781) 852-3199, will be specified in the “Contact Us” screens of the remote test platform closer to the test date. If they choose to report a technical bug (Figure 22), they will be given a list of problems they may be experiencing to choose from (Figure 23), and they will be directed to support.
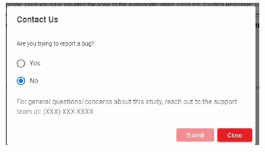
Figure 21. Contact support screen.
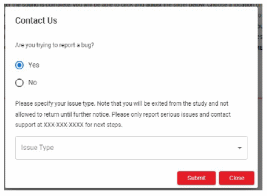
Figure 22. Choosing to report a technical bug.
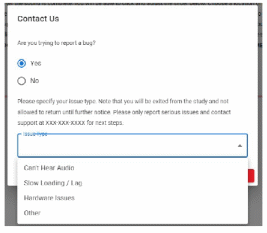
Figure 23. List of technical bugs.
Test subjects may also decide to exit the test, upon which they will be presented with the window in Figure 24. They may select reasons why they chose to exit the test (Figure 25). Test subjects also have the option to exit the test without providing a reason.
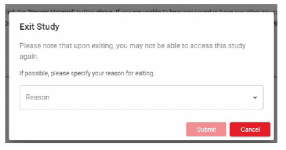
Figure 24. Exit test window.
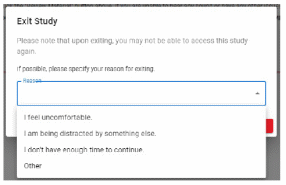
Figure 25. Reasons to exit.
Each of the four Main Test sessions of the Phase 1 remote test are like the Practice Session. For test subjects in the group who are provided a contextual cue, the question in Figure 26 is asked after each sound is played in the Main Test sessions, “Imaging hearing this sound several times each day while outdoors and near your home, how annoying would this sound be to you?” This question was designed to provide a time and location context through which test subjects react to the sound. For test subjects in the group who are not provided a contextual cue, the question in Figure 27 is asked after each sound is played in the Main Test sessions, “How annoying was the sound to you?” After responding to all sounds in a Main Test session, test subjects are given a break(Figure28) before continuing to the next session. After all four Main Test sessions are complete, test subjects are directed to the Post-test Survey (Figure29).
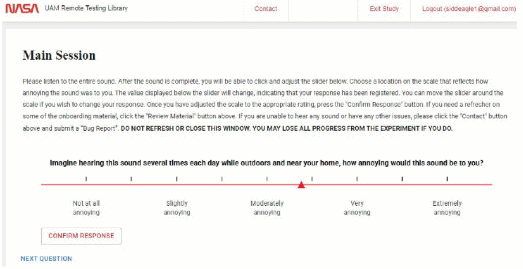
Figure26. Question for test subjects who are provided a setting/location context.
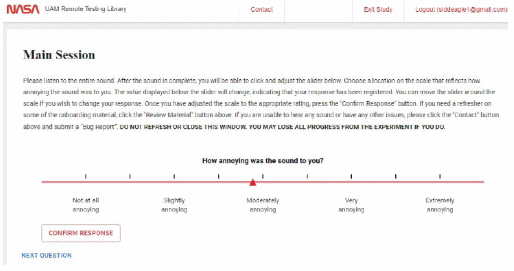
Figure27. Question for test subjects who are not provided a setting/location context.

Figure 28. Break between Main Test sessions.

Figure 29. End of Main Test sessions.
The Post-test Survey consists of just two questions, and they are given in Figure 30. The first question asks test subjects to answer “Yes” or “No” to whether they adjusted the volume on their computer during the test. Any test subject who answers “Yes” will not have their responses analyzed. The second question asks test subjects to choose from a list of potential problems/challenges they encountered while taking the test. The “I had no difficulties during the test” is the default option, and it is automatically de-selected if test subjects choose any of the other choices. More than one issue may be selected. Test subjects may elaborate on their issues/challenges by typing text in the white space provided.
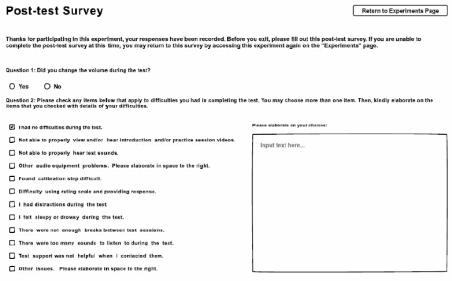
Figure 30. Post-test survey.
.
| File Type | application/vnd.openxmlformats-officedocument.wordprocessingml.document |
| Author | Little, Claire A. (HQ-JD000)[Consolidated Program Support Servic |
| File Modified | 0000-00-00 |
| File Created | 2022-07-13 |
© 2026 OMB.report | Privacy Policy