OPR Screen Shots
MyTravelGov
OPR Screen Shots
OMB: 1405-0252
Online Passport Renewal (OPR)
Customer Facing
Screen Shots
Online Passport Renewal (OPR) is a web service that allows qualified U.S. citizens to apply for a passport renewal (DS-82) online. OPR allows the applicant to complete the form, pay applicable fees, upload a passport photo, and submit the application package online. NOTE: This document contains screen captures of OPR. It does not include screenshots of web pages from other sites (i.e. travel.state.gov, connect.gov). The screenshots contained in this document are presented in the same sequence as they appear in OPR.
Page Break
Table of Figures Page(s)
Figure 1: Create Account or Login 3-4
Figure 2: OPR Eligibility 5-6
Figure 3: Privacy Act, Notices, and Disclaimers 7
Figure 4: Passport Book and/or Passport Card Information 7-9
Figure 5: Travel Plans 10
Figure 6: Product Selection 11
Figure 7: Personal Information 12-13
Figure 8: Address and Contact Information 14-15
Figure 8b: Address Verification via USPS 16-18
Figure 9: Emergency Contact 18-19
Figure 10: Photo Upload 19-21
Figure 11: Final Review 21-25
Figure 12: eSignature, Submit and Pay 25-26
Figure 13: Payment on Pay.gov 27-28
Figure 14: Application Home Screen 29-30
Figure 15: Notices and Disclaimers Text 30-33
Figure 1: Create Account or Login
An account must be created before the OPR process can begin.
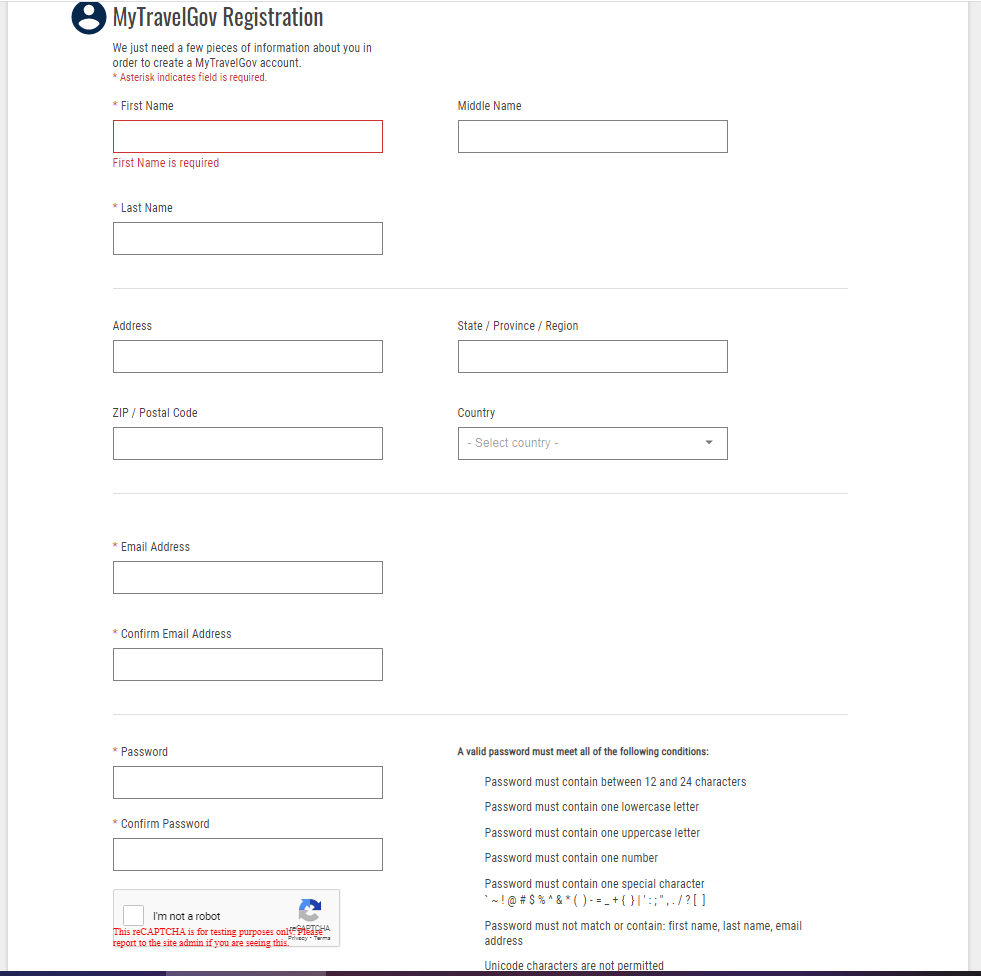
Within an account the applicant may choose to delete an application they started but did not submit, continue to work on an application that has been saved but not submitted, or choose to be redirected to a paper-based application process (i.e., 2DB or the passport application wizard both located on TSG).
A partially completed application will appear on the user account home page (see Figure 14).
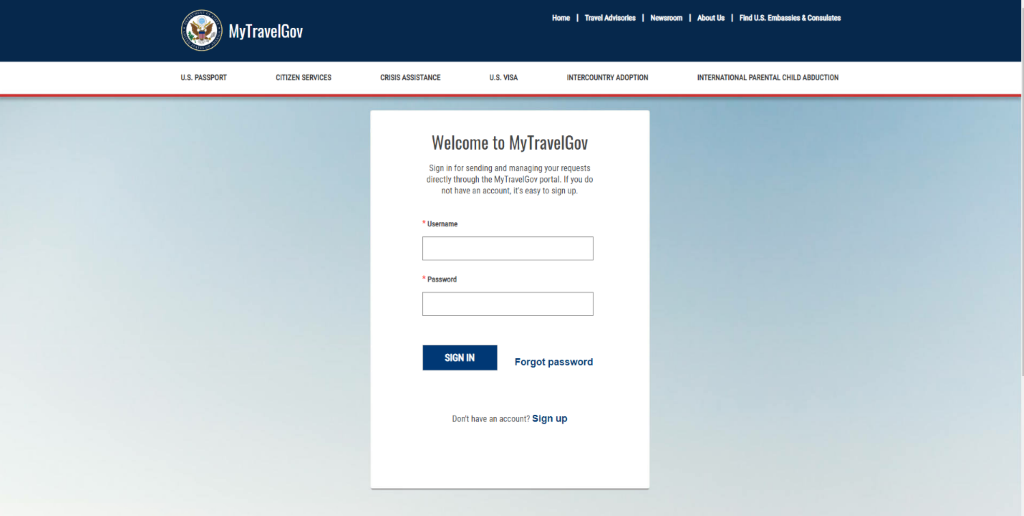
The applicant will log in using their email address and the password they created.
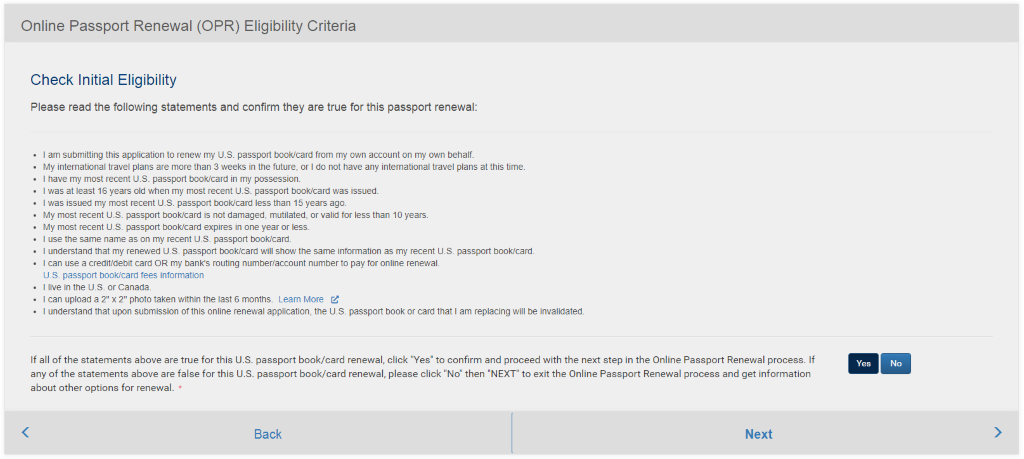
Figure 2: OPR Eligibility
![]()
![]()
In order to be eligible to renew a passport using OPR during phase 1, the applicant must meet the following criteria:
Age 18 or older
Has a mailing address in the US or Canada
Is not changing their name, sex, date of birth, or place of birth
Has a prior product on hand that:
Is not damaged (information is readable),
Was issued within the last 15 years with 10-year validity at the time of issuance,
Has no more than 12 months validity remaining, and
Is not a Diplomatic, Official, or No Fee product
C1 OPR Release 1 is scoped to process online DS-82 renewals that do not require supporting paperwork.
If the applicant clicks ‘Yes’ for each acknowledgement they proceed to Figure 3: Privacy Act, Notices and Disclaimers.
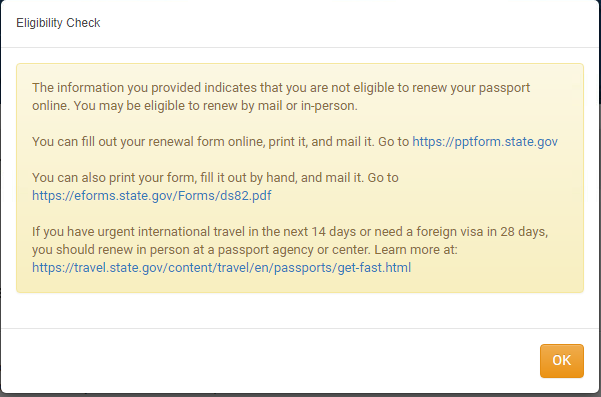
If the applicant clicks ‘No’, they will be given the following message along with the two paper-based choices to select from.
Page Break
Figure 3: Privacy Act, Notices, and Disclaimers
In order to continue, the applicant must certify that they have read the notices and disclaimers.
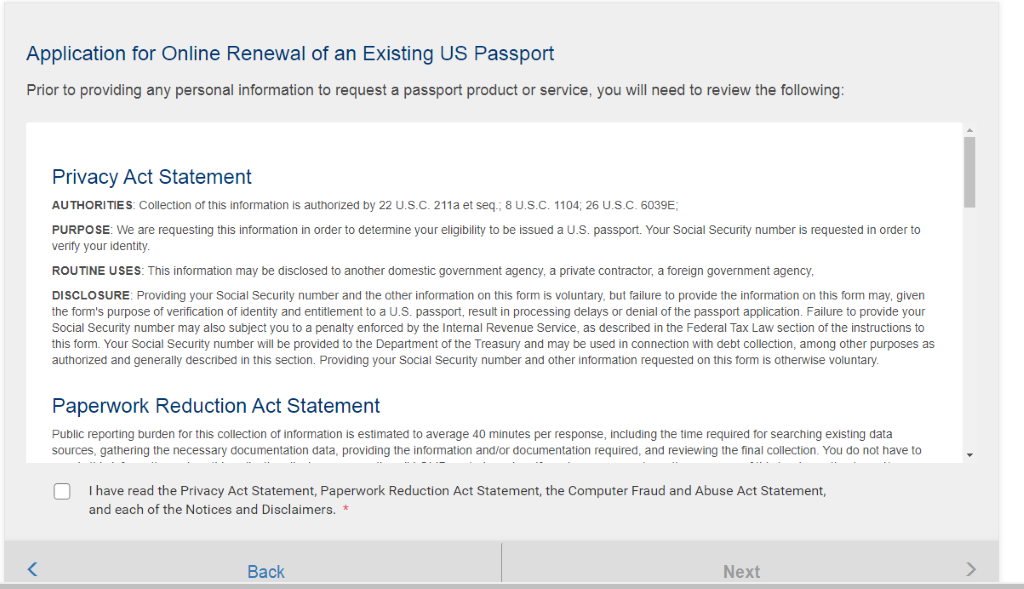
The applicant must click “Yes” to having read the disclaimers to proceed to Figure 4:
The “Next” button will remain deactivated unless the applicant places a checkmark next to the “I have read...” statements and has scrolled to the end of the notices and disclaimers.
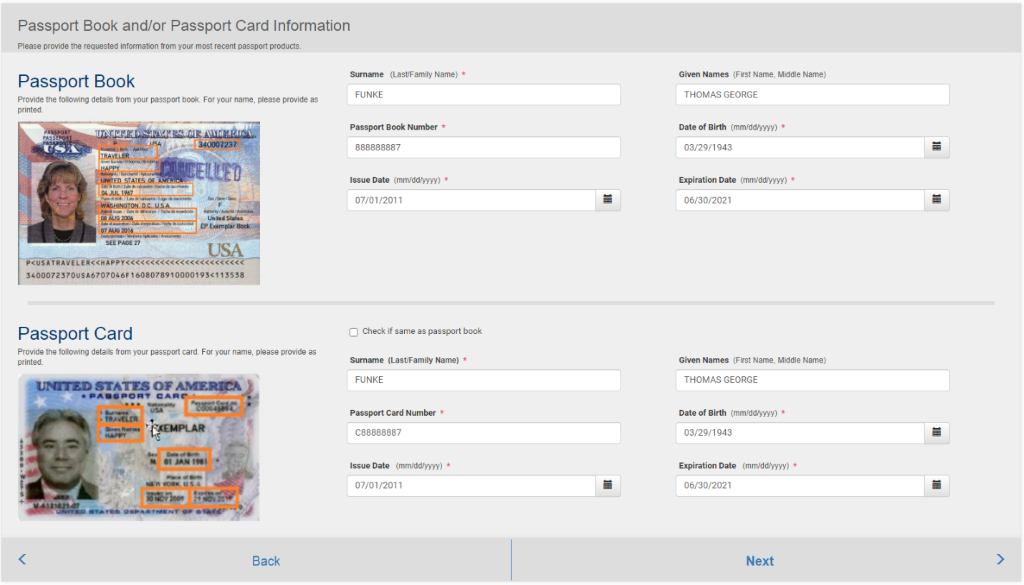
Figure 4: Passport Book and/or Passport Card Information
The application is broken down into six simple steps. The step they are on is clearly marked at the top of the page. The applicant may start and stop at any point during the application process and the system will save the progress.

![]()
The applicant next enters information from their existing product. Surname (Last Name, Family Name) and Passport Book Number fields are prepopulated with the data from the product that was determined to be eligible for Online Passport Renewal (OPR). The remaining fields must be entered as they appear in the existing product(s).
Once the applicant completes the required information the system will confirm their eligibility to apply. If they are eligible, they will see the following:
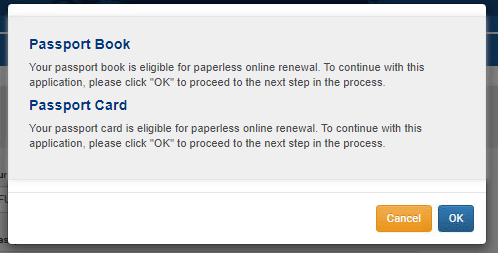
If they are not eligible, they will see the following:
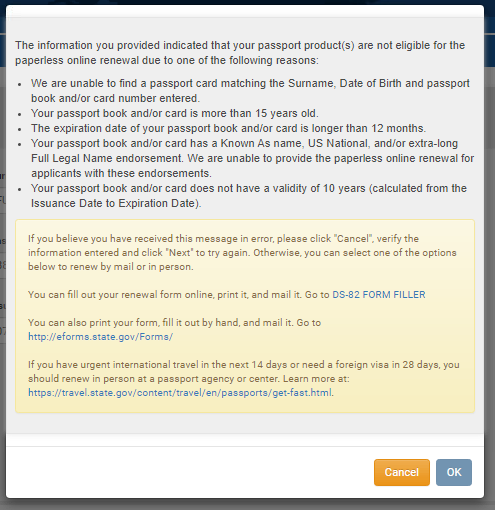
Page Break
Figure 5: Travel Plans
*NOTE: If the applicant selects a travel date in less than two weeks, a message will be displayed prompting them to call the National Passport Information Center.
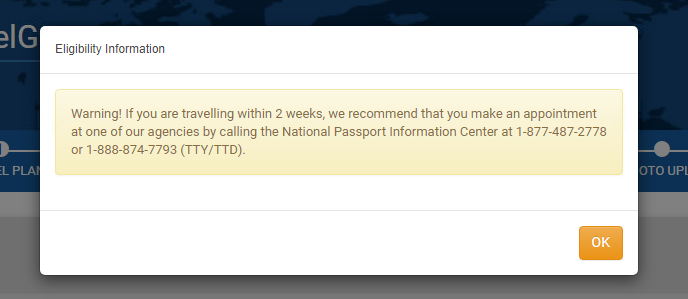
Countries can be chosen from the Travel Country dropdown; the applicant clicks ‘Add a Country’ to access the dropdown menu and “Save” to add them to the list below. The applicant can click the “Remove Country” icon to delete it from the list.


![]()
Figure 6: Product Selection
The next steps are choosing products (book and/or card), processing method (routine or expedited), and delivery method (standard or express).

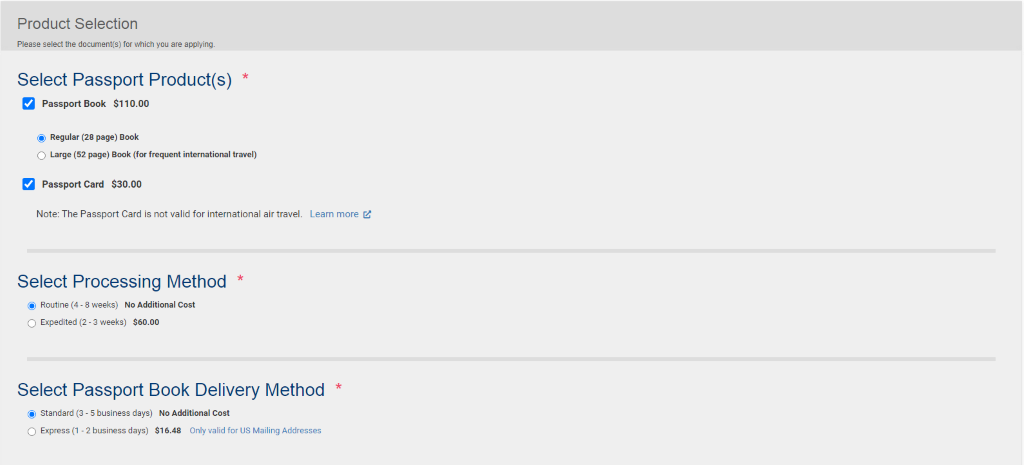
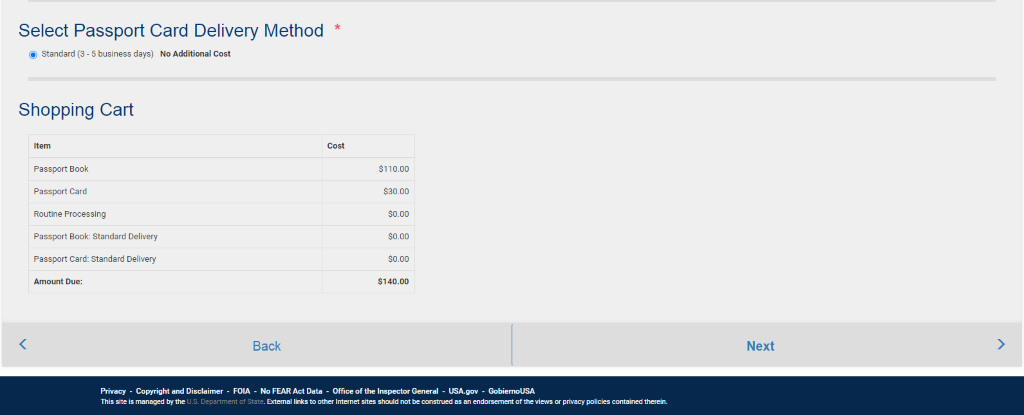
The “shopping cart” at the bottom shows the products, processing, and delivery methods selected with the associated fees and the total amount due.
Page Break
Figure 7: Personal Information
Next, the applicant fills in their personal information. The asterisks signify required fields.
Country of Birth, State/Territory of Birth, Date of Birth, Sex, Hair Color, and Eye Color are dropdown fields; the Name, Social Security Number, Height, Occupation, and Employer or School fields are each free type.

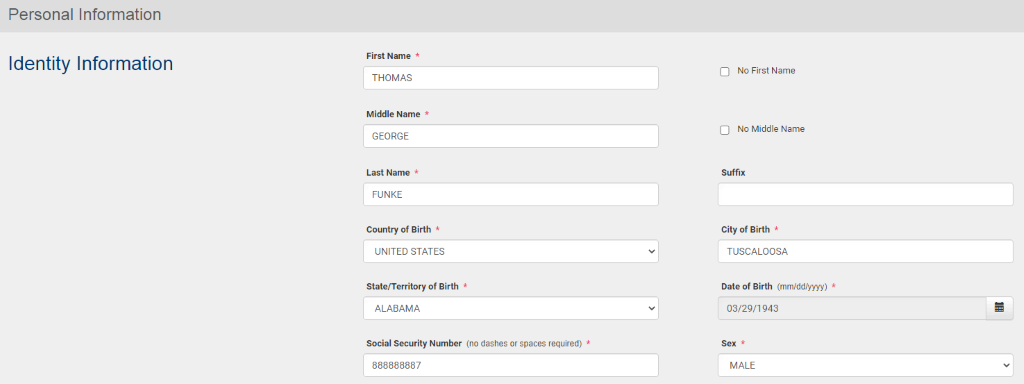
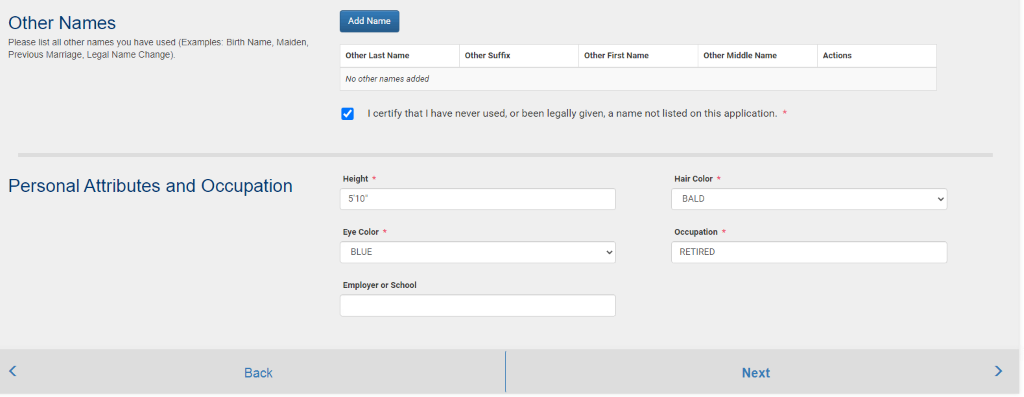
The applicant will need to document other names they have used and certify that they have done so. This is to improve the accuracy of data checks for fraud detection. The applicant will not be able to click “Next” until they have certified the “Other Names” field.
The applicant can click ‘Add Name’ under Other Names to enter names and save with ‘Save’; ‘Cancel’ clears out any information that has been entered. The applicant can click ‘Delete’ to remove it from the list.
The State/Territory of Birth field becomes a mandatory field when an applicable Country of Birth is selected (i.e., United States).
Page Break
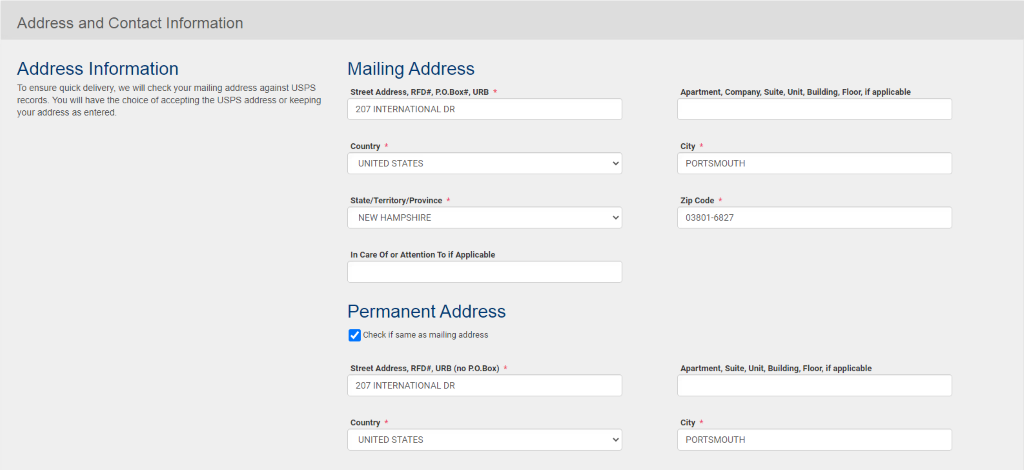
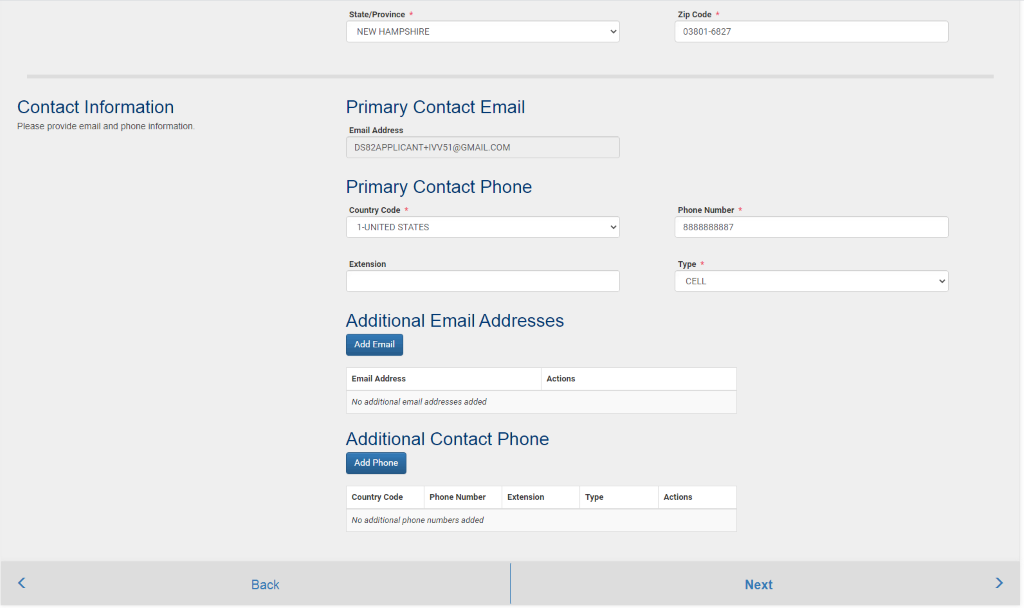
Figure 8: Address and Contact Information
OPR will not allow a Post Office Box to be entered into the Permanent Address field. Additionally, for the initial release only, U.S. and Canada mailing addresses will be accepted.

![]()
The applicant may also indicate that their permanent address is the same as their mailing address. If the permanent address and mailing address is the same, the system will auto populate the information from the mailing address to the permanent address.
*Important: The applicant’s email address will be locked and will reflect the email address used to create the account at the beginning of the process. The applicant is required to enter a primary phone number, the type of phone number (cell, home, or work – accessed by a dropdown menu), and the country code (United States by default). The applicant may optionally enter additional email address and contact phone numbers before proceeding.
Page BreakFigure 8b: Address Verification via USPS
OPR will verify the address entered with USPS. Depending on the results, the applicant will see one of the following screens:
If USPS Address Validation fails, the applicant will be prompted to return to the previous screen to edit their address or may continue with the address as they entered it.
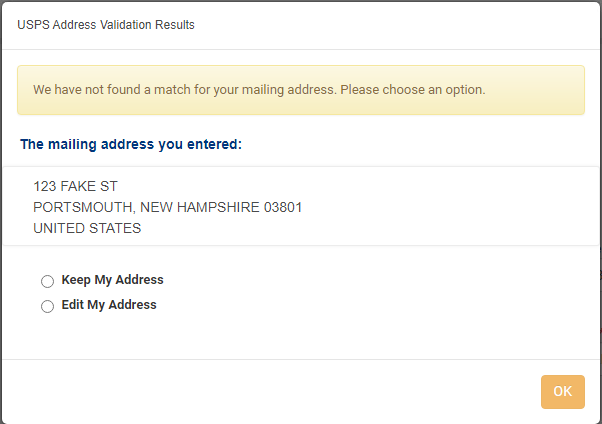
If USPS Address Verification finds a match, the applicant will be prompted to use the USPS formatted address, may keep their address as they entered it, or may return to the previous screen to make edits.
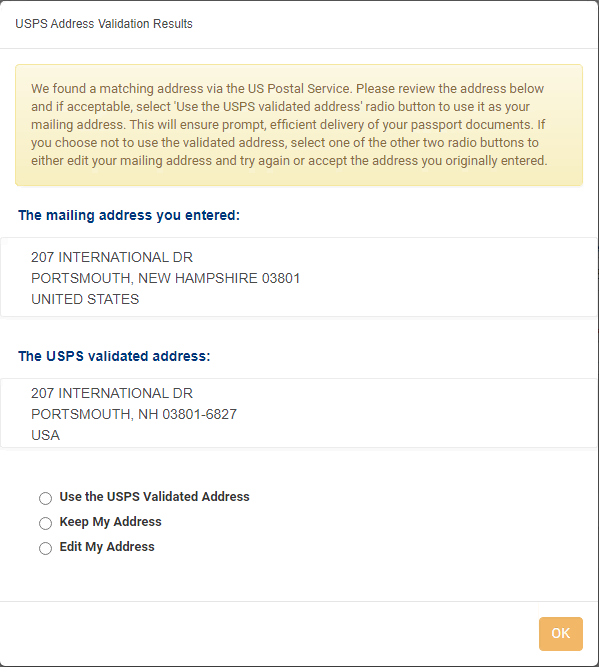
The ZIP Code field is restricted to numerals (0-9) for when United States is selected as Country for Mailing Address however when Canada is chosen the field allows Alphanumeric (A-Z, 0-9) characters to be entered.
If the applicant chooses to use the address they entered, regardless of the USPS return, the system will still confirm that the Zip Code is valid for the entered state. The applicant will not able to advance to the next step if the zip code is not valid for the selected state.
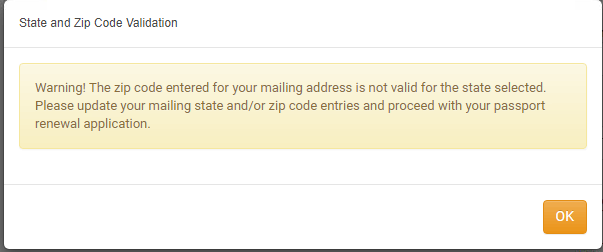
Figure 9: Emergency Contact
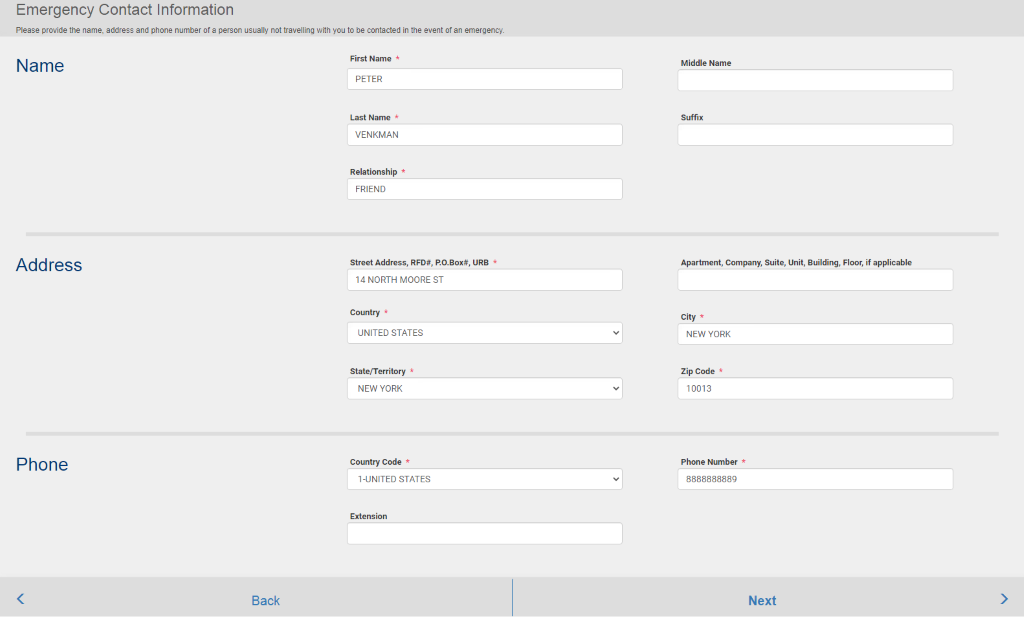
The applicant is required to provide an emergency contact and must provide their name (first and last), relationship, complete address details, and phone number.
The Country Phone Code field defaults to “01-UNITED STATES”. Fields with an asterisk are mandatory and will receive a “Required” message if the applicant attempts to skip them.

![]()
Figure 10: Photo Upload
There are two methods the applicant can use to upload their digital image file -- by directly uploading the photograph or by using CA’s CEAC Photo Upload Tool, which crops, centers, and sizes the image. The applicant may choose to directly upload their photo rather than using CA’s CEAC Photo Upload Tool because CA’s tool is Flash-based and will not work on mobile devices (iOS products).
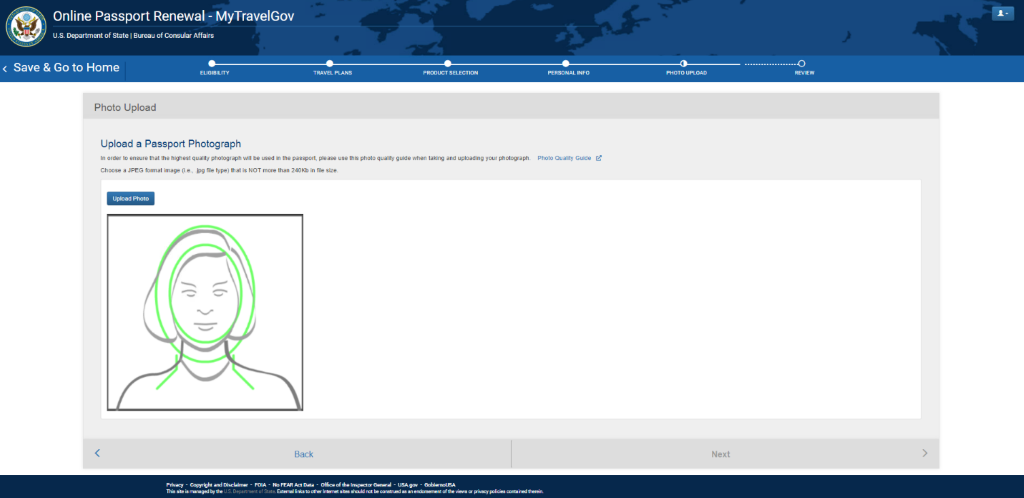
The applicant will upload a photo, the system will check the quality, and then the applicant is asked to confirm the photo chosen – in case they want to change it.
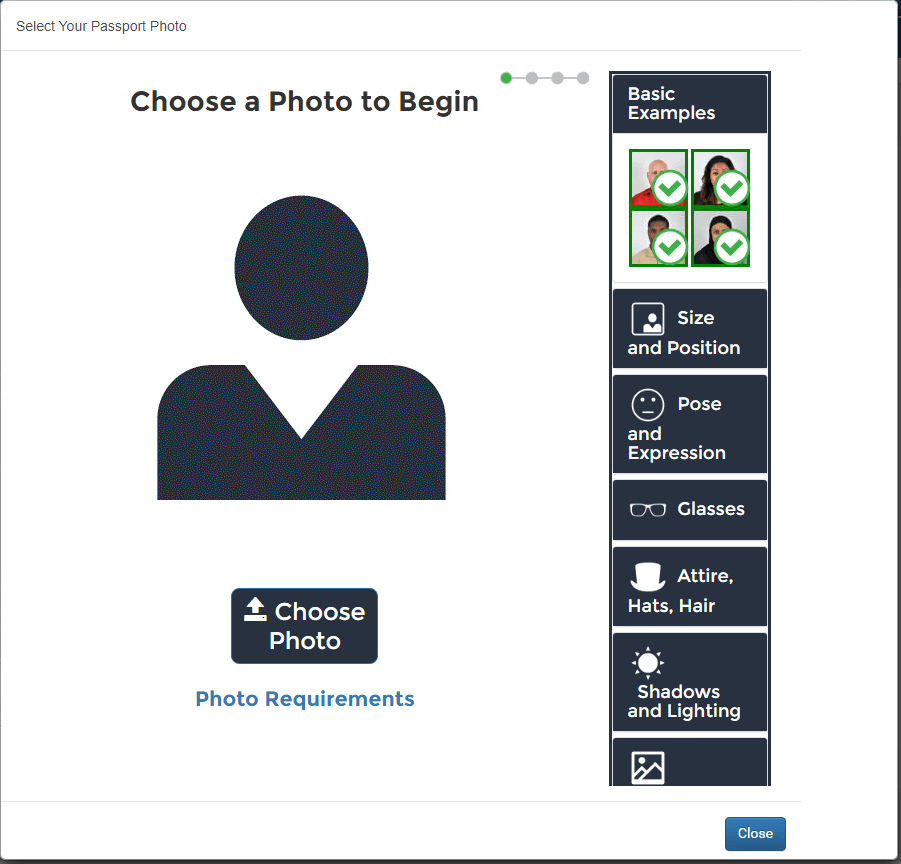
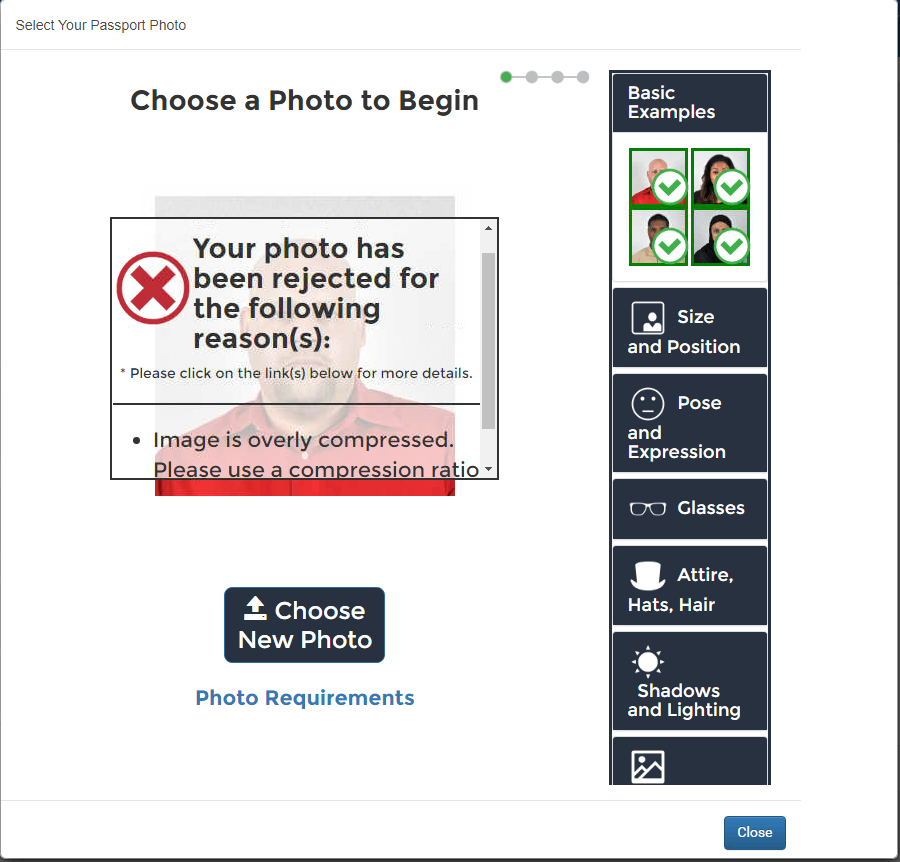
The current Quality Over The Web (QOTW) tool is going to be replaced with an improved QOTW product called FACE-VACS. This product claims a 99% accuracy rate in its ability to detect glasses.
Figure 11: Final Review
The applicant is given a review screen and allowed to make changes before providing their e-signature and payment. This covers all the information the applicant has entered into the application up to this point.
![]()
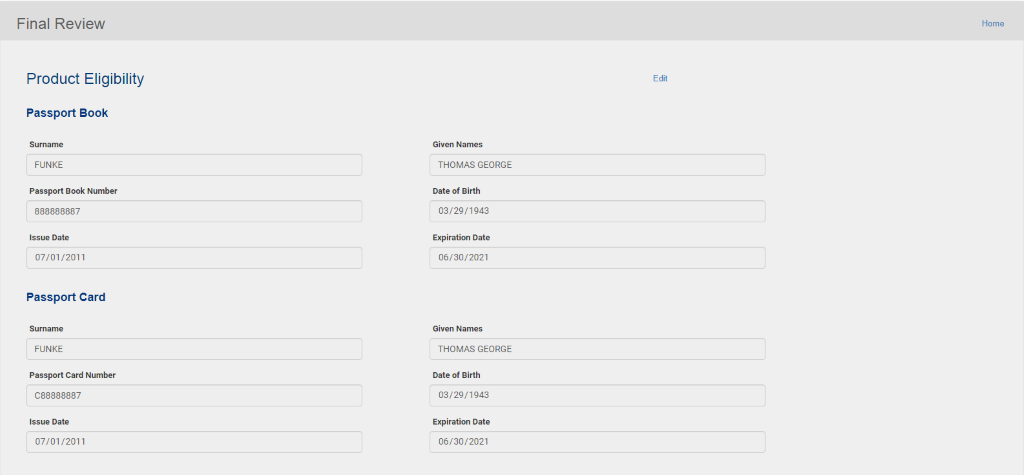
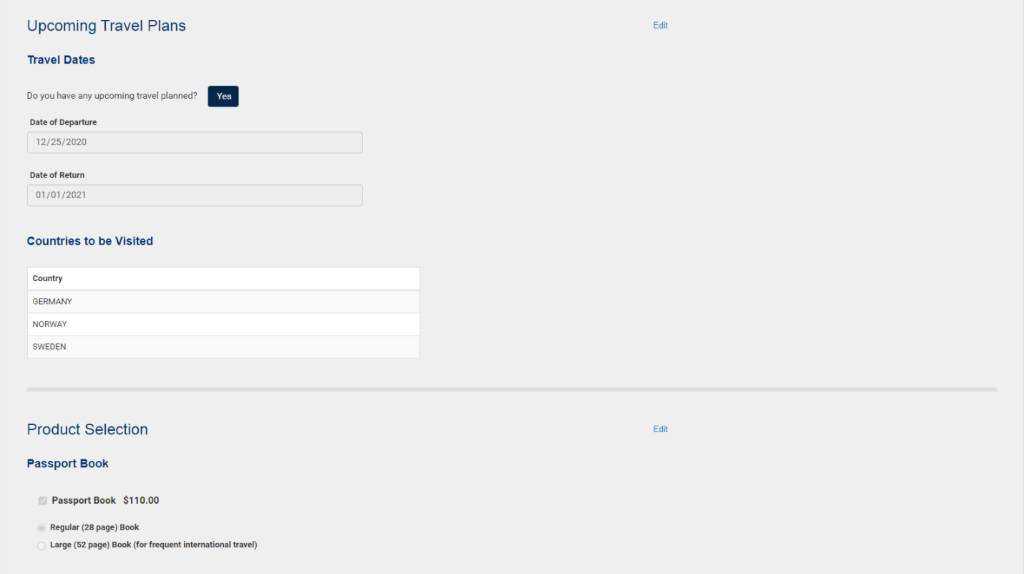
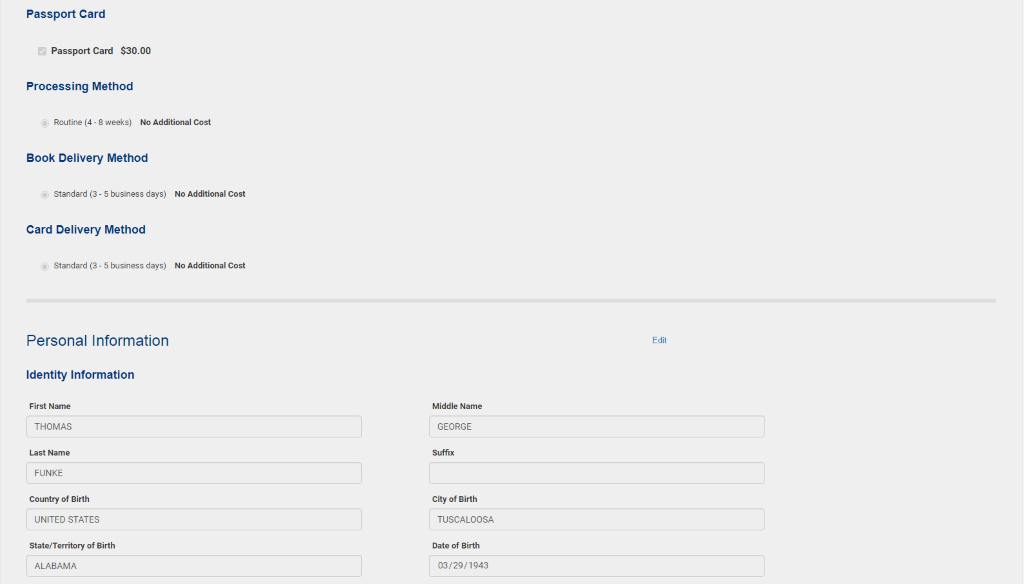
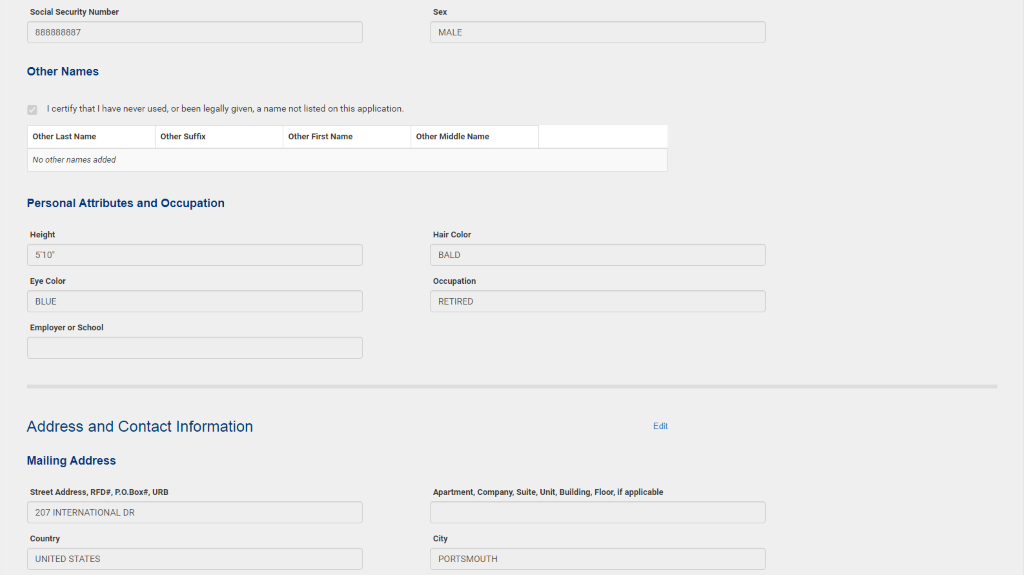
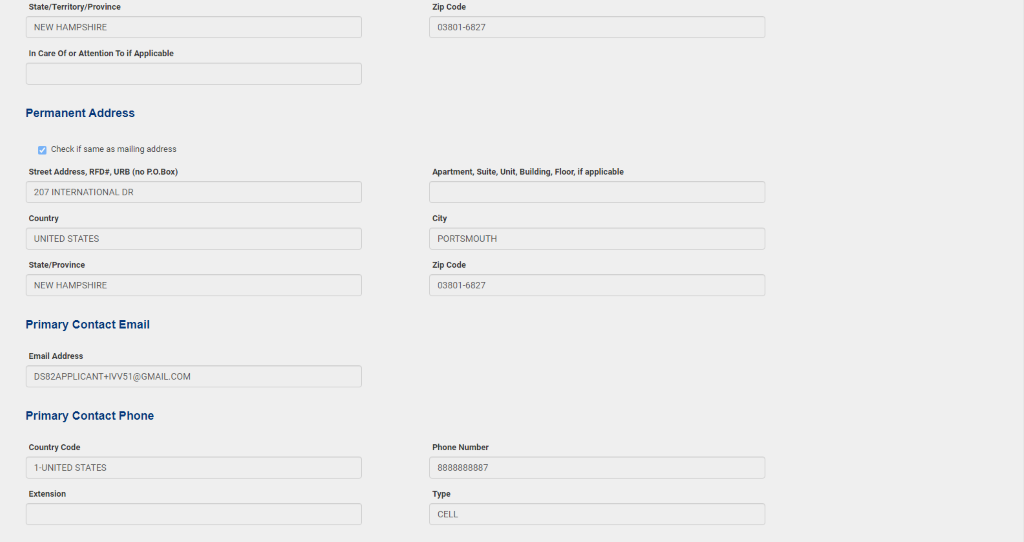
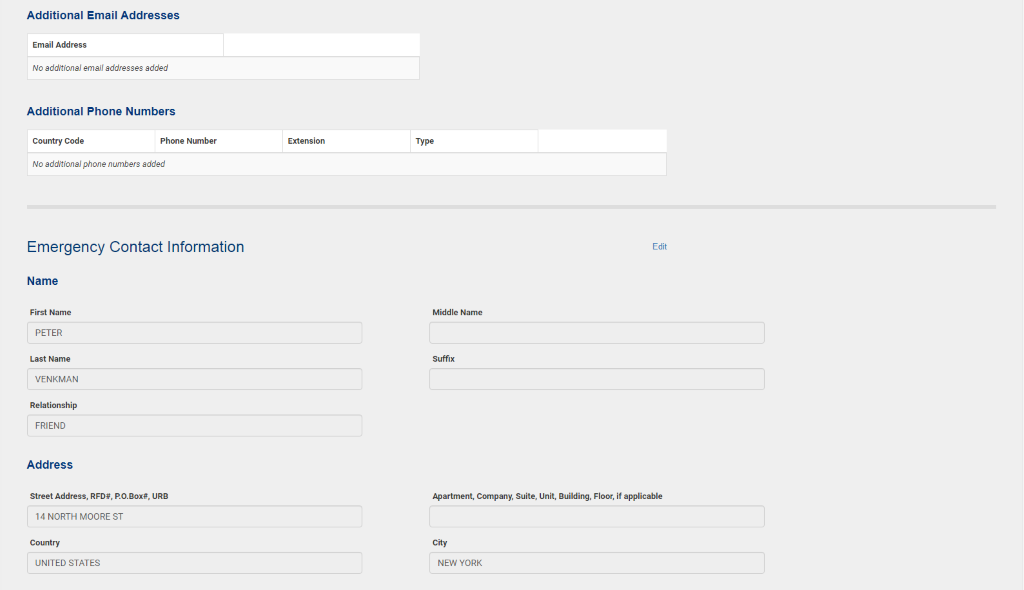

Figure 12: eSignature, Submit and Pay
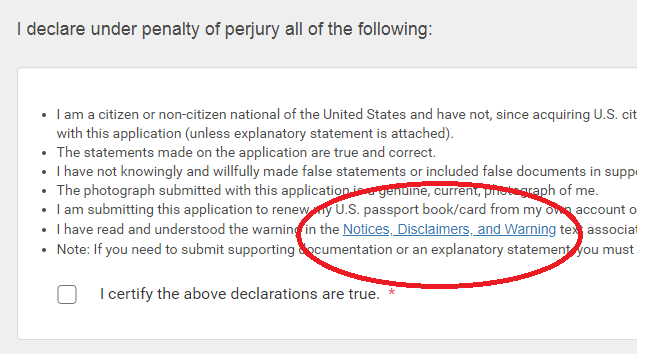
The applicant must enable the ‘I certify the above declarations are true’ checkbox and provide their ‘Current US Passport Book/Card ICN (Inventory Control Number) Number’ prior to clicking the ‘Sign and Submit Application’ button. Verifying the ICN is an added check to confirm the applicant has their passport product physically in their possession.
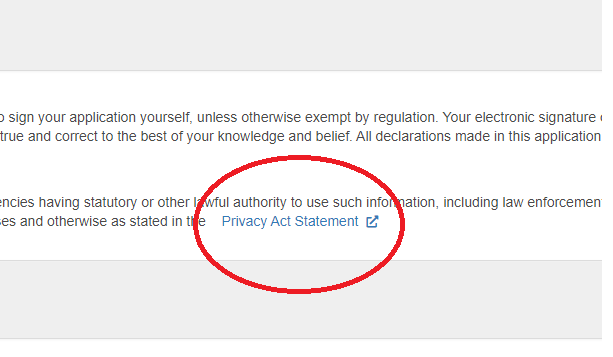
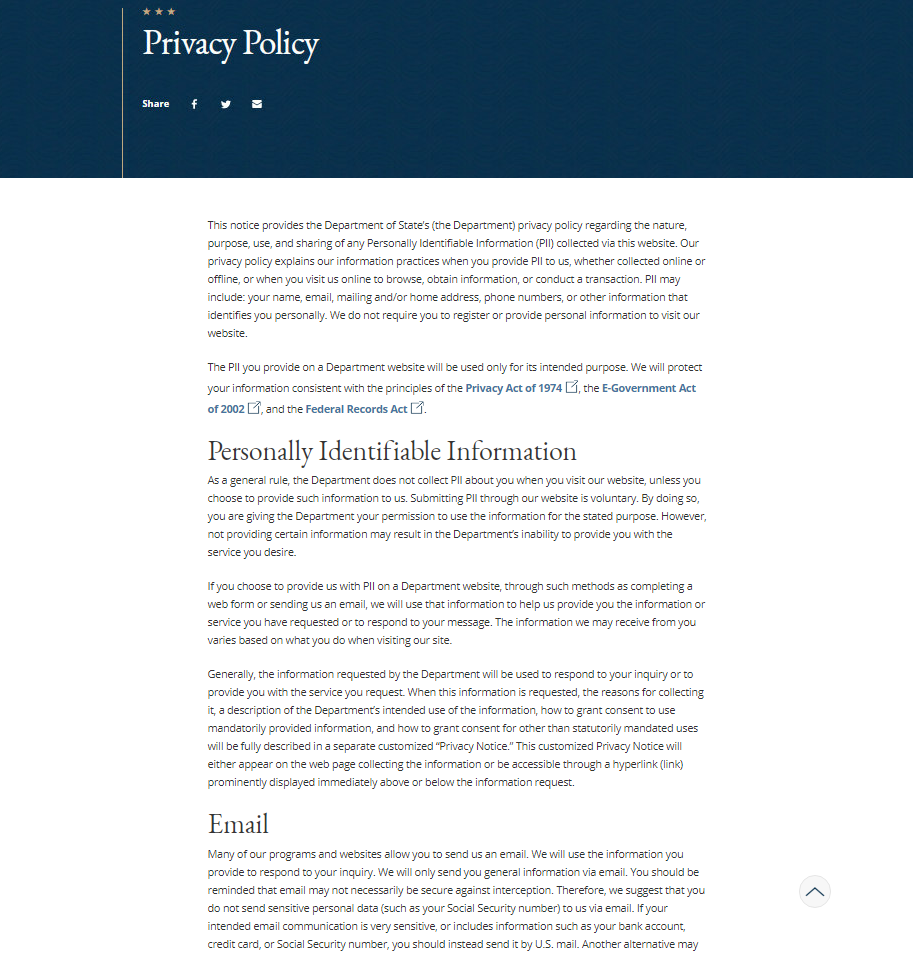
The applicant can view the “Privacy Act Statement” and “Notices, Disclaimers, and Warning” by opening the links in this section (see Figure 15).
![]()
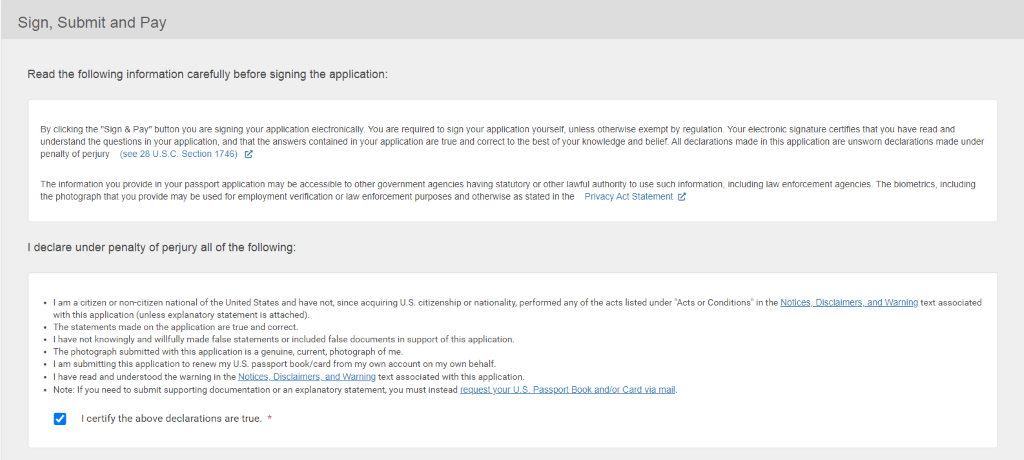
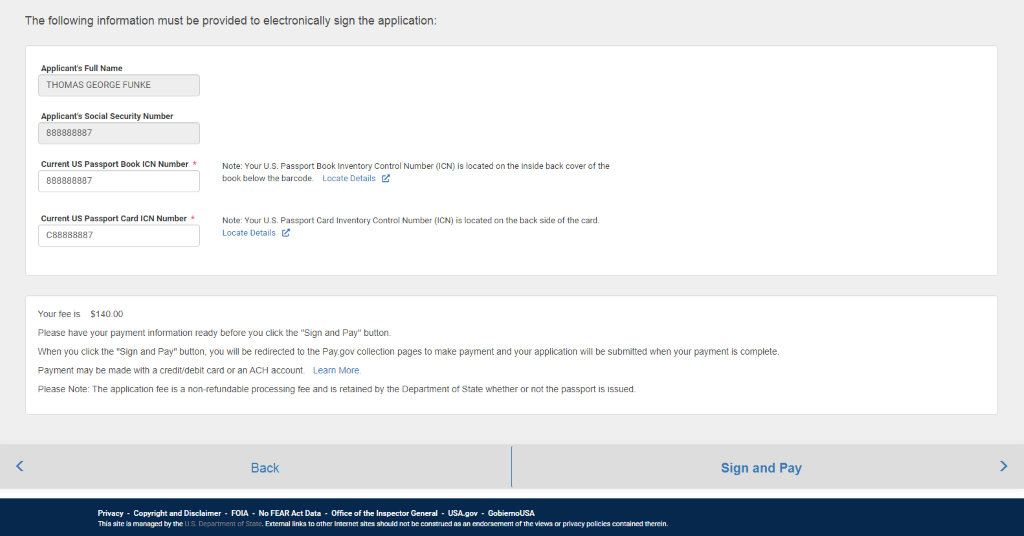
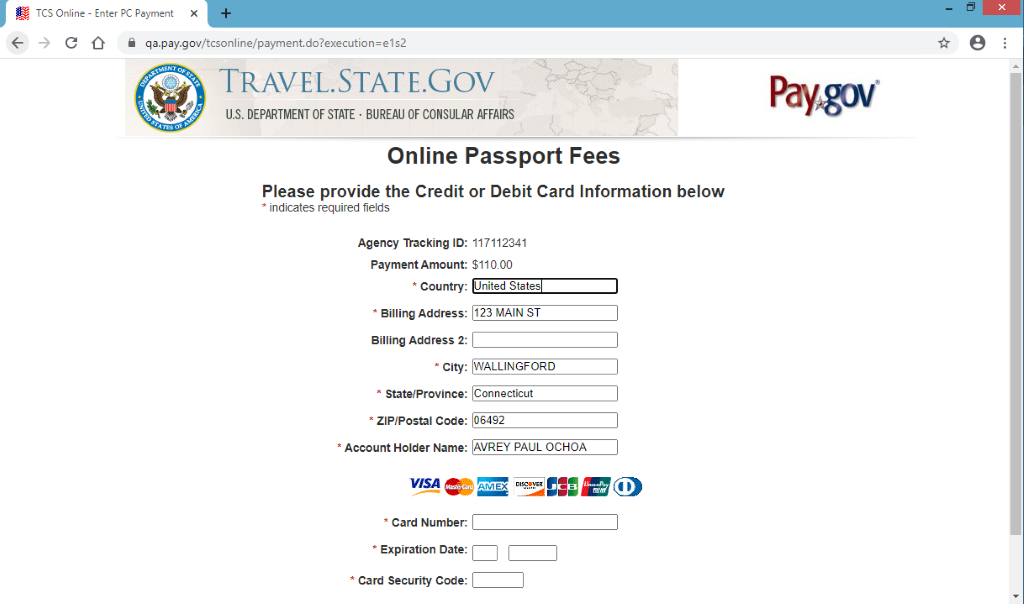
Figure 13: Payment on Pay.Gov
Within the same browser session, the applicant is redirected to pay.gov for payment processing. The applicant has the option to complete payment using either ACH withdrawal from a savings or checking account or pay with a credit or debit card.

The applicant will be prompted to enter payment details depending on their choice of payment method.
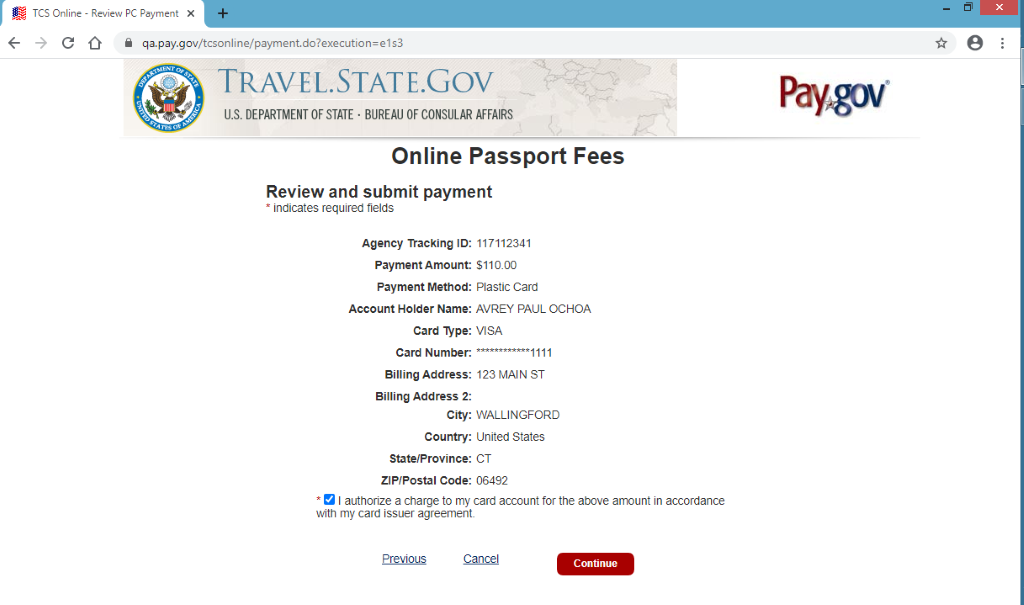
The applicant will be prompted to confirm their information and must select the box to authorize payment before proceeding.
The applicant will be notified of their successful payment and presented with an electronic receipt of the transaction, which will also be sent to their email. At this point the application is submitted. The applicant may print their application for their records or return to their home screen from this page.
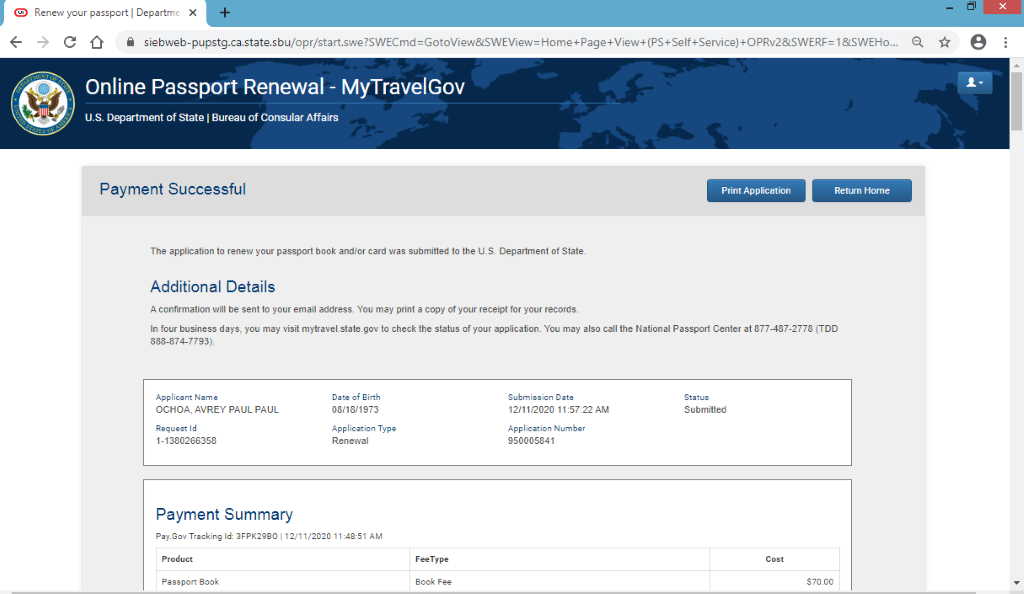
Figure 14: Application Home Screen
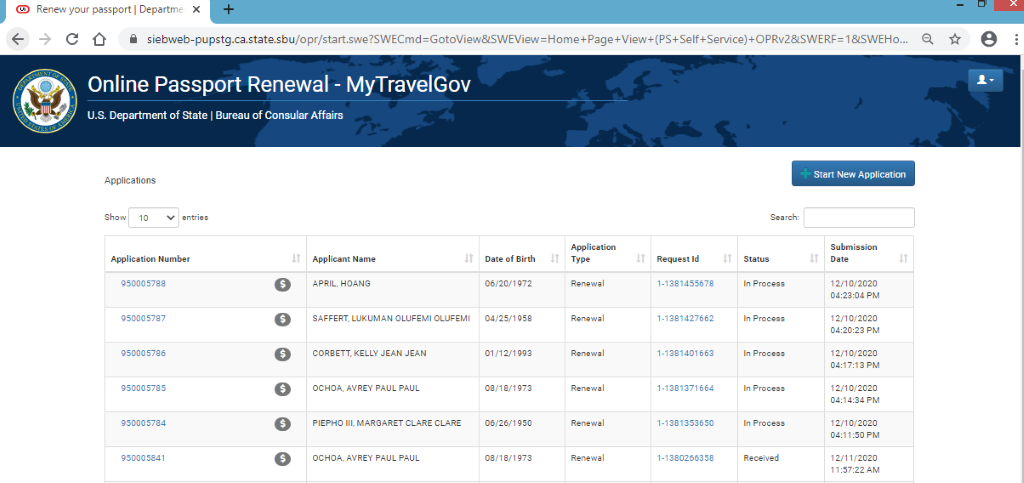
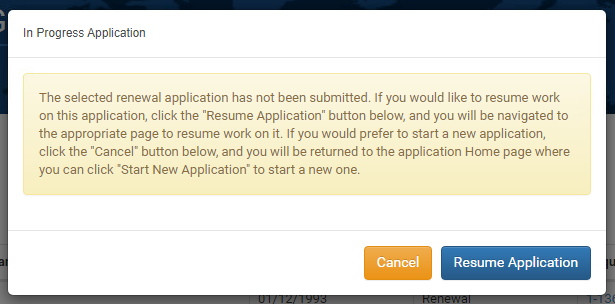
If the applicant returns to their home screen, they will be able to view the applications they have submitted which are associated with their account/email address. They may also resume applications they have started but not yet submitted and view the status of their submitted applications.
The applicant may also use the home screen to electronically update their contact information and/or mailing address on a submitted application and may upgrade their processing or delivery options.
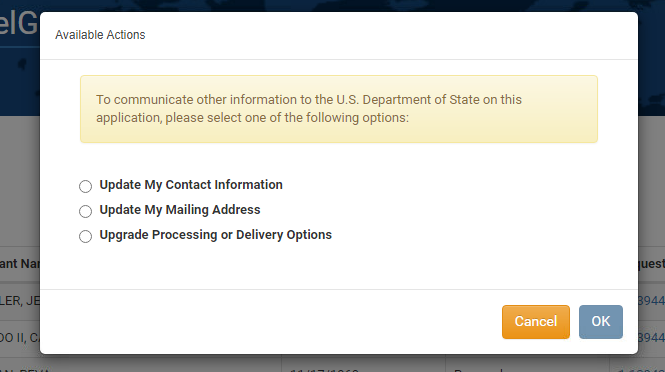
Figure 15: Notices and Disclaimers Text
Below are the “Privacy Act Statement” and “Notices, Disclaimers, and Warning” which the applicant certifies having read by signing and submitting the application (as seen in Figure 12).
(also available at https://state.gov/privacy-policy/)


| File Type | application/vnd.openxmlformats-officedocument.wordprocessingml.document |
| Author | Traci Thiessen |
| File Modified | 0000-00-00 |
| File Created | 2023-08-31 |
© 2026 OMB.report | Privacy Policy