Attachment H5 - Mobile Device User Guide (Interviewer Training Manual)
Attachment H5 - Mobile Device User Guide (Interviewer Training Manual) 09082021.docx
Field Test for the Second National Household Food Acquisition and Purchase Survey (FoodAPS-2)
Attachment H5 - Mobile Device User Guide (Interviewer Training Manual)
OMB: 0536-0077
Mobile Device User Guide |
5 |
5.1 Device Policies and Use Guidelines
Field interviewers are responsible for the care and security of computer equipment (including mobile devices) and must inform Westat promptly of any malfunctions. While the equipment has been designated for the field interviewer’s use, it is Westat property. Please refer to the “Tools of the Trade” magazine for detailed information about user rights and responsibilities. Field interviewers must:
Treat Westat electronic devices with the same professional care shown to respondents;
Restrict outside access to Westat electronic devices or systems;
Not import or export information from a Westat electronic device;
Not personalize Westat electronic devices in any way;
Not install personal software of any kind on a Westat electronic device;
Not update the operating system (OS), even if prompted to do so;
Not download files from the Internet to a Westat electronic device; and
Report loss of electronic devices to their supervisor as soon as the loss is discovered.
At the completion of the assignment or the termination of their employment, field interviewers must return to Westat all materials and equipment provided to them, as directed by their supervisor.
Field interviewers who drive Westat vehicles or non-Westat vehicles while conducting Westat business are expected to refrain from using electronic devices such as cellular telephones and email and text messaging devices while driving. Safety must come before all other concerns. Field interviewers should safely and legally park the vehicle before placing or accepting a telephone call or before text messaging, including, for example, programming, reading from, or entering data into an electronic device. If pulling off the road is not safely possible, field interviewers should use the device at a more appropriate opportunity. Under no circumstances should a Westat-issued electronic device be used while driving a motor vehicle.
Field interviewers are expected to obey all local ordinances and state laws, including those addressing the use of electronic devices. Field interviewers who are charged with traffic violations resulting from the use of an electronic device while driving will be solely responsible for all liabilities that result from such actions.
5.2 Using the iPhone
The following are basic instructions for using your iPhone for your Westat field work.
5.2.1 iPhone Hardware and Access
Charging the Battery
It is important to keep your iPhone’s battery charged. Your iPhone has been equipped with a battery backup case called a mophie. A fully charged backup battery and iPhone battery will last about 16 hours between charges. It is very important that you keep your battery charged while working. Otherwise, the data could be compromised.
T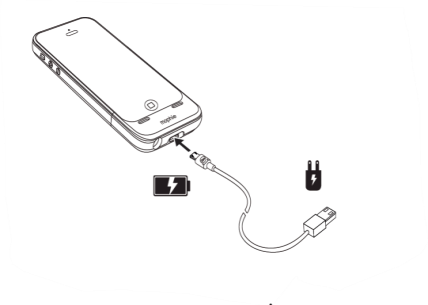 o
charge your iPhone and the mophie, have the case around the iPhone
and turn on the mophie using the switch on the back of the case.
Next, connect to a power outlet using the
mophie cable and USB power adaptor.
When you plug it into the charger, the lights on the back of the mophie should be blinking, indicating that it is charging. If the lights are not blinking, flip the switch on the battery case.
When the phone is on, you will see a battery icon in the upper-right corner of the screen that shows the battery level or charging status of the iPhone.

You have a car charger (black Powergen Dual port car charger) that may be used to charge your iPhone. You may use either slot on the charger, but always be sure that the indicator lights on the back of the mophie case are blinking, indicating the phone is charging.
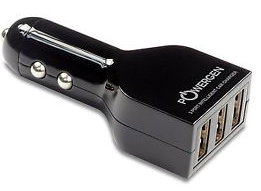
The iPhone with the backup battery uses a standard Micro USB cable that on one end has a micro USB plug and a standard USB plug on the other (this cable is white). The standard USB plug goes into the car charger or the iPhone charger, and the Micro end goes into the bottom of the backup battery.
Adjusting the Volume
The buttons on the side of the iPhone adjust the audio volume. The buttons control the volume for the ringer, alerts, audio playbacks and other sound effects.
Volume down
Volume up


Ring/Silent Switch
Above the volume control buttons is the Ring/Silent switch. If you flip the switch to ring mode, all sound effects are active.
Switching to silent mode turns off all sound effects to avoid interruptions.


Rng/silent switch
Turning the Phone On/Off
The Sleep/Wake button located at the top of the phone is used to turn the phone on, off and to lock the iPhone. To turn on the iPhone, press and hold the Sleep/Wake button.
To turn the iPhone’s screen off, press the Sleep/Wake button once (but do not hold the button). Turning off the screen prevents you from unintentionally interacting with the touchscreen, for example when you put it in your pocket or bag. Get in the habit of turning the screen off when you are not using the iPhone.
To turn off the iPhone, press and hold the Sleep/Wake button for a few seconds until the slider appears, then drag the slider to the right.
Sleep/Wake

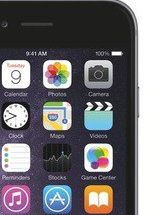
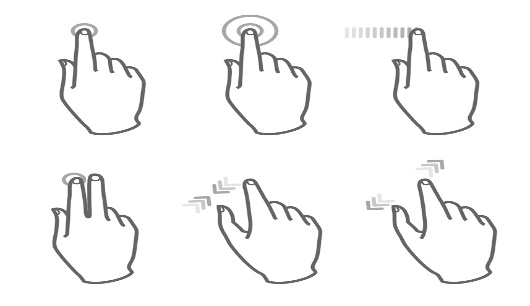
Interacting With the Touchscreen
You interact with
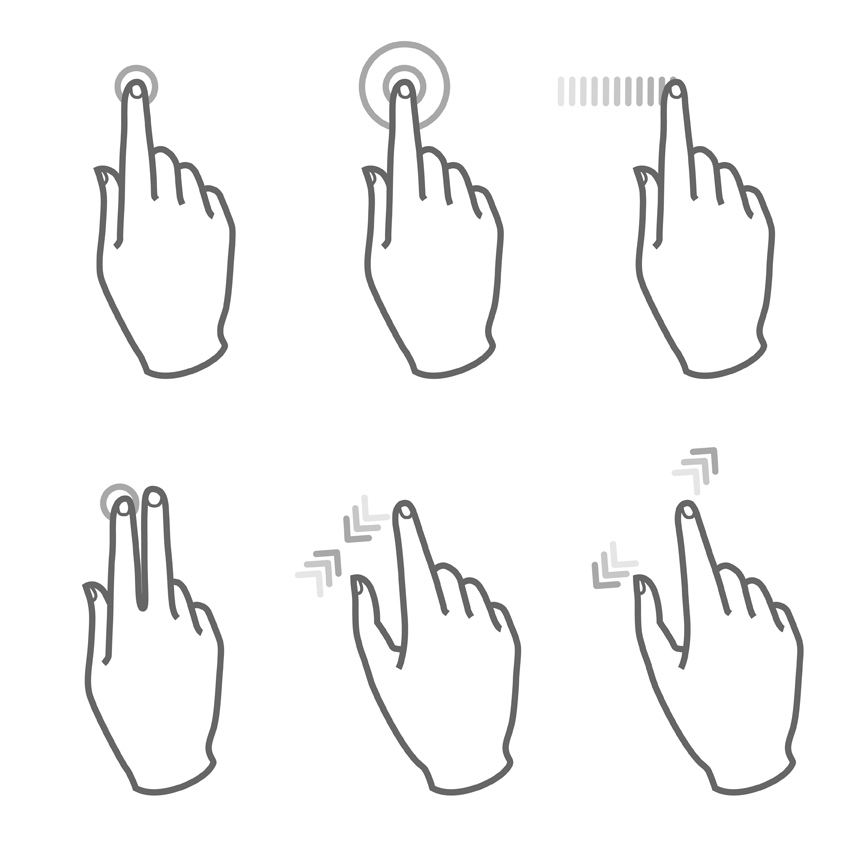
the iPhone by touching the screen and using your fingers to tap,
double-tap, swipe, and pinch objects on the touchscreen.
Unlock Screen
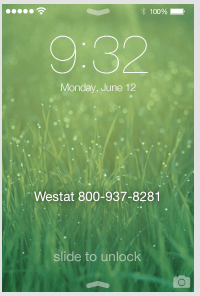
When you first turn on the iPhone, or when the phone times out after about a minute of inactivity, the Unlock Screen is displayed. At the Slide to unlock message, swipe from left to right.
Passcode Screen
T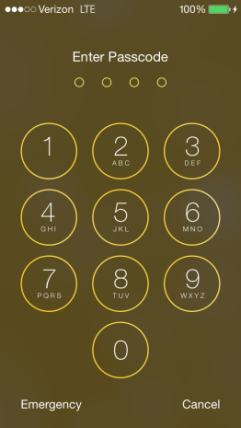 he
Passcode Screen will also be displayed every time the phone is
turned on or times out. To continue, enter your iPhone passcode,
which is 2684.
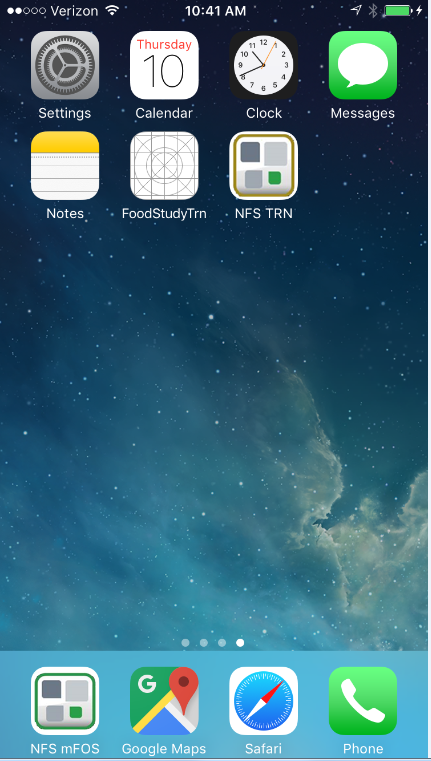
The Home Screen and Button
The Home Screen is where to access all other screens and functionalities of the iPhone. To return to the Home Screen, press the Home button located at the bottom of the phone.
Home Screen


5.2.2 Phone Calls, Texting, and Voicemail
Making/Answering a Phone Call
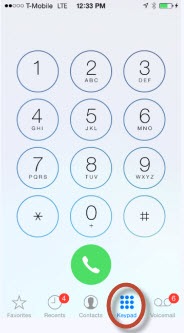
To dial a phone number, first tap the green Phone icon at the bottom of the Home Screen.


At the next screen, if the keypad is not displayed, tap the Keypad icon at the bottom of the screen. Enter the phone number you wish to call. Next, tap the green Phone icon and the number will be dialed.
The phone will sound or vibrate when you have an incoming call and the following screen will display.
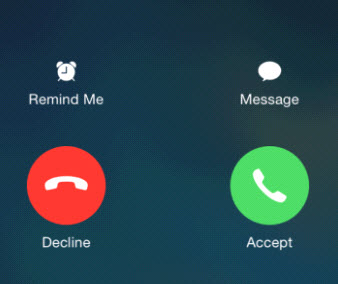 Tap
Accept to answer an incoming call. Or if the iPhone is
locked, drag the slider.
To silence a call, press the Sleep/Wake button or either volume button. You can still answer the call after silencing it, until it goes to voicemail.
To decline a call and send it directly to voicemail, do one of the following:
Press the Sleep/Wake button twice quickly.
Tap Decline (if iPhone is awake when the call comes in).1
To remind yourself to return the call, tap Remind Me and indicate when you want to be reminded.
Contact List
The iPhone Contact List should be used for Westat employees only. Never add a study respondent to your contacts list.
 To
access the contacts screen from the home screen, tap on the green
Phone icon, then at the bottom of the screen, tap the
Contacts icon.
All of your contacts will be listed on the All Contact screen. Tap the blue + sign to add a new contact.
At the New Contact screen, tap the applicable text field(s) and enter the contact name. Then, tap the applicable phone field and enter the phone number. Other contact information can be added to the other fields if desired. Tap Done when finished.
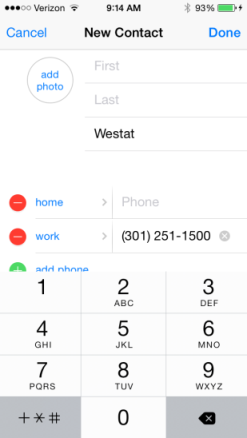
To place a call to someone on your contacts list, tap the phone icon next to the name. The phone will then dial the number.

Voicemail
Visual Voicemail lets you see a list of your messages and choose which one to listen to or delete, without having to wade through all of them.
To open voicemail, first tap the Phone button at the bottom of the Home Screen. The Voicemail icon is located at the bottom right of the Voicemail Screen.

The first time you open Voicemail, you will be prompted to enter the Voicemail password. The password for accessing your Voicemail will be 2580.
Listening to and Deleting a Voicemail Message
To listen to a voicemail message, first tap on the Voicemail icon and then tap a message.
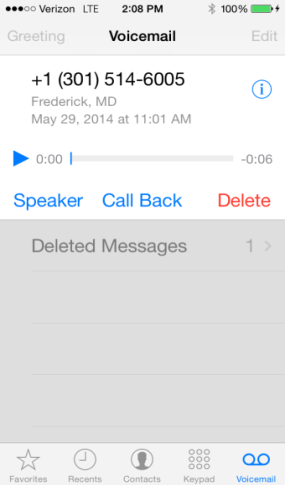
The message will begin to play. To listen again, select the message and tap the blue Play arrow. If visual voicemail isn’t available with your service, tap the Voicemail icon and follow the voice prompts.
Voicemail messages are saved until you delete them or your carrier erases them.
To delete a message, tap on the message and then press Delete.
NOTE: In some areas, deleted messages may be permanently erased by your carrier.
Texting
To send a text, tap on the Messages app on
the Home Screen.


At the New Message screen, enter the phone number you want to send the message to in the To field. Then, type the message in the text field above the keyboard. When you are finished, tap Send.
The project allows you to enter your supervisor as well as other data collectors into your Contacts list. To send a text to one of your contacts, type the name in the To field. The contact will appear below the field. Tap on it to enter into the To field.
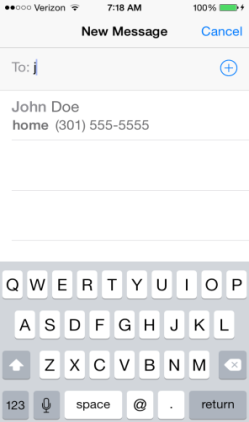

NOTE: Although texting is allowed with study respondents, NEVER enter a study respondent into your Contact list. This is a violation of respondent personal identifying information (PII) practices.
Y our
iPhone’s Mail app is configured to send and receive your email
messages associated with your IceWarp email account. Tap the mail
icon to access the Mail app.
To see the messages in your inbox, tap Inbox. In order to draft a new message, tap the pen and paper icon at the bottom of the screen. This will bring up the New Message screen, where you will be able to draft your new message. Once you are finished, tap Send in the upper right corner to send the message.


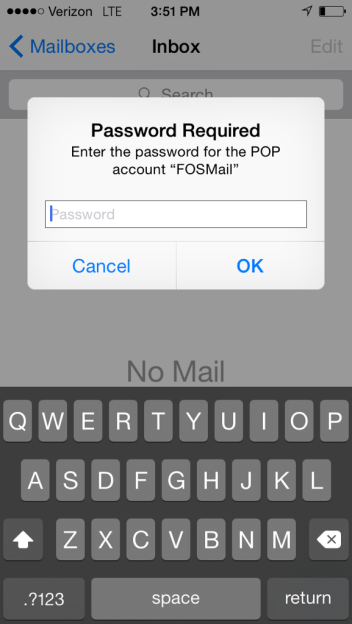
Note that if you make a change to your IceWarp password online, you will be prompted to update the password on your iPhone as well.
5.2.3 Other iPhone Features
Apps
The small, square pictures in the center of the screen are called Apps. App is an abbreviation for application. An app is a piece of software.
All of your iPhone’s apps are accessed via the home screen. When on the home screen, you may need to swipe left or right in order to view all of the apps on the phone.
To open an app, tap on it.
Force Closing Apps
Applications that have been opened will continue to run in the background of your device even when you are not using the application. Over time, this will slow down your phone’s operating speed. To force close apps you are no longer actively using, press the home button twice quickly. This will bring up all the apps currently running, each in an individual screen pane.
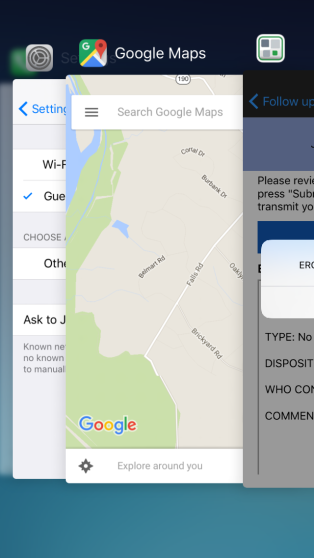
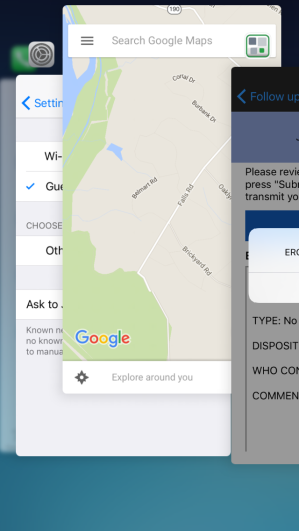
You can scroll through the apps to see which ones you want to force close. To close the app, place your finger on the app screen and swipe towards the top of the phone. This app screen should disappear from the list. You can do this for all running apps except for the home screen.
It is recommended you do this at least once a day to improve performance.


Connect to Wi-Fi
If
![]() appears
at the top of the screen, you’re connected to a Wi-Fi network.
The iPhone automatically reconnects anytime you return to the same
location.
appears
at the top of the screen, you’re connected to a Wi-Fi network.
The iPhone automatically reconnects anytime you return to the same
location.
T o
configure Wi-Fi: Tap the Settings app on the Home Screen.
Then, tap Wi-Fi.
Choose a network: Tap one of the listed networks and enter the password, if required.
Ask to join networks: Turn on Ask to Join Networks to be prompted when a Wi-Fi network is available. Otherwise, you must manually join a network when a previously used network isn’t available.
Forget a network: Tap next to a network you’ve joined before. Then, tap Forget this Network.
Join a closed Wi-Fi network: Tap Other, then enter the name of the closed network. You must already know the network name, security type, and password (if required).
Type Texting
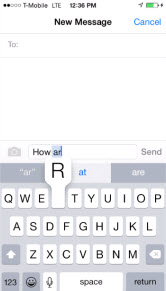
An onscreen keyboard allows you to enter text when needed.
Tap a text field
to see the onscreen keyboard and then tap letters to type. When you
touch a letter, an enlarged display is shown. The letter isn’t
entered until you release your finger from the key. Use the
![]() key to delete the letter if it is incorrect. Note that auto-spell
function is enabled on your iPhone.
key to delete the letter if it is incorrect. Note that auto-spell
function is enabled on your iPhone.
Tap the
![]() key to type uppercase, or touch the
key to type uppercase, or touch the
![]() key and slide to a letter. Double-tap the
key and slide to a letter. Double-tap the
![]() key for caps lock. To enter numbers, punctuation, or symbols, tap
the
key for caps lock. To enter numbers, punctuation, or symbols, tap
the
![]() key. To quickly end a sentence with a period and a space, just
double-tap the Space Bar.
key. To quickly end a sentence with a period and a space, just
double-tap the Space Bar.
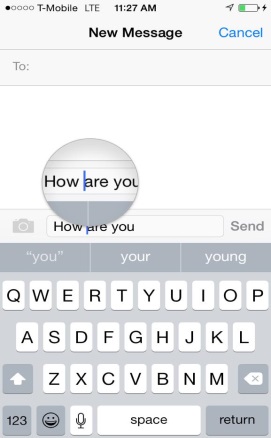
To move the
cursor to revise text, touch and hold the text to show the
magnifying glass, then drag to position the insertion point and then
release. You can use the
![]() key to delete text or add new text.
key to delete text or add new text.
For
additional practice with typing on the iPhone, try this online
tutorial:
http://iphone.typingweb.com/index.php
Talk to Text
 Some
screens utilize the iPhone function called Siri which changes spoken
words to typed text. If a screen has Siri, the microphone icon will
be displayed at the bottom of the keyboard. To activate Siri, tap
the
![]() icon.
icon.
A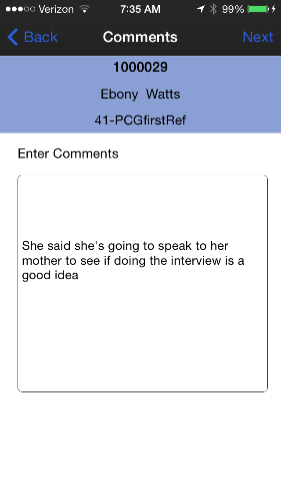 t
the next screen, say clearly what you would like translated to text.
Then, tap Done.
t
the next screen, say clearly what you would like translated to text.
Then, tap Done.
The words you spoke will be translated into the text field. You can edit the text if needed.
NOTE: Do not use this function to record any personal identifying information such as a person’s name, age, gender, or health condition. Also do not record the project name or abbreviation. Any text you type or that is converted from your speech is automatically associated with this case, so there is no need to refer to the specific case—and usually not the project either.
Siri
In addition to talk to text, Siri is also an intelligent personal assistant and knowledge navigator that works as an application for Apple. Siri lets you use your voice to send messages, make calls, set reminders, and more. You can access the Siri application by pressing the home button for a few seconds and the following screen is displayed.
Y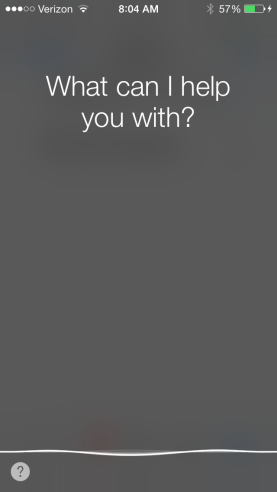 ou
can speak whatever item you want Siri to assist with. For example,
you can say something like, “Send a text message to field
supervisor”. Siri will automatically start a text message
addressed to your contact listed as “field supervisor”.
Siri can help you make phone calls. For example, “Call field supervisor”. Siri would automatically dial your contact listed as “field supervisor”.
Siri can also assist you in finding directions to gas stations or restaurants, for example. If you say “McDonald’s”, Siri will find the closest locations for McDonald’s and offer to phone them or give you directions to the locations.
The Siri privacy policy states:
The things you say and dictate will be recorded and sent to Apple;
All information including your name, address book, and contacts will be sent to Apple;
The location of your device can be accessed (if location services is turned on);
You can choose to turn Siri location services “Off”;
If you choose to turn Siri off, all voice data input will be deleted. It is possible that older voice data input that is not associated with you may be kept for research purposes (i.e., to help improve the functionality of Siri Services); and
All uses of Siri comply with the Apple Privacy statement.
5.2.4 Google Maps
The Google Maps app is available on the Westat iPhone. Google Maps is a map service that you view in your web browser. Google Maps allows you to view basic maps as well as driving directions from your current location.
Opening Google Maps
Tap the Google Maps app on the Home Screen to open.
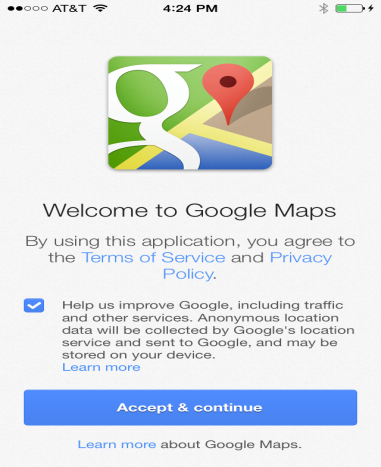
Once you open the Google Maps app, you will need to Accept the Term of Service and Privacy Policy, so click on Accept and Continue. To review the Terms of Service and Privacy Policy, click on the blue links.
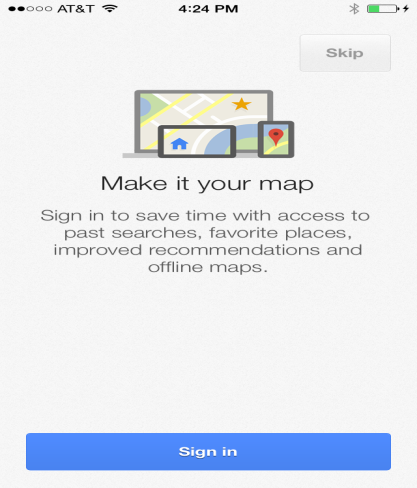
When you open the Google Maps, you will be prompted to sign in. You can skip this step, by just pressing the Skip button at the top of the page.

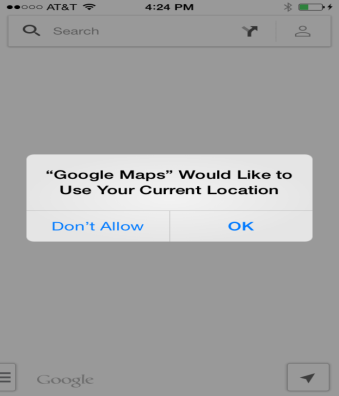
This will take you to the first screen in the Google maps app. A pop-up screen will appear that says “Google Maps would like to use your current location”. Click on OK so that the device can pick up your location to provide accurate directions to your desired destination.
Searching for Driving Directions
Searching for driving directions to a physical address will be the most common method for using Google Maps. There may be times that you will need to search for a business address, and those are available in Google Maps as well.
To search for an address, begin entering the physical address in the field located at the top of the page. You will notice that once you begin entering the physical address, the screen will automatically begin pre-filling the information based on your current location.
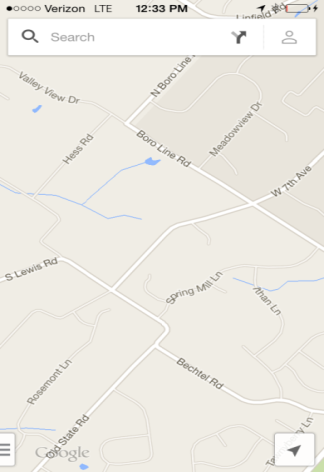
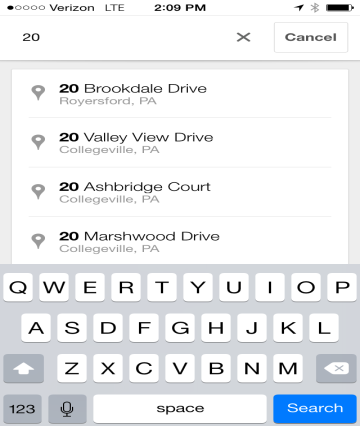
Search results will automatically appear underneath and an icon showing your destination will appear on the map itself. At the bottom of the screen, to the right of the address, a car icon is shown with an estimated time. If you click on the car icon, the next screen displays the directions onscreen.

A variety of routes are usually displayed, and you can choose the route you prefer. If you prefer to see the directions in a different mode of transportation (i.e., transit, bike, or walking), click on the appropriate icon at the top of the screen.
When ready, click on Start Navigation. A voice will begin to navigate you to your destination. To unmute the voice, click on the 3 dots located in the lower right hand corner and click on Mute voice guidance.


5.2.5 iPhone Updates
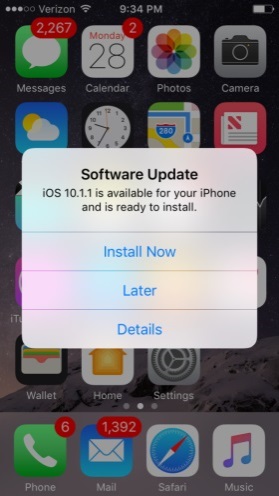
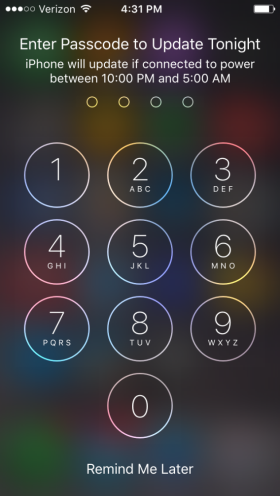
During the field period, your iPhone may prompt you to update the operating system. YOU SHOULD NOT UPDATE YOUR iPHONE! If your device prompts you to update the operating system, always select to postpone to “Later” and then “Remind Me Later”. Do not grant the device permission to update the operating system.
See the images below and the options selected to ensure that a new version of iOS is not installed on your phone.


5.3 Using the mFOS App
The mFOS app is the program on the iPhone that you will use to record your Westat work.
You can find two versions of the mFOS app on your Home Screen. There is a production version called NFS mFOS and a training version called NFS TRN. The production version will be located in the dock at the bottom of the screen and the training version will be on your home screen. You should only use NFS TRN for the homestudy and classroom training. You should only use the NFS mFOS once data collection has begun.


5.3.1 Initial mFOS Log-in
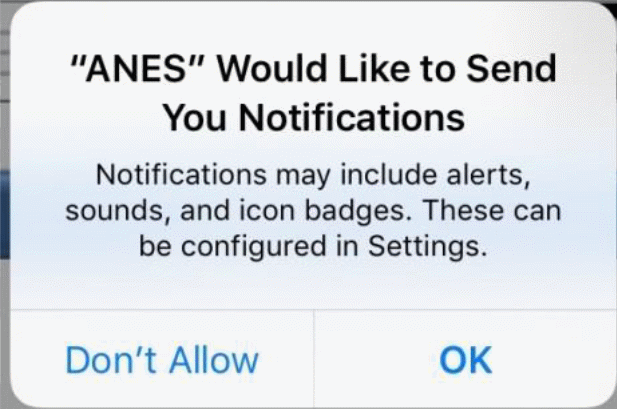
The first time you open the app, you will receive a pop-up notification asking for permission to use location and receive notification. Tap “Allow” and “OK” in order to continue. These images reference a different study, but the notification that you see will be the same, with the NFS study referenced instead of “ANES”.

With the exception of the myDay section of the app, the mFOS features described in this chapter run parallel to the features offered on your IMS.
5.3.2 Authentication Screen
The Authentication Screen establishes the connection to BFOS in order to download your cases so you can enter your record of call information.
The device will need to be authenticated once a day, when you first turn on your phone. To authenticate, type your unique BFOS username and password in the fields then press Authenticate.
There is a small
black and white show password icon
![]() to the right of the password field. Press this to show/hide your
password as you enter it.
to the right of the password field. Press this to show/hide your
password as you enter it.
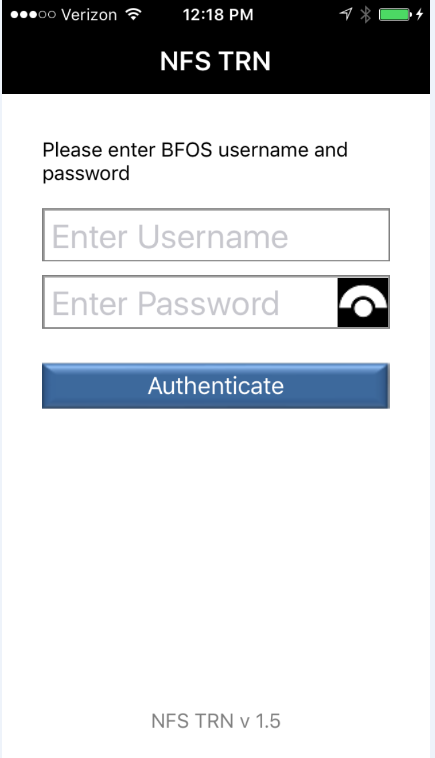
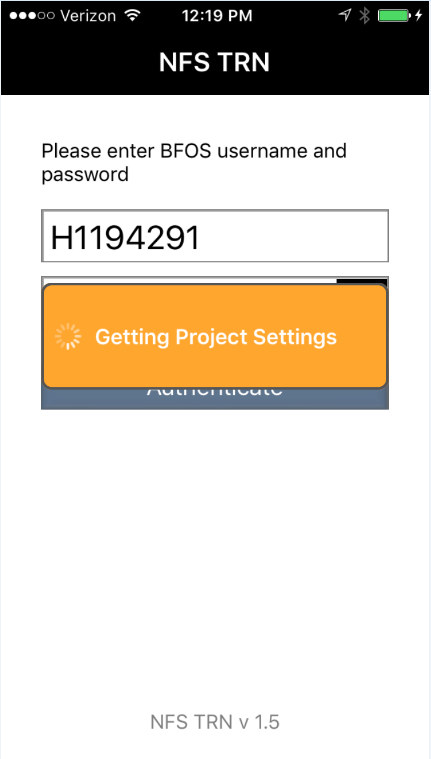
If your username and password were entered correctly, your login will authenticate, project settings will be configured, and your case list will begin to download. You will see a series of displays in the orange box as you are being logged into the App. The following screen is just one of those displays.
5.3.3 myDay
The mFOS app has two sections. myDay and myCases. The first one to open is myDay. The purpose of the myDay section is to record your time working during the day.
Using myDay
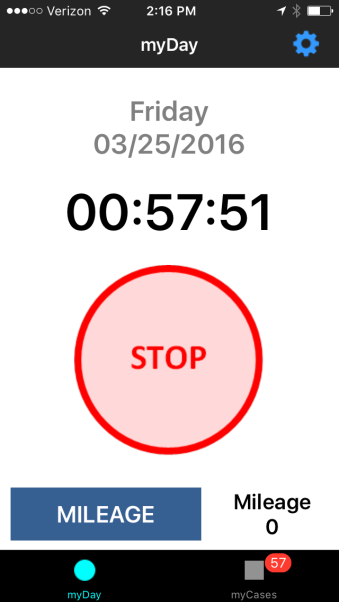
When you start your day, tap the START icon to start logging time worked.
NOTE: If location services are not turned on, you will receive a prompt to have them turned on. Tap Ok to continue.
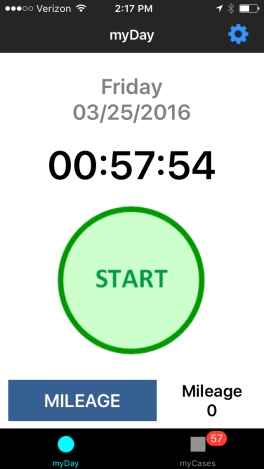
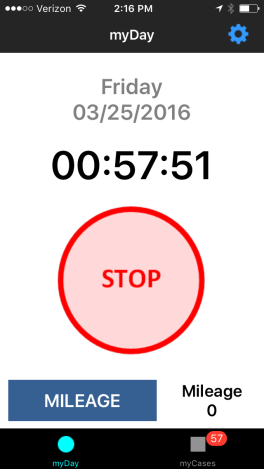
Remember to always turn the iPhone’s screen off by pressing the Wake/Sleep button once before putting the phone in your pocket or a bag. This will prevent you from unintentionally interacting with the screen and stopping the myDay timer. Do not turn the phone off until the end of your day after you have stopped myDay.
When you stop working, either to take a personal break or when you are done working for the day, press STOP. When you press STOP, the active activity log will stop running and the activity log will be displayed on the top of your screen with the time that has been logged for that day. Make sure to press START when your break is over.
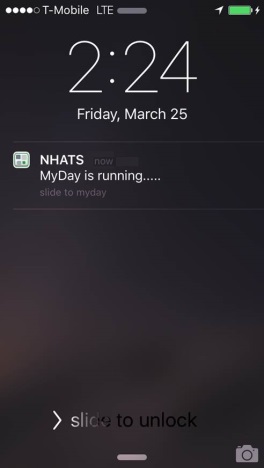
When the activity log is running for 30 minutes without an interaction, a reminder notification will be displayed on the home screen. The purpose of the notification is to let you know that the activity log is running in case you have stopped working and need to press STOP. You can press OK to close the notification or do nothing.
Entering Mileage in myDay
To enter your mileage for the day, tap on Mileage in the lower left corner of the myDay screen.


A box will appear allowing you to enter your total mileage for the day. Tap on the text box to bring up the keyboard.
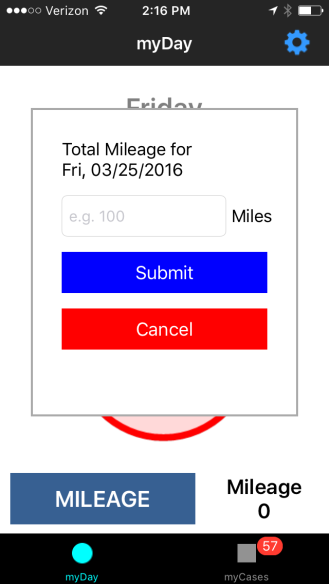
Use the keyboard to enter your total mileage (tap the 123 key on the keyboard to bring up numbers). When you are finished, tap Submit. To return to the myDay screen without submitting, tap Cancel.
5.3.4 myCases
Opening the myCases Section
The myCases function in the mFOS app is where EROC case information is entered. To open, tap on myCases at the bottom of the myDay Screen.
myCases Screens
The myCases screen displays all of your cases. You can scroll up and down the list by swiping the screen. For each case entry the case ID, name (if known), disposition status, and address are listed. The red badge at the bottom of the screen displays how many cases are in the case list.
If a case has a refusal disposition associated with it, it will be highlighted in red.

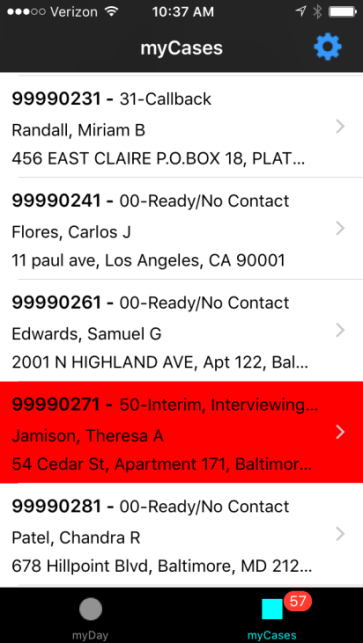
At the top of the screen is a case list search function. Tap in the field labeled Enter Search Text and begin typing the case information you would like to search for.
myCases Details Screen
To view more details about the case, click on the arrow found on the right-hand side of each case on the case list screen.
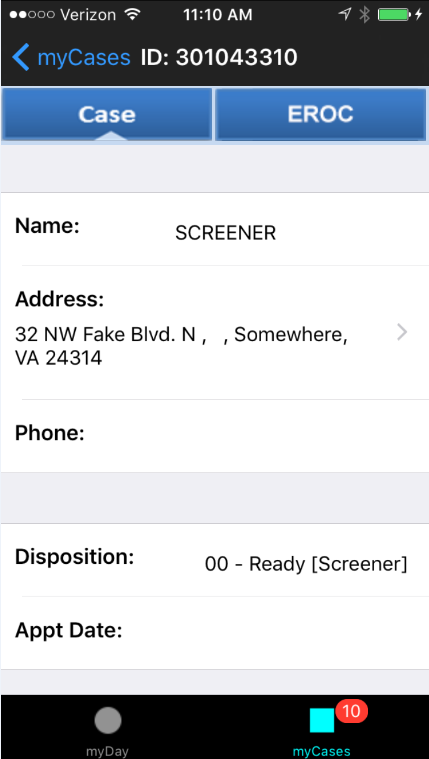
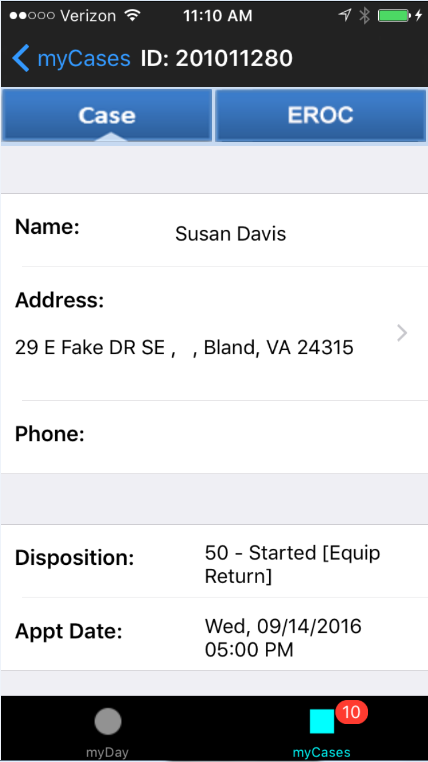
There are two blue tabs at the top of the case screen. Navigate between the “Case” tab and the “EROC” tab by tapping each tab. On the Case tab, scroll up and down to see all of the case information listed. The Case tab will display the name, address, phone, and disposition status.
When available, it will also display information about any appointment date for that case. To view more information about the facility or the proxy, tap the small arrow on the right side of that row.


5.3.5 Mobile EROCS
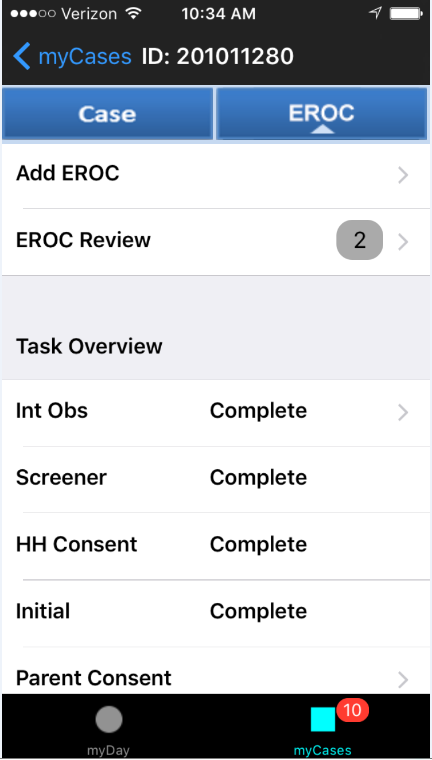
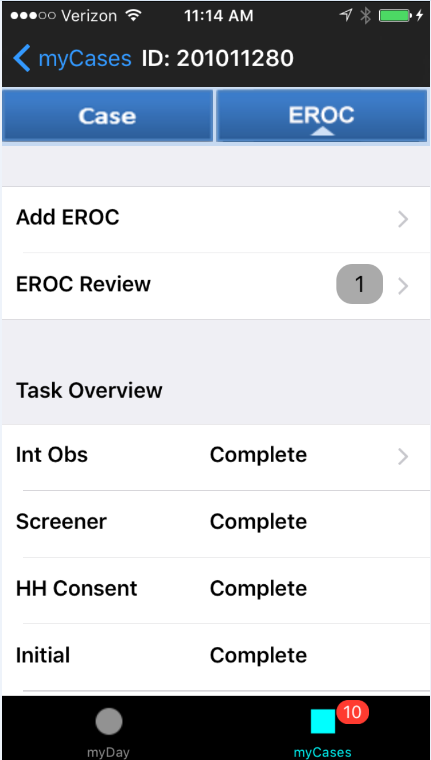
EROC information is accessed by tapping the EROC tab at the top of the case screen. From here you may add EROCS, view EROCs that have already been entered, and also see an overview of the current statuses associated with the case. The task overview includes all interviews and the status of each. For example, if interviews have been completed you will see “Complete” next to the task and for those that are not complete it will be blank. The interviews accessible through the iPhone will have an arrow pointing towards the right. Those include Interviewer Observation, Household Consent, Parental Consent, and NRFU. See screenshot below.


Displaying EROCs
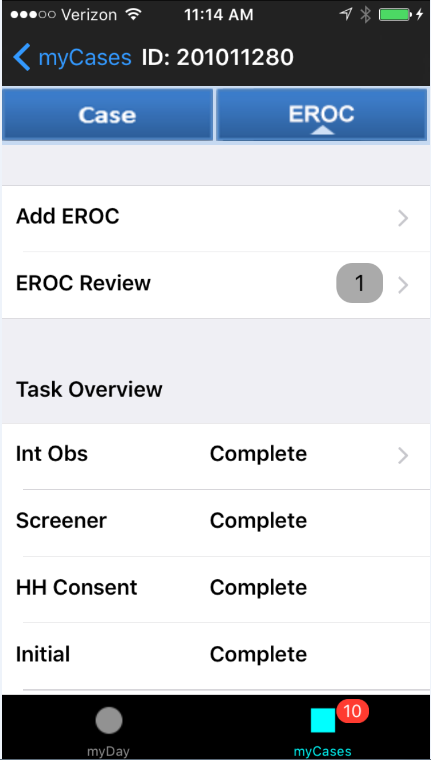
To view contact disposition codes and information that has already been entered on the case, tap EROC Review at the top of the EROC tab.

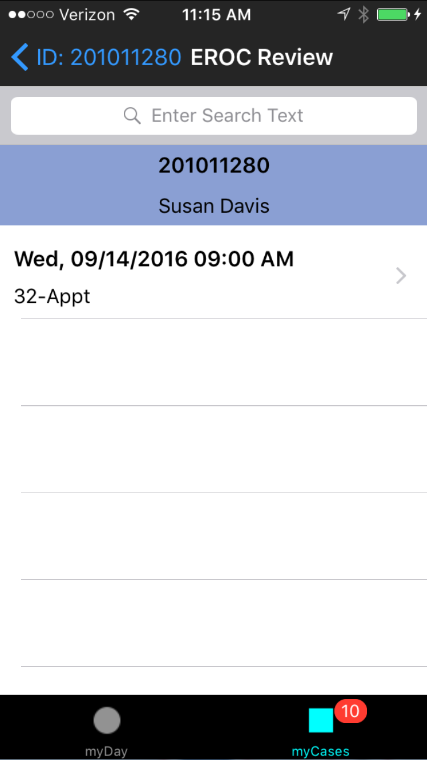
The EROC Review screen is displayed. The search function at the top of the screen searches on disposition code, timestamp, and task. Tapping the arrow to the right of each entry displays further information about that EROC.

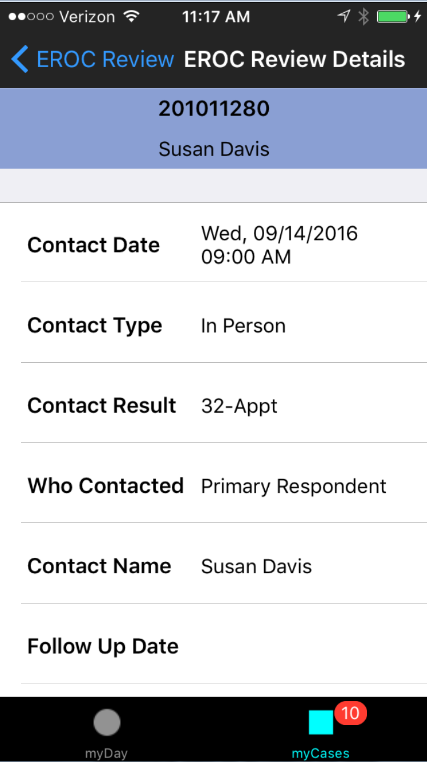
The EROC Review Details screen provides detailed information about the contact. Scroll down to see the entire list of information, including comments and appointment details. To return to the previous screen, tap EROC Review at the top left of the screen.


Entering EROCs
To add a new EROC to a case, tap Add EROC at the top of the EROC tab.

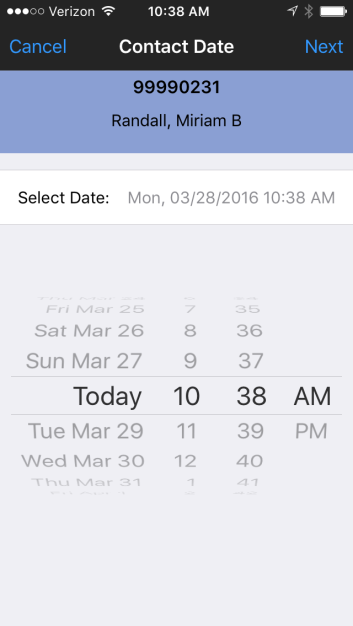
At the Contact Date screen, select the date and time of the contact attempt. The screen will default to the current date and time. If the contact attempt was made more than 15 minutes prior, select the date and time by scrolling up and down the four menus until the desired contact date and time is highlighted. Then, tap Next.
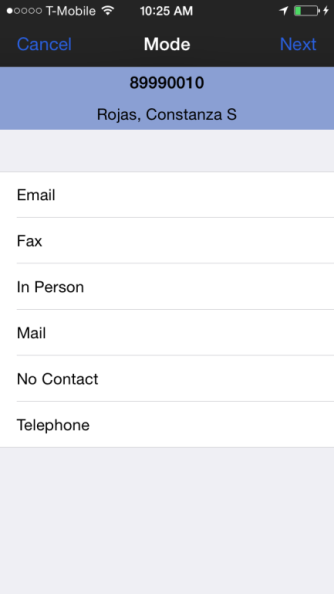
At the Mode Screen, select the mode for the task by tapping it. A checkmark shows your selection. If Phone is selected, a text field is provided to enter the telephone number. Tap Next to continue.
At the Disposition Code Screen, select the disposition by tapping it. A checkmark shows your selection. Tap Next to continue.
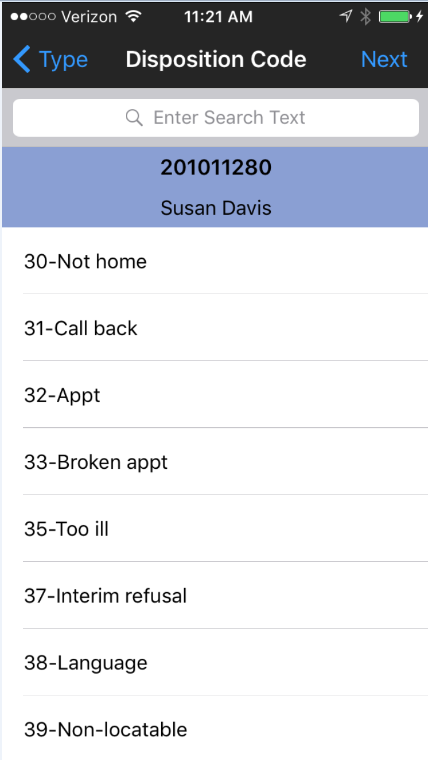
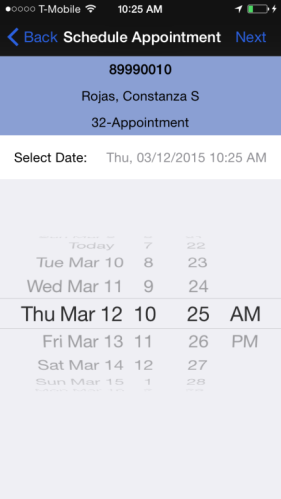
Schedule Appointment Screen
When an appointment disposition code is selected at the Disposition Code screen, the Schedule Appointment screen is displayed. Select the appointment date and time by scrolling up and down the four menus until the appointment date and time is highlighted. Then, tap Next.
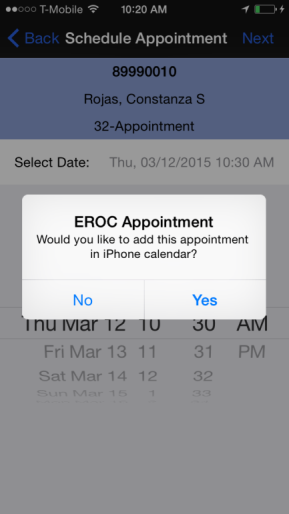
A dialog box will appear on the screen asking if you would like to add the appointment to the iPhone calendar. Tap Yes to save the appointment as an event in your iPhone’s calendar. Tap No to proceed without saving to the iPhone calendar.
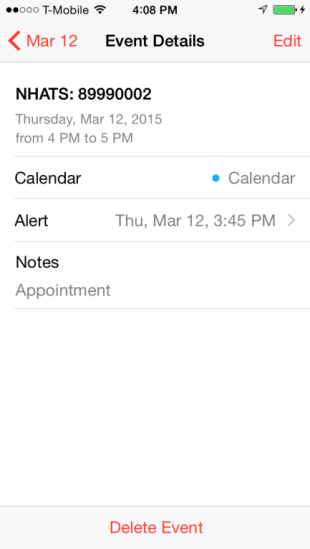
If you choose to save the appointment to your iPhone’s calendar, it will be saved as an event in the Calendar app.
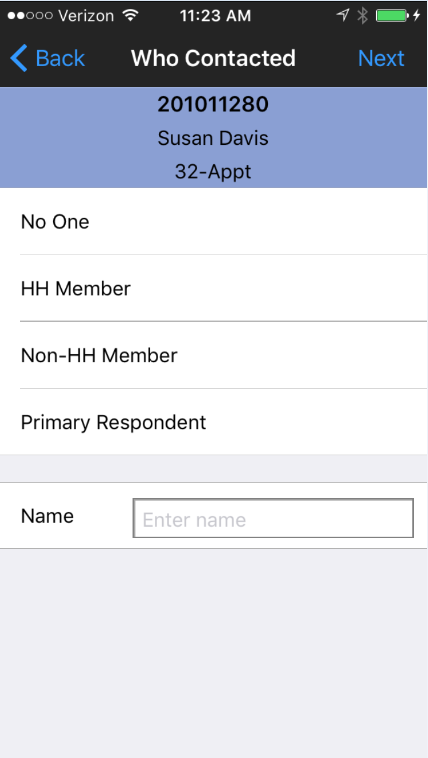
Who Contacted Screen
At the Who Contacted Screen, select the mode for the task by tapping it. A checkmark shows your selection. If No One, HH Member, or Non-HH Member is selected, you must enter a name in the text field provided. If Primary Respondent is selected, the PR’s name will automatically population int ehte Name field if it is known. If it is not known, you must enter a name in the text field provided for this option as well.
NOTE: Since you are entering a name in this field, do not use Siri.
The appointment code and rescheduled appointment code may only be set with the SP, proxy, or facility staff person. An error message will be displayed if you attempt to select a different contact type.
Comments Screen
The Comments Screen is where you enter any comments that you have about the case. Some disposition codes require that you enter a comment at this screen. Tap the white box so that the keyboard comes up. You can type in your comments or use Siri.
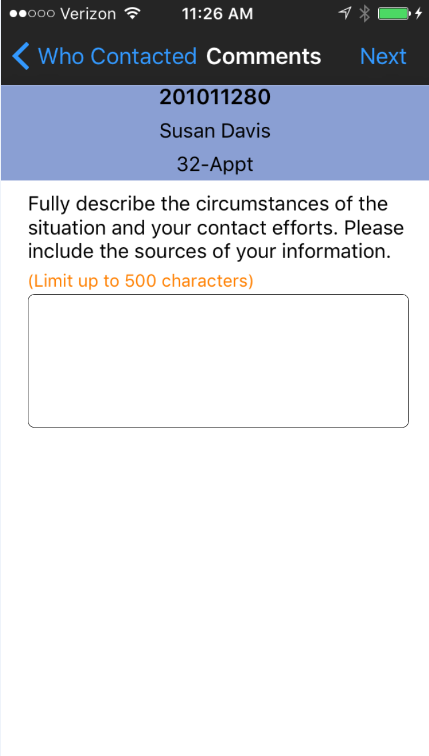
Tap Next to continue to the next screen.
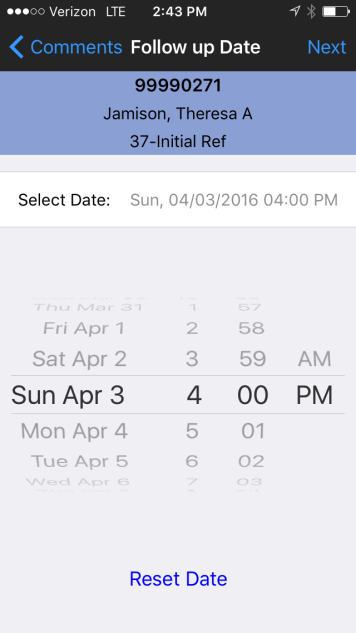
Followup Date Screen
At this screen, enter a followup date and time if applicable to your EROC. The followup date will default to NONE, and no date will show in the select date pane at the top, unless the date and time wheels are adjusted. If a followup date is selected accidentally, it can be cleared by pressing the RESET DATE button at the bottom of the screen.
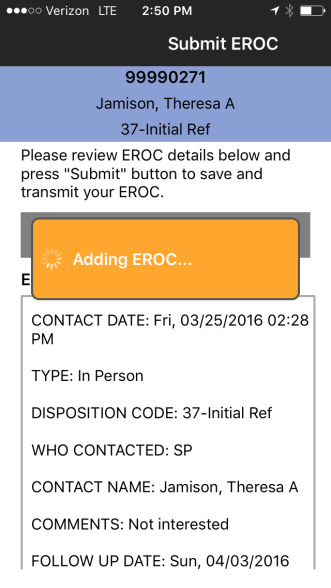
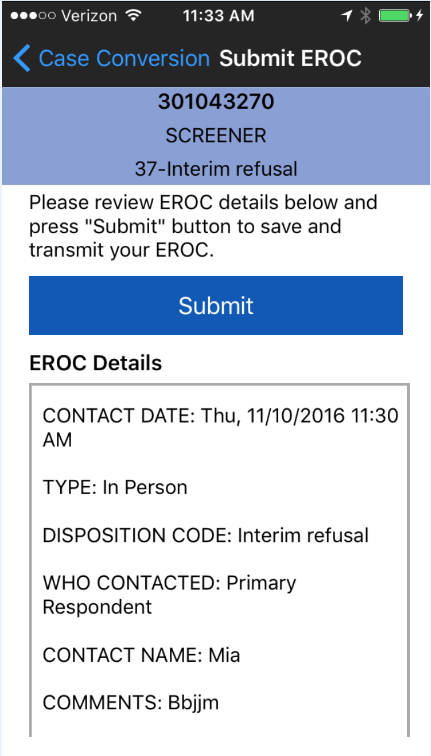
Submit EROC Screen
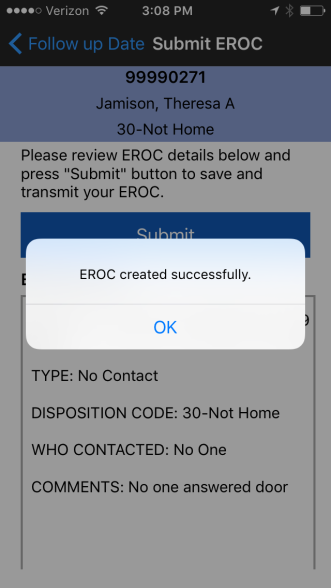
This screen will display all of the EROC information that has been entered on the previous screens. After carefully reviewing this information, tap Submit to transmit. If you need to make any corrections to the information, press the blue Back in the top left corner of the screen.

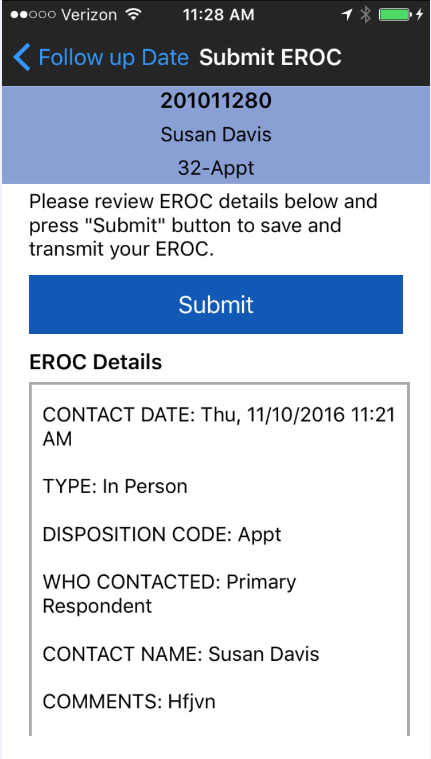
You will receive a message letting you know that your EROC has been successfully submitted. Tap OK to continue.
Refusal Disposition Codes
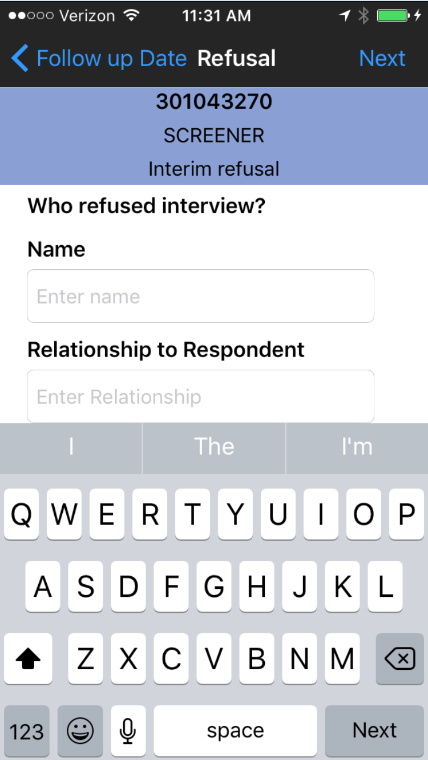
Refusal disposition codes require entry of additional contact refusal information. If a refusal code is selected at the Disposition Code screen, the refusal screens will be presented. Tap the refusal code to select it, and then tap Next to continue.

The Refusal screen asks for the name of the person who refused or broke off the interview, and their relationship to the SP. Tap on the text boxes to bring up the keyboard to enter this information.
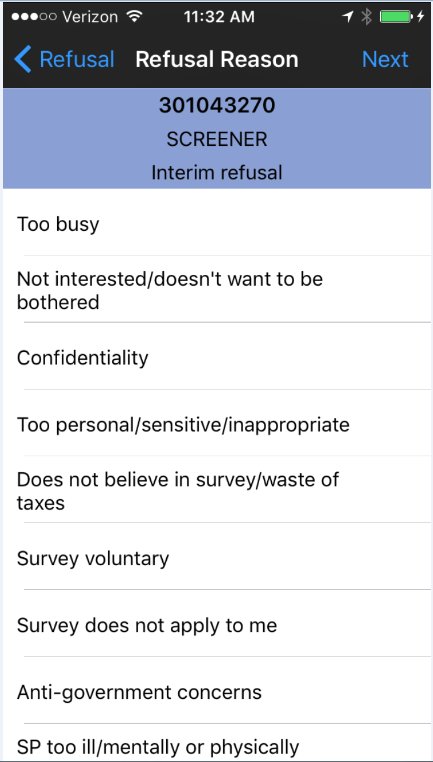
The Refusal Reason Screen asks for the reason for the refusal or breakoff. To select a reason, tap it. To continue, tap Next.
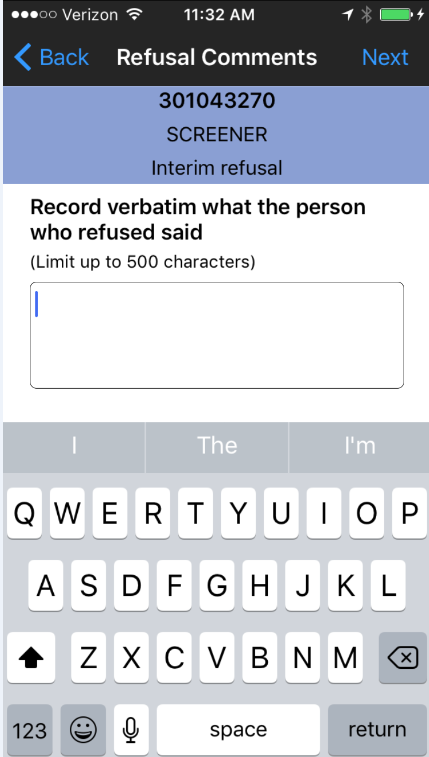
The Comments screen asks you to enter what the person said. Tap the text field and the keyboard will be displayed. You can type or talk text the comments. Tap Next to continue.
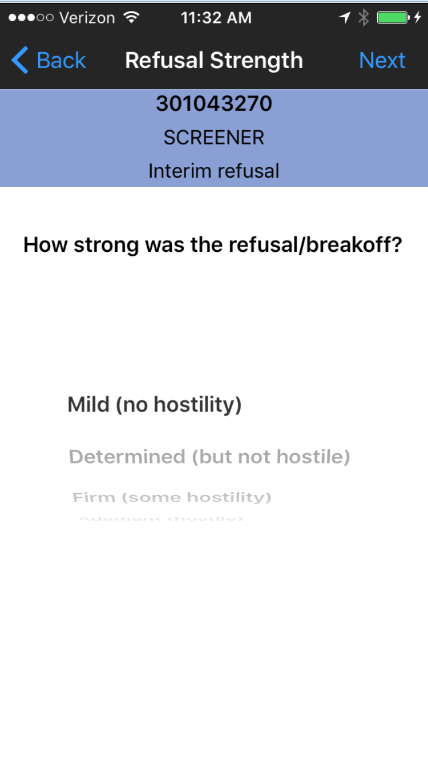
At the Refusal Strength screen, select the appropriate severity of the refusal by tapping on it to highlight. Tap Next to continue.
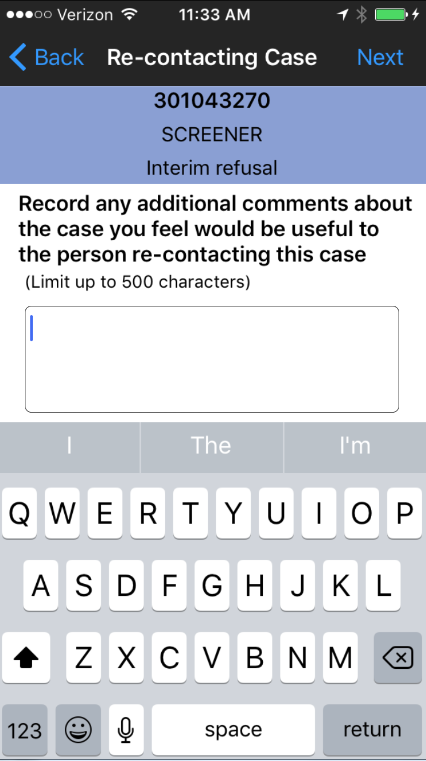
The Additional Comments screen asks for any additional comments about the case that you feel would be useful to the person re-contacting this case. Tap the text field and the keyboard will be displayed. You can type or talk text the comments. Tap Next to continue.
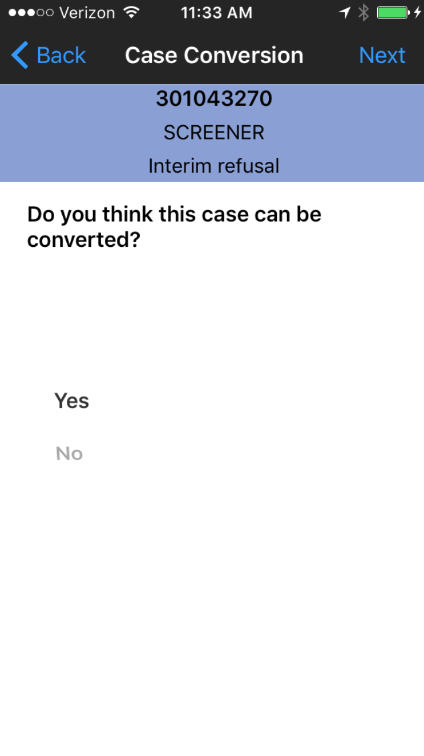
The Case Conversion screen asks whether you think this case can be converted. Select Yes or No by tapping on it to highlight it. Tap Next to continue.
The last screen is the submit EROC screen presented earlier.

5.4 mFOS End of Day Best Practice
Below are a few steps that you should be familiar with and plan to take at theend of each work day.
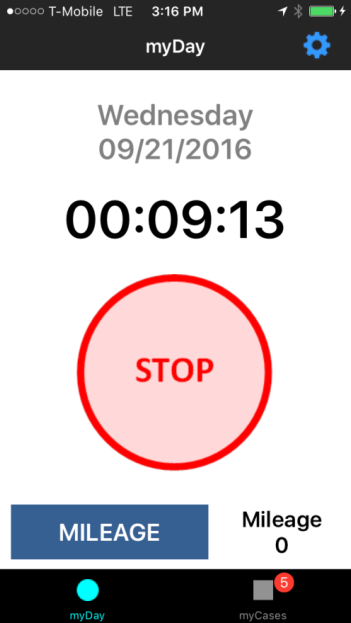
STOP myDay
Go to myDay tab and click STOP button to stop a task. Make sure the button turns green and timer stops counting.


STOP Button
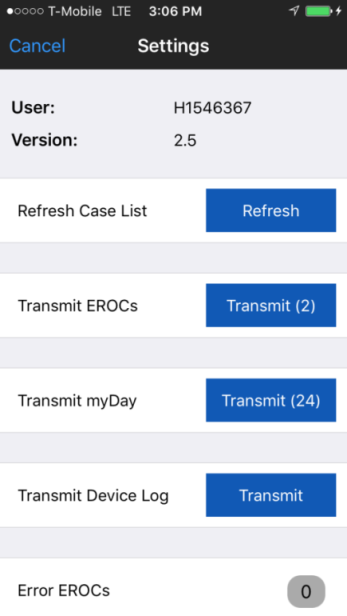
Transmit data from Settings screen
Navigate to the settings menu by tapping the blue gear icon in the top right corner of the myDay or myCases screen

![]()
Transmit EROCs :– Transmit EROCs button shows number of un-synced EROCs on the device. Click on the Transmit button (if count is greater than zero) to transmit EROCs to the server.

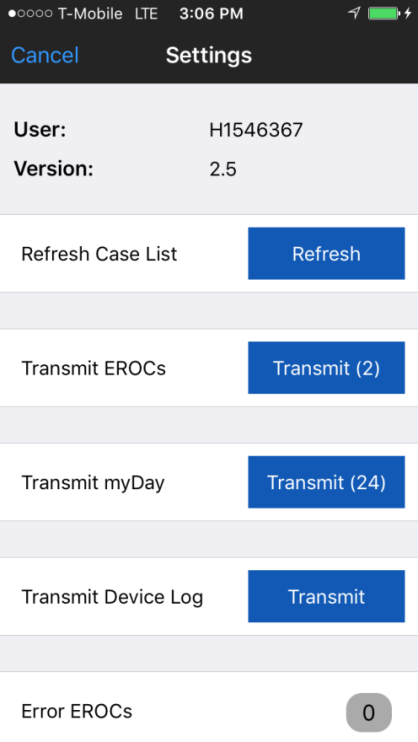
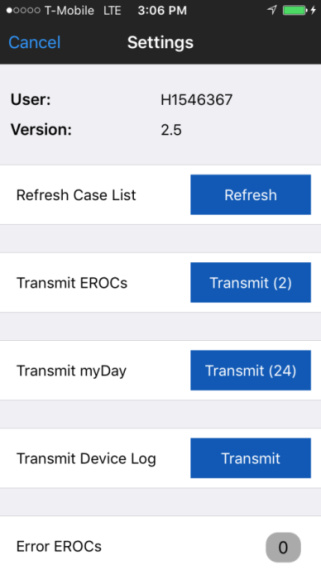
Transmit myDay :- Transmit myDay button shows number of un-synced myDay locations on the device. Click on the Transmit button (if count is greater than zero) to transmit location entries to the server.

Transmit Device Log : – Click on the Transmit button to transmit device log

Kill the app
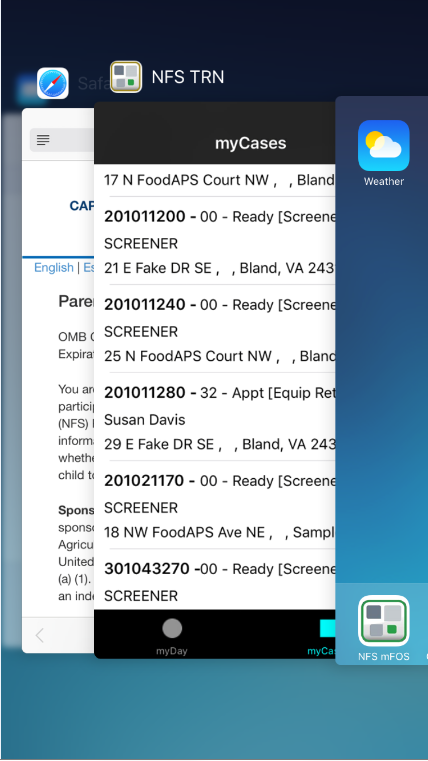
Double click on the Home button

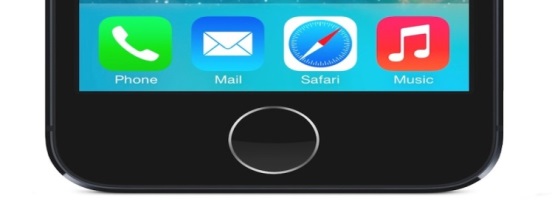


Home button
Find the NFS mFOS App and swipe the App screen up.


NFS mFOS App
![]()
1Note that in some areas, declined calls are disconnected without being sent to voicemail.
|
|
|
|
Attachment H5 – Mobile Device User Guide (Interviewer Training Manual) |
5- |
|
| File Type | application/vnd.openxmlformats-officedocument.wordprocessingml.document |
| Author | Chantell Atere |
| File Modified | 0000-00-00 |
| File Created | 2022-08-06 |
© 2026 OMB.report | Privacy Policy

