Attachment H2 - Contacting Procedures (Interviewer Training Manual)
Attachment H2 - Contacting Procedures (Interviewer Training Manual) 10292021.docx
Field Test for the Second National Household Food Acquisition and Purchase Survey (FoodAPS-2)
Attachment H2 - Contacting Procedures (Interviewer Training Manual)
OMB: 0536-0077
Field Interview Contacting Procedures |
2 |
This chapter describes the procedures you will use for contacting respondents sampled for in-person data collection during various data collection steps and the materials that have been developed to help you, as field interviewers, make contact with the households. It covers an overview of the sampling design, locating households, contacting respondents, field interviewer materials, and disposition codes.
2.1 Overview of Address-based Sampling Design
We will select a nationally representative sample of household addresses in 12 areas across the nation. After accounting for ineligibility, nonresponse, and inability to use technology, we expect to complete the National Food Study (NFS) Field Test component with a total of 430 households.
The in-person screener will collect information on income. This information will be used by the CAPI program to automatically select households for the NFS Field Test. Higher-income households will be selected at a lower rate than other households.
2.2 Advance Letter Mailing
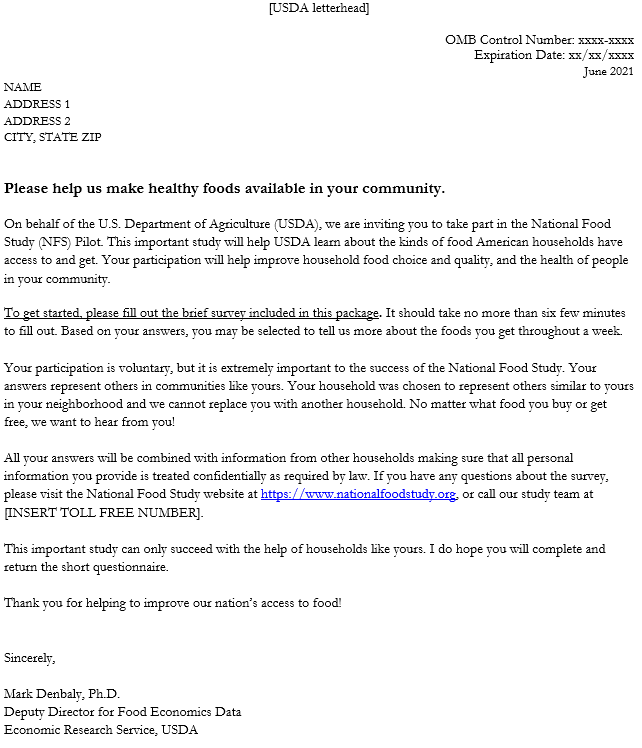
Prior to the initial household visit, sampled households will be sent an advance letter (see Exhibit 2-1 for the template that will be used) inviting them to participate in the study, stating the study’s purpose, and briefly describing the study requirements and incentives. The advance letter contains a sample picture of the interviewer ID badge.
Although most households will receive the advance letter mailing, and many potential participants will have read or heard about the letter by the time we conduct the initial household visit, some may not for a variety of reasons. The following scenarios are always possible: we did not have the correct or complete addresses so the mailing was not delivered by the post office, someone else in the household opened and read the letter, and so forth. Some may throw the mailing away without opening it or may simply forget receiving it.
We have provided you with generic hard copies of the advance letter that will be sent to sampled households, so that you can show it to households when you conduct the initial household visit to help jog their memory about the study. To help the households identify you, be sure to show them your study ID badge and let them know that it matches the sample ID badge picture in the advance letter they received. To gain the respondent’s cooperation, be sure to review the contents of the advance letter mailing beforehand so that you are ready to listen to the respondent’s concerns and are able to address them and explain the purpose of the study.
Exhibit 2-1. NFS Field Test Advance Letter Template

2.3 Case Assignment
Review your cases and develop a plan for completing the assignment efficiently. Before you begin contacting each case assigned to you, sort through your cases geographically so that you know where your cases are and spend as little time as possible driving. Your supervisor will help you cluster your cases. The Interviewer Management System (IMS) allows you to sort your cases electronically by city, ZIP Code, etc. to assist you in clustering your caseload to be cost effective.
Be prepared for the interview. Review your case materials including any EROCs previously entered for your cases. Make sure you have all of the forms, equipment, and supplies you need to conduct the interview before you leave home.
Maintain a schedule of your contact attempts and appointments with your respondents and your supervisor. Keep careful records and track the time you spend on the study and the costs you incur. Your supervisor will review these reports with you during your weekly conference call. Accurate and detailed documentation of miles driven and time spent on the NFS Field Test is a critical part of the interviewing process.
2.3.1 Locating Households
For the majority of your cases, you should be able to locate the household addresses easily. The address information displayed in “Active Cases” in the IMS and “myCases” in mFOS contains the most recent address information from the USPS address file.
You can use the Google Maps app on your iPhone to assist you with directions to the sampled address. When locating an address without an associated name, you could mistakenly locate a different household with a similar address. Therefore, it is very important to verify that you have the correct address prior to conducting the screening interview. This can be done by verifying the exact address either in “Active Cases” in the IMS and “myCases” in mFOS for the specific case ID. If all of the information matches, including the street number, name, secondary address (such as apartment #), city, state, and zip, then you have found the correct address and the interview can proceed.
Some of the cases may be more challenging to locate and will require some additional work. As you proceed with your locating efforts, please keep in mind your responsibility to maintain the confidentiality of NFS Field Test data. Do not disclose any information obtained through data collection to anyone other than those involved in the study without the knowledge and consent of the household member(s). Sharing information with anyone without the household member’s knowledge and consent is a violation of your confidentiality agreement.
2.3.2 Interviewer Observation Form
Once the household has been correctly identified, you will need to complete the Interviewer Observation Form (see Exhibit 2-2) questions prior to approaching the household. You will need to fill out these seven questions based on your observation of the outside environment. A completed observation form should ALWAYS be followed up with an attempt to contact the household. It should never be completed without a contact attempt. We will discuss the interviewer observation questions in more detail in Chapter 4. However, it is important to note here that this will be an important step that needs to be completed after locating the correct address but before making contact with any of the members of the household. For your convenience, the interviewer observation form is accessible on the NFS Field Test mFOS app on your iPhone.
Exhibit 2-2. Interviewer Observations Form
1. DU Type? (select one)
1 unit (such as, detached, single family home) 2+ units (such as, townhouse, rowhouse, duplex, triplex, quad-plex, apartment, condo) Mobile home, trailer or recreational vehicle that is occupied Some other type of residential structure Non-residential/Not a DU |
|
|
2. Is there any indication of a child or children living in the DU? (Please look for evidence indicating the presence of children such as
Yes No Don’t know |
||
3. What is your best guess of the number of people living in the DU? 1-2 3+ Don’t know |
||
4. How many windows are on the front face of the DU? 1-2 3+ Don’t know |
||
5. DU Condition? (using your best guess, choose all that apply) Well kept DU exterior Evidence that it is a rental unit Evidence of vandalism |
|
|
6. DU Property? (using your best guess, choose all that apply) Driveway or parking lot exists for DU Sidewalk exists Good street condition
|
Gated community Evidence of litter
|
|
7. Neighborhood Type? High income Upper middle income |
Middle income Low income |
|
8. Other Notes:
|
|
|
2.3.3 Drop Points
For the NFS, you need to be aware of addresses that the Post Office refers to as drop points. A drop point is the point where the mail gets delivered. Mail for all the units is dropped at one location by the postal worker and is then distributed to the individual units within the building. Examples of drop points include: an apartment building with many apartment units, a single box shared by more than one family, fraternity houses and gated communities where mail for all homes is delivered to a gatehouse.
Within a drop point could be multiple drop units. Drop point refers to the building and drop unit to the units within the building. The individual dwelling units within a drop point address are called drop units. There can be as few as two to as many as 100 or more drop units in a building. Drop units do not each have a unique mailing address because mail is not delivered directly to the unit. However, the front doors or mailboxes of drop units in some buildings may be labeled in some fashion to assist with mail distribution by the building staff.
In order to maintain the integrity of the sample design, when a drop point “base” address is known (without a specific unit number associated), you will have to follow a special procedure in order to add each dwelling unit that you find at the drop point address so that each unit can be given a chance of selection to participate in the study. There will be very few of these addresses in our sample.
2.3.4 Not Available after Multiple Contacts
Some cases may require several contact attempts before you can complete the screener. If you have difficulty finding someone at home, but you know for sure that someone does live at the address, take the following steps:
Attempt contacts at different times of the day (morning, afternoon, or evening);
Attempt contacts on different days of the week;
Attempt contacts on weekends (Saturday and Sunday); and
Talk with neighbors about the best times to reach a household member without divulging much about the study.
You may have to alter your routine interviewing schedule in order to contact respondents who are frequently not at home. If you have not been successful in making an appointment after three contact attempts, discuss the case, and all problem cases, with your supervisor to develop a strategy. Be observant about the household’s property. Is the lawn or garden kept? Are newspapers, mail or local flyers piled up? Is there a car in the driveway? Signs there is a pet inside? Please note any information you observe in your Electronic Record of Contacts (EROCs), which are explained further below in Section 2.6. EROCS tell the story of what you saw. Be thorough and explain what you observe so you and your Supervisor can make decisions about how to work the case.
2.4 Field Interviewer Contact Materials
We have developed a number of field interviewer materials that will assist you in contacting respondents. Familiarize yourself with each of them so that you use them when appropriate.
2.4.1 Study FAQs
When you are successful in reaching an adult in a household, your task is to introduce yourself and the study and to gain their cooperation in completing the screener. In many cases, the introduction is all that you will need, although there will be times when the respondent may have questions before agreeing to complete the screener. Think of it this way-- respondents’ questions indicate they are interested and concerned. Try to view questions as opportunities, not obstacles, and listen for the ‘intent’ of the question. Some tips to keep in mind are as follows:
Listen to the respondent’s questions and answer by providing only the information needed to remove the respondent’s doubts about you or the survey.
Keep your answers brief and to the point. Do not volunteer extra information or unnecessarily lengthy explanations.
Be thoroughly familiar with the purpose and general operations of the survey.
Be familiar with the introductory letter and the study information sheet so that you can point out the written answers as you respond to questions.
A list of Frequently Asked Questions (FAQs) and suggested answers is presented in Appendix A. Review them thoroughly so that you can answer these common questions in your own words. These are also available for study participants to review on the NFS website under the Help tab.
2.4.2 Field Interviewer Scripts
Initial Visit Scripts
Your relationship with the household is a special association that begins with the initial introduction. How you present yourself in the first few minutes of contact with your household respondent is critical. You have a very brief period of time to introduce yourself and state the purpose of your visit. Therefore, it is important to be prepared and effectively use those first few moments to gain the respondent’s cooperation.
Before contacting the household, make sure you review all information and know what to say. Know the introductory contact bullet points and suggested statements well enough to talk freely about the study and the importance of the household’s participation. Avoid memorized or rehearsed introductions that take on an insincere quality. Practice your introductions and be familiar with brief answers to common questions asked about the study.
Your knowledge and excitement about the study are important factors in gaining cooperation. Your opportunity to present the study positively is brief. Know the importance of the NFS, be prepared for questions, listen to the respondent, and smile.
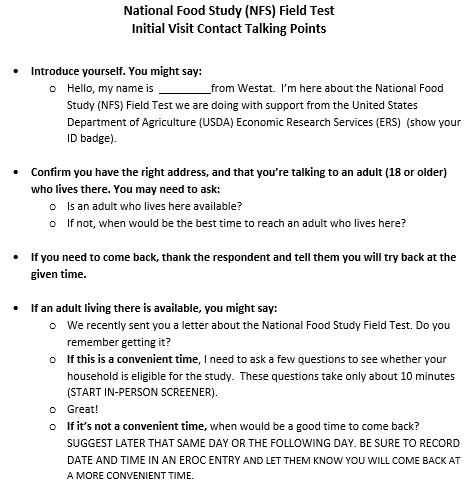
The NFS Field Test Initial Visit Contact Talking Points document (Exhibit 2-5) is for you to use for making initial study contact. Use the appropriate talking points in the script to introduce yourself and the study. The script is to help guide your contact approach. You are not expected to read each suggested item verbatim, but your introduction should include the basic information addressed in the script and must be presented professionally. Some key points in the script that should be emphasized are the need to ensure the person who serves as your screener respondent is a member of the household and at least 18 years old. Be prepared to provide additional information “sound bites” about the study to answer any questions a respondent may have.
Exhibit 2-3. NFS Field Test Initial Visit Contact Talking Points

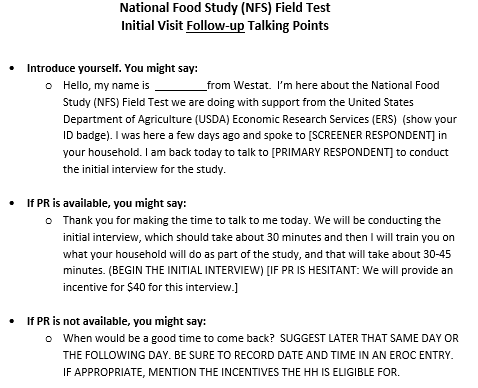
Exhibit 2-4. NFS Initial Visit
Follow-Up Contact Talking Points 
 nce
the household completes the screener interview, is found to be
eligible, agrees to participate in the NFS Field Test and has signed
the consent form (discussed further in Chapter 4), you will conduct
the initial interview with the primary respondent. The primary
respondent is identified at the very beginning of the initial
interview. The primary respondent is the person in the household who
is responsible for most of the grocery shopping and meal preparation.
If you find that household members share grocery shopping and meal
preparation responsibilities equally, and one of them is the screener
respondent, administer the initial interview to the screener
respondent. In most households the screener respondent will also be
the primary respondent. If the screener respondent is not identified
as the primary respondent, you will need to find out when the primary
respondent will be available and, if not available right then,
schedule an appointment to come back to complete the initial
interview with that individual before you leave the residence.
Sometimes you may need to contact this individual by phone to
schedule a time to come back and complete the interview. If it is
determined that you need to come back at another time to conduct the
initial interview, refer to the Initial Visit Follow-Up Script
(exhibit 2-6) for tips on what to say when you return to the
household to conduct the initial interview and Food Log training.
Final Visit Script
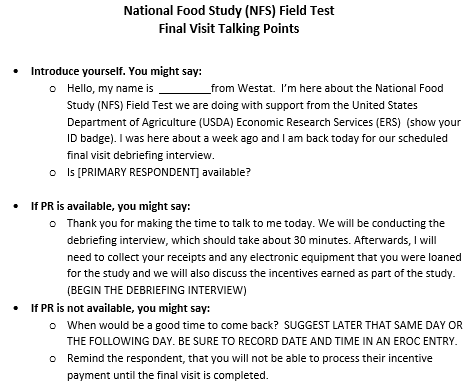
Before you leave the household during the initial visit, you will ask the household for a good time to come back for the final visit, which will need to be scheduled for seven days after the start of the their food log participation. Remind them that the final visit will consist of a debriefing interview with the primary respondent, collection of any Westat equipment, and a review of the total incentive earned by the household. When you return to the household for the final visit, you should remind the household who you are and why you are back. Again, you will need to make sure your badge is displayed and visible, especially if someone other than who was recruited originally for the study answers the door. Some tips on contact points for the final visit are outlined in Exhibit 2-7.
Exhibit 2-5. NFS Field Test Final Visit Contact Talking Points

2.4.3 NFS Field Test Identification Badge
You should always have your badge displayed on your clothing and easily visible. Remember, the advance letter that was mailed included an image of a sample ID badge so they will be looking for this to ensure that you are who we said you are. You should always have a generic hard copy of the advance letter that was mailed handy and you should refer to it when making initial contact with the household to help them recall the study and receiving the letter.
2.5 Interim and Final Disposition Codes
Response rate, simply defined, is the number of completed interviews divided by the number of eligible respondents in the sample. In general, a higher response rate suggests that more confidence can be placed in the study’s results. For a list study sample such as NFS Field Test, nonresponse can be due to failure to obtain cooperation or a failure to locate selected sample addresses. The main way response rates are tracked for this study is through disposition codes that you or the system enters to document the results of your contact with each household. For every contact attempt, you will enter a disposition code through an EROC entry.
There are two types of disposition codes: interim and final.
2.5.1 Interim Disposition Codes
Interim disposition codes describe the working status of any case that has not been made final, such as call back, appointments, an initial refusal, or a language problem. A case may be given several different or the same interim codes during the data collection period, but it can have only one disposition code at a time. We use the word “disposition” to mean the status or situation for the case at a given time. Some codes are assigned automatically by the system and some are assigned by you. More details about the codes will be explored during the classroom training.
2.5.2 Final Disposition Codes
Final disposition codes describe the ultimate status of any case that has either been worked to completion or been determined to be ineligible or not viable, such as completed interviews, final refusals, or final unable to locate. Certain final codes will be automatically assigned to a case through the IMS by CAPI; others will be assigned by your Field Supervisor. For the most part, you will not be responsible for using the final disposition codes.
2.6 Overview of Electronic Record of Contacts (EROCs)
All in-person visits, including the initial and final visit for each household, any telephone calls received or made, and all other efforts to gather information about a case must be entered on the electronic record of contact (EROC). The EROC is the only mechanism for communicating individual case progress and status to your supervisor and the Westat Home Office. It is important that you complete EROCs for every attempt you make to complete an interview. In addition to the IMS EROC entries, you can also enter EROCs through the mFOS application. EROCs can be launched and completed at each task level; therefore, if you complete an EROC at screener task level, we will know that the information you provide in that EROC is associated with the screener task level.
There may be certain parts of the country where you are visiting to recruit a household where the cell service in the area is not sufficient and you are unable to access the EROC through your iPhone due to poor cellular service. If you are unable to access the IMS or mFOS due to poor cellular service or internet connectivity issues, you should record important information regarding your contact efforts, such as the date, time, day of week, name of person you contacted, and the disposition code in the notes App on your iPhone. Once you are able to, you will need to input the information from the notes into an EROC.
|
|
|
|
NFS Field Test Procedures Manual |
2- |
|
| File Type | application/vnd.openxmlformats-officedocument.wordprocessingml.document |
| Author | Erika Bonilla |
| File Modified | 0000-00-00 |
| File Created | 2022-03-29 |
© 2026 OMB.report | Privacy Policy