ORR Application Manual
ORR Application Manual.doc
Refugee Data Submission Sytstem for Formual Funds Allocations
ORR Application Manual
OMB: 0970-0043
Refugee Arrivals Data System Final
![]()
R efugee
Arrivals Data System
efugee
Arrivals Data System
Office of Refugee Resettlement Data Submission website

Prepared For:
Office of Refugee Resettlement
Administration for Children and Families
U.S. Department of Health & Human Services
Aerospace Building
901 D Street, SW
W

![]()
August 2015
Table of Contents
1.1. Overview of ORR-DSW Process 1
2. ORR-DSW Site Registration 2
2.2. ORR-DSW Site Registration 3
3.1. ORR-DSW Notice to Users 5
4.3. ORR-DSW Upload History Page 12
1.Introduction
The Office of Refugee Resettlement - Data Submission Website (ORR-DSW) upgrades the process in which Asylee, Entrant, and Social Services Secondary Migration data are submitted. The application will allow uploads directly to the ORR-DSW which will store the data from each file. Utilizing this system of submission will allow instant feedback on uploaded data as ORR-DSW validates each submission upon upload. Feedback is provided within minutes of submission whether data is accepted or rejected and the reason(s) for rejection if data fails validation.
Each state will assign two representatives to log into the ORR-DSW system. From the main upload screen the state representative will choose the type of file to upload. Once the file has been selected, upload the file by clicking the “Upload” button. The ORR-DSW will check the file against a predefined set of validation definitions to make sure that the file meets the requirements needed to be successfully uploaded into the ORR-DSW system. If the file passes validation, the Upload History section of the ORR-DSW will be updated to reflect the successful submission. An e-mail confirming the successful submission and upload will be sent to the users. When a file fails to pass validation an e-mail will be sent asking the user to check the ORR-DSW website for the reason(s) why the file did not pass validation. The Upload History table is updated to reflect the failed upload attempt and will display an option to open an errors report screen. The errors report screen will consist of a table listing the reason(s) why the file could not pass validation. The user must then go back to the file and correct any errors that have been pointed out. Please note that the ORR-DSW system will only display up to 200 errors on the Errors Report Screen. The file may have more than 200 errors but only the first 200 will be displayed. Once the errors have been corrected, re-upload the corrected file and the same process will occur.
1.1.Overview of ORR-DSW Process
Site Registration: An e-mail will be sent with a link to the ORR-DSW website where the registration process will begin.
Logging on to the System: Once you have registered to use the ORR-DSW system you will then log on to the ORR-DSW system.
File Upload: After you have logged on to ORR-DSW, you will then proceed to upload your Asylee, Entrant, and Social Services Secondary Migration files.
File Validation/Review: After you upload your files, the ORR-DSW will validate the files and the files will either pass or fail.
Error Correction: If you have any files that failed validation, you must correct the errors and re-upload the file.
Reporting: After matching has been performed on uploaded files, you will be able to view and print reports.
2.ORR-DSW Site Registration
Before logging onto the ORR-DSW system, you must first register to gain access to the system.
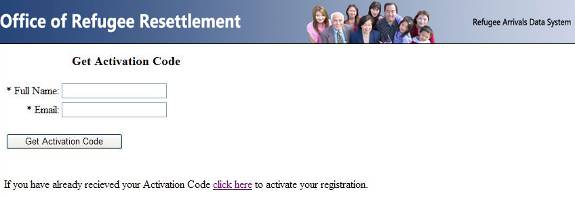
2.1.Activation Code
An e-mail will be sent to you that provides a link to a webpage that will ask you to enter and submit your name and e-mail address in order to receive an activation code that will allow you to register to use the ORR-DSW web site. The activation code is part of the registration process as an added security measure. You will not be able to register for ORR-DSW access without the activation code.
ORR-DSW
Activation Code Screen
Enter your name.
Enter your e-mail address in the text box and click the “Get Activation Code” button.
The activation code will be sent to your e-mail address immediately and you will have approximately one hour to register for the site before the activation code expires.
If you do not register for ORR-DSW access within one hour of receiving your activation code you will need to re-submit your e-mail address for a new activation code
After you have received the Activation Code, please return to same address above and click on the link under the “Get Activation Code” button to open the ORR-DSW registration page or simply click the link in the get activation code e-mail.
-
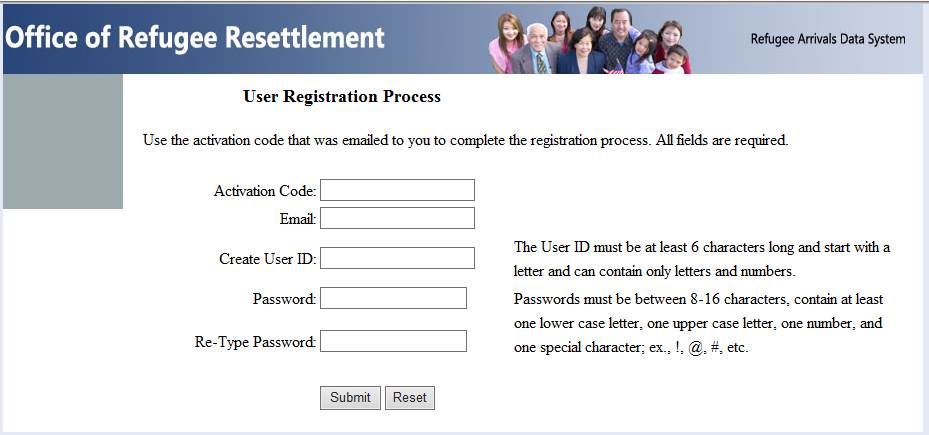
2.2.ORR-DSW Site Registration
The registration page will prompt for the activation code as well as other user info to activate your registration.
ORR-DSW
Registration Page
Enter the activation code in the Activation Code text box
Enter your e-mail address
Create a user name and enter the user name in the Create User ID text box
User names must be at least six (6) characters
User names can NOT contain any special character (!, @, $, _, etc.)
Create a password and enter and confirm the password in the Password text box
Passwords must be between 8-16 characters, contain at least one lower case letter, one upper case letter, one number, and one special character; ex., !, @, #, etc.
An example of a password using all requirements: P@ssw0rd
Click on the Submit button to finish the registration process
When you click the Submit button you will be registered and will be taken to the ORR-DSW Notice to Users and Login page.
3.Logging in to the System
After you have registered for access to the ORR-DSW system, you will then be required to log in to the system.
3.1.ORR-DSW Notice to Users
When you return to the site after you have registered, you will need to navigate to https://orr.gdit.com in your web browser. Going to this link will take you to the ORR-DSW Notice to Users and Log In page. Going to this link before you register will still take you to the same page, but you will not be able to log into the system as you have not registered and created a user name and password. Please read the ORR-DSW Notice to Users before logging into the system.
3.2.ORR-DSW Log In Page
After you have read the ORR-DSW Notice to Users, log in to ORR-DSW.
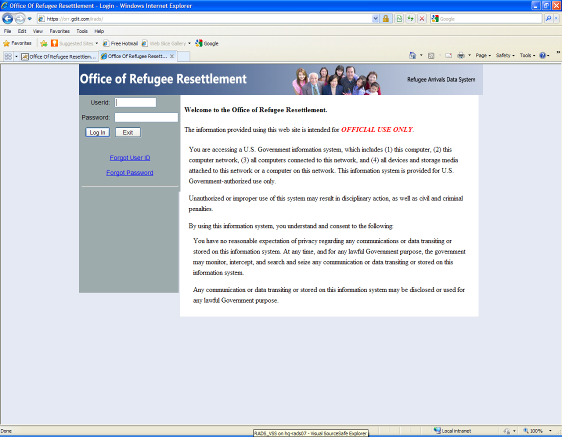
ORR-DSW
Log On Screen
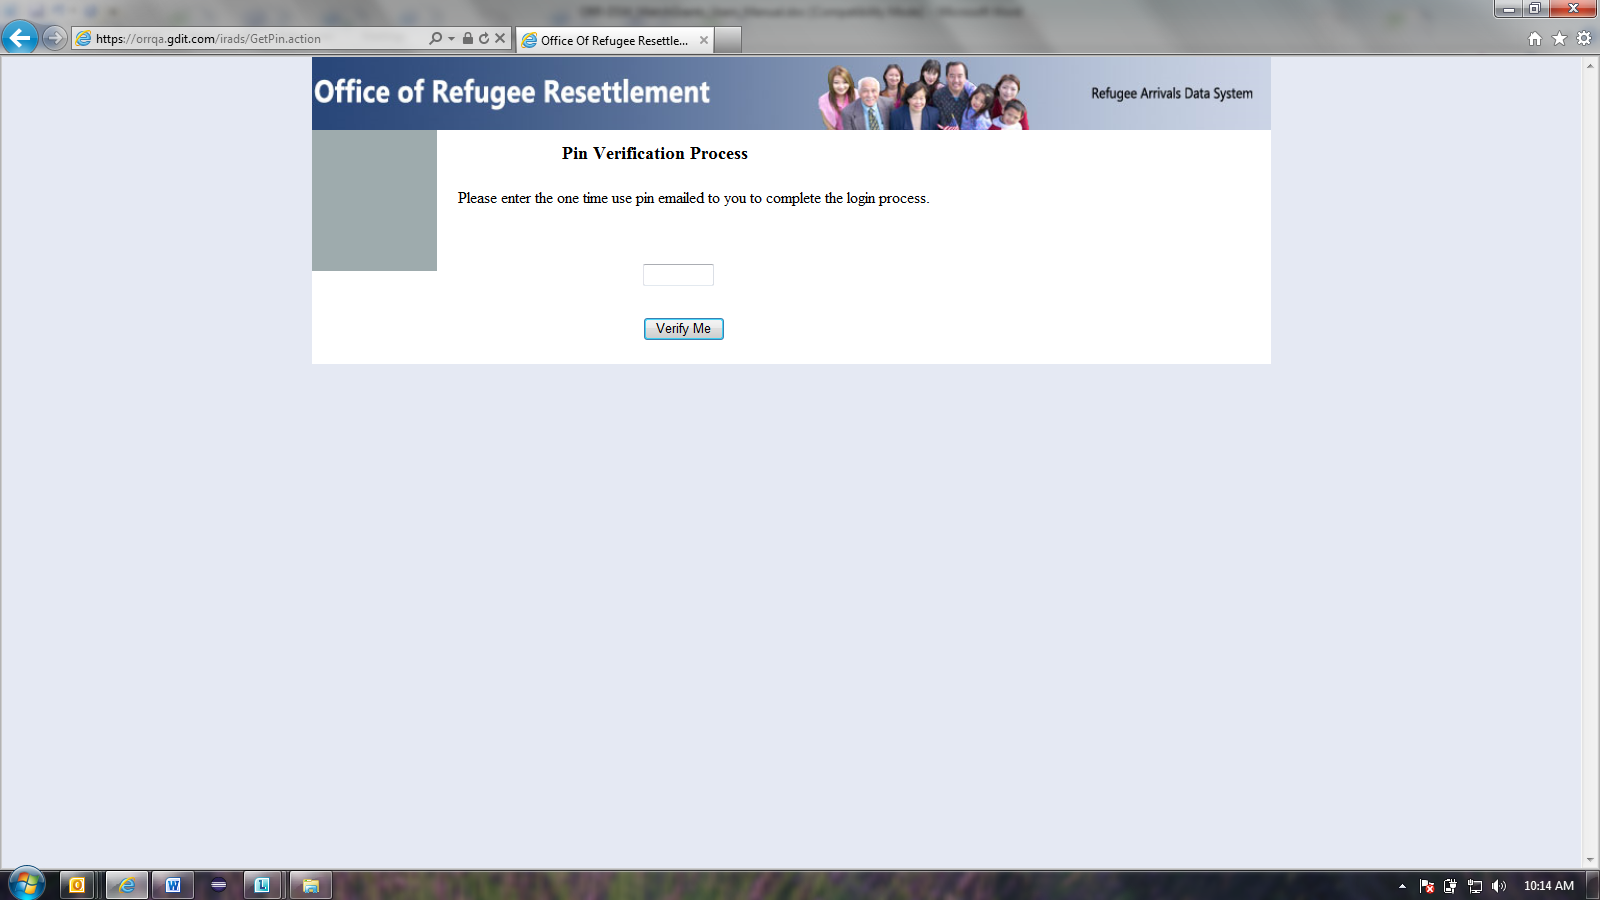
When the log on screen loads, enter the username and password that you created in the registration process. Click the Log In button, the ORR-DSW Pin Verification Process screen will load. The Pin Verification Process is a required security measure that is needed to log into iRADS.
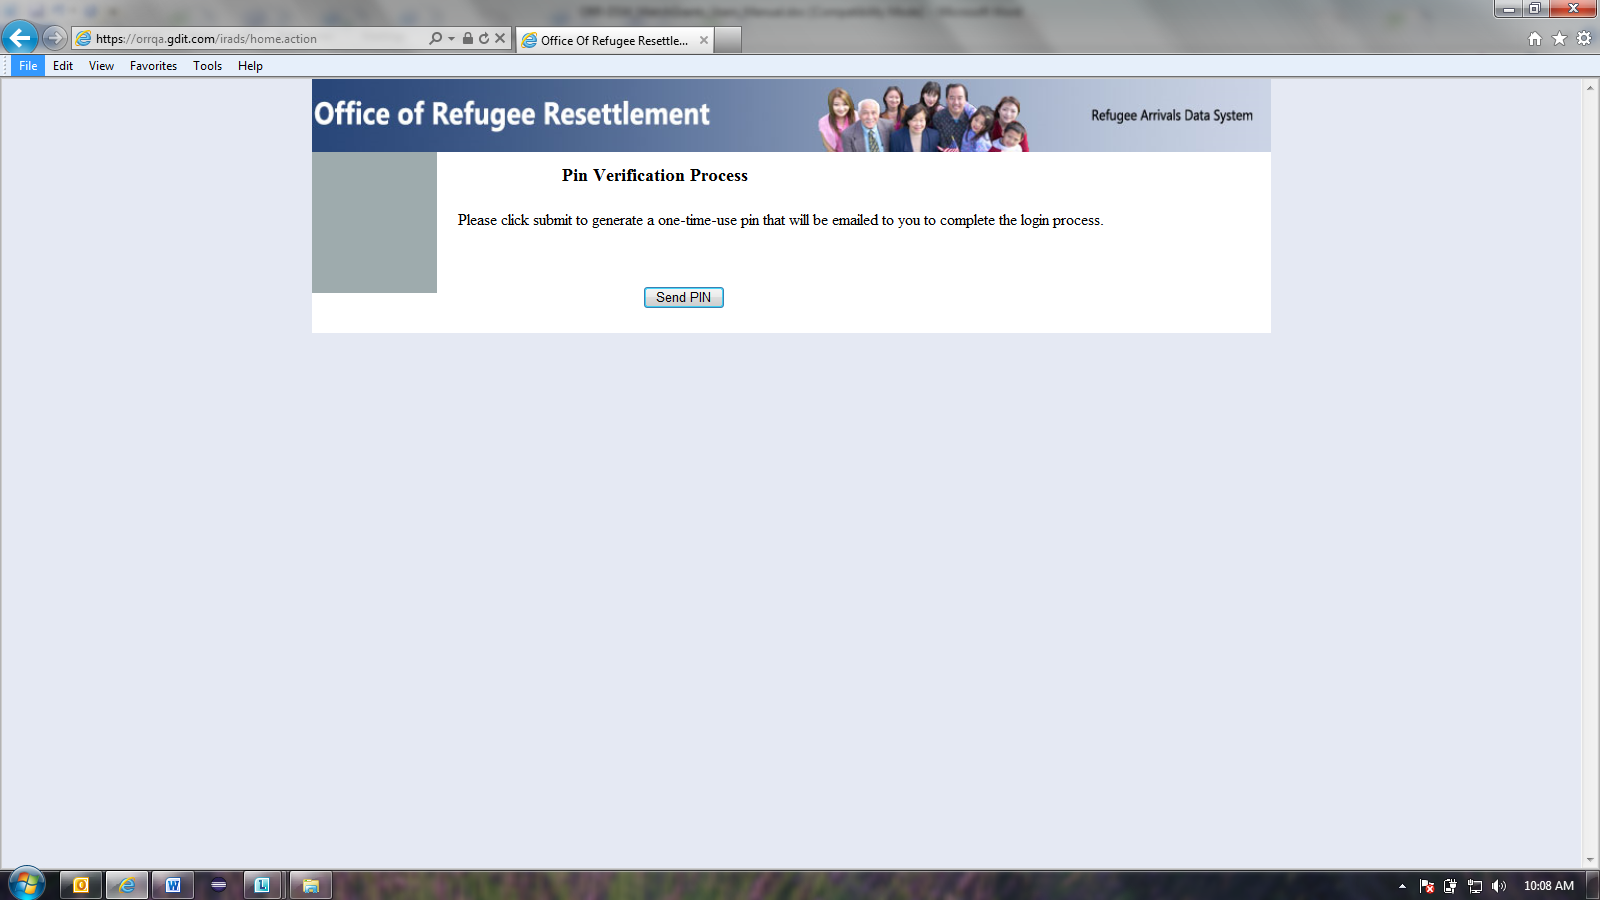
Pin
Verification Process screen
On the ORR-DWS Pin Verification Process screen, click on the “Send PIN” button. A one-time use PIN will be sent to the email account that you entered when you registered with the site. After clicking the “Send PIN” button, a new screen will load where you must enter the PIN that was sent to your email account.
PIN
Verification Entry Screen
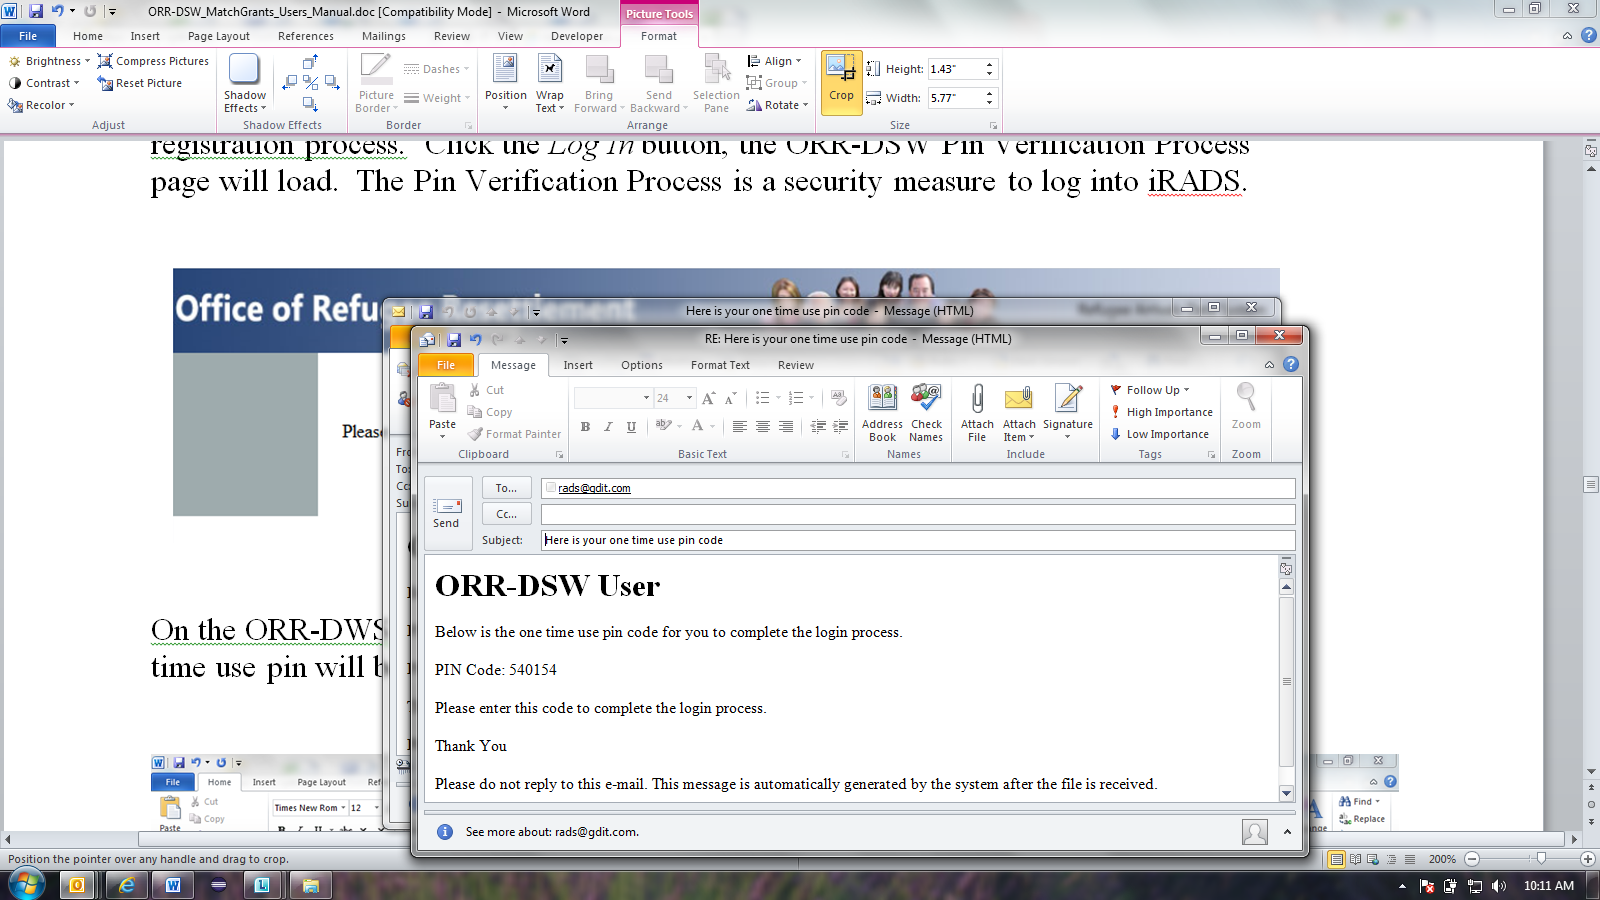
PIN
Verification Email
You can either copy and paste the PIN Code from the email or manually enter the PIN Code on the PIN Verification Entry Screen. Once you enter the code, click the Verify Me button and the ORR-DSW Home Page will load. If you incorrectly enter the PIN Code, you will have one more attempt to correctly enter the PIN Code. If you incorrectly enter the PIN Code a second time, you will be taken to the ORR-DSW login screen and you must restart the log in process.
If you forget your UserID or Password, click the appropriate link under the Log In button to take you to the pages to retrieve your UserID or to reset your Password.
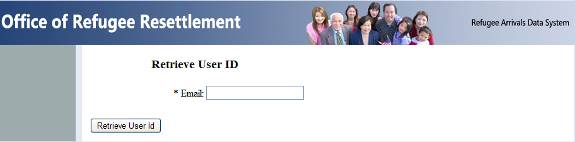
Retrieve User ID Page
To retrieve your user-id, enter your e-mail address and click the Retrieve User ID button and the user-id will be sent.
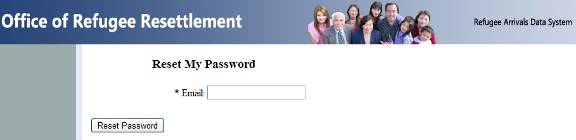
Reset
Password Page
To reset your password, enter your e-mail address and click the Reset Password button. A temporary password will be sent. Upon subsequent logon, you will be required to change the password immediately.
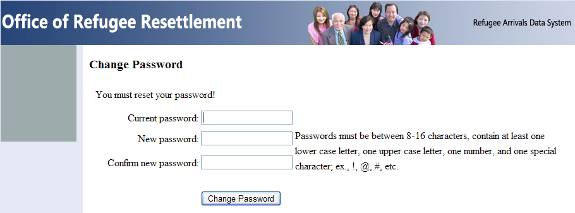
Specify New Password Page
3.3.ORR-DSW Home Page
The ORR-DSW Home Page acts as a portal to the rest of the ORR-DSW site. From the ORR-DSW Home Page you can navigate to the:
File Upload page – users can upload Asylee, Entrant, and Social Services Secondary Migration files
Upload History page - (hover the mouse pointer over File Upload and a drop down menu will display a link to the Upload History page) where users can check the history of their uploaded files as well as the status of each individual file
Account Profile Page – Users can update passwords
Reports – View a set of reports based on the matching results of the data that you upload. (Note: Reports menu selection will not be visible until matching process has been performed.)

ORR-DSW
Home Page
3.4.Account Profile Page
The Account Profile page allows you to change your password.
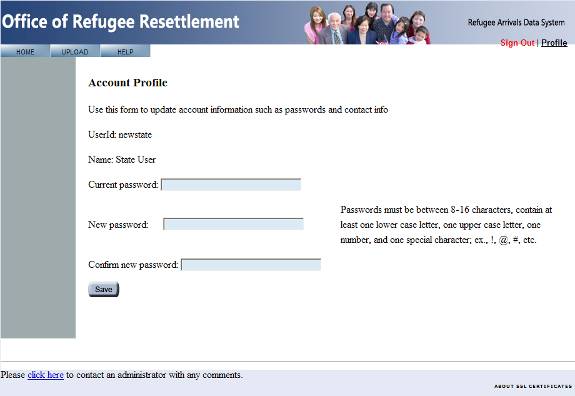
Account
Profile Screen
Enter your current password in the Current Password text box
Enter your new desired password in the New Password and Confirm New Password text boxes
Click the Save button to complete the update process
4.ORR-DSW File Upload
Select the ORR-DSW File Upload tab to open the ORR-DSW File Upload main screen.
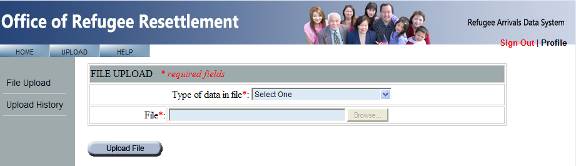
ORR-DSW
File Upload Screen
4.1.Uploading Files
First select the type of file you want to upload from the drop down selection provided for you:
Asylee - Social Service (SS)
Asylee - Targeted Assistance (TAG)
Entrant
Social Services Secondary Migration
Click the Browse button to look for the file you want to upload to ORR-DSW, a Browse Window will open.
Once you have found the file in the Browse Window select the file and click the Open button.
ORR-DSW will display the file path and name in the text box.
Click the Upload button.
ORR-DSW will upload the file and ask you to Continue Validation.
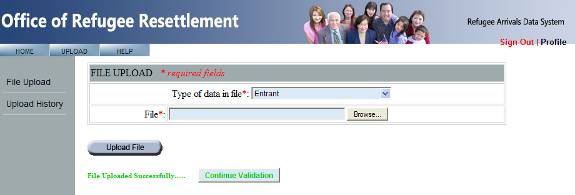 Continue
Validation
Continue
Validation
Click on the Continue Validation button and you will be taken to a Validation page where the validation process is started.
Validating Page
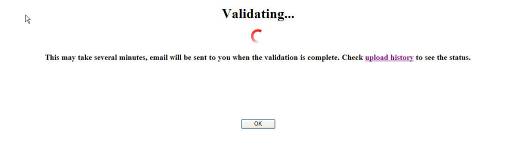
Validation Page
Click the OK button on the Validation page to go back to the File Upload page.
If for any reason you need to re-upload a file that you have already successfully uploaded, proceed to upload the file as if it were a new file. A window will pop up and ask if you want to overwrite the previously uploaded file. Click on the Yes button to upload the new file or click on the No button to cancel the process.
4.2.Validation Process
After a file is uploaded it will be validated against a predefined set of rules. If the file successfully passes validation there will not be any further action required. If the file fails to pass validation you will be required to correct whatever issues did not pass validation and re-upload the file after the corrections have been made.
4.3.ORR-DSW Upload History Page
Hover over the ORR-DSW File Upload tab and click on Upload History menu item to open the Upload History Page.
ORR-DSW keeps a history of every file you upload and/or overwrite. You cannot upload more than one type of file at the same time. For instance, you can only successfully upload one Asylee Social Services file.
ORR-DSW
File Upload History Page
A failed upload automatically results in the file being removed from the system and you can upload a new file without needing to do anything to the failed file.
The following is a break down of each column in the File Upload History Table:
File Name – displays the name of the file that has been uploaded.
Upload Date – displays the date and time the file was uploaded.
Uploaded By – displays the name of the user who uploaded the file.
File Type – displays the type of file that has been uploaded.
Status – displays the status of the uploaded file.
“Validating” means that the file has been received and is in the process of validation
“Success” means that the file has been received and has passed validation
“Failed” means that the file has been received and has not passed validation. You will need to click on the “Failed” link to view the reason(s) the file did not pass validation, make the necessary changes to the file, and re-upload the file.
When you click on the “Failed” link a new page with the Error Summary will open
The Error Summary will display a line by line account for the reason(s) the file did not pass validation, not to exceed 200 errors
“Overwrite” means that the first file uploaded successfully passed validation but a new or updated file has been uploaded and overwritten the previously submitted file.
“Uploaded” means that the file has been uploaded to the system but has not yet been validated. Click the “Validate” button under the “Uploaded” status to proceed with file validation.
Rows Processed – the number of rows in the file that were processed for validation
Once again, if you upload an updated version of a file that has already successfully passed validation, proceed to upload the file as if it were a new file. A new window will pop up and ask if you want to overwrite the previously uploaded file. Click on the Yes button to upload the new file or click on the No button to cancel the process.
5.ORR-DSW Error Summary/Correction
The Error Summary page opens when you click on the Status link of a failed file upload:
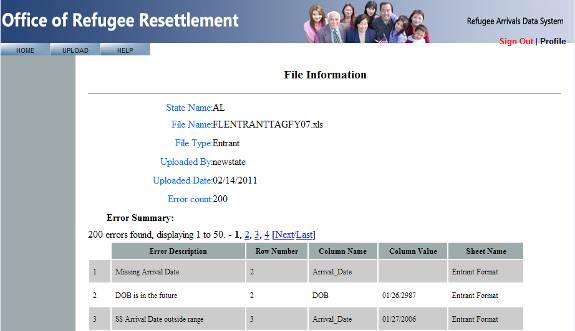
ORR-DSW
Error Screen
The Error Summary is a table consisting of a line by line account for the reason(s) the file did not pass validation:
Error Description: displays a brief description about the error
Row Number: displays the row number in which the error is located
Column Name: displays the name of the column in which the error is located unadulterated
Column Value: displays the incorrect value that is currently not passing validation
Sheet Name: displays the Excel sheet name on which the error is located
The Error Screen will not show more than 200 errors. There may be more than 200 errors on the file but only the first 200 will be displayed on the Error Screen. The error summary can also be downloaded in Excel if desired.
6.ORR-DSW Reports
You can view the matching results of the data that you uploaded in report format.
***NOTE TO USERS – REPORTING FUNCTIONALITY WILL NOT BE AVAILABLE UNTIL AFTER THE MATCHING IS COMPLETE***
Select a file format to view the report in. All formats contain the same data but are displayed differently:
HTML
Microsoft Excel
PDF
Rich Text Format
A list of reports is displayed for the corresponding fiscal year. Clicking on the link of the report name will open the report in the web browser.
Social Services Secondary Migration, Migration results
Social Services Secondary Migration Detail
State Entrant Submissions – Summary
State Entrant Submissions – Detailed
Social Services State Asylee Submissions – Detailed
Social Services State Asylee Submissions – Summary
Targeted Assistance State Asylee Submissions– Detailed
Targeted Assistance State Asylee Submissions – Summary
When opening a report in either the Rich Text Format or Microsoft Excel formats, a pop-up will ask the user to either Open or Save the file.
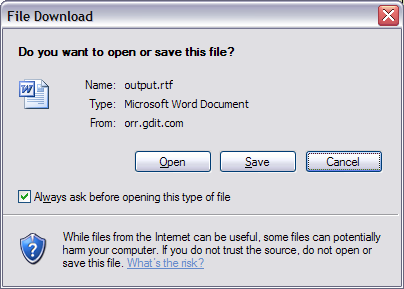
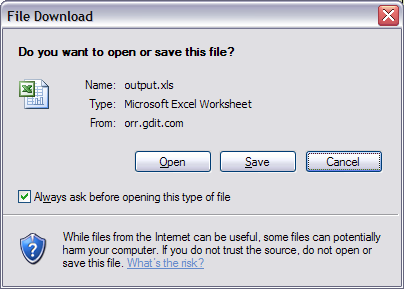
Click on the Open button to open the report on your screen, or click on the Save button to save the report to your hard drive.
You can also save reports once they are open by going clicking on the File menu and choosing Save As.
| File Type | application/msword |
| File Title | ORR Application Manual |
| Author | CIS Dept. |
| Last Modified By | DHHS |
| File Modified | 2015-08-27 |
| File Created | 2015-08-26 |
© 2026 OMB.report | Privacy Policy