2 nclrp-continuation-online-application-user-guide
NURSE Corps Loan Repayment Program
nclrp-continuation-online-application-user-guide
NURSE Corps LRP Application
OMB: 0915-0140
Bureau
of Health Workforce
NCLRP
Online Continuation Application User Guide


|
Table of Contents |
|
|
||
|
||
|
||
|
||
|
||
|
||
|
||
|
||
|
||
|
||
|
||
|
||
|
||
|
||
|
Introduction: NCLRP Online Application User Guide
Purpose: The Nurse Corps Loan Repayment Program (NCLRP) Continuation Online Application user guide serves as the main tool for the Customer Care Center to answer application questions regarding issues participants have when calling for resolution. In addition to this user guide, the Customer Care Center Analysts must be familiar with the NCLRP Continuation Application Guidance, as some of the questions will be program based and are not discussed in this user guide. The primary intent for this user guide is to focus on the functionality developed for the NCLRP Online Continuation Application.
Roles: The application will be filled out by external users. The Customer Care Center Analysts need to understand the functionality to support external users should they encounter any problems with the application.
Precondition: Participant has a question regarding the NCLRP Online Continuation Application and contacts the Customer Care Center for help to resolve an issue. Participant currently:
Has an Obligation End Date (OED) within the range set by Program for the current cycle
Has a participant status of “Active-on-Duty”
Falls into is the current date or in the past
Has not applied for a Continuation within the same Fiscal Year (FY)
The BHW Portal allows participants to navigate to the NCLRP Continuation application. Note: Participant will skip this page if he/she links directly from the HRSA website.

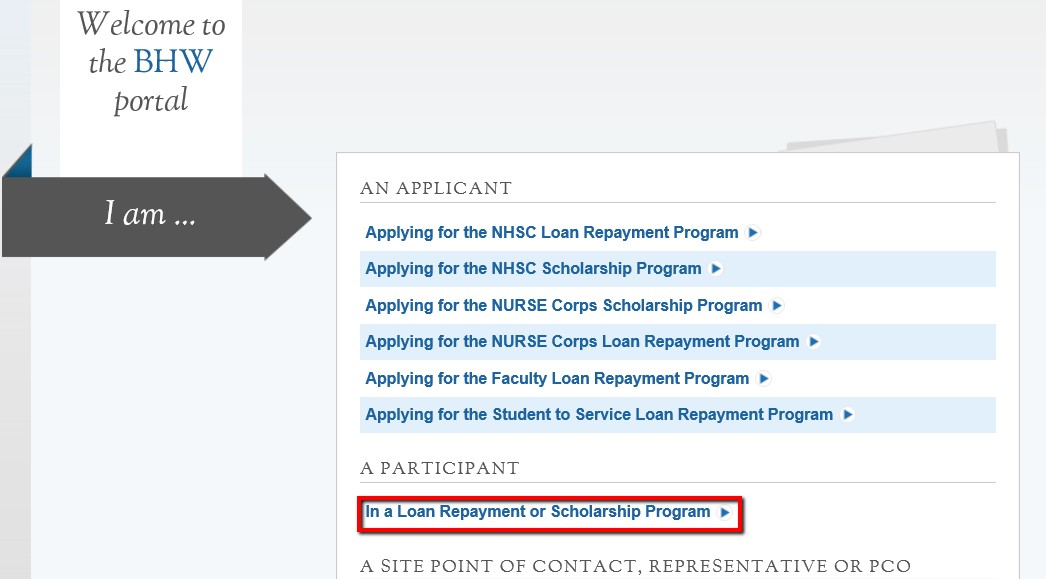
Steps:
Participant selects “In Loan Repayment or Scholarship Program.”
System displays log in page (see Section 2 and 3).
Participant can log in and begin his/her portal account.
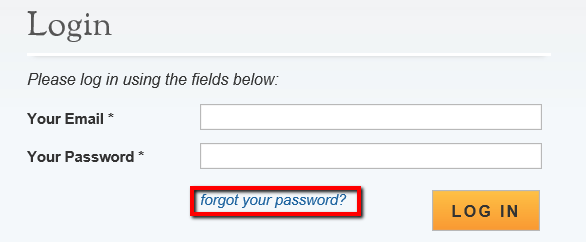
The participant will be able to log in using their existing portal account. The participant will enter his/her email address and password used in creating his/her account. If the participant forgets his/her password, they can reset his/her password by selecting the “Forgot your password?” link. If the participant does not have a portal account he/she will have to “Create an Account.” See section 3.
Steps:

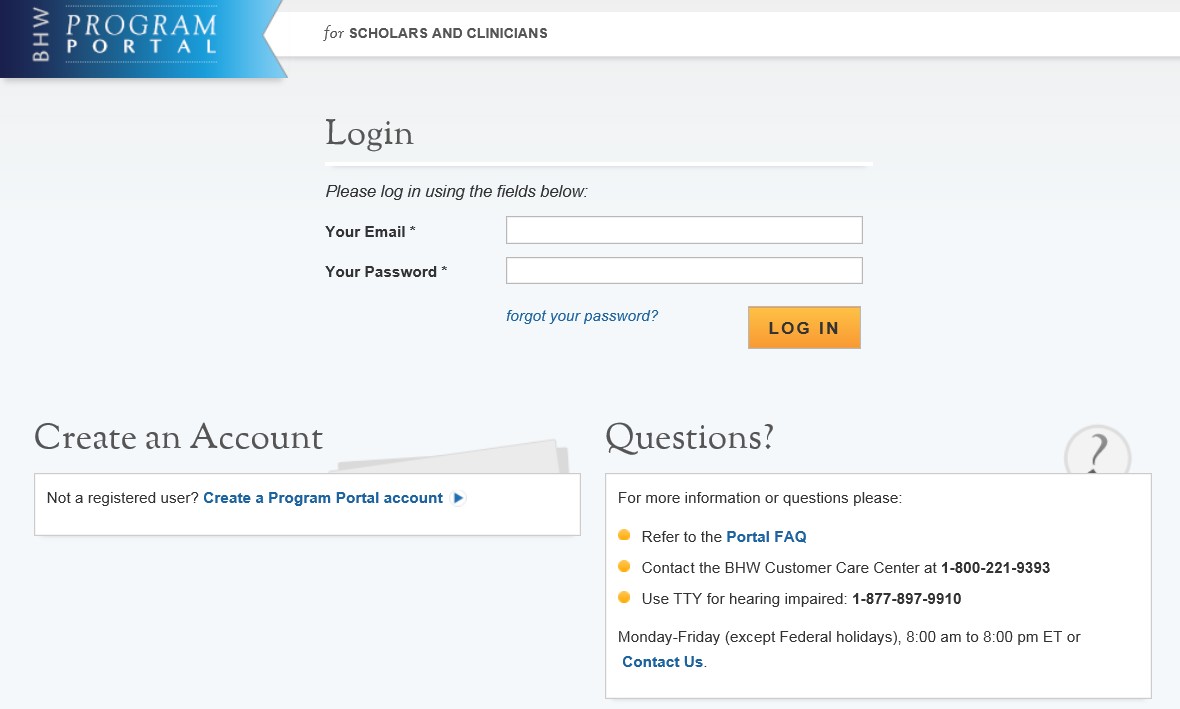
Participant enters his/her email address and password.
Participant selects Login and the system brings him her to the Not Started Home page.
Business Rules:
The participant will be warned after his/her second failed log in attempt
The participant’s account will be locked after the third failed log in attempt.
The participant can select “Forgot your password?” to reset his/her account, or;
Contact the Customer Care Center to have his/her account unlocked
If the participant does not have an existing account to apply for a continuation contract through the NCLRP Online Continuation Application he/she will have to create an account.
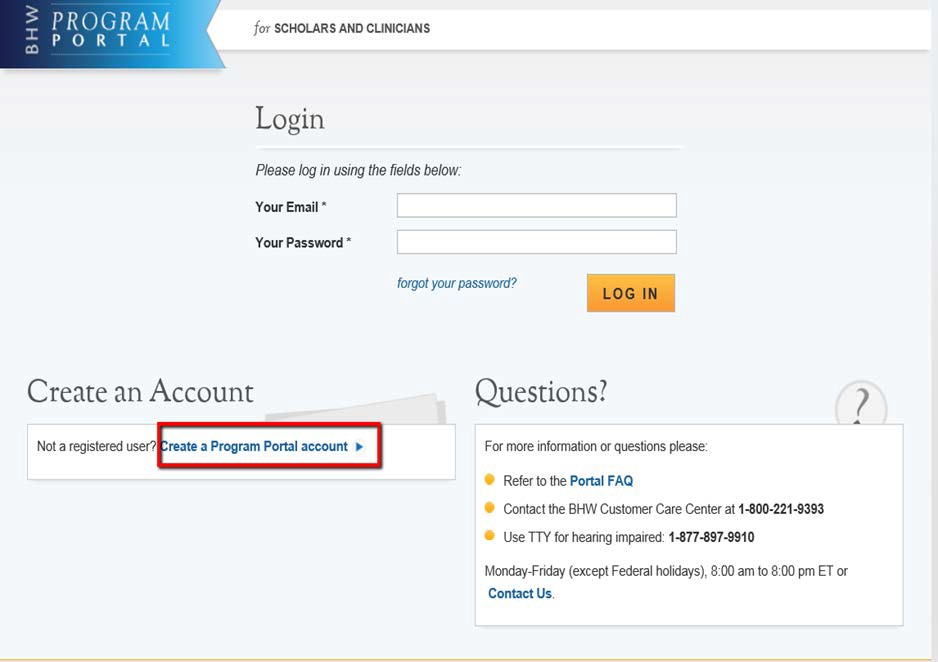
 Steps:
Participant navigates to the Online Continuation Application via the weblink: https://programportal.hrsa.gov/extranet/participant/login.seam
Participant selects the “Create an Account” link in the bottom left hand section of the page (see red box).
Business Rules:
System shall allow user with existing portal account from past cycle (including other programs) to login with the existing login information.
System shall require current NCLRP participants to login in with their portal account to apply for NCLRP Continuation application.
The participant will be prompted to fill in a series of fields in order to create an account. Once the participant selects “Create,” the system will send an activation email to the address used to create the account. The instructions for the participant are detailed in the email.
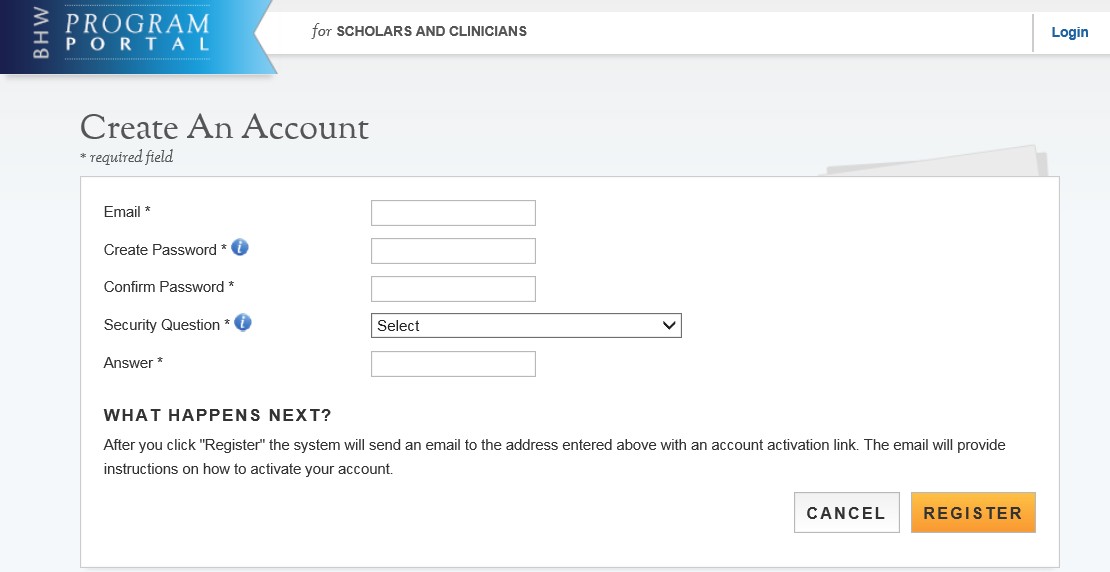
 Steps:
Participant answers each of the required fields.
Participant selects Register to register for an account with the NCLRP.
The system will prompt the user at the top of his/her screen that his/her account is created. The system also sends an activation email to the participant’s email address.
The email will be from: noreply@hrsa.gov with a subject of “Activate your HRSA account.” The participant will open the email and click on the activation link in the body of the email (See Figure 3).
The system will re-direct the participant to the Home page notifying him/her that his/her account is activated.
Business Rules:
The email address provided by the participant will serve as his/her username.
The system will not allow the participant to use an email that is already attached to an existing participant account.
Below is a sample of the activation email sent to a participant. Once the participant selects the link in the body of the email, the system will activate his/her account and re-direct him/her to log into the portal.


Section 4: Forgot Your Password
If the participant forgets his/her password, he/she will have to select the “forgot your password” link and follow these steps in order to reset it:


Steps:
Participant selects “forgot your password”.
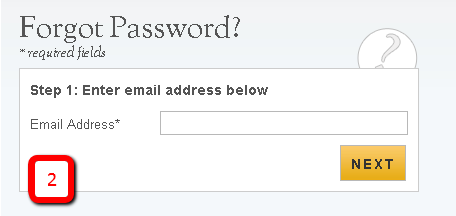
Participant enters his/her email address and selects Next (see Figure 2).
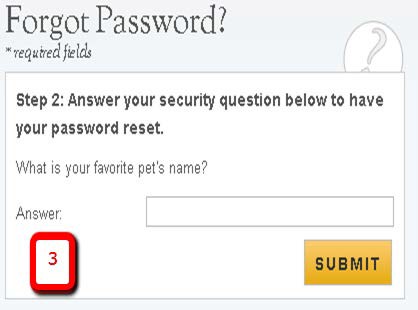
The Participant answers his/her security question they selected when they created his/her account, and selects Submit (see Figure 3).
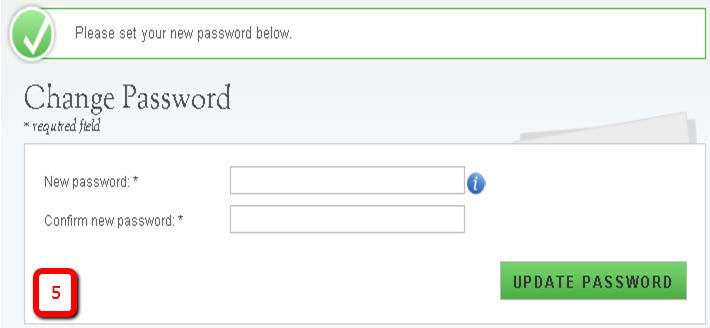
System displays confirmation and sends email to participant (see Figure 4).
Participant selects Reset Password Link from email.
Participant enters new password and selects Update Password, (see Figure 5).
Note:
Passwords must have a minimum length of eight characters; shall not contain slang, jargon, or personal information; shall not contain all or part of your username; and must contain: at least one English upper-case character (A-Z), at least one English lower-case character (a-z), at least one numerical digit (0-9), and at least one special character (e.g. @, !, $, %). A character may not be repeated more than once in succession.
The participant accesses the online continuation application through the Participant Portal Home Page. This is the first page the participant sees on his/her initial log in. The continuation application link will appear under the I need to… section. Once the participant has started his/her application, his/her status will change to “In Progress” and the continuation application link will move to the Activities section
Steps:

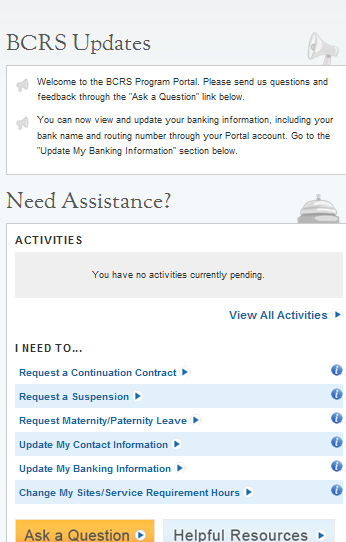


1. Participant selects Request a Continuation Contract.
Note:
Once the participant starts his/her application the link will now appear under Activities. This also provides the participant with his/her application status.
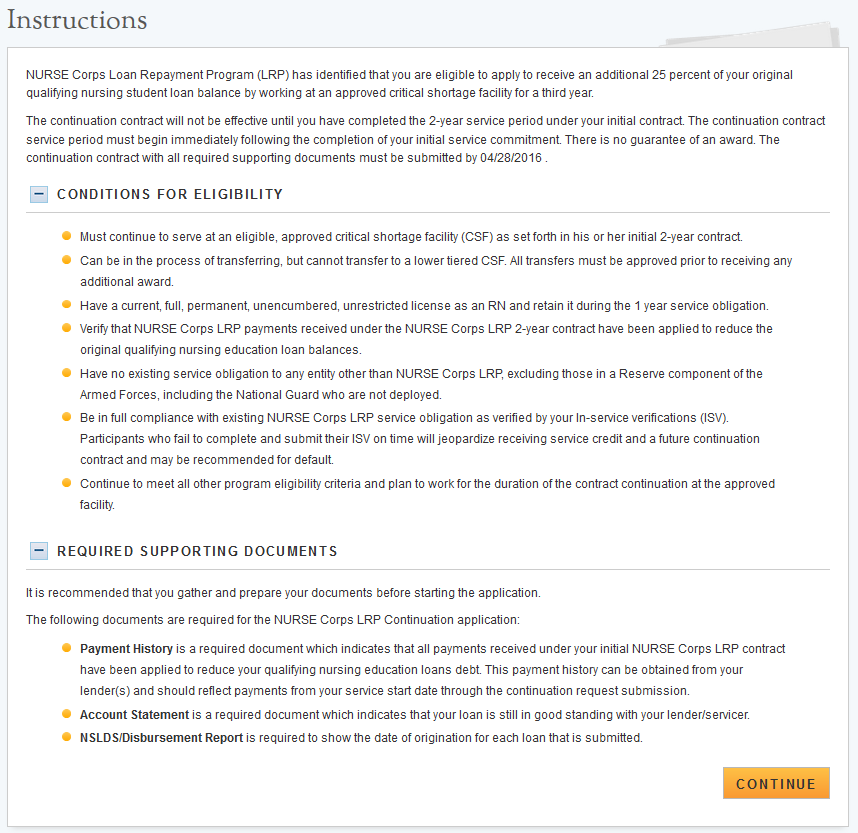
Participants are requested to read the following documents prior to starting his/her application:
2016 Application and Program Guidance (APG)
When the participant selects Request a Continuation Contract he/she will be brought to the instructions page
Business Rules:
System shall display the Continuation Application link on the participant’s portal if the following conditions are met:
Participant’s OED is within the range set by Program for the cycle
Note: If OED has passed while the cycle is still open, the participant will still be able to access the link
Cycle start date is current date or cycle close date has not passed
Participant has been specifically added to the current cycle on his/her participant profile and the cycle start date is current date or cycle close date hasn’t passed
Participant status is:
Active > On Duty
Active > On Duty > Verification Due
Active > On Duty > Verification Overdue
Complete
Obligation Fulfilled


Business Rules, cont.:
System shall remove the Continuation Application link on the participant’s portal as follows:
Participant is in awarded status:
Continuation link should be removed upon awarded.
Participant is in Withdrawn status:
Continuation link should be removed at end of current FY (September 30 at 11:59 PM)
Participant is Ineligible from review:
Continuation link should be removed 6 months after the current FY (March 30 of the next year at 11:59 PM).
Participant is Discontinued Review:
Continuation link should be removed 6 months after the current FY (March 30 of the next year at 11:59 PM).
System shall remove link if participant goes from an eligible participant status to an ineligible participant status during the cycle.
System shall enable the link if participant goes from an ineligible participant status to an eligible participant status, and the cycle is still open.
Initially, when the participant selects Request a Continuation Application they are brought to the instructions page. This displays the conditions for eligibility and explains the required supporting documents.

Steps:
Participant read information on status page.
Participant selects Start Continuation Application.
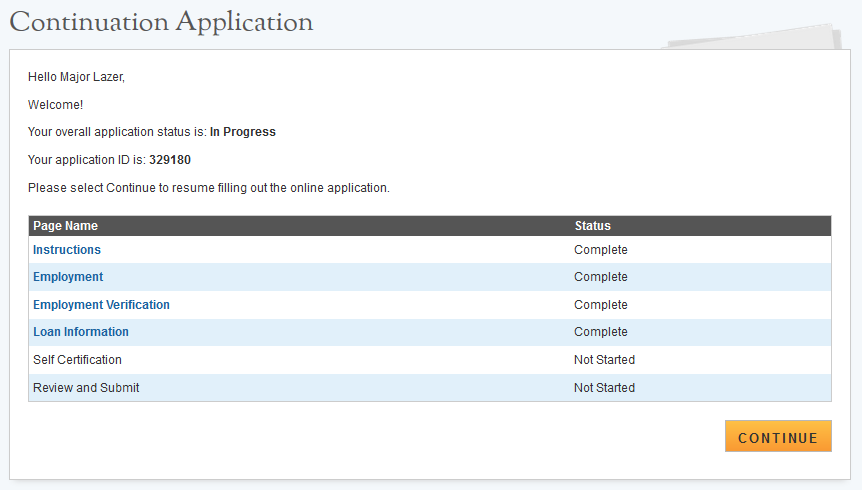
Whenever a participant logs out and logs back in to the Continuation application, the participant should be directed to the In Progress landing page. The participant will be able to see the status of each section and can navigate to different sections from this landing page.

Steps:
Participant reads information on status page.
Participant navigates to a specific section by selecting the page name hyperlinked in the table, or;
Participant continues his/her application from the last saved page by selecting
 .
.
Business Rules:
System shall only link to pages that are in a “Complete” or “In Progress” status. The participant will not be able to jump a page that is “Not Started”.
If the participant selects “Continue,” the system shall direct them to the last “In Progress” page. For example, if ”Employment” is “Complete” and Employment Verification in “In Progress” system shall direct participant to General Information once they log back into the application if they select ”Continue”.
The Employment Information of the Continuation application will display the current site stored in BMISS for the participant. The participant will have the option to indicate that the site is not correct.

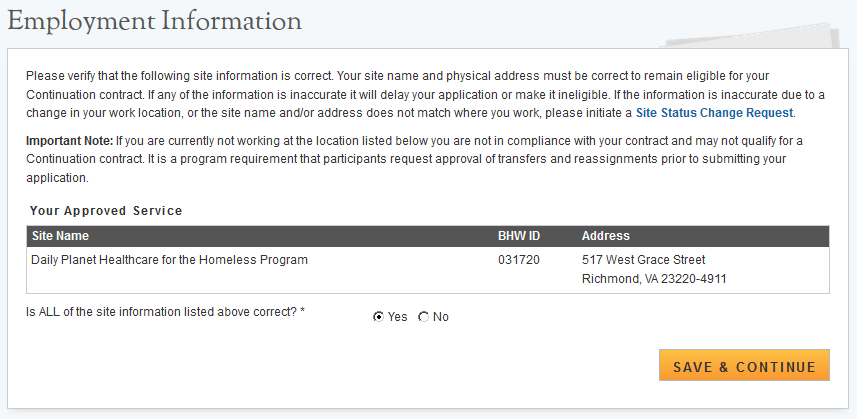

Steps:
Participant answers required fields.
Required fields denoted with an asterisk (*).
1. Participant selects Save & Continue once he/she has answered all the required fields.
2.
Participant will be directed to Employment Verification page upon
selecting continue if all required fields are entered and the
participant marks “yes” to Is
all site information Correct.
Otherwise the participant will be directed to the loan information
page.
Business
Rules:
• System
shall display the site the participant is currently
tied
to
in
BMISS from his/her Site Position Assignment
(SPA)
o Note:
This should always be the current
SPA
when
participant
comes to this page as this may
change
while
he/she is
applying.
• System
shall display the following information for each
site:
o Site
Name
o Site
Address
o BHW
ID
• System
shall require participant to indicate if site is
correct.
• System
shall direct participant to
Employment
Verification
section
of the application if participant says Yes to site is correct upon
selecting Save and
Continue.
System shall indicate that participant needs to submit a Site Status Change Request to update the site if participant says No to site correct.
System shall provide a link to initiate a Site Status Change Request on employment page if participant says No to site correct.
System shall direct user to Site Status Change Request if user selects on Site Status Change Request link from Continuation application.
System shall disable Employment Verification section if participant says No to sit correct and direct the participant to the Loan Information page.
System shall direct participant to Loan/Payment History page upon selecting Save and Continue if participant says No to site correct
Note: once participant goes back and says Yes to site(s) being correct, they should be directed to EV page (which should then be enabled).
Section 8: Employment Verification
On the Employment Verification page of the continuation application, Employment sites are required to answer questions about the participant’s current employment information. The participant will be able to view the information entered by the site Point of Contact (POC) before submitting his/her application. If the participant believes any answers entered by the site POC are incorrect, a participant may cancel the existing EV and re-initiate a new one.

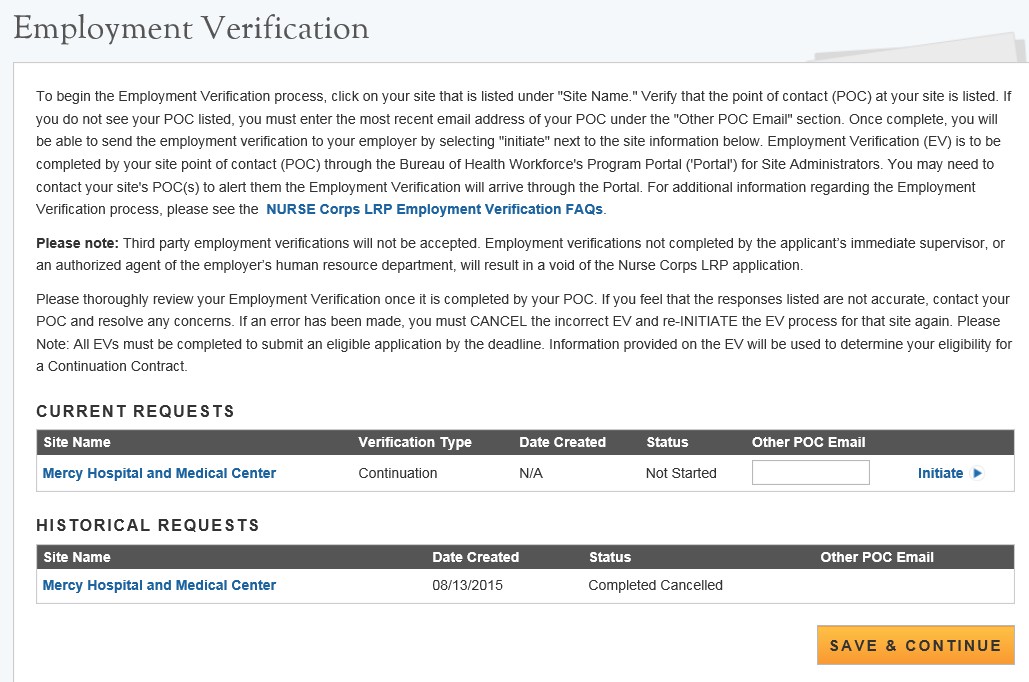
Steps:
Sites shown in the Employment section will be listed in the table in the Current Requests section.
Participant may click site name to review the address, phone number and point of contact for his/her site.
Participant can initiate EV by clicking Initiate next to his/her site.
Participant selects Save and Continue once he/she has initiated his/her EV.
A participant may navigate to the Loans page without initiating an EV.
Participant is directed to the Loans page.
Business Rules:
System shall display EV status as Not Started before participant initiates an EV Request.
System shall allow participant to resend EV if EV status is “Returned-Unverified”.
An EV will be returned unverified if the site POC indicates that the participant does not work at that site.
System shall disable initiate button if EV status is “In Progress” or “Complete”
The participant still has the option to cancel the EV.

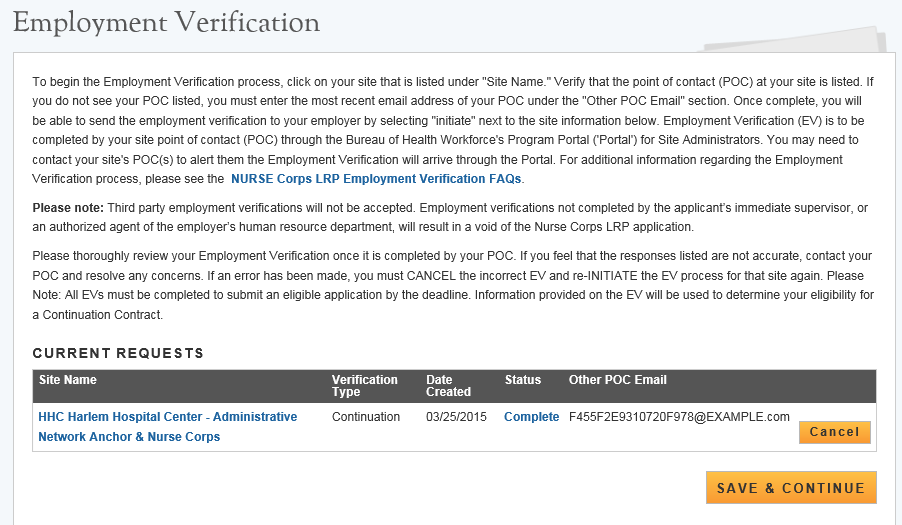
Business Rules, cont.:
System shall deem employment page complete when EV in current requests table is complete.
To be able to delete an EV the user must cancel a request that is “In Progress” or “Completed”.
System shall link to complete EV on the EV section of the application once completed by the site POC.
System shall open read-only EV if clicked on once completed.
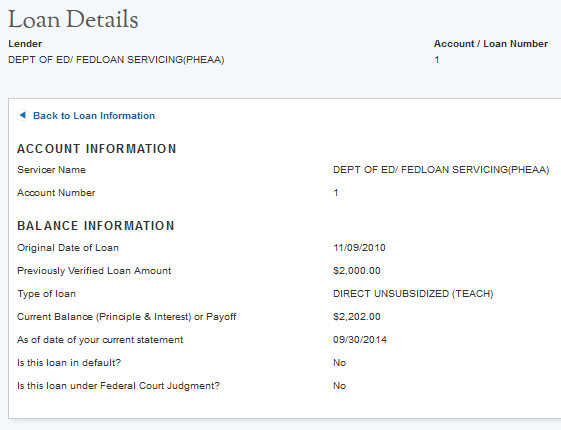
The system will display all approved loans from the participant’s previous obligation. The participant will have the ability to update their previously approved electronic Federal loans using their National Student Loan Data Systems (NSLDS) account or manually update each of the previously approved loan(s) to its current status as well as the current balance. The system will display all current (updated) loans in a separate table.
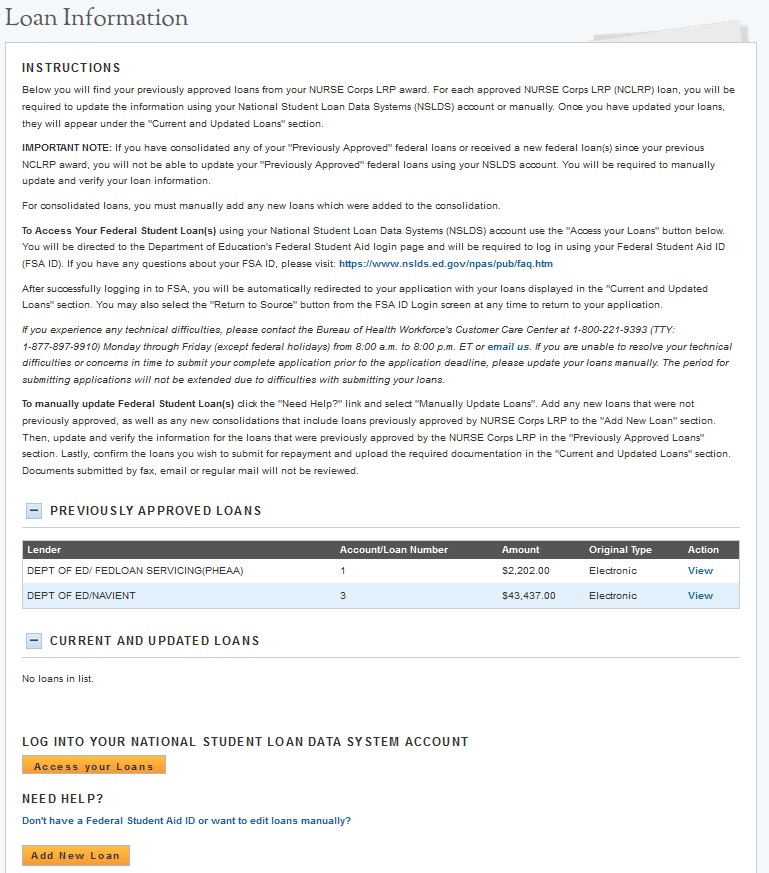

 Steps
to Access your loans:
Steps
to Access your loans:
Particpant navigates to LOG INTO YOUR NATIONAL STUDENT LOAN DATA SYSTEM ACCOUNT and
clicks
![]()
Particpant is direct to the Department of Education's Federal Student Aid login page and logs in using their FSA ID
Particpant will be automatically redirected to his/her continuations application after authentication
If NSLDS authentication and retrieval is successful, the particpant’s loan(s) will display in the Current and Updated Loans table
Particpant can view a read only version of his/her loan details by clicking the “View” button next to each loan electronically retrieved.
The date and time of the last successful transaction with the NSLDS will be displayed for reference
The social security number and date of birth associated with the particiapnt must match the social security number and date of birth on file with the Department of Education
Previously approved should not have been consolidated
No new Federal loans can be present on an applicants NSLDS report since their previous obligation
Particpant may update loans previously retrieved from NSLDS by clicking the
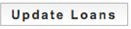 (Update
Loans) button to display the ‘Access your
Loans”
(Update
Loans) button to display the ‘Access your
Loans”
button
Particpant will be direct to the Department of Education's Federal Student Aid login page and logs in using their FSA ID as detailed in Step 2
Particpant can remove electronically retrieved loans by clicking the
![]() (Remove
Loans) button and confirming selection
on
(Remove
Loans) button and confirming selection
on
pop-window
 Particpant
will be able to view a comprehensive report of all
NSLDS
federal loan data retrieved and submitted with his/her application
upon submission of his/her
application
Particpant
will be able to view a comprehensive report of all
NSLDS
federal loan data retrieved and submitted with his/her application
upon submission of his/her
application
Particpant can view a read only version of his/her loan details by clicking the “View” button next to each loan electronically retrieved.
The date and time of the last successful transaction with the NSLDS will be displayed for reference
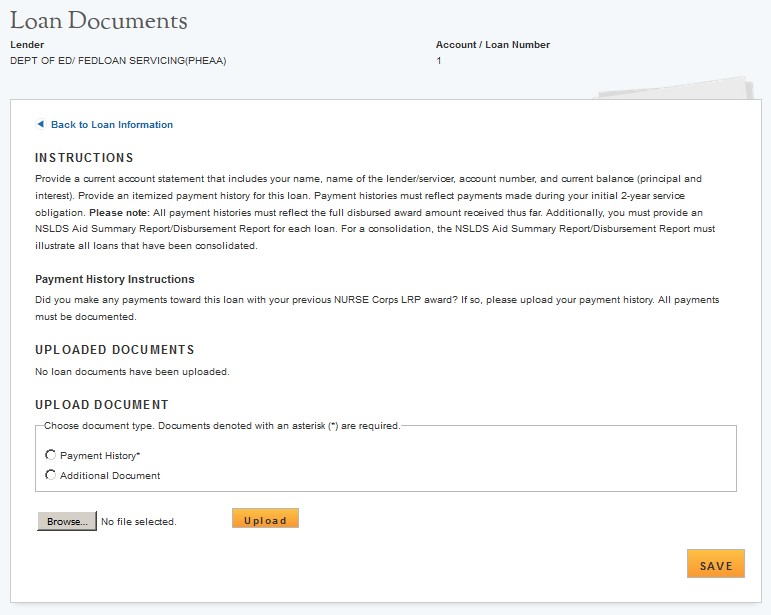
Participant clicks Upload Documents.
Participant will be redirected to the Loan Documents page (see Figure 4).
Status will be updated to Documents Uploaded when all documents are uploaded.
Participant can choose to add another loan.
To add another loan, the participant will click the Add New Loan button and repeat the below steps 3-9.
Note: Only private loans may be added when loans are electronically retrieved.
Steps to Manually Udpate:
 To
manually update previously approved electronic loans the participant
must first click the “Need
help?’
link and choose to manually update
loans.
To
manually update previously approved electronic loans the participant
must first click the “Need
help?’
link and choose to manually update
loans.
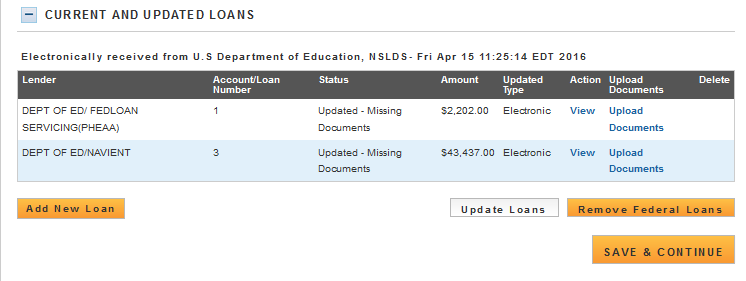
Participant clicks ‘Edit’.
Participant is directed to Loan Details page (see Figure 2).
Participant is required to fill in all required fields to continue:
Loan Status
Sold/Transferred
Servicer (previous electronic loans only)
Account Number (previous electronic loans only)
Current Balance
Is the loan in default
Is the loan under Federal court judgment
Purpose of loan
If the loan has been consolidated, the participant will be required to enter the following information:
The loan it was consolidated into
Date of Consolidation
o Note: The system will automatically set the balance of the loan to 0.
If the loan has been paid off through payments the participant will be required to enter the following information:
Date of statement that shows pay-off
o Note: The system will automatically set the balance of the loan to 0.
After the participant enters all information, he/she will click Save and Continue and will be taken to Loan Information Page (see Figure 1).
The loan now appears under Current and Updated Loans table (see figure 3).
Participant clicks Upload Documents.
Participant will be redirected to the Loan Documents page (see Figure 4).
Status will be updated to Documents Uploaded when all documents are uploaded.
Participant can choose to add another loan.
To add another loan, the participant will click the Add New Loan button and repeat the above steps 3-9 and below steps 1-3.

 If
the participant wants to edit his/her loan, the participant can
click
the ‘Edit”
button.
If
the participant wants to edit his/her loan, the participant can
click
the ‘Edit”
button.
If the participant does not add another loan or edit their loan, they will click Save and Continue.
Steps Upload loan Documents:
Participant will upload necessary documents and click Save.
Consolidated Loan Supporting Document is required if the participant indicates that his/her loan is consolidated.
Participant clicks Save.
Participant will be directed back to the Loan Information page (see Figure 1).
Status will be updated to Documents Uploaded when all documents are uploaded.
Business Rules:
System shall require user to select one method (electronic or manual) to update/add Federal loans.
System shall require fields if participant selects “Other” for Lending Institution:
Lender Name
Phone Number
Phone Extension
Fax Number
System shall not allow Current Balance As of Date to be prior to Original Date of Loan or after current date.
System shall not allow user to enter in a Current Balance As of Date more than 30 days from current date.
System shall require that Original Date of Loan be,
After Loan Consolidated Dates, if Yes to Consolidated Loan
Prior to Loan in Default/Loan Judgment Dates, if Yes to Loan in Default or Loan under Judgment
System shall require use to enter date if “Yes” to Loan in Default.
System shall require user to indicate how many loans have been consolidated in loan if “Yes” to Consolidated Loan.
System shall require user to upload required documents for each loan on submit application.
The Loan Information page shall remain “In Progress” until all required loan supporting documents are uploaded.
System shall require user to submit at least one Consolidated Loan Document, if “Yes” to Consolidated Loan.
The participant does not have to upload the documents immediately. The participant can continue with the application and navigate back to the loan section to add his/her loan documents.
System shall allow user to upload multiple Consolidated Loan Documents if “Yes” to Consolidated Loan.
System shall direct user to Loan Supporting Document page upon selecting “Save & Continue” for loan details.
Section 10: Self Certification
The Self-Certification page is where the participant is required to certify certain certifications by checking the checkbox next to each certification.

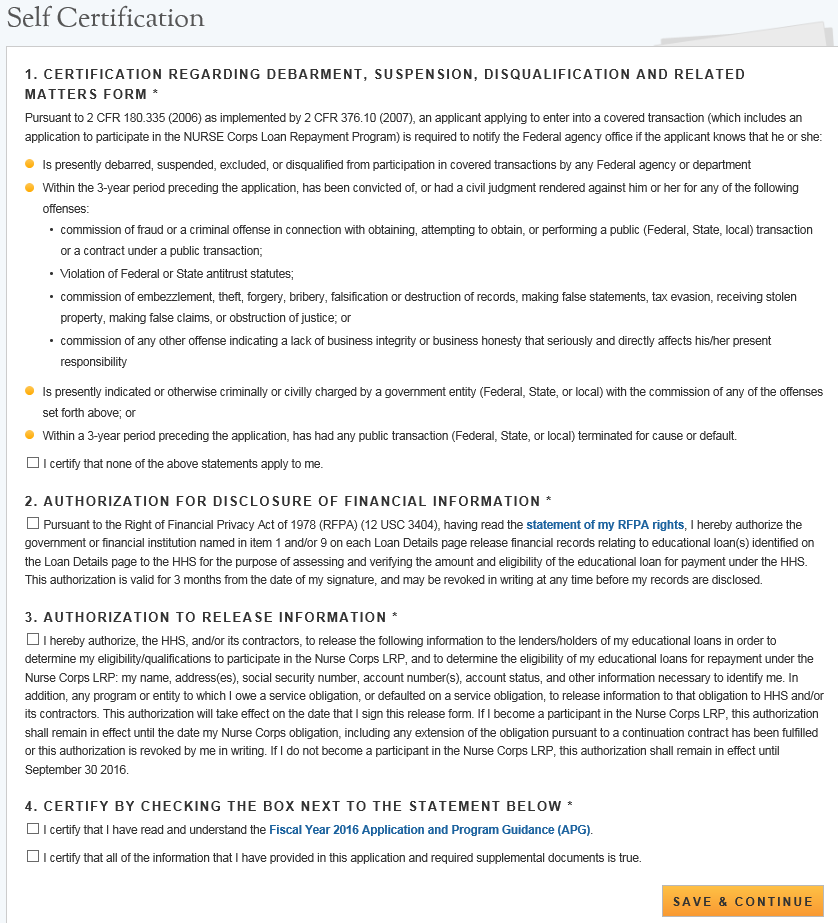
Steps:
Participant reads each certification.
Participant indicates that he/she agrees by selecting the checkbox.
Participant selects Save and Continue.
Notes:
System shall require that the participant has responded to each certification question to proceed.
System will clear Self Certification page if the participant proceeds to Review and Submit paged but then navigates to another section of the application.
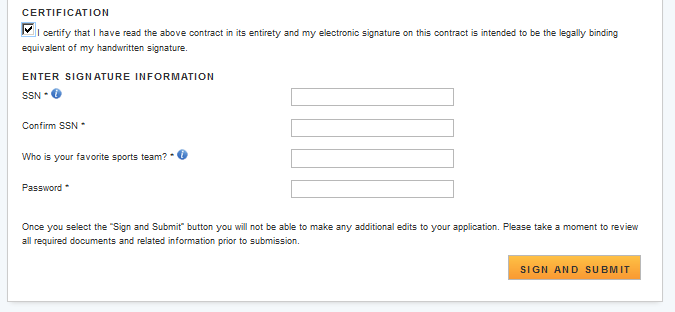
The Sign Contract section will be where the participant signs his/her continuations contract. This will be the last page of the application. Once the participant signs the contract, he/she will submit the application and if eligible, will immediately be kicked off for review.

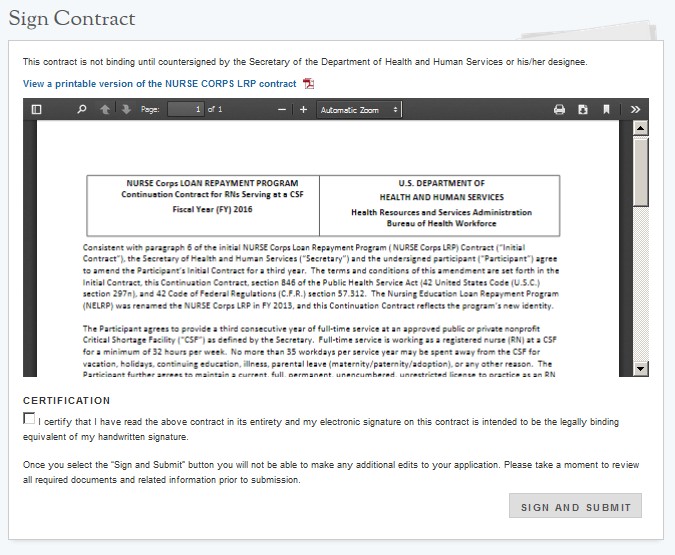
Steps:
Participant reviews the contract.
The Participant enters his/her SSN, Security Question answer, and password.
Participant selects Submit.
Business Rules:
System shall not allow application to be submitted after the application deadline for the given cycle.
All page statuses except for review and submit must be complete for participant to submit his/her application.
Participant must enter his/her correct SSN, security answer and password in order to submit his/her application.
System shall display error message and not allow participant to submit if any of the information entered is incorrect.
System shall direct user to landing page with links to uploaded documents and .PDF version of the application.
System shall display appropriate contract for participant on the page.
The contract for NCLRP is dependent on the participant’s application type (Base or Nurse Faculty).

Business Rules, cont.:
System shall link to .PDF version of contract at top of page.
System shall require user to check the checkbox that participant has read the contract and agrees to its terms.
System shall include tool tip next to security question that participant can change security question and answer from account settings.
Section 12: Submitted Landing Page
After the participant submits his/her NCLRP continuations application, he/she will be directed to the Submitted landing page and the overall application status will change to “Submitted”. On the Submitted landing page the participant will have the ability to withdraw his/her application. The participant cannot edit his/her application upon submission. The participant may withdraw his/her application until the application is under obligation if applicable.

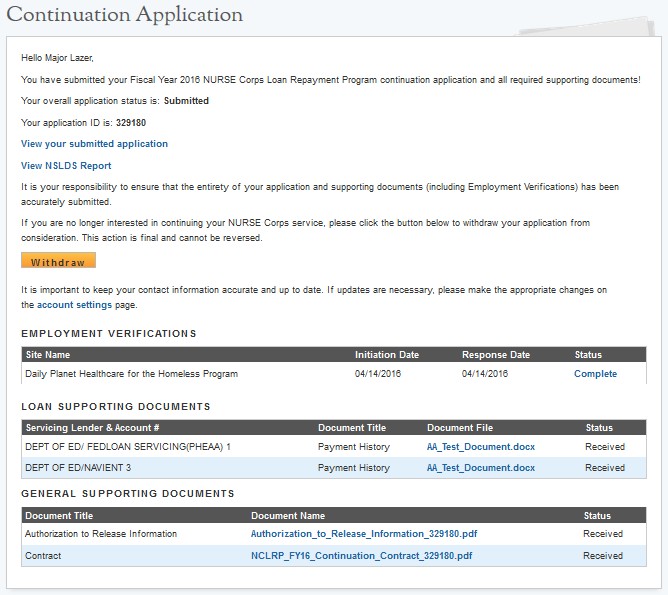
Business Rules:
System shall allow user to Withdraw application.
System shall disable Withdraw when participant is Sent to the Obligation module (upon status updating to “Pending Addendum” or “Pending Obligation”).
System shall link to documents uploaded in application after application has been submitted on the submitted landing page:
Loan/Payment History Documents
System shall link the completed EV submitted by the site POC on the submitted landing page.
System shall provide a .PDF copy of submitted application after application has been submitted.
System shall display continuation application ID.
System shall direct user to Withdraw confirmation screen upon selecting withdraw.
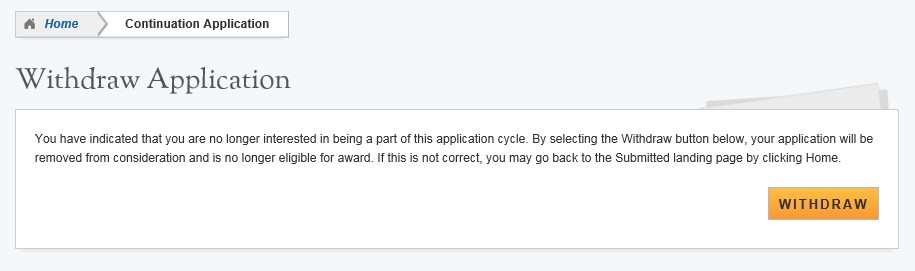
Section 13: Withdraw Application
A participant has the option to withdraw his/her application after submission. The participant may withdraw his/her application until the participant is in the Obligation Module. Once the participant withdraws his/her application, he/she cannot resubmit the application and will not be considered for an award.
Steps:


From the Submitted landing page and participant will click
Withdraw.
The participant will be directed to the “Withdraw Application screen for confirmation.
The participant clicks Withdraw and is directed to the Submitted Home page.
Note: The participant’s status will be updated to “Withdrawn”.
Business Rules:

The ability to withdraw an application will be disabled when the participant is sent to obligation.
Withdrawing the application will make the participants final status withdrawn, which cannot be undone.
Please use the following instructions to resolve any iquiries a NCLRP participant might have:
For Technical Issues:
Production Support Process:
When a technical issue is encountered, e.g. Participant cannot upload his/her Resume, the Customer Care Center should log the issue in the BMISS Issue Tracker. The NCLRP Continuation Application BMISS HyperCare team will monitor the BMISS Issue Tracker to define and resolve the issue. Once the issue is resolved, the HyperCare team will notify the Customer Care Center Analyst of the resolution.
Capturing Issues:
It is important to capture and log as much detail as possible. The BMISS HyperCare Support Team will need enough information to recreate the issue in order to solve the problem. Participant details should include the following:
Participant information: Full name, last four of SSN, email, phone number
The exact NCLRP Continuation Online Application screen the participant was on when the issue occurred (screenshot if applicable)
The Web Browser the participant was using (e.g. Internet Explorer, Firefox, etc.)
The frequency of the issue (e.g. always, sometimes, etc.)
For Program Related Issues:
Division Support Process:
If an participant has a program question, the Customer Care Center will try to answer the problem by referring to the Application and Program Guidance. If the Customer Care Center is unable to answer the question then the Participant’s question and information are recorded and the Customer Care Center contacts the appropriate DNHSC Analyst. DNHSC answers the question and the Customer Care Center responds back to the Participant.
Capturing Participant Information:
The following participant information should be captured with as much detail of the issue as possible:
First and Last Name
Email Address
Phone Number
Last four digits of SSN
Section of Online Application the user was on when they encountered the problem
Detailed summary of the problem
Supporting Document (If applicable)
PROPERTY
OF HRSA | BHW

![]()
| File Type | text/rtf |
| File Title | APC User Guide |
| Author | Josh Reitnauer |
| File Modified | 2017-03-09 |
| File Created | 2016-05-10 |
© 2026 OMB.report | Privacy Policy