Form 1 NCLRP-online-application-user-guide
NURSE Corps Loan Repayment Program
NCLRP-online-application-user-guide
NURSE Corps LRP Application
OMB: 0915-0140
B![]() ureau
of Health Workforce
ureau
of Health Workforce
NURSE Corps LRP Online Application User Guide

BHW Management Information System Solution (BMISS)
NURSE Corps Loan Repayment Program
Online Application User Guide
November 2016
Table of Contents
Introduction: NCLRP Online Application User Guide 3
Section 3: Forgot Your Password 8
Section 4: Home Page (Application Status = “Not Started” or “In Progress”) 10
Section 6: General Information 15
Section 8: Employment Verification 25
Section 9: Qualifying Education 28
Section 10: Loan Information 32
Section 12: Supporting Documents 38
Section 13: Self-Certification 40
Section 14: Review & Submit 41
Section 16: Application Withdraw 44
Section 17: Edit Application 46
Section 18: Account Settings 48
Introduction: NCLRP Online Application User Guide
Goal: The NCLRP online application user guide serves as the main tool for the Call Center to answer applicant inquiries. In addition to this user guide, the call center analysts must be familiar with the NCLRP Application Program & Guidance, as some of the questions will be program based and are not discussed in this document. The primary intent for this user guide is to focus on the functionality developed for the NCLRP online application.
Roles: There are no roles associated with the NCLRP online application, as any external user can apply.
Section 1: Create Account
T
The first step an applicant takes in order to
begin the NCLRP Online Application is
to create an account.
Steps:
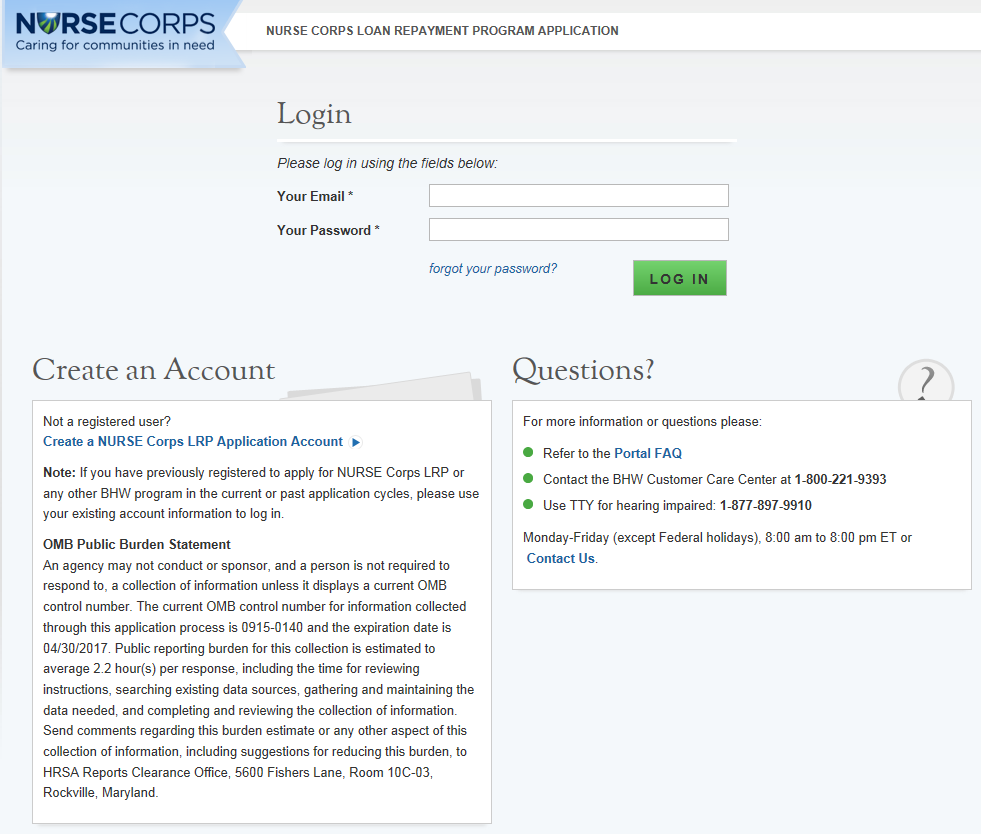
Applicant navigates to the online application via the web link:
https://programportal.hrsa.gov/extranet/application/NCLRP/login.seam
Applicant selects the “Create a NURSE Corps LRP Application
Account” link in the bottom left hand section of the page.
Please note that applicant can access login page from NCLRP website
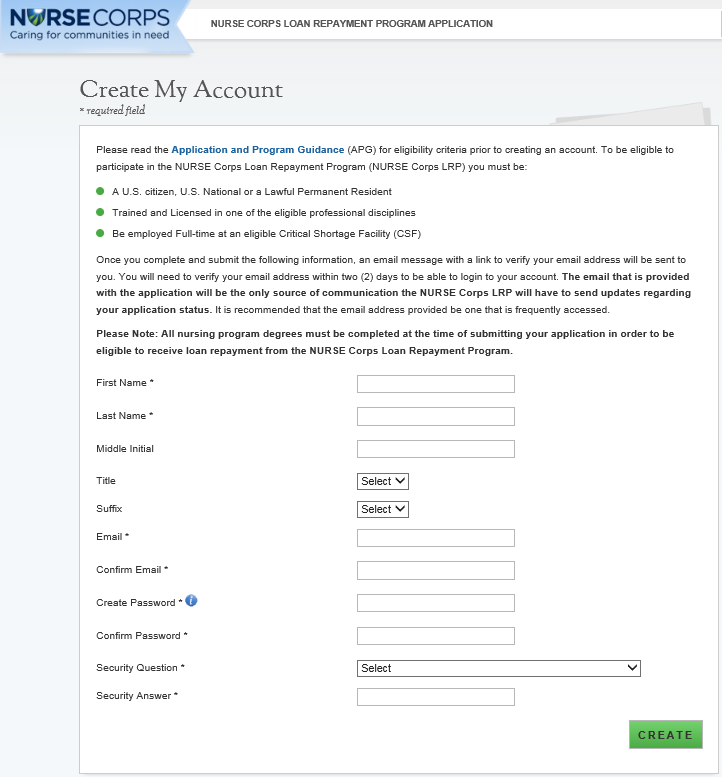
The applicant will be prompted to fill in a series of fields in
order to create an account. Once the applicant selects “Create,”
the system will send an activation email to the email address
provided when creating an account.
Steps:
Applicant answers each of the required fields.
Applicant selects
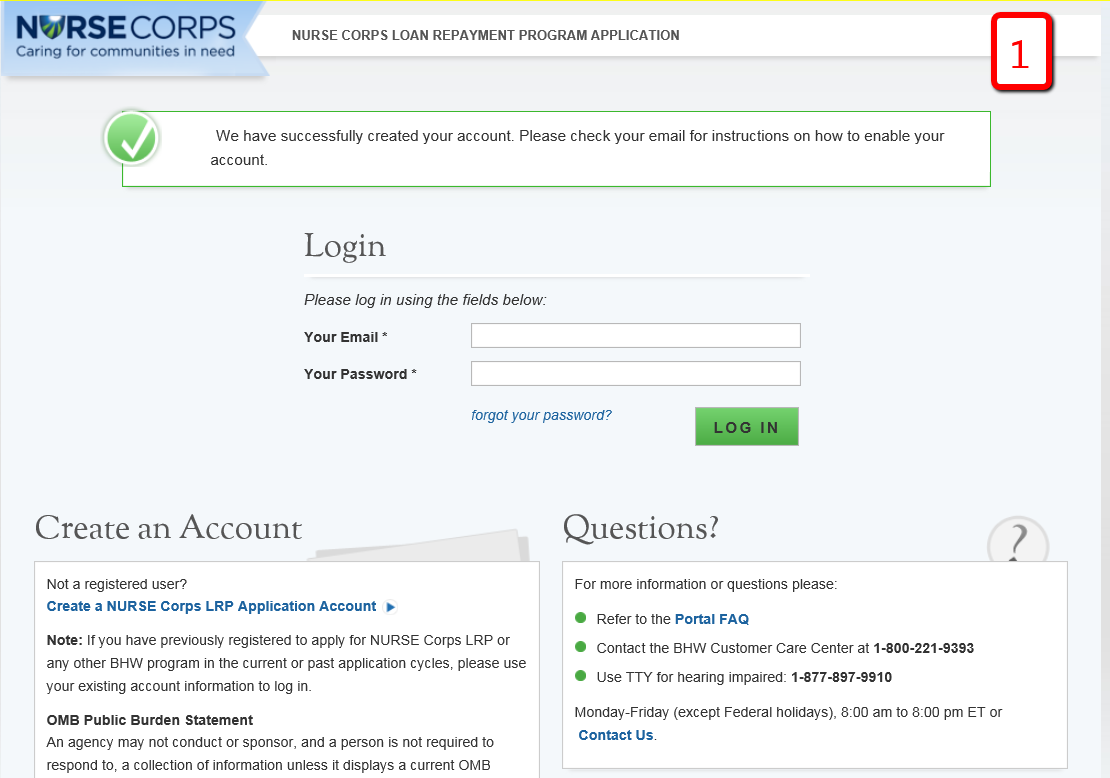
System re-directs the applicant to the NCLRP application “Log
in” and prompts the user at the top of his/her screen that
“We have successfully created your account. Please check
your email for instructions how to enable your account.”
(See Figure 1)
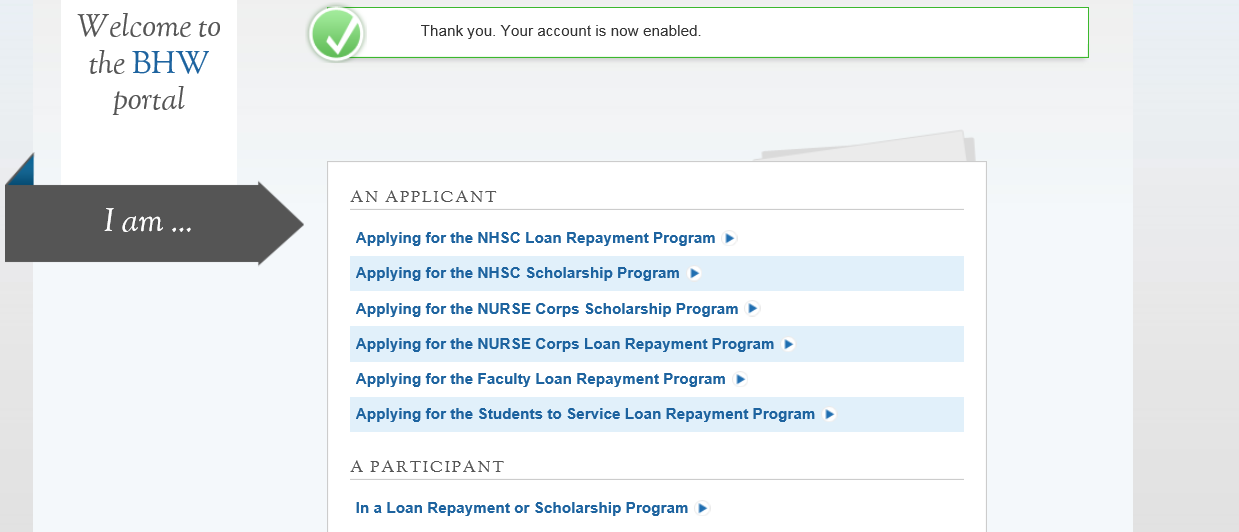
Applicant goes to the email account used to create his/her NCLRP
application and opens the message.
Applicant selects the activation link in the body of the email.
System re-directs the applicant to the NCLRP application “Log
In” page notifying them that his/her account is enabled.
Business Rules:
The email address provided by the applicant will serve as his/her
NCLRP online application username.
System cannot create account if applicant email already exists in a
previously created account for any program in any application cycle
The applicant will receive an error message if he/she tries to
create a new account with an existing email address
Error message will prompt applicant to log in with his/her
existing email
![]() to register for an account with the NURSE Corps Loan Repayment
Program (NCLRP).
to register for an account with the NURSE Corps Loan Repayment
Program (NCLRP).
Business Rules Cont:
The following information will be auto-populated on the General
Information page based on the information entered on the Create
Account page:
First & Last Name
Middle Initial
Title
Suffix
Applicants can roll over the tool tip next to the “Password”
field for details on password criteria.
Passwords must have a minimum length of eight characters; shall not
contain slang, jargon, or personal information; shall not contain
all or part of your username; and must contain: at least one
English upper-case character (A-Z), at least one English lower-case
character (a-z), at least one numerical digit (0-9), and at least
one special character (e.g. @, !, $, %). A character may not be
repeated more than once in succession.
System shall disable ability to create an account after application
deadline.
Section 2: Loggin In
After an applicant activates his/her account, he/she will be able to log in. The applicant will enter his/her email address (username) and password he/she used when creating his/her account in order to log in. If the applicant forgets his/her password, he/she can reset the password by selecting the “forgot your password?” link. This will be later described in Section 3 (next page).
Steps:
Applicant enters his/her email address and password.
Applicant selects
At first log in applicant is re-directed to
the “Not Started” home page (screen
shot displayed in section 4).
Business Rules:
After selecting the activation link in the email, the system
notifies the applicant that his/her account is activated (this only
happens on the initial log in).
At first log in, the applicant is directed to the “Not
Started” home page which details the NCLRP application. Once
an applicant begins his/her application he/she will not be directed
to the NCLRP Not Started home page on the next log in.
After the applicant’s second failed log in attempt, the
applicant will be warned that his/her account will be locked if the
next log in attempt is incorrect.
The applicant’s account will be locked after the third failed
log in attempt and he/she will be required to go through the
“Forgot your Password” process or contact the Call
Center to unlock his/her account.
![]()
S
3
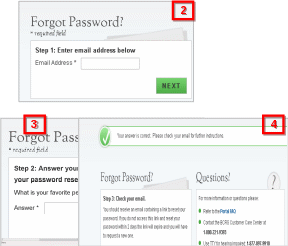
ection 3: Forgot Your Password
If
the applicant forgets his/her password, he/she will have to select
the
![]() link
and follow these steps in order to reset the password.
link
and follow these steps in order to reset the password.
Steps:
Applicant selects
Applicant enters his/her email address and selects
Applicant answers his/her security question and selects
System displays confirmation and sends an email to applicant (see
Figure 4).
![]() on the log in page.
on the log in page.
![]() (see Figure 2).
(see Figure 2).
![]() (see Figure 3).
(see Figure 3).
Steps Cont:
Applicant goes to his/her inbox to access the email sent to unlock
his/her account.
Applicant selects Reset Password Link from email.
Applicant enters new password and selects
System updates new password.
Applicant is directed to the BHW portal home page.
Applicant selects “Applying for the NURSE Corps Loan
Repayment Program.”
Applicant enters in email address and new password.
Note:
Passwords must have a minimum length of eight characters; shall not
contain slang, jargon, or personal information; shall not contain
all or part of your username; and must contain: at least one English
upper-case character (A-Z), at least one English lower-case
character (a-z), at least one numerical digit (0-9), and at least
one special character (e.g. @, !, $, %). A character may not be
repeated more than once in succession.
![]() (see
Figure 5).
(see
Figure 5).
5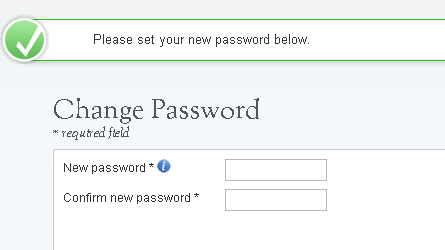
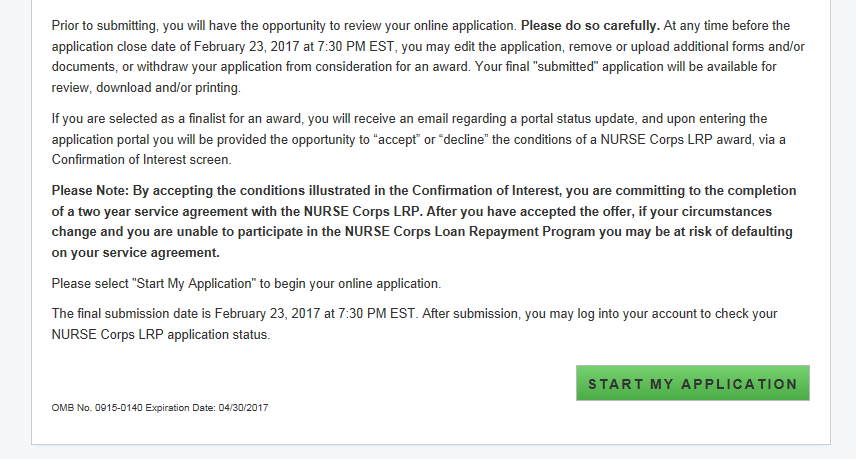
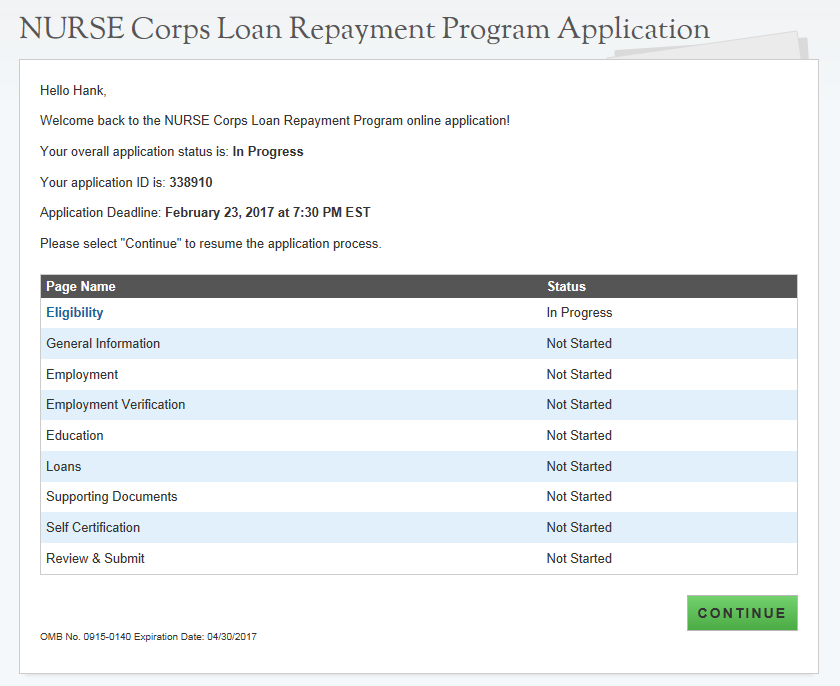
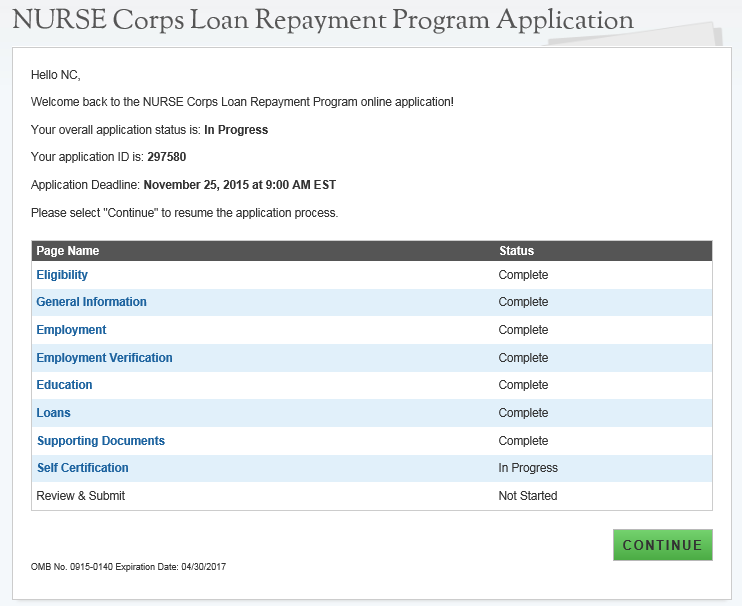
Section 4: Home Page (Application Status = “Not Started” or “In Progress”)
The Not Started Home Page is the first page the applicant sees on his/her initial log in. Once an applicant begins his/her application he/she will no longer be directed to the Not Started Home Page but will be re-directed to the NCLRP In Progress Home Page when logging in.
Steps:
Applicant reads through the information displayed on the Not
Started Home Page.
Applicant selects
Business Rules
The APG, EVF FAQ and Funding Preference definition links will open
in a new window when an applicant clicks on the link
Once an applicant clicks
![]() .
.
![]() he/she will no longer be directed to this page when he/she log in
he/she will no longer be directed to this page when he/she log in
I
Business Rules, cont.:
The Credit Report will be available to upload in the Review
Supporting Documents table after an applicant submits his/her
application, even if review for that applicant has not started.
The Credit Report will then display on the review pages if uploaded
from the Application Profile.
Analyst can enter comments in the New Comments text box and
by selecting Add Comment.
Analyst can view all existing comments under Existing Comments.
Existing Comments will display the analyst, date, and time of the
comment.
Steps:
Applicant reads information on status page.
Applicant navigates to a specific section by selecting the link to
the desired page name in the table.
The page must already been completed or is in progress to select a
specific section; or
If the applicant selects
Business Rules:
The system shall only link to pages that are in a “Complete”
or “In Progress” status. The applicant will not be
able to jump to a page that is “Not Started.”
If the applicant selects “Continue,” the system shall
direct them to the first incomplete page. For example, if
Eligibility is “Complete”, system shall direct
applicant to General Information once he/she log back into the
application if he/she select ”Continue”.
![]() the system will direct the applicant to the first incomplete page
the system will direct the applicant to the first incomplete page
Section 5: Eligibility
The Eligibility page is used to ensure the applicant meets the qualification requirements to apply for an NCLRP application. If the applicant is deemed eligible, he/she will be able to continue with the application. If an individual does not pass the initial screening portion of the online application, he/she will not be able to continue.
Steps:
Applicant answers all required questions.
Applicant selects
Applicant will be directed to General Information page if he/she is
eligible.
Business Rules:
System shall require applicant to respond to all questions before
he/she can continue
If the applicant answers “Yes” to question 3, the
system will display two sub-questions, each is required.
If applicant indicates “Yes” for “Do you have
an existing service obligation?” he/she will be required
to provide supporting documentation on the supporting documents
page.
System shall direct user to ineligible landing page if one or more
answer(s) is:
Licensed Registered Nurse = No
Applicant Citizen or National = No.
Existing Service Obligation= Yes
Completed before submission = No
Uniformed service member = No
Applicant Judgment Lien = Yes
Applicant Defaulted Federal Debt = Yes
Applicant CSF type/School Accreditation = No
Minimum working hours/Working full-time = No
![]() once he/she has answered all the eligibility questions.
once he/she has answered all the eligibility questions.
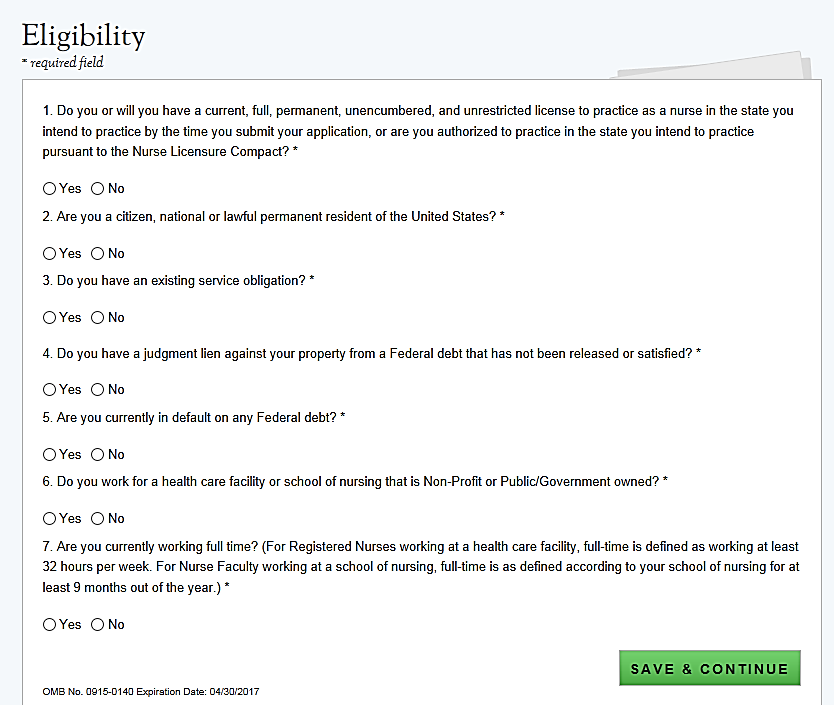
Business Rules Cont:
NOTE: The ineligible landing page will not give the specific
reason that the applicant was deemed ineligible, only several
possible reasons for ineligibility from the Eligibility section will
be displayed
If an applicant is logged in with an existing participant username
and says no to having an existing service obligation he/she will
get an error message and will not be able to continue with the
application until he/she change his/her response to “Yes”
to having an existing service obligation.

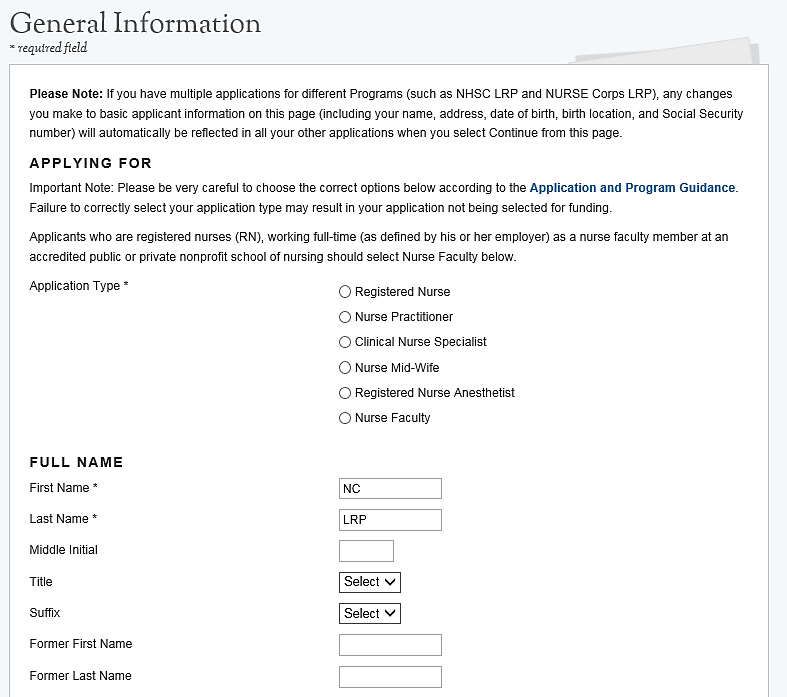
Section 6: General Information
The General Information page consists of questions about the applicant’s contact information. The information under Full Name (such as First and Last Name, etc.) is pre-populated from the answers the applicant supplied when creating his/her account. These fields are editable.
Steps:
Applicant answers required fields.
Required fields denoted with an asterisk (*)
Applicant selects
Applicant will be directed to Employment page if all required
fields are entered.
If Nurse Faculty is selected applicant will be directed to the
Employment School Search
If any other application type is selected applicant will be
directed to the Critical Shortage Facility Search
Business Rules:
The following fields are populated from answers during the create
account process:
First Name
Last Name
Middle Initial
Title
Suffix
Applicant will select Application Type
If Registered Nurse, Nurse Practitioner, Clinical Nurse
Specialist, Nurse Mid Wife or Registered Nurse Anesthetist is
selected system will display functional role question which will
be required
If Nurse Practitioner is selected system will also display main
specialty question which will be required
![]() once he/she have answered all the required fields.
once he/she have answered all the required fields.
Business Rules, cont:
If Nurse Faculty is selected, system will display tenured question
which will be required
If applicant is not tenured system will prompt applicant to input
Nurse Faculty appointment dates
The faculty appointment must be at least 9 months for applicant to
be eligible and continue with the application
If the applicant selects a Country other than the United States,
the State/Province/Region field transforms from a dropdown to a
required text field and the Zip/Postal will be optional.
Based on the SSN entered, the applicant may receive an error
message with an error code
The code can be used to determine the issue with the SSN
System shall mask the SSN and require the user to enter it twice
Error message will request the user re-enter his/her SSN if he/she
do not match
Only the last 4 numbers of the applicant’s SSN will be
displayed after saving the page (xxx-xxx-1245).
The applicant will not be able to move forward if the SSN he/she
entered exists in another NCLRP application account from any
application cycle
If applicant selects that one of his/her phone numbers is non-U.S.
number, the field transforms from a U.S. phone format to a text
field.
The applicant Birth Date must be prior to application cycle start
date.
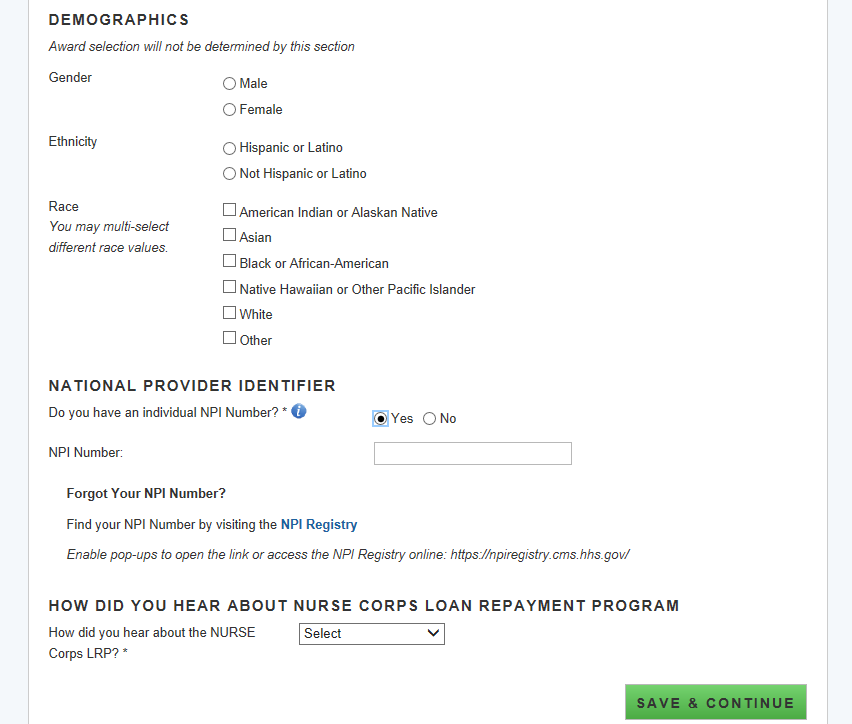
If applicant selects ‘Other’ for how did you hear about
NURSE Corps Loan Repayment Program, system will display text box
for applicant to enter information.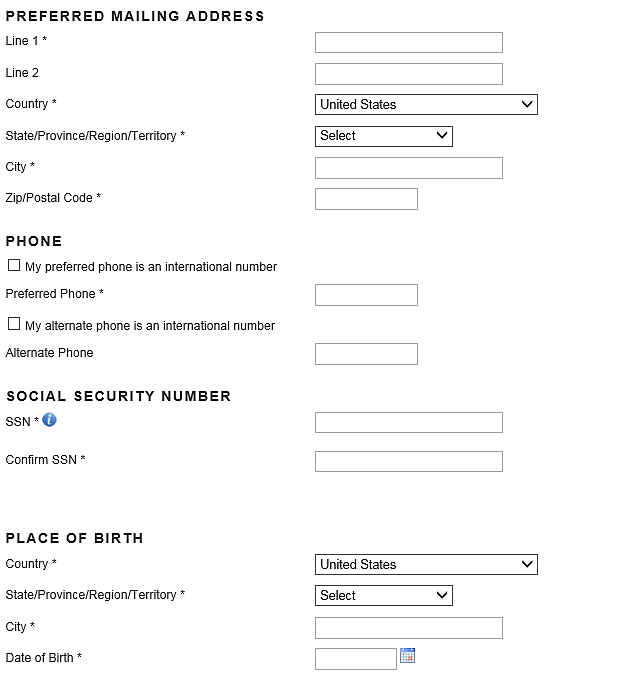
Business Rules, cont:
System requires applicant to answer the question, “Do you
have an individual NPI number?”
System does not require the NPI number to be provided. The
application can be submitted without an NPI number
System shall display the NPI number if applicant provided it in a
prior application. The NPI number can be updated by the applicant
The system will store ONLY the most recent NPI number and record
whether it is a full, partial, or non-match, defined as:
Full match: NPI number found + the first and last name match
Partial match: NPI number found + the first and/or last name do
not match
Non-match: NPI number not found
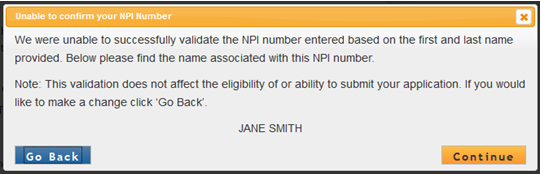
System shall display an error message if the NPI number is a
partial-match: “We were unable to successfully validate the
NPI number entered based on the first and last name provided. Below
please find the name associated with this NPI number. Note: This
validation does not affect the eligibility of or ability to submit
your application. If you would like to make a change click ‘Go
Back’.
[Last name, First Name,]
System shall display an error message if the NPI number is a
non-match: “We were unable to validate the NPI number
entered. Note: This
validation does not affect the eligibility of or ability to submit
your application. If you would like to make a change click ‘Go
Back’.
System shall display an error message if the NPI number is
associated with an organizational NPI, instead of an individual
person: “We are unable to validate the organization NPI
number entered. Please enter your individual NPI number. Note: This
validation does not affect the eligibility of or ability to submit
your application. If you would like to make a change click ‘Go
Back’. (See screenshot to left)
Business Rules, cont:
Once the applicant proceeds from the General Info page, the account
settings will update with the appropriate information
Applicant home Preferred Mailing Address
Applicant Primary Phone Number & Extension
Applicant Alternate Phone Number & Extension
Demographic information is optional
If applicant is logged in with an existing application account, any
basic information that is changed on this page (such as SSN, name,
address, etc.) will automatically be updated on all existing
accounts
Note: this is only for existing application accounts (such
as an applicant that has applied to both NCLRP and NHSC LRP). This
will not update any information on the participant record.
If an applicant wishes to change his/her application type after
completing the Employment Verification section, he/she must first
cancel his/her Employment Verification if his/her Employment
Verification has been initiated.
System shall not allow applicant to change Date of Birht on the
General Information page if electronic loans are present.
Section 7: Employment
The Employment Information page captures the applicant’s current employment information. Depending on the applicant type, a Critical Shortage Facility will be required for NCLRP applicants or a school site will be required for NCLRP-NF applicants.
Steps NCLRP-NF:
Applicant selects state in the drop down
Applicant chooses a school from the drop down
Applicant selects
Applicant will be moved to Employment Verification section
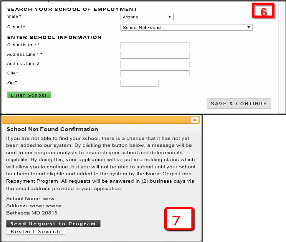
Steps NCLRP-NF: School Not Found:
If the applicant cannot find his/her school he/she will select
“School not Found” in school drop down (see
screen shot 6)
Applicant enters school information and selects
A popup will display, giving the applicant a choice of sending the
request to Program or restarting the search (see
screenshot 7)
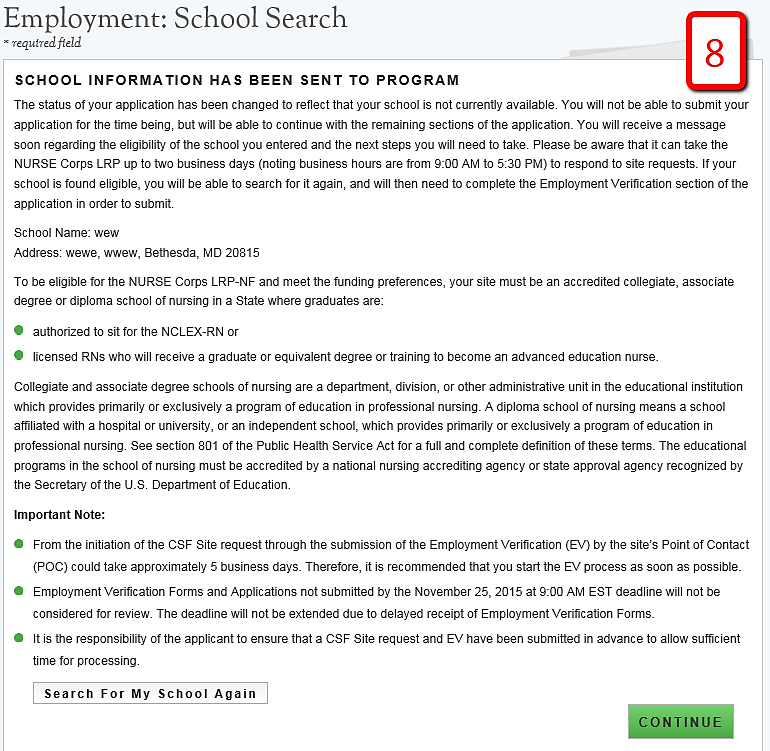
If the applicant sends the request to program, he/she will be
returned to Employment School Search Page and language will be
displayed indicating that he/she has sent his/her school
information to Program (see screen shot 8)
Applicant will click continue and be directed to Qualifying
Education page
![]() once he/she have answered all the required fields.
once he/she have answered all the required fields.
![]()
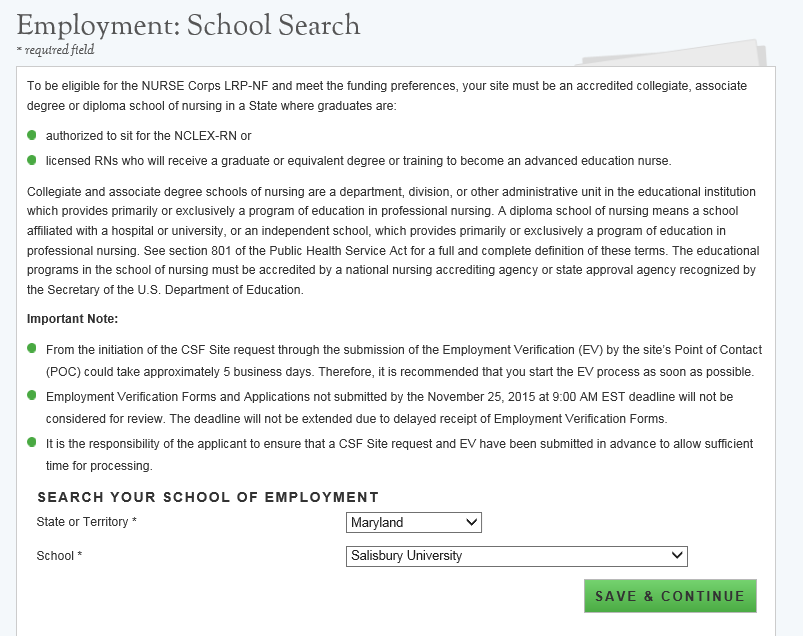
Business Rules:
System shall limit school name field based on state selected
System shall only provide schools in the school dropdown that:
Exist in BMISS
Are Accredited
Have a status of non-profit/active
System shall enable option “School Not Found” during
entire application cycle which can be selected for any state
System shall populate the following fields and require user to
complete them in order to continue if applicant selects “School
not Found”
School Name
School Address
System shall require applicant to confirm or cancel program
communication upon selecting “Enter School” if
applicant does not see his/her school
If applicant selects “Restart Search” from the School
Not Found Confirmation Pop Up, he/she will be taken back to the
employment search screen
System shall send communication to Program with the following
information if applicant confirms to send communication to Program
Applicant first and last name
Applicant email/username
Applicant school name and address entered by applicant
System shall put applicant in “In Progress-Employment Not
Found” status if applicant sends school information to
Program from the School Not Found pop up
System shall enable Qualified Education page if user is in the “In
Progress- Employment Not Found” status
The Employment Verification page will not be enabled in this
situation
Business Rules cont:
An analyst has the ability to make an applicant site “Eligible”
or “Ineligible” from the Manage Application Documents
screen when an applicant is in the “In Progress- Employment
Not Found” status
If an applicant site is made ineligible by an analyst his/her
status will be “Ineligible” and he/she will be directed
to the ineligible landing page after he/she refresh his/her screen
or logs back in
If an applicant is made eligible by an analyst the applicant will
receive an email and his/her school will be added to BMISS
The applicant must repeat the steps outlined above to add his/her
school of employment
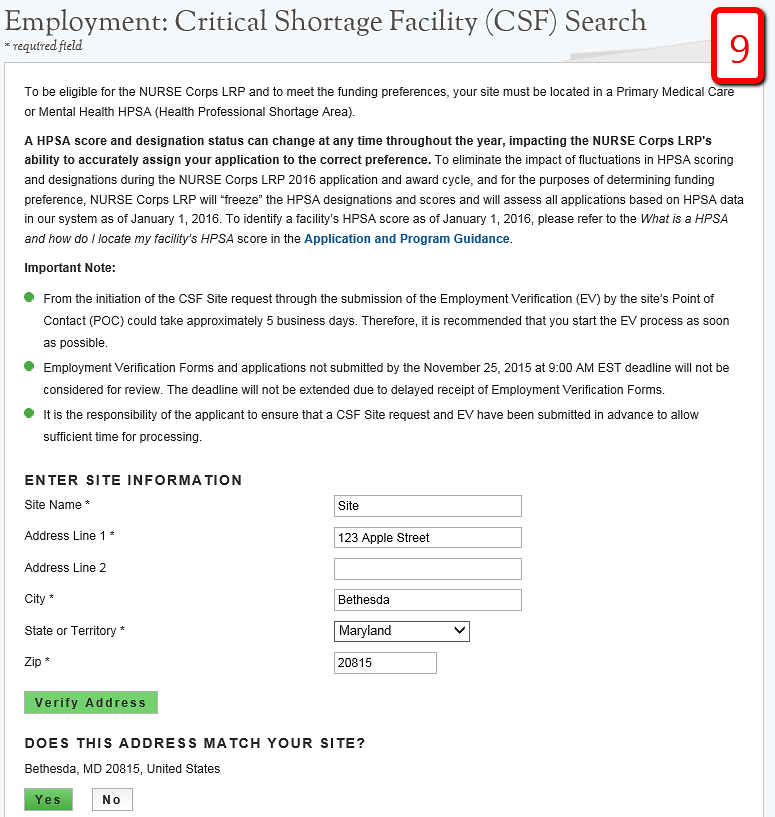
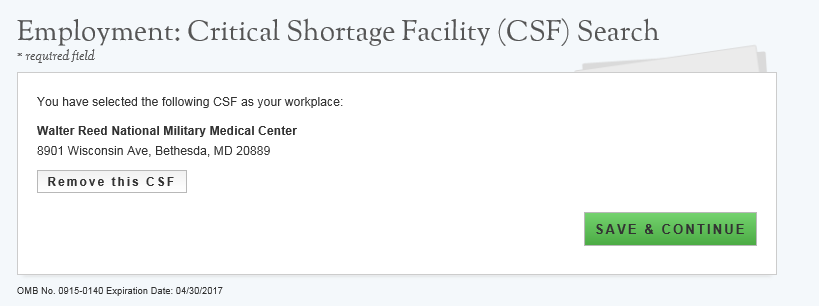
Steps NCLRP:
Applicant fills out the name and address of his/her Critical
Shortage Facility
Applicant selects
Verified address appears at the bottom of the page (see
figure 9)
If address entered is a match applicant selects
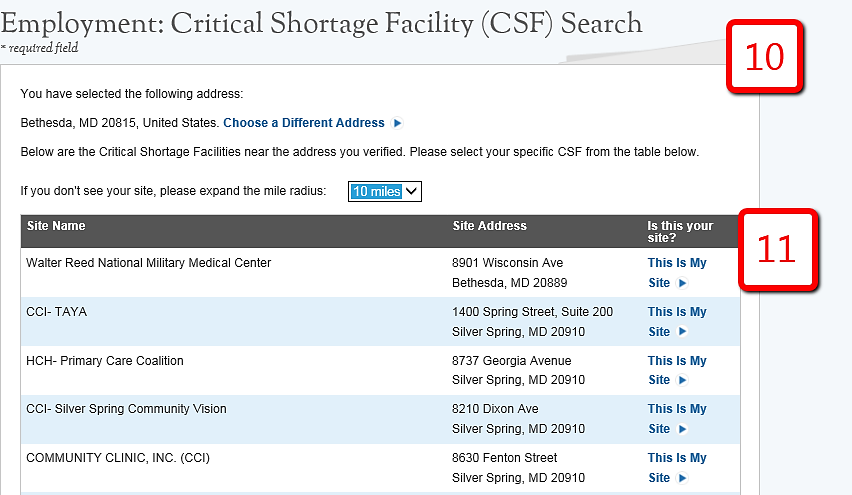
System will display a list of search results within a ½ mile
radius of the Google address if user selects “Yes”
to Google address match (see figure 10)
If address entered is not a match applicant selects
System will display a list of search results within a 10 mile
radius of the Google address if user selects “No”
to Google address match (see figure 11)
![]()
![]()
![]()
If applicant does not see his/her site he/she can expand the
search radius.
Applicant selects site he/she currently work at by clicking
“This is my site”.
Applicant clicks
Applicant is taken to Employment Verification Page.
![]()
Steps NCLRP: Site Not Found:
If applicant does not see his/her site he/she will click
A popup will display, giving the applicant the choice of sending
the request to program or restarting the search (see
figure 12)
If the applicant sends the request to program he/she will be
returned to Employment Site Search Page and language will be
displayed indicating that he/she have sent his/her site information
to Program (see figure 13).
Applicant will click Save and Continue and be directed to
Qualifying Education page.
Business Rules:
System shall enable Verify Address only when applicant enters all
required fields for CSF address
System shall provide address match from Google to the address
entered by user (if possible)
System shall inform applicant if there is no Google address match
for address entered by applicant if address cannot be geocoded to a
Google address
System shall direct applicant to retype address and clear address
fields if there is no Google address match for address entered by
applicant on the first search attempt
System shall display Site Not Found pop-up to send site information
to Program if there is no Google address match for address entered
by applicant on the second or more search attempts
System shall display a list of search results within a ½
mile radius of the Google address if user selects “Yes”
to Google address match
![]() at the bottom of the search results
at the bottom of the search results
Business Rules Cont:
System shall allow applicant to change the radius of the search
results
System shall display a list of search results within a 10 mile
radius of the address the applicant entered if user selects “No”
to the Google address match
System shall only provide sites in search results that:
Exist in BMISS
Have a Mental or Primary Care HPSA score as of the Jan 1 HPSA Lock
Have a status of non-profit/active
System shall direct user to Employment Verification request page if
user selects a site from the search results and selects Continue
System shall enable Continue button only when user selects an
option from the search results
System shall require applicant to confirm or cancel program
communication upon selecting “I do not see my site listed”
from the search results
If applicant selects “Restart Search” from the Site Not
Found Confirmation Pop Up, he/she will be taken back to the
employment search screen
System shall send communication to Program with the following
information if applicant confirms to send communication to Program
Applicant first and last name
Applicant email/username
Applicant site name and address entered by applicant
Business Rules Cont:
System shall put applicant in “In Progress-Employment Not
Found” status if applicant sends site information to Program
from the Site Not Found pop up
System shall enable Qualified Education page if user is in the “In
Progress- Employment Not Found” status
The Employment Verification page will not be enabled in this
situation
An analyst has the ability to make an applicant site “Eligible”
or “Ineligible” from the Manage Application Documents
screen
If the applicant’s site is made ineligible by an analyst,
his/her application status will update to “Ineligible,”
and he/she will be directed to the ineligible landing page after
he/she refreshes his/her screen or logs back in
If an applicant is made eligible by an analyst the applicant will
receive an email and his/her site will be added to BMISS
The applicant must repeat the steps outlined above to add his/her
site
Steps to remove a Site or School:
Applicant navigates to the employment page by clicking the
Employment link at the top of the page
Applicant clicks “Remove School” or “Remove Site”
Once previous site is removed applicant will have to repeat steps
to add another site
Business Rule:
If the applicant has an initiated or completed Employment
Verification, he/she must cancel the Employment Verification before
he/she can remove his/her site
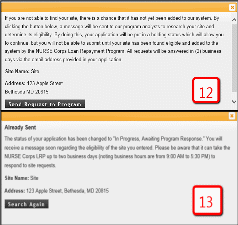
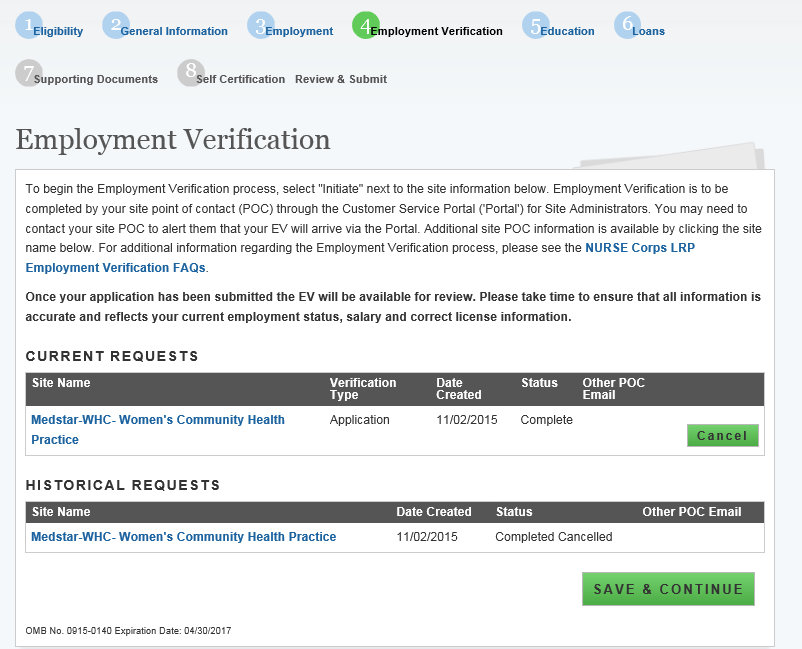
Section 8: Employment Verification
W
Steps:
System will populate EV request for site added on Employment page
Applicant can click site name to verify that the appropriate
address, phone number and point of contact are listed
Applicant can enter “Other POC Email” if the applicant
does not see his/her correct POC in the site information or if the
site does not have a POC associated with it
Applicant clicks
Applicant clicks
Applicant is taken to the Education section
Business Rules:
System shall populate an EV request for the site added on the
Employment page
System shall display EV status as Not Started before applicant
initiates a EV Request
System shall enable Cancel button if EV status is “In
Progress,” “Complete”, or “Returned-Unverified”
System shall allow applicant to resend EV if EV status is
“Returned-Unverified”
System shall allow applicant to continue to next section,
Qualifying Education, if individual EV Request is in any status.
![]()
![]()

Business Rules Cont:
System shall send an email to “Other” POC entered by
applicant with instructions on how to register a portal account
If an applicant wishes to change his/her application type (which
can be done by navigating to the General Information page), he/she
must first cancel his/her Employment Verification if the Employment
Verification has been initiated
If an applicant wishes to remove his/her site (which can be done by
navigating to the Employment page), he/she must first cancel
his/her Employment Verification if the Employment Verification has
been imitated
Steps to cancel EV
Applicant navigates to Employment Verification page using the
navigation links at the top of the screen
EV status will be displayed and can either be Initiated,
Complete or Returned Unverified
Applicant selects
Applicant can re-initiate EV by clicking the
Business Rules:
If the applicant wants to change Employment Site/School Site he/she
must navigate to the Employment page and remove Employment
Site/School after cancelling the EV
If the applicant would like to change his/her application type
he/she must navigate to the Employment page and remove Employment
Site/School Site, then navigate to the General Information Page to
change his/her application type after cancelling the EV
![]() if he/she wish to cancel the EV
if he/she wish to cancel the EV
![]() button
button

Business Rules Cont:
If an applicant changed his/her Employment Site/ School Site or
his/her application type the applicant must repeat the steps to add
an Employment Site/School Site & initiate an EV
An applicant may cancel an EV and complete the rest of the
application but will not be able to submit his/her application
until the Employment Verification has a status of “Complete”.
System will display at the bottom of the page a table of all EVs
that have been cancelled called the “Historical Requests”
table.
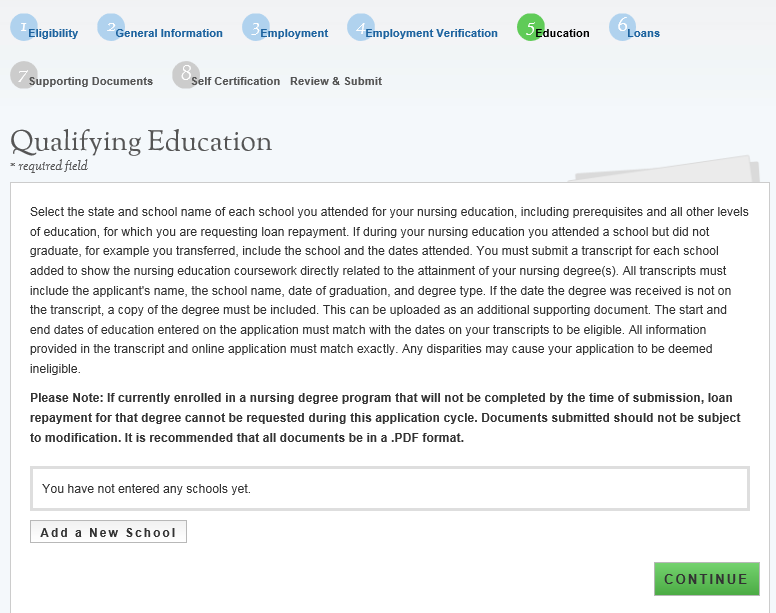
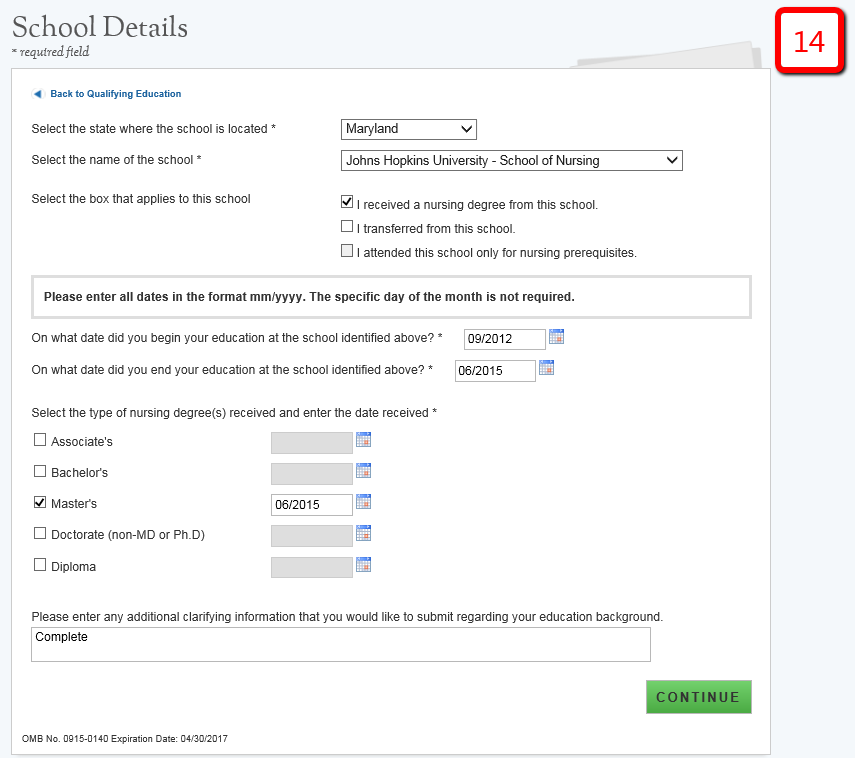
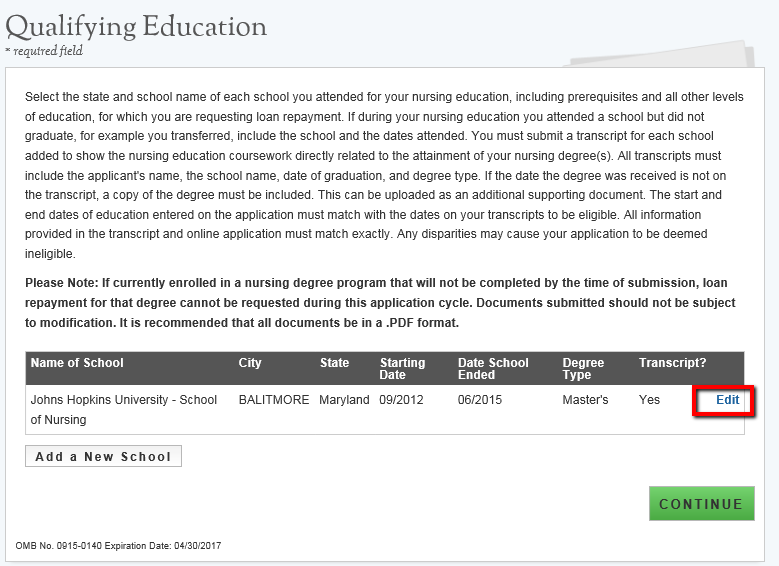
Section 9: Qualifying Education
T
Steps:
Applicant selects
Applicant is directed to the School Details page (see
figure 14)
Applicant selects the state where the school is located
Applicant will select school based on list populated when state was
selected
Applicant will select whether he/she received a degree from
selected school, transferred from selected school or attended
selected school for nursing prerequisites
Applicant will enter the date he/she began and ended his/her
education at selected school
Date format is mm/yyyy
If applicant indicated that he/she received a degree from the
schools, the applicant will select type of nursing degree(s)
received and date(s) received from the school
Date format is mm/yyyy
Applicant selects
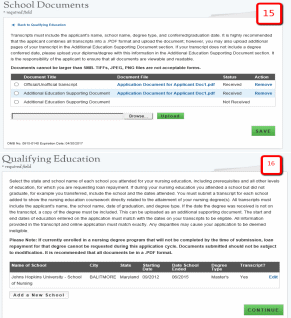
Applicant is taken to the “School Documents” page (see
figure 15)
Applicant has to upload an Official/Unofficial transcript to
continue to the next section
Applicant has the option to upload unlimited Additional Supporting
Documents
![]()
![]()
Steps Cont:
After applicant uploads his/her documents he/she will select
Applicant can add an additional school or edit existing school
information
Applicant will select
Business Rules:
System shall require user to answer required fields to be able to
continue
System shall limit school name drop down based on state selected
System shall require user to enter in “Other School”
information if “Other” is selected for NCLRP School
Name
System shall require user to check at least one:
I received a nursing degree from this school
I transferred from this school I attended
this school for nursing prerequisites
System shall not allow user to select both:
I received a nursing degree from this school
I attended this school for nursing prerequisites
![]() and be directed back to the Qualifying Education landing page (see
figure 16) where he/she will see the school(s) added.
and be directed back to the Qualifying Education landing page (see
figure 16) where he/she will see the school(s) added.
![]() after adding all schools and be directed to the Loan section
after adding all schools and be directed to the Loan section
Business Rules Cont:
System
shall require user to add at least one school with a nursing degree
selected to be able to continue to the loan section.
System
shall require user to answer “Date Received Degree” and
if “I received a nursing degree from this school” is
selected.
System
shall require that “School Start Date” is after Birth
Date.
System
shall require that School Start Date is prio to current date.
System
shall require that “School Start Date” is before
“School End Date”.
System
shall require that “School End Date” is on or before
“Date Received Degree”.
System shall require that “School End Date” and “Date
Received Degree” is on or before the application submission
date.
This check will occur upon submission of the application.
System shall allow user to edit school added by clicking “Edit”
in the table and the education details will populate with
information entered.
System shall require a transcript for each school added.
System shall allow unlimited “Additional Education Supporting
Document” to be uploaded for each school added.
Business Rules Cont:
System shall not allow the earliest school start date to be greater
than three (3) months later than the latest loan date or the latest
school end date to be greater than three (3) months prior to the
earliest loan date if applicant adds or edits a school after at
least one loan is added.
This is only if applicant navigates to education page after adding
at least one loan (or chooses to edit application after
submission).
If an applicant inputs his/her dates as MM/DD/YYYY the system will
default dates to MM/YYYY format.
Education start date and degree received date is defaulted to the
first day of the month in the BMISS system
For example, if an applicant indicated his/her education start
date is 10/14/2015 and degree received date as 11/11/2019 the
BMISS system will interpret it as 10/01/2015 & 11/01/2019
respectively.
Education end date is defaulted to the last day of the month in the
BMISS system
For example, if an applicant indicates his/her education end date
as 10/14/2019 BMISS system will interpret it as 10/31/2019.
Applicant can enter comments for each school added.
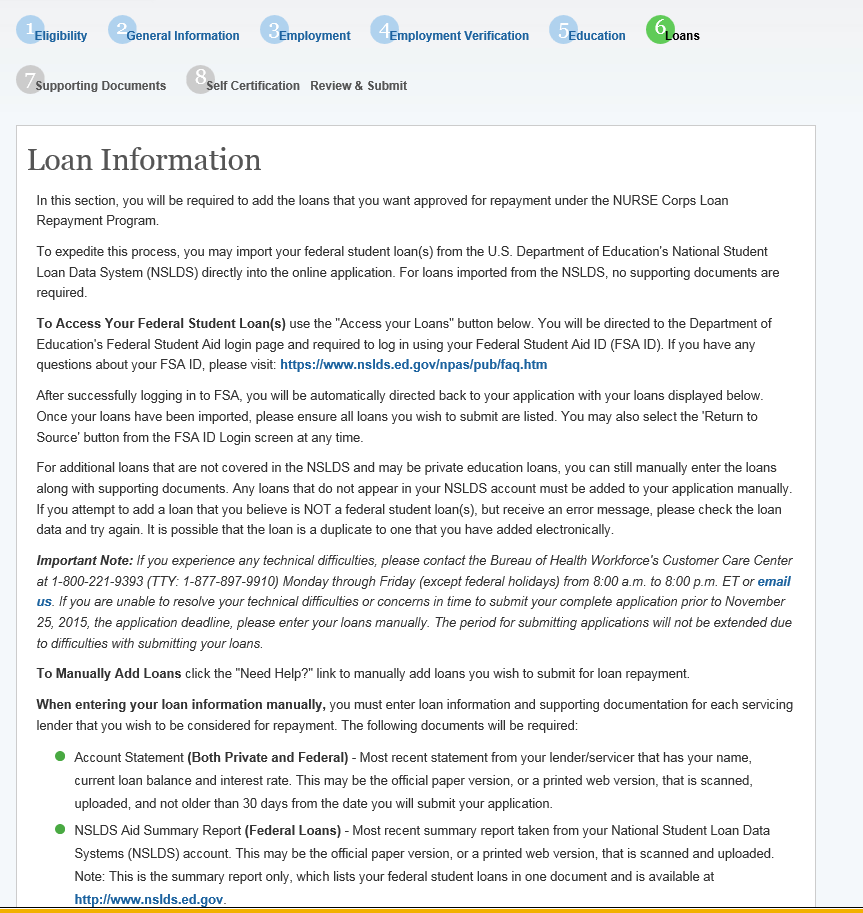
Section 10: Loan Information
T
Steps to Electronically Retrieve Loans:
Applicants navigate to LOG INTO YOUR NATIONAL STUDENT LOAN DATA
SYSTEM ACCOUNT and clicks
Applicant is direct to the Department of Education's Federal
Student Aid login page and logs in using their FSA ID.
Applicant will be automatically redirected to his/her S2S LRP
application after authentication.
If NSLDS
authentication and retrieval is successful, the applicant’s
loan(s) will display in the “Electronically Imported From
Your NSLDS Account” table (See figure A) Applicant
can view a read only version of his/her loan details by clicking
the “View” button next to each loan electronically
retrieved. The date
and time of the last successful transaction with the NSLDS will be
displayed for reference
Note:
The social security number and date of birth entered in the
General Information section of the application must match the
social security number and date of birth on file with the
Department of Education.
Applicant
will answer “Yes” or “No” to “Do you
have additional Loans that need to be added?” applicant
answers “No,” the
If applicant answers “Yes” applicant will be directed
to Loan Details page
![]()
![]() button will become available and the applicant will be directed to
Supporting Documents section of the application.
button will become available and the applicant will be directed to
Supporting Documents section of the application.
Steps Cont:
Applicants
may update loans previously retrieved from NSLDS by clicking the
Applicant will be required to re-authenticate with the Departments
of Education using his/her FSA ID.
Applicants
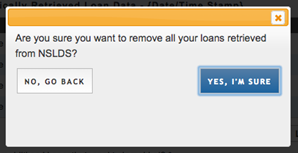
can remove electronically retrieved loans by clicking the
Applicants
will be able to view a comprehensive report of all NSLDS federal
loan data retrieved and submitted with his/her application upon
submission of his/her application.
![]() (Update Loans) button
(Update Loans) button
![]() (Remove All Loans) button and confirming selection on pop-window.
(Remove All Loans) button and confirming selection on pop-window.
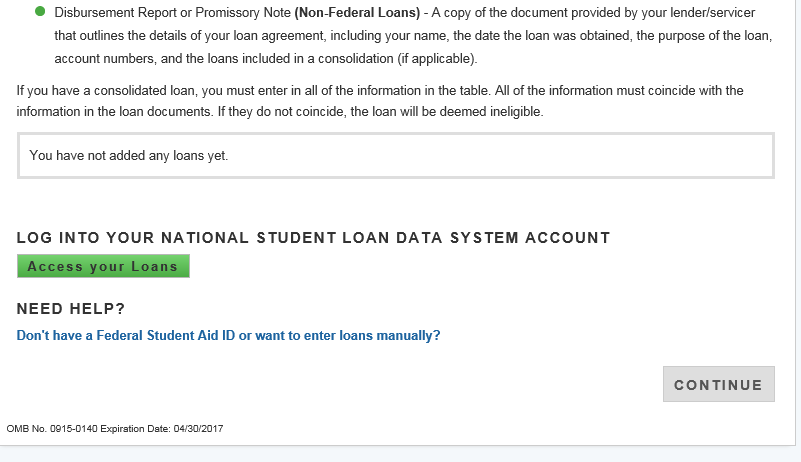
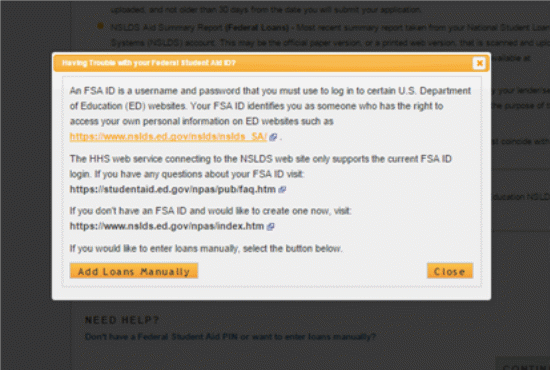
Steps to Manually Add Loans:
Applicant
clicks on the “Don’t have a Federal Student Aid ID
or want to enter loans Manually?” link under the “Need
Help?” heading.
Applicants will view a popup message with a link to Add Loans
Manually.
Applicant will be directed to the Loan Details page when clicking
the Add Loans Manually button.
Business Rules:
System shall require at least one loan (Electronic or Manual) to
be added to continue.
System shall not require applicant to retrieve loans
electronically.
System shall check to see if applicant has already manually added
federal loans and de-active “Access your Loans” button.
System will deactivate the “Access your Loans” button
and display a notice if the applicant is using Internet Explorer
version 9 or lower.
System shall redirect applicant to his/her application and prompt
data exchange between HHS and DoED when user successfully
authenticates.
If the data exchange was not successful due to incomplete NSLDS
data, the system shall display the following message “Certain
loan information needed to successfully transmit from the NSLDS to
your online application was incomplete. Please reach out to the
NSLDS and try again - OR - add your loans manually.”
System shall display federal loans retrieved via web service under
a table tiled “Electronically Imported From Your NSLDS
Account”
Section 11: Loan Details
The Loan Details page captures additional loan data that the applicant will submit for each manual loan he/she will submit with the application.
Please note: If an applicant submits all loans using the NSLDS retrieval, and does not manually add any loans to his/her application, he/she will not have access to the loan details page.
Steps to Manually Add Loans:
Appplicant
fills in all required fields to continue:
Name of current servicing lender
Loan account number
Original date of the loan
Original amount of the loan
Current balance (Principal & Interest)
Interest rate (Optional)
Type of loan
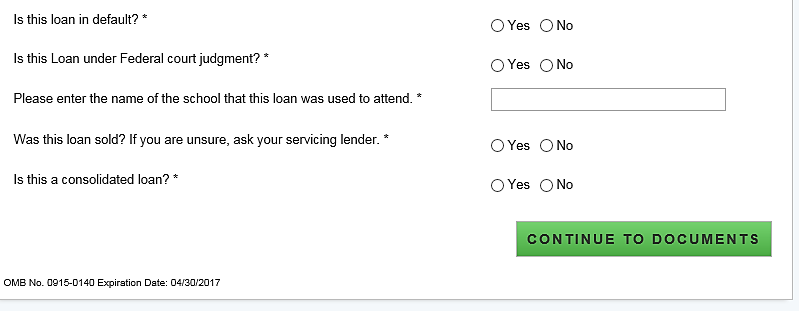
Is this loan in default
Is this loan under Federal court judgment
Is this a consolidated loan
After the
applicant enters all required fields, he/she will click
Applicant
will upload necessary documents and click
Applicant can choose to add another loan. To add another loan, the
applicant will click the Add New Loan button and repeat the steps
above.
If the
applicant wants to edit or remove his/her loan, the applicant can
click the check box to Remove loan at the bottom of the Loan
Details page.
![]() (Continue to Documents) and will be taken to Loan Supporting
Documents Page (See Figure B).
(Continue to Documents) and will be taken to Loan Supporting
Documents Page (See Figure B).
![]() (Save).
(Save).
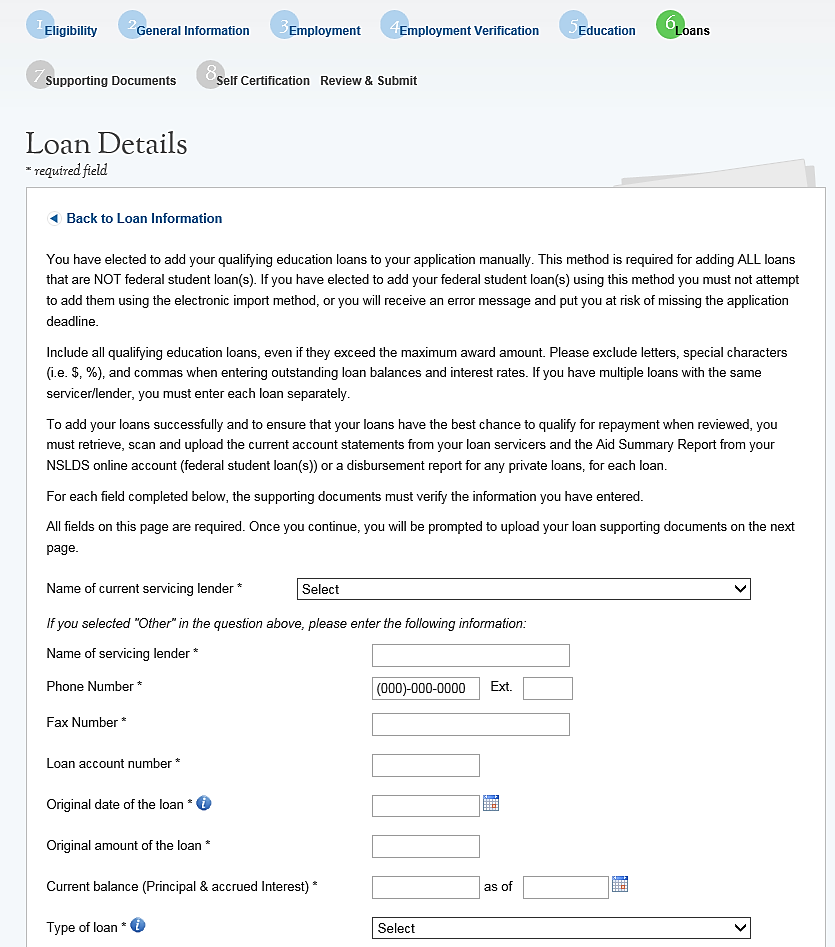
Steps Cont:
If the
applicant does not add another loan or edit his/her loan, he/she
will click
Business Rules:
System shall allow account number to be alpha –numeric and
allow special characters.
System shall not allow “Current Balance As of Date” to
be prior to “Original Date of Loan”.
System shall not allow user to enter a “Current Balance As of
Date” more than 30 days prior to current date.
System shall not allow user to enter a “Current Balance As of
Date” after the present date.
If loan is not consolidated, System shall require that “Original
Date of Loan” be:
No more than 3 months prior to earliest education start date.
No more than 3 months after latest education end date.
System shall require “Consolidated Loan Dates” to be :
No more than 3 months prior to earliest education start date.
No more than 3 months after latest education end date.
If loan is consolidated, “Original Date of Loan” must
be prior to all “Original Date of Loan” for all
consolidated loans.
If loan is in default/under court judgment “Original Date of
Loan” must be prior to Date of Court Judgment/Date of
Default.
![]() (Continue).
(Continue).
Business Rules Cont:
System shall require user to submit a Consolidated Loan Document,
if “Yes” to Consolidated Loan.
System shall require user to submit an “Account Statment”
for each loan.
System shall require user to submit a Disbursement Report for
non-Federal loans only.
System shall require user to submit an Aid Summary Report for
Federal loans only.
System shall allow user to continue to next section without
uploading all or any required loan documents. Loan page status will
be “In Progress” until all required documents have been
uploaded for each loan. The applicant will not be able to submit
his/her application until all required loan documentation has been
uploaded.
System should not allow applicant to manually enter a federal loan
if loans have been electronically retrieved via NSLDS.
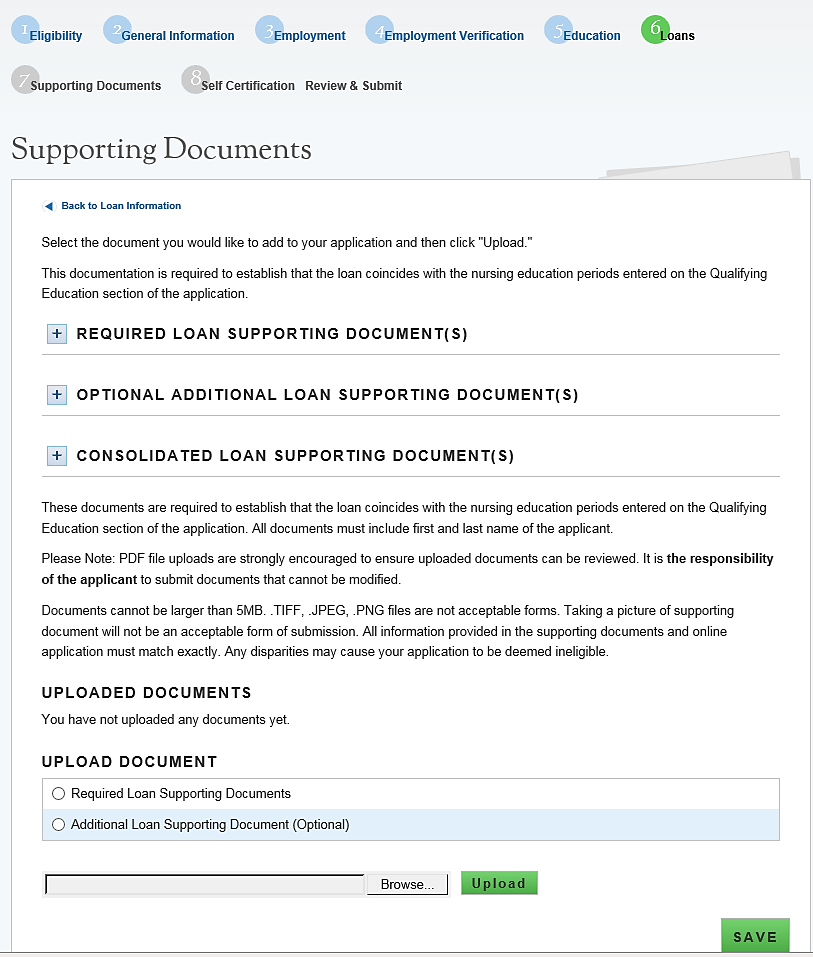
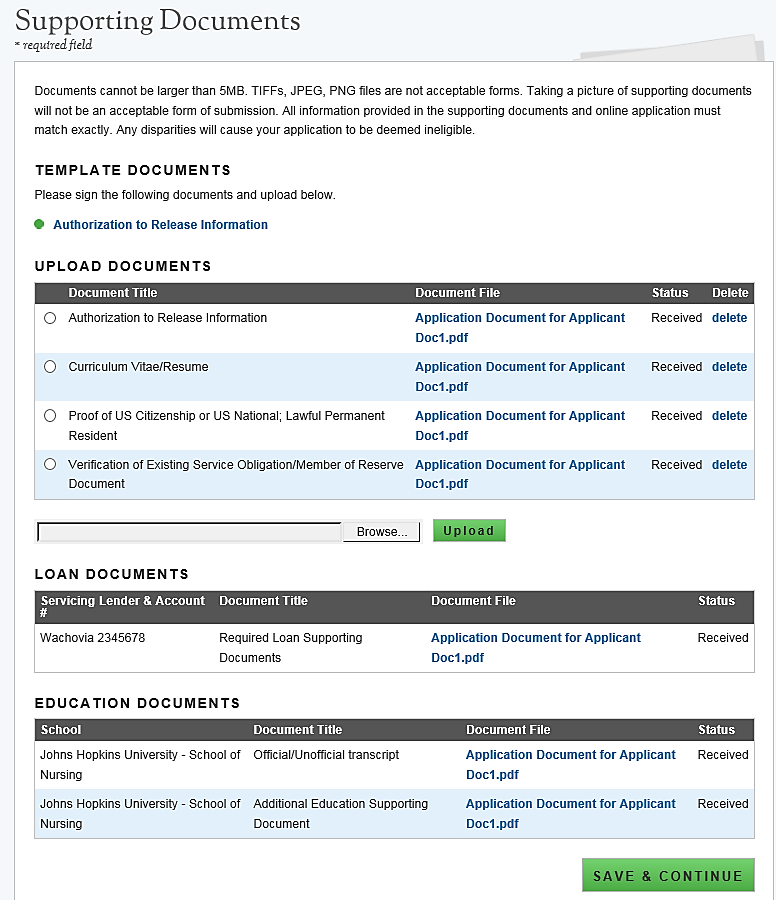
Section 12: Supporting Documents
T
Steps:
Applicant selects the type of required document he/she will upload.
Applicant selects “Browse” to find the document he/she
wishes to upload.
Applicant selects “Upload” when he/she selecs the
appropriate document.
Applicant repeats these steps for all of the required documents.
Applicant clicks on “Authorization to Release Information”
to download the respective form.
Applicant will fill out and upload forms to his/her application.
Applicant clicks “Save & Continnue” to proceed.
Business Rules:
System shall display the required supporting documents to submit
application for each applicant
Each uploaded document will be linked for the applicant to view
System shall allow applicant to upload different types of documents
– PDF, jpeg, text, doc
System shall allow applicant to upload document size up to 5 MB
System shall display a required transcript for each school
submitted on Qualified Education Information page
he Supporting Documents page consists of all documents that an
applicant must submit with his/her NCLRP application. The
documentation consists of required documents for NCLRP and NCLRP-NF
applications.
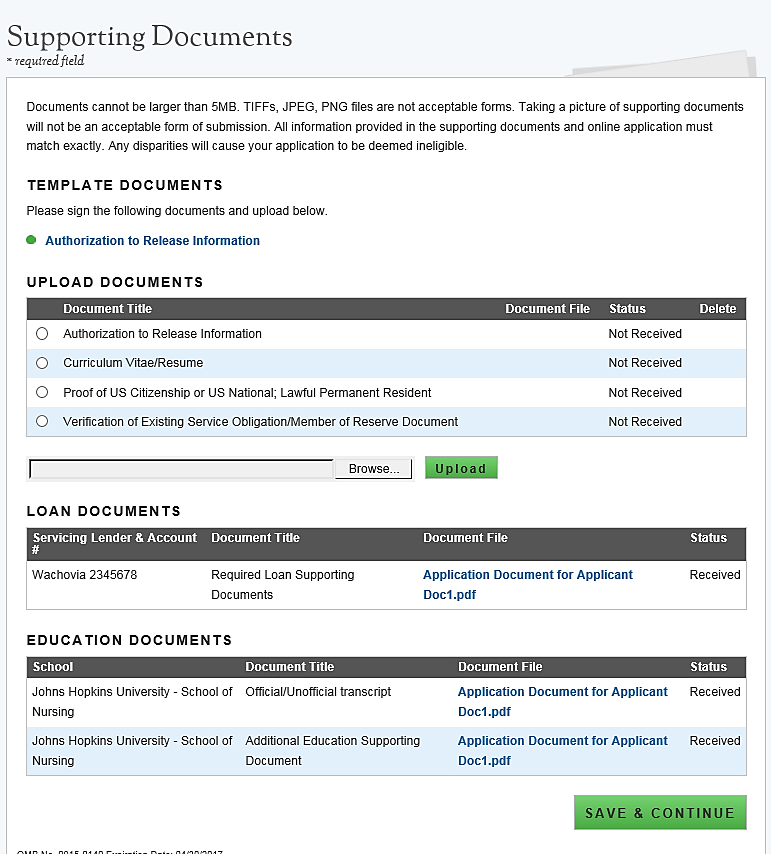
Business Rules Cont:
System shall display all loan documents uploaded for each manually
added loan
System shall require the “Existing Service Obligation”
document to be upload if the applicant answered “Yes”
to having an existing service in the Eligibility section
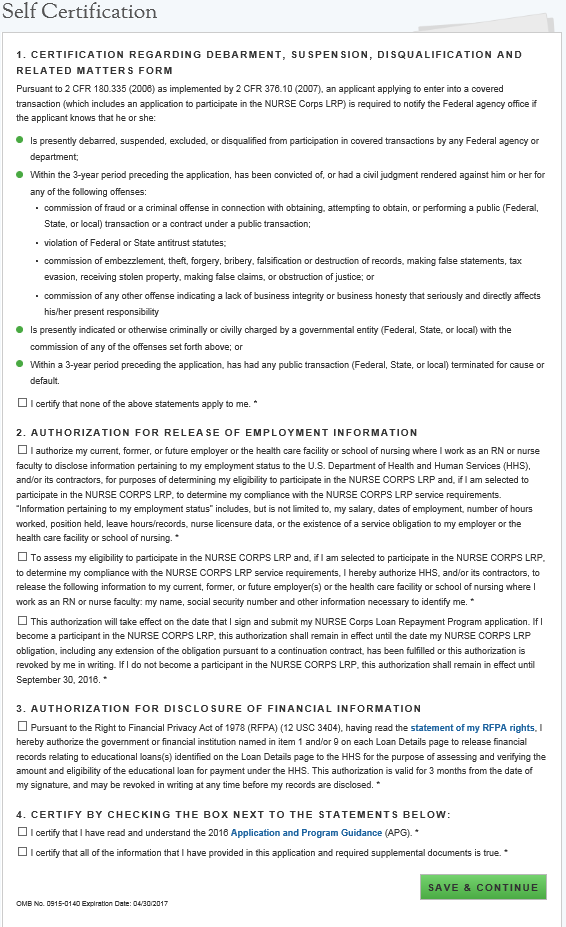
Section 13: Self-Certification
T
Steps:
Applicant reads each certification statement.
Applicant checks the box that certifies each statement.
Applicant selects
Business Rules:
System shall require the applicant to respond to each certification
question to proceed.
System will clear Self Certification page if the applicant proceeds
to the Review and Submit page but then navigates to another section
on the application to make any edits
The applicant must complete the Self-Certification each time after
editing.
![]() .
.
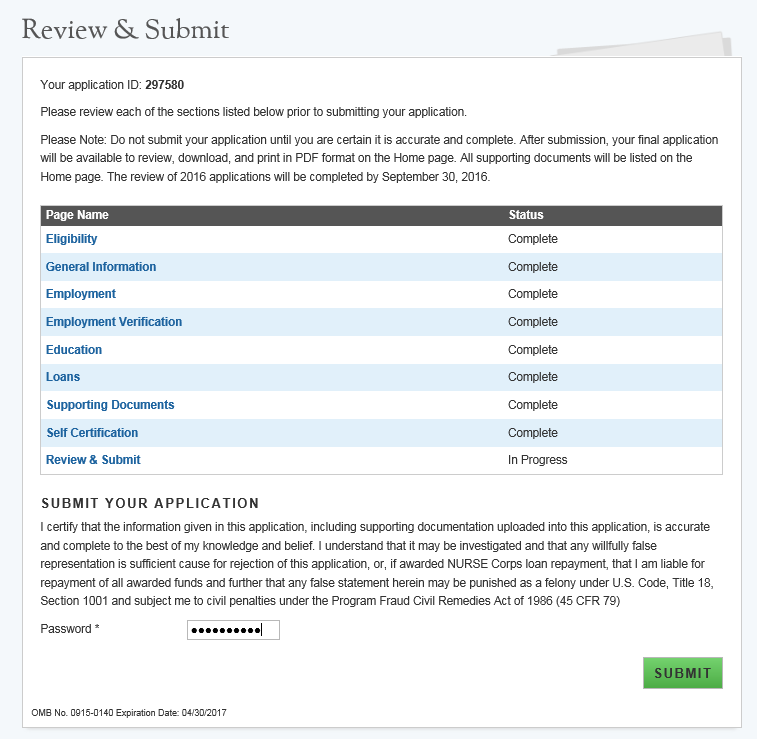
Section 14: Review & Submit
T
Steps:
Applicant reviews the application and makes any necessary edits
Applicant enters password
Applicant selects
Business Rules:
Applicant can view and edit any page of the application by clicking
on the page name before submitting.
Applicant will then be required to complete the Self-Certification
section again
Applicant must enter in his/her correct password in order to submit
his/her application.
All page statuses except for review and submit must be complete for
applicant to submit his/her application.
System shall not allow application to be submitted after the
application deadline.
System shall update application status to a submitted status upon
submission.
![]() .
.
Section 15: Submitted Page
After the applicant submits his/her NCLRP application, he/she will be directed to the Submitted landing page and the overall application status will change to either “Submitted” or “Submitted – Ineligible.” If any of the responses on the online application deem an applicant ineligible, the status upon submission will be “Submitted – Ineligible.” If the responses submitted deem the applicant eligible the application status will be “Submitted.” On the Submitted landing page, the applicant will have the ability to edit or withdraw his/her application. The applicant will have the ability to edit his/her application until the application deadline. The applicant may withdraw his/her application up until the applicant receives a Confirmation of Interest (COI), if applicable.
Business Rules:
System shall update the application status to
“Submitted-Ineligible” upon submission if:
Received degree date from education page is in the future
Applicant has an existing BHW service that has an obligation end
date in the future (validated by SSN check)
The Employment Verification (EV) submitted by the site Point of
Contact (POC) indicated that the applicant does not meet the
required work hours per week to be eligible for an award
The EV submitted by the site's POC indicated that the applicant
does not have a current, full, unrestricted, and unencumbered
license
The EV submitted by the site's POC indicated that the applicants
employment start date is after his/her submission date
System shall disable the
System shall update applicant status to “In Progress”
upon selecting Edit
System shall disable Edit when application cycle closes
System shall save most recent application status upon cycle close (Example: If the
applicant edits and never re-submits by the application close date,
his/her final status will be “In Progress”)
![]() button if/when applicant is sent Confirmation of Interest (COI)
button if/when applicant is sent Confirmation of Interest (COI)

Business Rules Cont:
System shall allow applicant to select Undo Withdrawal after he/she
has Withdrawn the application if he/she wish to resubmit.
System shall link a copy of submitted application in PDF after
application has been submitted. The applicant will able to view the
site POC’s EV responses within this document.
System shall display “Submitted-Ineligible” Landing
Page content if applicant is deemed ineligible upon submission
(Edit and Withdraw functionalities will still be enabled until the
application deadline). All
documents uploaded by the applicant will be linked on the Submitted
Landing Page.

Section 16: Application Withdraw
A
Steps:
From the Submitted Home Page an applicant will click the
The applicant will be directed to the “Withdraw
Application” confirmation screen
The applicant clicks
Note: The applicant will now have a status of “Withdrawn”
On the Submitted Home page the applicant can undo the withdraw
by clicking
If the applicant clicks
The applicant will click
Applicant will follow steps to complete and submit application.
The applicant will read each certification
Applicant indicates that he/she agrees by selecting the
checkbox.
Applicant selects
![]() button
button
![]() and is directed to the Submitted Home page (see
Figure 20)
and is directed to the Submitted Home page (see
Figure 20)
![]()
![]() he/she will be directed to the In Progress Landing Page
he/she will be directed to the In Progress Landing Page
![]() from In Progress application and will be directed to the Self
Certification Page
from In Progress application and will be directed to the Self
Certification Page
![]() .
.

Steps Cont:
Applicant is directed to the Review and Submit Page
Applicant reviews the application.
The Applicant enters his/her password
Applicant selects
Business Rules:
The ability to withdraw an application will be disabled when the
applicant is sent to COI.
If an applicant wishes to re-submit his/her application he/she must
resubmit by the application deadline.
The system will save the most recent status once the application
closes if applicant selects withdraw.
An applicant may withdraw his/her application if his/her status is
“Submitted” or “Submitted-Ineligible”.
![]() and is directed to the Submitted Home Page.
and is directed to the Submitted Home Page.
Section 17: Edit Application
I
Steps:
The applicant clicks Edit Application.
The applicant clicks
The applicant will be directed to the In Progress Landing Page (see
figure 21)
The applicant navigates to any section to make the necessary edits
The applicant clicks Save & Continue at the bottom of the page
where edits were made in order to save the edits
Once all edits are made and saved the applicant will navigate to
the Self- Certification page
Applicant will follow steps to complete and resubmit application
![]() or
or
![]() pop-up (below)
pop-up (below)

Business Rules:
The applicant will not be able to Edit his/her application after
the application deadline.
An applicant must resubmit his/her application by the application
deadline if he/she want to be considered for an award.
The applicant will be directed to the In Progress landing page when
selecting Edit.
The applicant’s status will be changed to “In-Progress”
upon selecting Edit.
All business rules apply on each page if the applicant selects
Edit.

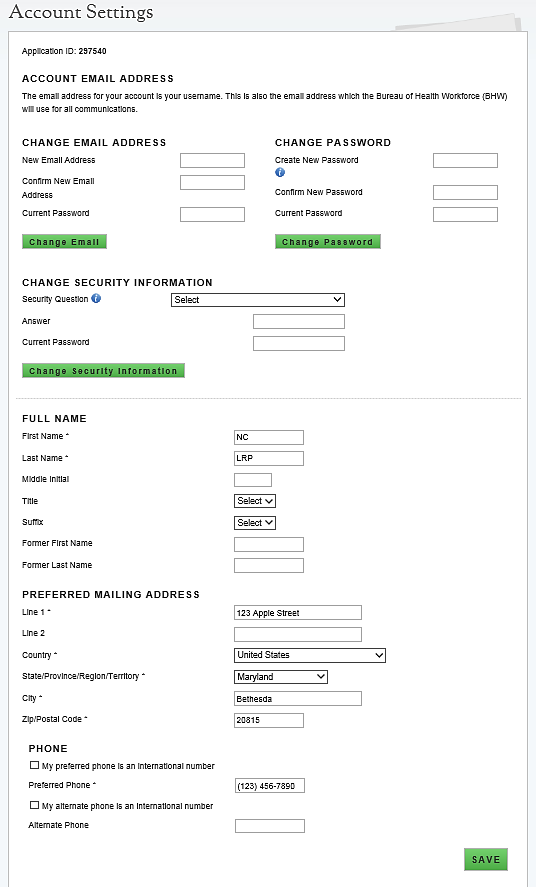
Section 18: Account Settings
T
Steps to change password or email:
Applicant enters new password or email
Applicant confirms new password or email
Applicant enters current password
Applicant clicks to Change Password or Change Email
System displays confirmation that password or email has been
successfully updated
Steps to change security information:
Applicant selects Security Question from the dropdown
Applicant enters new Security answer
Applicant enters current password in the “Current Password”
box
Applicant clicks Change Security Information
System displays confirmation that security information has been
successfully updated.
Business Rules:
System shall inform user that password/email/security information
is now changed upon selecting Save.
System shall inform user that he/she must log out and log back in
upon updating password/email/security information.
System will not create account if email exists in a previously
created account.
System will send confirmation to new email if email was updated.
Section 19: Resolving Issues
Please follow the instructions to resolve any inquiries a NCLRP applicant might have:
For Technical Issues:
When a technical issue is encountered, e.g. Applicant cannot upload supporting documents, the Call Center should log this issue in JIRA with the applicant’s contact information and a description of the problem. At this point, the BMISS HyperCare Support Team would define and resolve the issue as well as notify the Call Center analyst of the resolution.
Logging Issues: When logging issues in JIRA
Log issues as “CC>NCLRP Online App > Eligibility Page”
CC refers to call center
Whichever page the issue is found on please indicate it after NCLRP Online App
If the issue occurs on the General Information page please log the issue as “CC>NCLRP Online App> General Info Page”
Attach a screenshot to the issue (if applicable)
Please do not include a screen shot of the whoops error message
Have the applicant take a screen shot of the page the problem was found on and attach that to the bug
Include the following details in the Description section:
Applicant information: Full name, last four of SSN, username, phone number, applicant id, application id
The exact Online Application screen the applicant was on when the issue occurred
The Web Browser the applicant was using
The frequency of the issue
Detailed description on how to reproduce the issue
The time and date this issue occurred
Include the priority and severity of the issue
For Program Related Issues:
If an applicant has a program question, the Call Center will try to answer the problem by referring to the Application and Program Guidance. If the Call Center is unable to answer the question then he/she must triage the question to the NURSE Corps Loan Repayment Program.
Online Application Program Related Issues Contact: To escalate questions about the NCLRP application, please submit inquires to the following email: nursecorpslrpsupport@hrsa.gov.
Capturing Applicant Information:The following applicant information should be captured and as much detail of the issue as possible:
First and Last Name
Email Address used to log into the application
Last four digits of SSN
Section of online application the user was on when he/she encountered the problem
Detailed summary of the problem
Supporting Document (If applicable)
S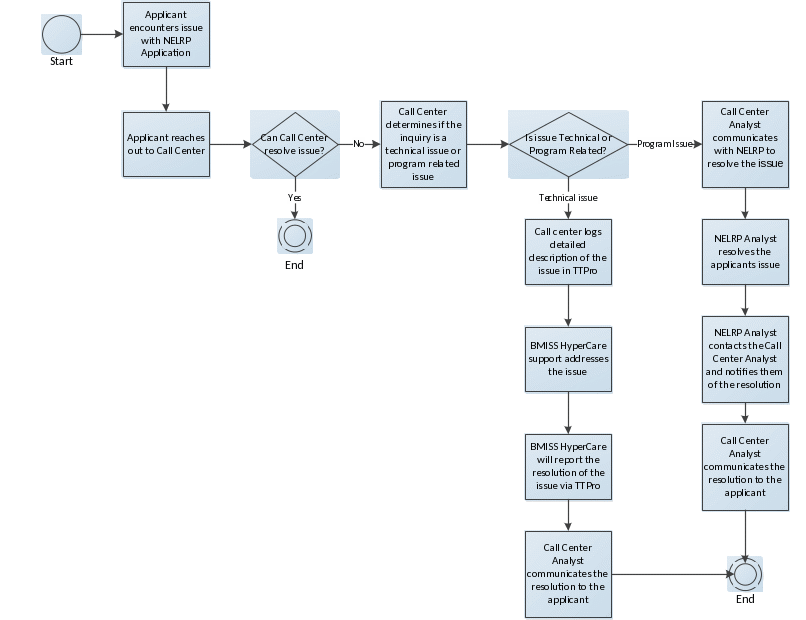 ection
20: Resolving Issue Flow Chart
ection
20: Resolving Issue Flow Chart
P![]()
![]() ROPERTY
OF HRSA | BHW
ROPERTY
OF HRSA | BHW
| File Type | application/msword |
| File Title | APC User Guide |
| Author | Josh Reitnauer |
| Last Modified By | Williams, Willie (HRSA) |
| File Modified | 2017-03-13 |
| File Created | 2017-03-13 |
© 2026 OMB.report | Privacy Policy