Certain Types of Statements for Dietary Supplements
Food Labeling: Notification Procedures for Statements on Dietary Supplements
0331 SCREENSHOTS 2016
Certain Types of Statements for Dietary Supplements
OMB: 0910-0331
Structure/Function Claims Notification (SFCN) Step-by-Step Instructions
Table of Contents
Enter a Structure/Function Claims Notification
Step 1 (Section 1)
Step 2 (Section 2)
Step 3 (Section 3)
Step 4 (Section 4)
Step 5 (Section 5)
Submission Confirmation
Enter a Structure/Function Claims Notification
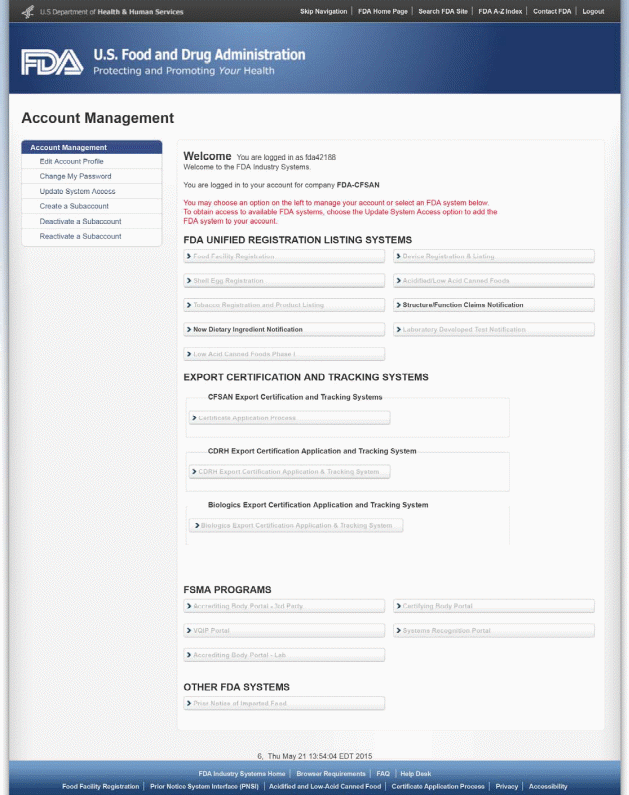
After you log into the FDA Industry Systems page, you will need to select the “Structure/Function Claims Notification” option from the list of systems available on the FURLS Home Page. A “Structure/Function Claims Notification” is used for all claims made pursuant to section 403(r)(6) of the FD&C Act, including nutrient deficiency claims and general well-being claims in addition to structure/function claims. See Figure 1 below.
Figure 1:
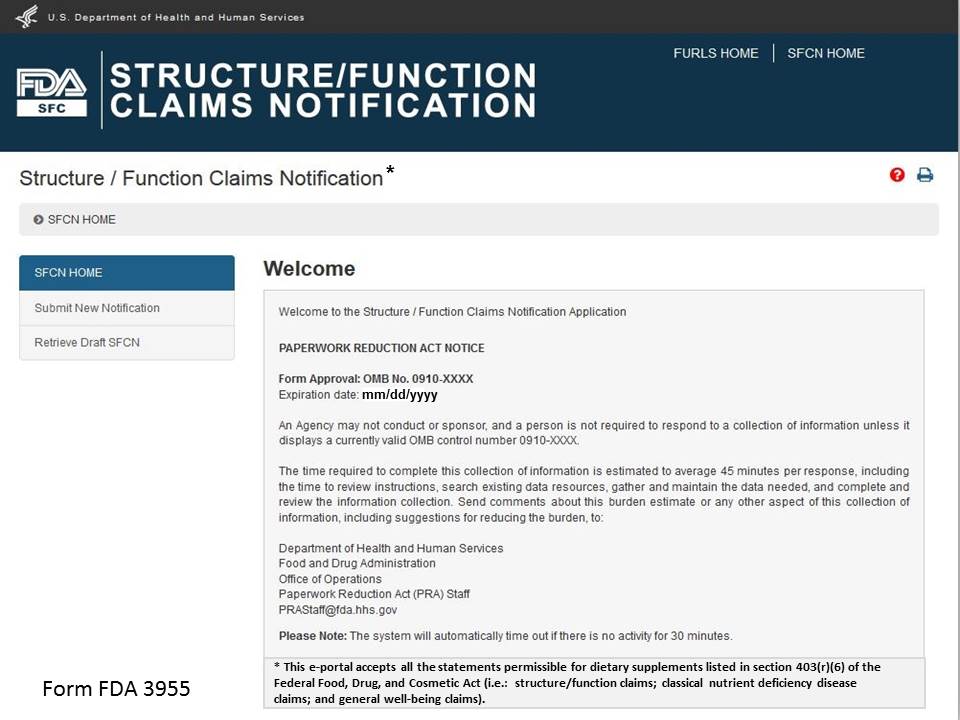
Once you have selected “Structure/Function Claims Notification,” you will navigate to the SFCN main menu. To begin the notification process, select “Submit New Notification” from the list of options. After you have entered an application and saved it as a draft, you may choose to “Retrieve Draft SFCN” from the main menu. See Figure 2 below.
Figure 2:
STEP 1
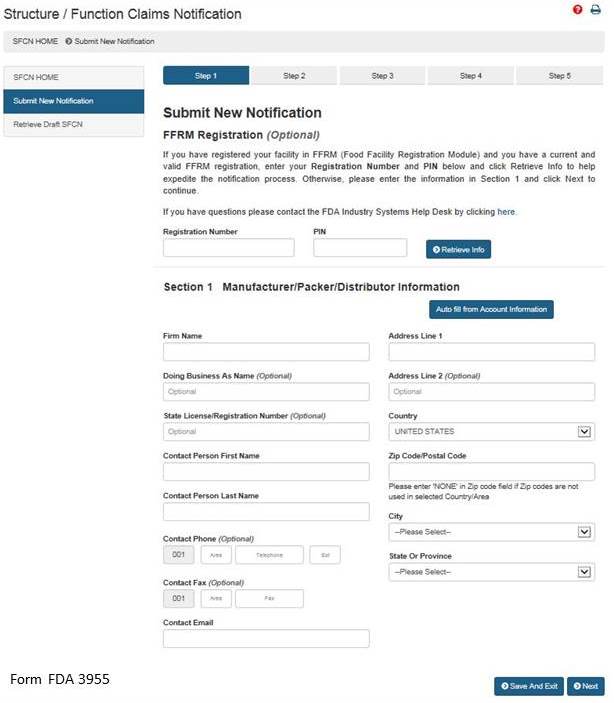
After selecting the “Submit New Notification” option, the system will take you to Section 1. See Figure 3 below.
Figure 3:
Section 1: Manufacturer/Packer/Distributor Information
The FFRM Registration section at the top of the page is optional. If your facility is registered in FFRM (Food Facility Registration Module) and it has a current and valid FFRM registration, you may enter its Registration Number and PIN (Personal Identification Number) into the corresponding boxes and click “Retrieve Info” to retrieve the facility’s information and pre-populate the remaining fields under Section 1.
If you have retrieved your FFRM information, you may select “Auto fill from Account Information” and some fields will be automatically populated based on the information in your Food Facility Registration Number and PIN. These fields cannot be edited in SFCN. If the information is incorrect, please login to the FFRM and follow the directions on how to update your facility information. If you would like to use a different facility, please logout of SFCN and login with the Registration Number and PIN which belongs to the facility for which you are submitting a notification.
If you did not retrieve FFRM information, you must manually complete Section 1.
Firm Name – The name of the manufacturer, packer, or distributor.
Doing Business As Name – (Optional field).
State License/Registration Number – (Optional field).
Contact Person Name – The representative of the manufacturer, packer, or distributor. (Optional field)
Contact Phone – The representative’s telephone number (Optional field).
Contact Fax – The representative’s fax number (Optional field).
Contact Email – The representative’s email address.
Address Line 1 – The physical location of the manufacturer, packer, or distributor.
Address Line 2 – The second address line if applicable (Optional field).
Zip Code – The Zip Code (domestic) or Postal Code (foreign) of the manufacturer, packer, or distributor.
NOTE: The system will prepopulate the remaining City and State or Province fields based on the Zip Code that was entered. You will select the city from the prepopulated list.
NOTE: The system will validate the address based on the zip code entered. If there are alternative street addresses (i.e., St., Street, Ave., Avenue, etc.) the system will provide you with the preferred match. You may accept or reject the recommended address and city. See Figure 4 below.
Figure 4:
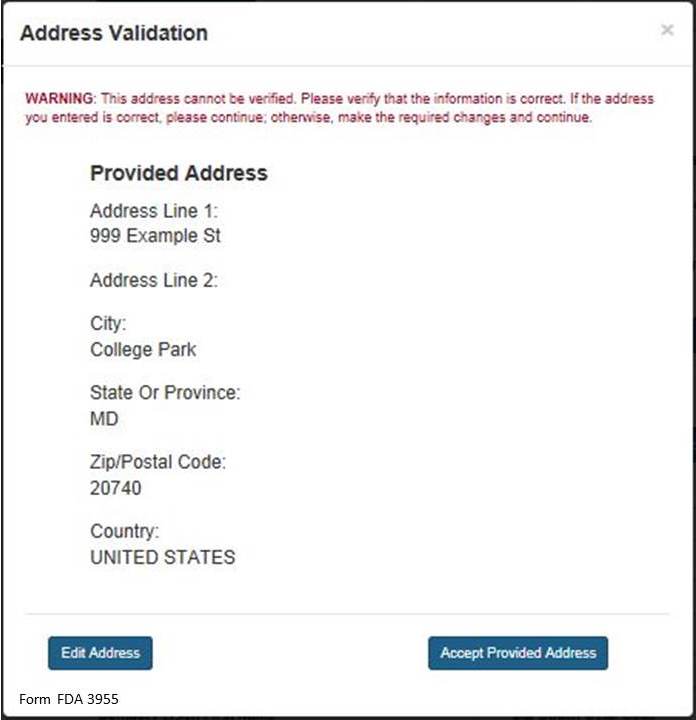
If you do not accept the recommended address, you may select “Edit Address” and return to the previous screen. Otherwise, select “Accept Provided Address” to validate the recommended address.
STEP 2
Section 2: Products and Claims
You have 2 options available to add products and claims. Option I allows you to manually enter products and claims. Option II lets you upload products and claims from a file; to facilitate this process, a downloadable template is provided. See Figure 5 below.
Figure 5:
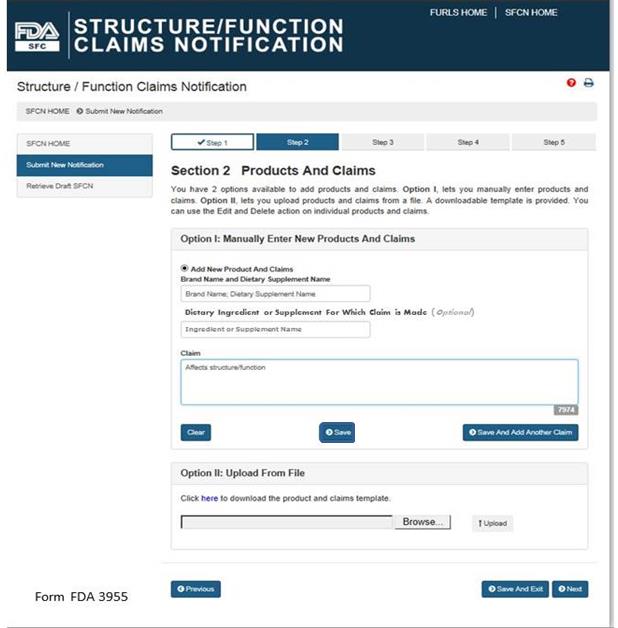
Option I: Manually Enter New Products and Claims
Brand Name and Dietary Supplement Name: The name of the dietary supplement (including brand name).
Dietary Ingredient or Supplement for Which Claim is Made: The specific ingredient for which the claim is being made (Optional Field).
Claim: This field must include the exact language that will be used on the label and labeling for one claim.
After you have manually entered the information into the fields described above, you have three options. First, you may select “Clear” which will clear all of the fields without saving your information. Second, you may select “Save,” which will save the information that you entered as a Claim. Third, you may select “Save and Add Another Claim” which will save the information that you entered as a Claim and clear all of the fields in order for you to enter your next claim.
You can use the “Edit” (pencil icon) and “Delete” (red X) action on individual products and claims.
After you select either “Save” or “Save and Add Another Claim,” the screen will refresh and allow you to: (1) add a new product and claims, (2) add claims to an existing product, or (3) select “Next” if you have no additional products or claims to add to the notification. See Figure 6 below:
Figure 6:
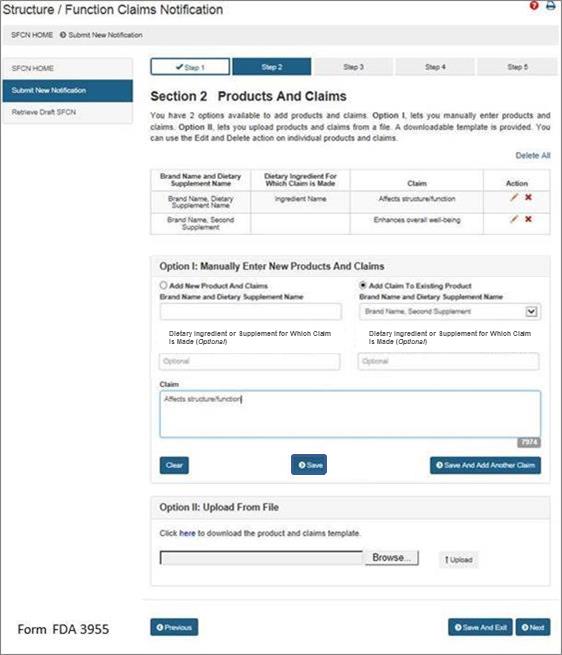
If you would like to add a new product and claims, select the option “Add New Product and Claims” and enter the information as you did for the first claim. See Step 2. Repeat this step until you have added all of the products with their respective claims that you would like to include in this notification.
If you would like to add additional claims to a previously entered product, select the option, “Add Claim to Existing Product.” Then select the corresponding “Brand Name and Dietary Supplement Name” from the list provided. Finally, enter the new claim into the appropriate field with the exact language that will be used on the label and labeling of the product that you selected. Repeat this step until you have added all of the claims that will be associated with the selected dietary supplement.
Option II: Upload From File
If you would like to upload the names of products and claims from a file, a downloadable template is provided. To access the template, select the word “here” from the phrase “Click here to download the product and claims template.” After you have incorporated your claims onto the template and saved it onto your computer, select “Browse” and select the file. Then select “Upload” to begin uploading your product and claims file.
When
you have added all of the desired products and claims, select either
“Save and Exit”
or “Next” to proceed.
STEP 3
Section 3: Labels (Upload one or more labels for a selected product) (Optional)
You may attach an electronic copy of any applicable product label(s). Please note that your file size needs to be 50 MB or less in order to upload electronically. The file types we accept include the following: pdf, jpg, doc, docx. See Figure 7 below.
Figure 7:
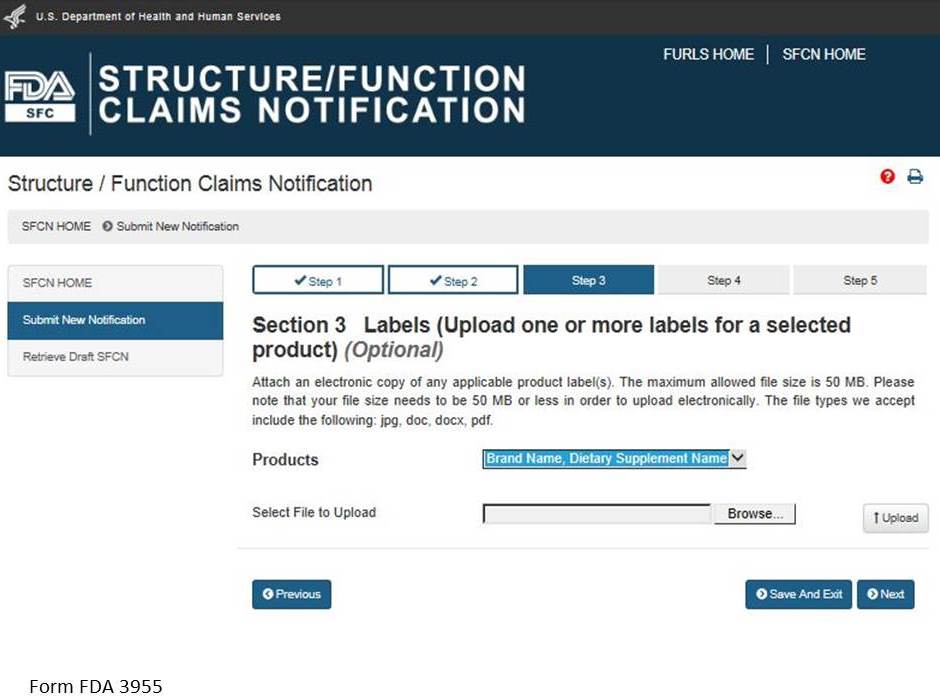
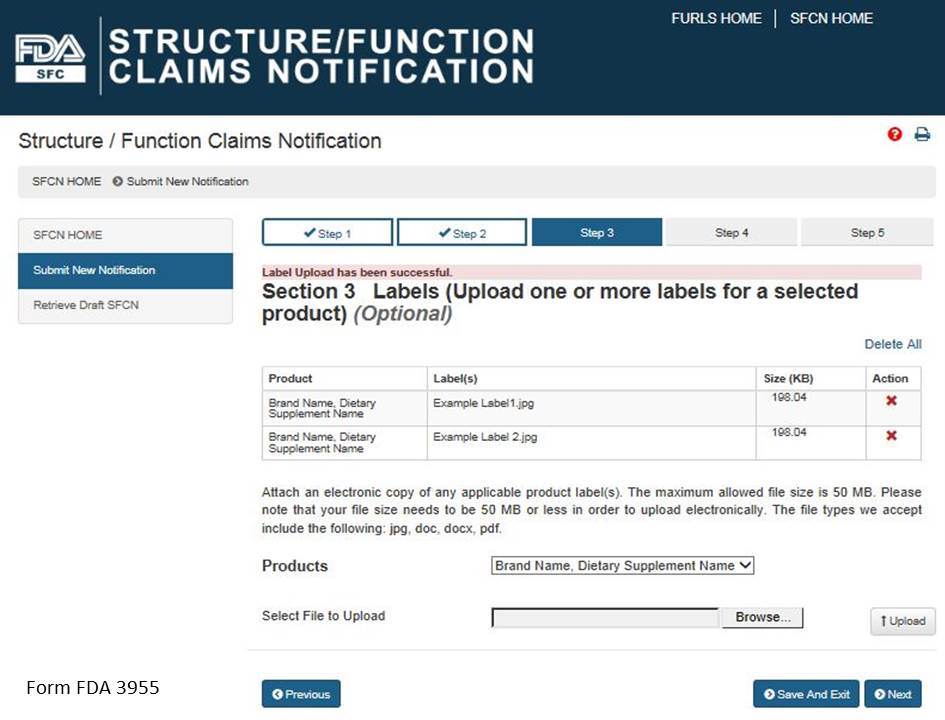
Select a product from the list of “Products” and then select “Browse” to select the corresponding label. Then select “Upload” to begin uploading the label. Repeat this step for all of the products in the notification for which you would like to provide labels. See Figure 8 below.
Figure 8:
STEP 4
Section 4: Notification Review
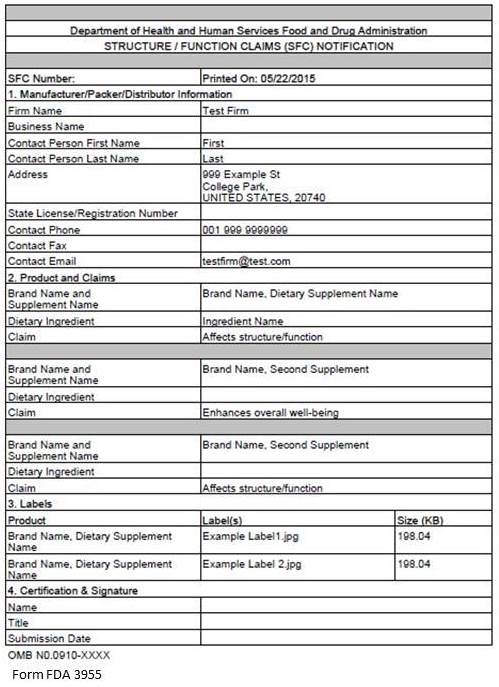
This step allows you to review your notification. To make changes to a section, select the “Edit” button beside that section. See Figure 9 below. If you wish to print your notification, select the “Print Notification” button. An image of what is printed is in Figure 10 below. If all the information is correct, click the “Next” button to continue.
Figure 9:
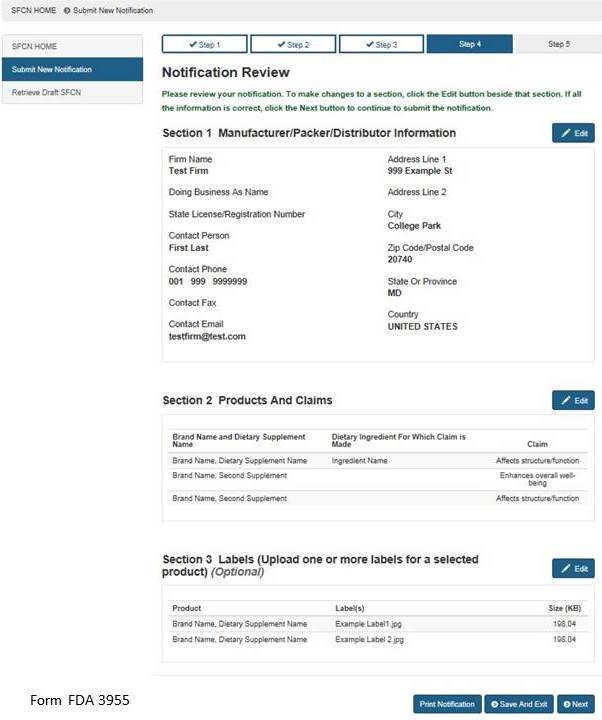
Figure 10:
If you would like to complete your application at another time, select the “Save and Exit” button below. The following screen will display, see Figure 11 below.
Figure 11:
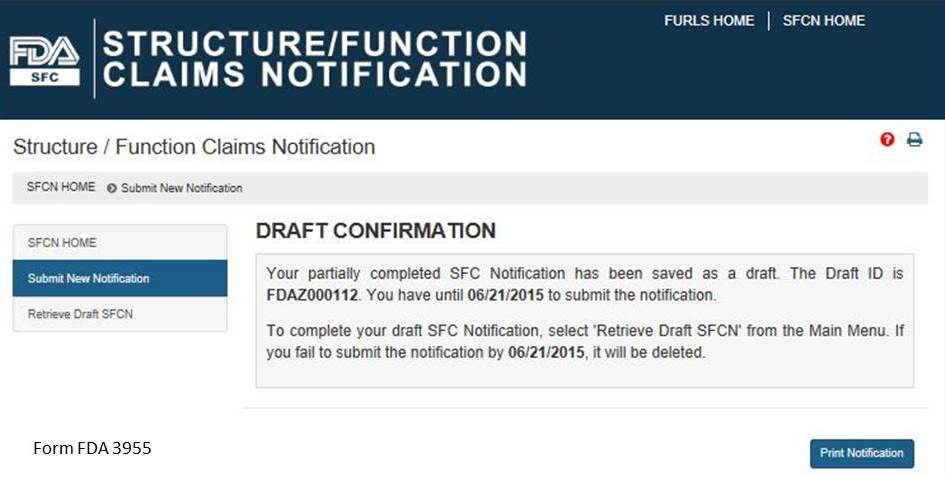
Otherwise select, “Next” to proceed with the notification submission. If you select “Save and Exit,” write down the Draft ID as it is required to access your draft SFC Notification. To complete your draft SFC Notification, select “Retrieve Draft SFCN” from the Main Menu. A deadline is assigned to this draft notification. If you do not access and submit your draft notification within 30 days, it will be deleted.
STEP 5
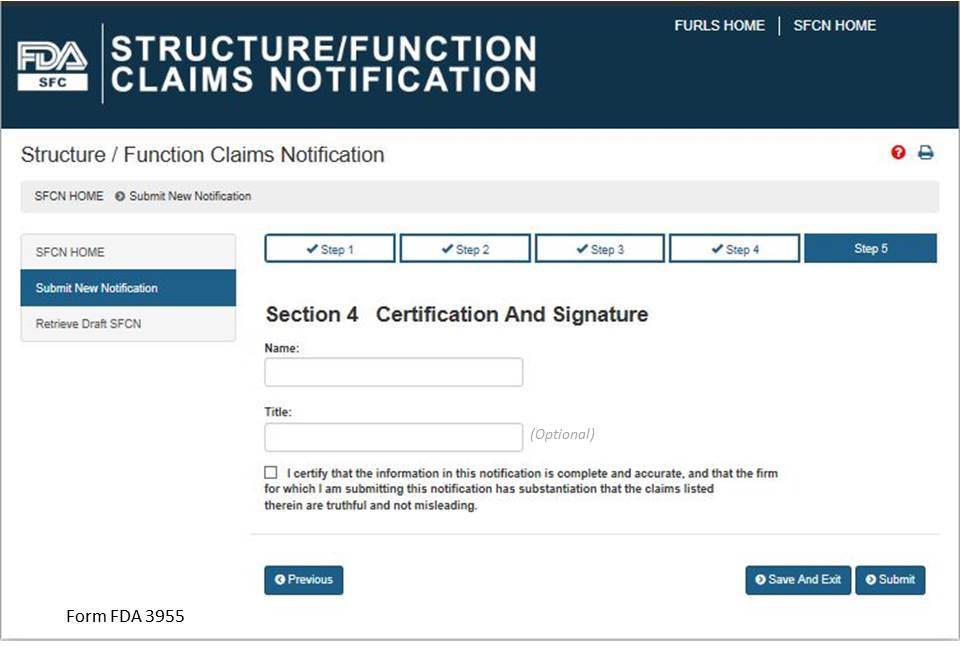
Section 5: Certification and Submission
This section serves as your certification that the notification is complete and accurate and that the notifying firm has substantiation that the claims listed are truthful and not misleading. See Fig 12 below. You must enter your full name and you may enter your title before selecting the box that confirms your certification of the notification. When you have completed this section, select the “Submit” button.
Figure 12:
Submission Confirmation
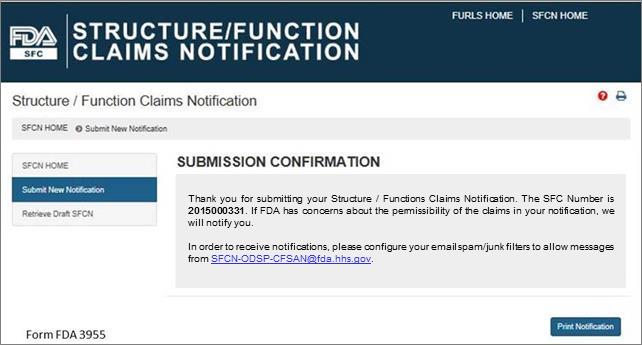
Once you have submitted your notification, the following screen will display. See Figure 13 below. Save the SFC Number that was assigned to your notification to allow you to access your application in the future. If FDA has concerns about the permissibility of the claims in your notification, we will notify you. In order to receive notifications regarding your submission, configure your email spam/junk filters to allow messages from SFCN-ODSP-CFSAN@fda.hhs.gov.
Figure 13:
Page
| File Type | application/vnd.openxmlformats-officedocument.wordprocessingml.document |
| Author | Swift, Sibyl |
| File Modified | 0000-00-00 |
| File Created | 2021-01-23 |
© 2026 OMB.report | Privacy Policy