The Boundary and Annexation Survey (BAS)
The Boundary and Annexation Survey (BAS) & Boundary Validation Program (BVP)
13_508_RespondentGuide_DigitalBAS_Local_v0.5_WorkingDraft_09_10_12
The Boundary and Annexation Survey (BAS)
OMB: 0607-0151
Boundary and Annexation Survey Respondent Guide: Digital BAS |
Issued January 2013 |
|
|
|
|
|
|

Table of Contents
1. Introduction to the Digital Boundary and Annexation Survey (BAS) 3
1.2 State Specific Arrangements and Agreements 3
1.4 Key Dates for Digital BAS Participants 3
1.5 Digital BAS Requirements 4
2. Topological Relationships and Spatial Accuracy 4
2.1 Topological Relationships in the MAF/TIGER Database 5
2.2 GIS and Spatial Accuracy 6
3. Census Bureau Provided Shapefiles 8
5. Updating the Census Bureau Shapefiles 9
5.1 General File Setup Guidelines 9
5.2 Changing the Map Projection 9
5.5 Area Landmarks, Hydro Areas, and Point Landmarks 15
5.6 Reviewing Changes to the Census Bureau Shapefiles 20
5.7 Submitting Digital Data 25
Appendix 1: Paperwork Reduction Project 33
Appendix 2: State Arrangements and Agreements 34
Appendix 3: Census Bureau Regional Offices - Contact Information 37
Appendix 4: Data Dictionary 38
Appendix 5A: 2013 Digital BAS – Example Process 1 42
1. Introduction to the Digital Boundary and Annexation Survey (BAS)
The U.S. Census Bureau conducts an annual survey called the Boundary and Annexation Survey (BAS) to collect information about selected legally defined geographic areas, such as counties (and equivalent areas), incorporated places, minor civil divisions (MCDs), as well as federally recognized American Indian reservations (including off-reservation trust lands and tribal subdivisions). The BAS also provides an opportunity for participants to review the names and geographic relationships for these areas. Title 13, U.S. Census Code authorizes this survey.
The U.S. Census Bureau uses BAS information to provide a record for reporting the results of the decennial and economic censuses, and to support the Population Estimates Program and the American Community Survey. Maintaining correct boundaries and boundary-to-feature relationships through the BAS helps ensure that the U.S. Census Bureau assigns the appropriate population to each governmental unit (GU).
In compliance with the Office of Management and Budget Circular A-16, the BAS supports the Census Bureau’s spatial data steward responsibilities for the Federal Geographic Data Committee and the Geospatial One-Stop by updating the inventory and boundaries of GUs. In addition, the BAS is the source of up-to-date information on boundaries, codes, and names for the U.S. Geological Survey’s (USGS) National Map and the Geographic Names Information System, as well as the source for changes in the boundaries of incorporated places, minor civil divisions (MCDs), counties (and equivalent areas), and federally recognized American Indian areas (AIAs), which include reservations and off-reservation trust lands.
The Census Bureau has established a number of arrangements or agreements with states for reporting boundary changes. Please visit the BAS program website or call (800) 972-5651 for information regarding state agreements.
If it comes to the U.S. Census Bureau’s attention that an area of land is in dispute between two or more jurisdictions, annexations or boundary corrections will not be made until the parties come to a written agreement, or there is a documented final court decision regarding the matter/dispute. If you have questions concerning this, contact the U.S. Census Bureau Legal Office at 301-763-9844.
All legal changes received by March 1 will be reflected in the Population Estimates Program and the American Community Survey. If the U.S. Census Bureau receives your updates by May 31, they will be included in your BAS materials next year.
To change the method of participation in BAS from digital to paper, or to have the MTPS software mailed to you, the Census Bureau must be notified by February 15 (for updates going into the ACS) or April 15 (for updates to be reflected in the next year’s BAS materials). Contact the Census Bureau at 800-972-5651 or email geo.bas@census.gov.
To participate in Digital BAS entities must meet the following requirements:
Have the ability to edit a Census Bureau shapefile1. Census requires that entities update Census Bureau shapefiles with boundary and feature changes, rather than submitting a shapefile from a local Geographic Information System (GIS).
Current information for the BAS point of contact, the person updating the shapefiles, and the highest elected official for the entity must be provided.
Legal documentation numbers and effective dates for all legal boundary changes (annexations and deannexations) must be provided.
Each non-legal boundary correction must contain proper update documentation according to boundary correction guidelines listed below, or the Census Bureau will not make the correction for this BAS cycle.
Important information about BAS 2013 non-legal boundary corrections:
Due to current resource and other budgetary constraints within the Census Bureau, the Census Bureau cannot guarantee that all boundary corrections will be processed in the same year’s BAS cycle, especially in the case of very large submissions with many boundary corrections. We will continue to process all legal boundary changes, regardless of the number submitted. The Census Bureau appreciates your understanding and support in this matter.
If there are any questions or concerns about the participation requirements, contact the Census Bureau at 800-972-5651 or geo.bas@census.gov.
2. Topological Relationships and Spatial Accuracy
The Geography Division of the Census Bureau is responsible for developing geographic applications and executing related activities needed to support the Census Bureau in collecting and disseminating census data. For more than twenty years, the Census Bureau’s TIGER database and Master Address File (MAF) have been critical resources for supporting the Census Bureau in its geographic activities.
The following section will describe how the Census Bureau uses a topologically integrated system and how this differs from traditional GIS systems, which use separate layers of data.
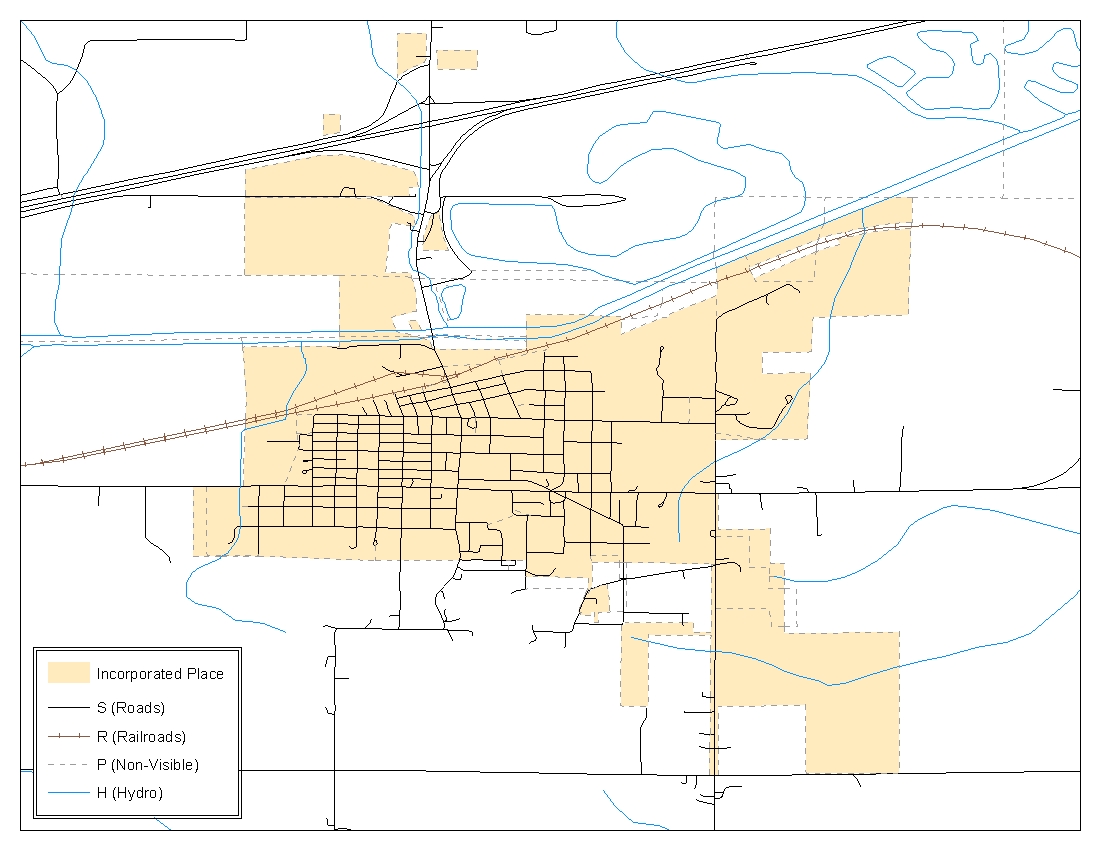
Topology can be described as the relationship between different levels of geography. MAF/TIGER is a geographic database in which the topological structures define the location, connection, and relationships of streets, rivers, railroads, and other features. These topological structures help define the geographic entities for which the Census Bureau tabulates data.
Instead of having a separate layer for each feature class (roads, boundaries, etc.) all MAF/TIGER information is stored in one layer or file. See Examples 2.1.1 and 2.1.2 for samples of topologically integrated files in MAF/TIGER.
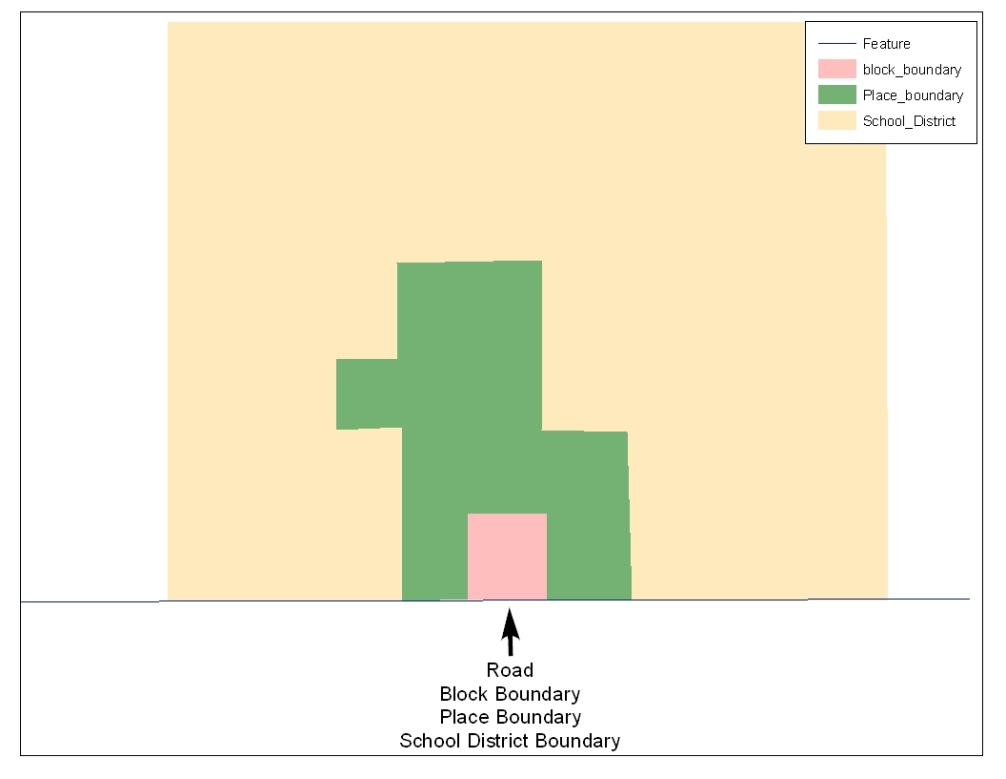
Example 2.1.1: This example shows how a road in MAF/TIGER can also represent a block boundary, place boundary and a school district boundary.
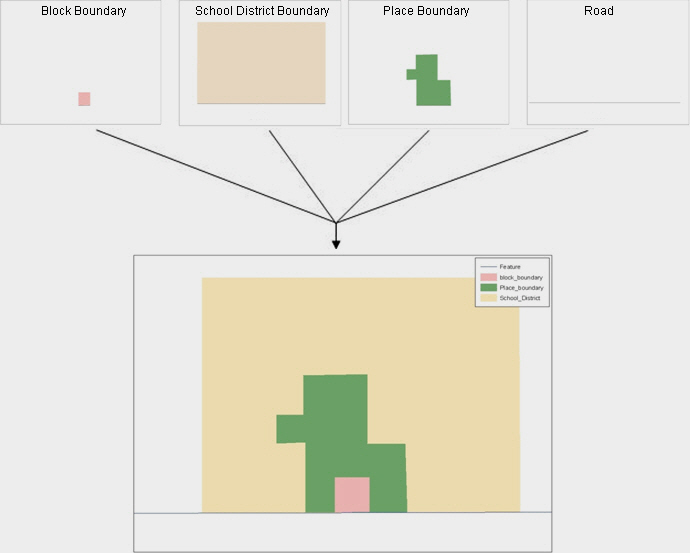
Example 2.1.2: This example shows how four different feature classes are topologically integrated into one layer. One road feature represents not only a road, but also a block boundary, place boundary, and a school district boundary.
In a GIS, feature classes are usually not topologically integrated: they are separated into layers. When these layers are overlaid in a GIS, there may be misalignments in the boundaries due to the nature of the data. These non-topologically integrated layers could cause issues in the MAF/TIGER database. Examples 2.2.1 and 2.2.2 show how files that are not topologically integrated might appear in a GIS when they are overlaid.
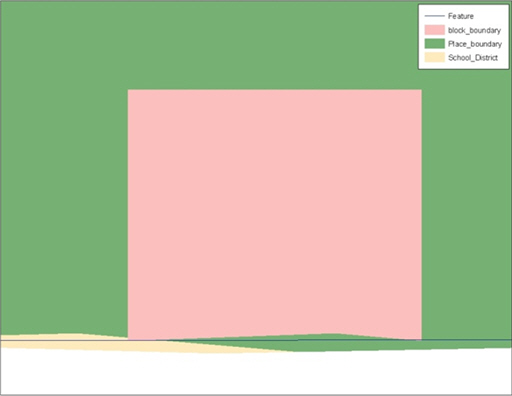
Example 2.2.1: This example shows an overlay of four different feature classes. Notice how the topological relationship is compromised. The block, place, and school district boundaries, which are supposed to follow the road feature, are no longer aligned with the road in several locations.
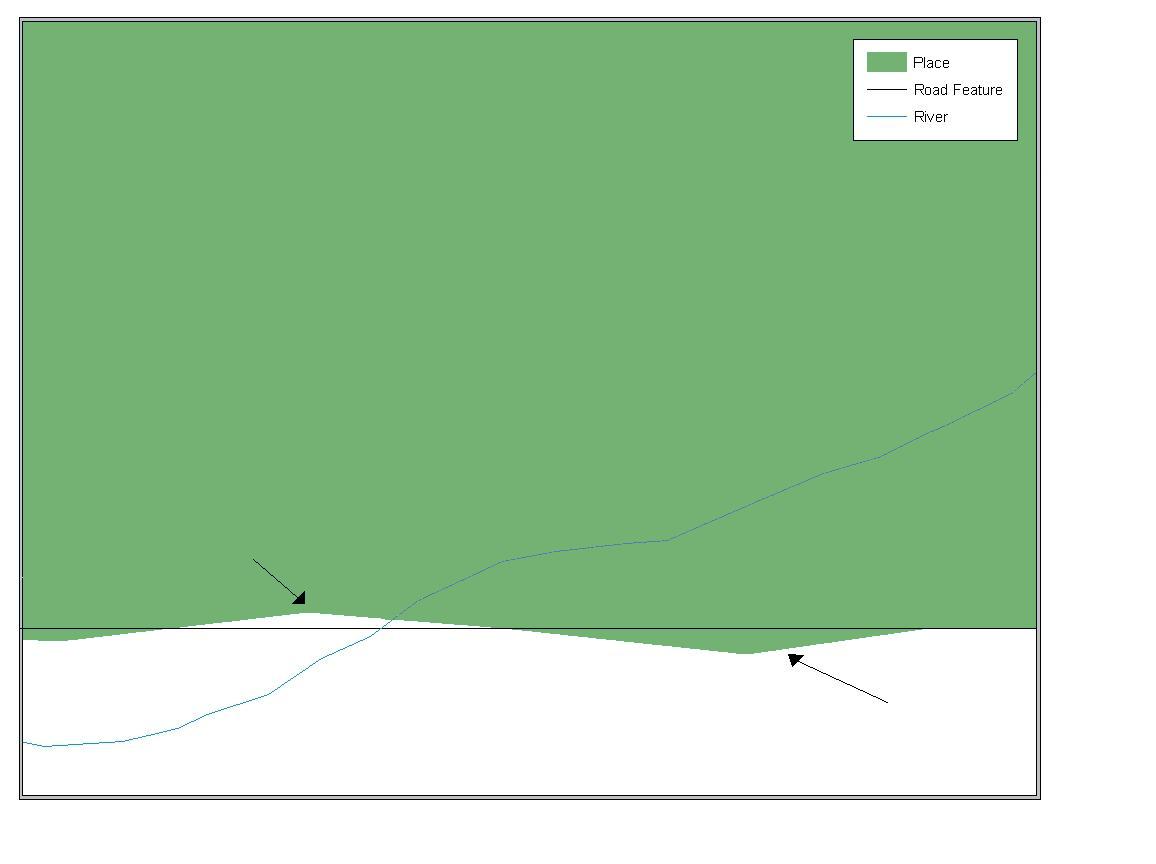
Example 2.2.2: This example shows a situation where a local GIS place boundary does not follow a road feature. Assuming that the boundary follows the road feature, changing the Census Bureau place boundary to match the local file exactly and become misaligned (see arrows) would dissolve the topological relationship in MAF/TIGER.
The spatial differences between local GIS data and the Census Bureau’s topologically integrated file are often very small (less than ten feet) and can create boundary-to-feature relationship issues for the Census Bureau. Section 5.6 provides instructions on how to review digital submissions for small spatial boundary corrections. It also lists some of the potential consequences of making spatial boundary corrections that dissolve the topological relationships present in the MAF/TIGER database. Examples of suggested methods for correctly making boundary changes can be found in Appendices 5A and 5B.
3. Census Bureau Provided Shapefiles
The Census Bureau provides all Digital BAS participants with entity layers in ESRI shapefile format. The number of polygon-based shapefiles that the Census Bureau sends to each Digital BAS participant depends on the type of entities contained within each county. However, each participant, regardless of the number of geographic entities, receives only one shapefile for the linear feature network for each county. See Table 3.1 for the names of the shapefiles.
If the files were downloaded from Census’s website, the file names will be slightly different. The prefix will begin with PVS (e.g., PVS_12_v2_edges_<ssccc>.shp). Throughout this guide, Census uses the prefix of bas_2013, but the PVS files are exactly the same.
BAS Shapefile Naming Conventions
Geographic Entity Type |
Shapefile Naming Convention |
County |
bas_2013_county_<ssccc>.shp |
Minor Civil Division |
bas_2013_mcd_<ssccc>.shp |
Incorporated Place |
bas_2013_place_<ssccc>.shp |
Consolidated City |
bas_2013_concity_<ssccc>.shp |
Edges (Roads, Rail, Hydro, etc) |
bas_2013_edges_<ssccc>.shp |
Area Landmarks |
bas_2013_arealm_<ssccc>.shp |
Point Landmarks |
bas_2013_pointlm_<ssccc>.shp |
Hydro Area |
bas_2013_water_<ssccc>.shp |
Geographic Offsets / Corridors |
bas_2013_offset_<ssccc>.shp |
Table 3.1: BAS Naming Conventions (Note: <ssccc> represents the two-digit state code and three-digit county code.)
All shapefiles provided by the Census Bureau are in the following unprojected geographic-based coordinate system:
Geographic Coordinate System – North American Datum 1983 (GCS NAD83)
Angular Unit: Degree (0.017453292519943299)
Prime Meridian: Greenwich (0.000000000000000000)
Datum: D_North_American_1983
Spheroid: GRS_1980
Semi-major Axis: 6378137.000000000000000
Semi-minor Axis: 6356752.314140356100000000
Inverse Flattening: 298.257222101000020000
4. Census Bureau Geocoding
Knowledge of the Census Bureau's geocoding methods is critical for creating Digital BAS submissions correctly. There are two methods: using MAF structure points to locate addresses and locating addresses using street centerlines.
Census will assign an address to a previously located structure point if possible. If not, the address will be geocoded using street centerlines.
It is important to review Digital BAS submissions to ensure that addresses will be placed correctly in relationship to the features around them, and that geographic offsets and corridors are created as needed.
5. Updating the Census Bureau Shapefiles
Census Bureau shapefiles can be updated to reflect boundary and/or linear feature changes that have occurred since the last BAS update. Examples of these procedures can be found in Appendices 5A and 5B.
Note: If there are problems with the processing of returned files, Census will email a feedback document requesting clarification of any issues. If the problem cannot be resolved before the project deadline, the changes in question will not be made during the current BAS cycle.
After receiving the shapefiles, follow these procedures before beginning actual updates:
Open the CD to verify that it contains the correct shapefiles or download the shapefiles from the PVS download page and open the downloaded .ZIP file to verify its contents.
Copy the shapefiles into a directory on a server/hard drive.
Open the shapefiles with GIS software.
Census files are in GCS NAD83 format and can be projected into any local coordinate system/projection. Most GIS software packages will allow users to transform file coordinate systems and projections. For example, if using ArcView to update files, activate and utilize ArcView’s Projection Utility Wizard extension. If using ArcGIS, use its Project tool in ArcToolbox. MAF/TIGER shapefile extracts contain defined projection information in the *.prj file. ArcView and ArcGIS access the *.prj file for projection information so there is no need to define these parameters before changing the file coordinate systems.
When updates are complete, participants may submit the boundary shapefile using any local coordinate system/projection provided that the shapefile contains a .prj file or spatial reference materials such as metadata.
In order to update MAF/TIGER, participants must create a separate change polygon layer for each updated entity type (county, MCD, place). The change polygons must be created in relation to the current MAF/TIGER boundary.
Appendices 5A and 5B provide two examples for creating annexation, deannexation, boundary correction, new entity, geographic corridor, and geographic offset change polygons. Review any boundary change polygons before submitting them (Section 5.6).
If additional shapefiles are needed, contact the Census Bureau at 800-972-5651 or geo.bas@census.gov.
5.3.1 Annexations and Deannexations
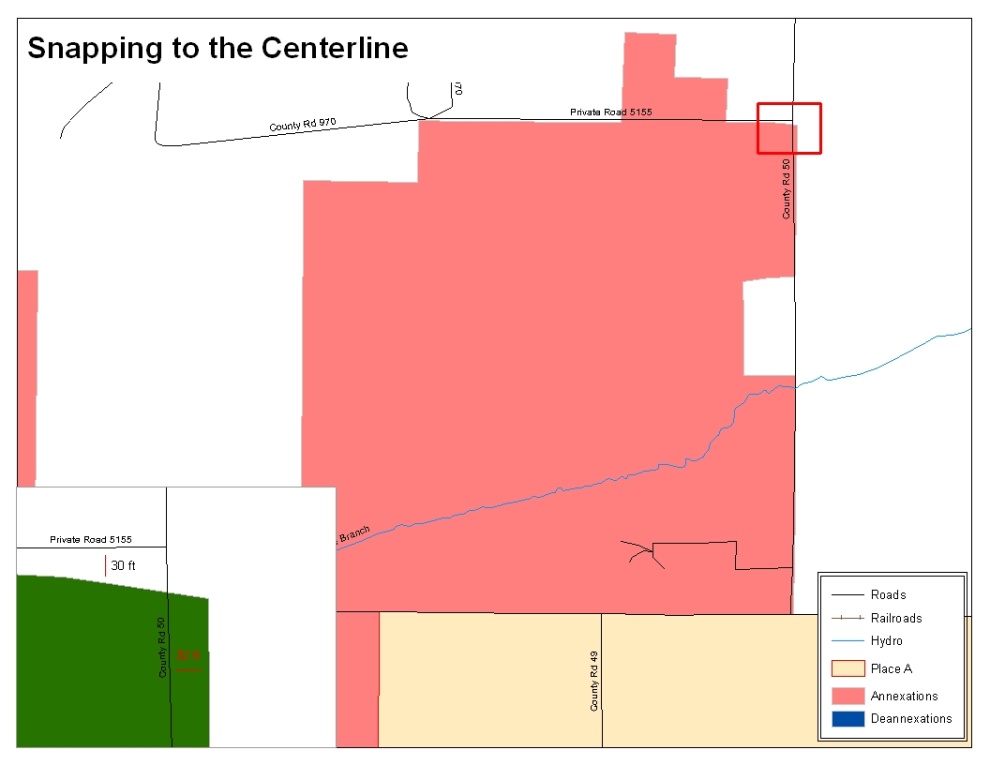
The Census Bureau will accept annexations and deannexations from counties, MCDs, and incorporated places. Each annexation or deannexation change polygon must have the required attributes and corresponding change type populated, as seen in Table 5.3.1.1. The Census Bureau will snap any annexation or deannexation to a MAF/TIGER feature when it exists within thirty feet of that feature.
Note: Enter the name of the jurisdiction annexing or deannexing the area in the NAME field.
Annexations and Deannexations
|
NAME |
CHNG_TYPE |
EFF_DATE |
DOCU (Not Required in GA) |
AREA (Required in GA) |
RELATE |
Annexation |
X |
X(‘A’) |
X |
X |
* See Note |
|
Deannexation |
X |
X(‘D’) |
X |
X |
* See Note |
|
Table 5.3.1.1 Annexations and Deannexations (Note: ‘X’ = Required field)
Note: Area in acres is required for Georgia, and requested for all other areas.
5.3.2 Boundary Corrections
The Census Bureau will also accept specific boundary corrections from counties, MCDs, and incorporated places. As with annexations and deannexations, the participant must create individual change polygons for each boundary correction. Each boundary correction must also have the required attributes and corresponding change type populated, as seen in Table 5.3.2.1, or the Census Bureau will reject them.
Note: Enter the name of the jurisdiction the boundary correction is for in the NAME field.
Boundary Corrections
|
NAME |
CHNG_TYPE |
EFF_DATE |
DOCU |
AREA |
RELATE |
||
Boundary Correction (Add Area) |
X |
X(‘B’) |
|
|
|
X(‘IN’) |
||
Boundary Correction (Remove Area) |
X |
X(‘B’) |
|
|
|
X(‘OUT’) |
||
Table 5.3.2.1 Boundary Corrections (Note: ‘X’ = Required field)
The Census Bureau uses a topologically integrated database. As a result, not all types of boundary corrections can be processed for inclusion into MAF/TIGER. The following are types of boundary corrections that the Census Bureau will accept, process, and update or reject during the current BAS cycle:
The Census Bureau will accept and process properly documented boundary corrections during the current BAS cycle…
that spatially interact with (abut) other BAS legal changes (annexation, deannexation, corridor, offset) and meet both of the following two conditions:
in situations where the existing boundary has been digitized incorrectly or appears in the incorrect location due to Census Bureau activities.
where the overall shape of the geographic entity is maintained and no feature-to-boundary relationships are dissolved.
The Census Bureau will reject boundary corrections…
along county boundaries unless there is a written agreement between the two counties that documents the correct location of the boundary.
between adjacent incorporated places or adjacent MCDs unless the county submitting the changes is part of a consolidated county agreement or there is a written agreement between the two incorporated places or MCDs.
that dissolves boundary-to-feature relationships (roads, rivers, railroads, etc.) if the difference is less than thirty feet.
which are greater than one square mile, or not contiguous with the rest of the entity boundary. These boundary corrections may be part of annexations which were never reported to the Census Bureau. If so, effective dates and legal documentation numbers should be provided.
that has a width of less than thirty feet over the entire polygon.
Note: Remember that the Census Bureau will snap any entity boundary correction to a MAF/TIGER feature when it exists within thirty feet of that feature.
5.3.3 New Incorporations
County participants may submit new incorporations for incorporated places and minor civil divisions through Digital BAS. As with other change types, an individual change polygon must be created for each new incorporation and possess the required attributes and the corresponding change type field must be populated (see Table 5.3.3.1).
Note: Enter the name of the new jurisdiction in the NAME field. For required documentation for new incorporations, contact the Census Bureau at 800-972-5651 or geo.bas@census.gov.
New Incorporations
|
NAME |
CHNG_TYPE |
EFF_DATE |
DOCU |
AREA |
RELATE |
New Incorporation |
X |
X(‘E’) |
X |
X |
|
|
Table 5.3.3.1 New Incorporations (Note: ‘X’ = Required field)
5.3.4 Geographic Corridors
The Census Bureau sometimes geocode addresses based on the street centerline. If the geocoding of these addresses would result in the population being assigned to the incorrect geographic entity, participants should create a geographic corridor.
A geographic corridor is an area that includes only the road right-of-way and does not contain any structures addressed to either side of the street. Example 5.3.4.1 shows a corridor that has been created where the incorporated place owns the right-of-way but the housing units are not included in the incorporated place (shown in color).
Example 5.3.4.2 shows that the right-of-way belongs in the unincorporated area, while the housing units are included in the incorporated place (shown in color). This is important for some cities because they are portraying that the city is not responsible for road maintenance. This is not relevant for Census Bureau tabulations and is not easy to depict in the Census nationwide database. This type of corridor should not be included in a BAS response.
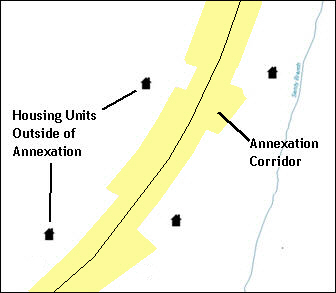
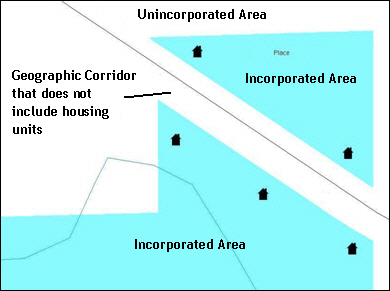
Example 5.3.4.1 Example 5.3.4.2
If geographic corridors are created, then individual change polygons for each geographic corridor must also be created. Each change polygon must have the required attributes and corresponding change type populated, as seen in Table 5.3.4.1. In the NAME field, enter the name of the jurisdiction. In the RELATE field, indicate whether the change is adding IN or taking OUT (removing) the corridor.
Geographic Corridors
|
NAME |
CHNG_TYPE |
EFF_DATE |
DOCU |
AREA |
RELATE |
Geographic Corridor |
X |
X(‘C’) |
|
|
|
X(’IN’, ‘OUT’) |
Table 5.3.4.1 Geographic Corridors (Note: ‘X’ = Required field)
5.3.5 Geographic Offsets
A geographic offset is an area claimed by a geographic entity that is only on one side of a road and does not include structures addressed to that side of the road.
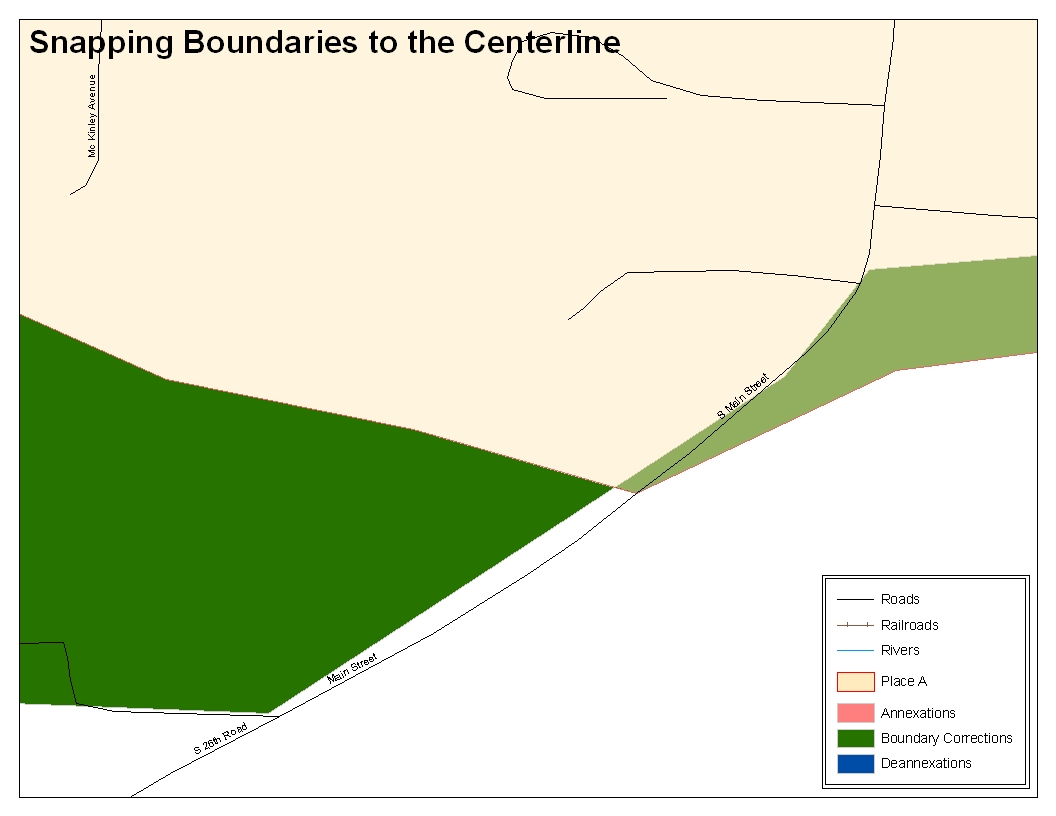
The Census Bureau is aware that many governments base their legal boundaries on cadastral (parcel-based) right-of-way mapping. Census maps are based on spatial data that is topologically integrated which makes maintenance of geographic offsets inefficient. Snapping an entity boundary to the centerline wherever applicable will help to establish more accurate population counts. If a boundary is the front lot line, Census strongly prefers that the boundary be snapped to the road. If a boundary is at the rear of a lot, then it should be depicted as such. Example 5.3.5.1 depicts a cadastral (parcel-based) boundary map and Example 5.3.5.2 shows how the boundary should be reflected when it is sent to the Census Bureau.
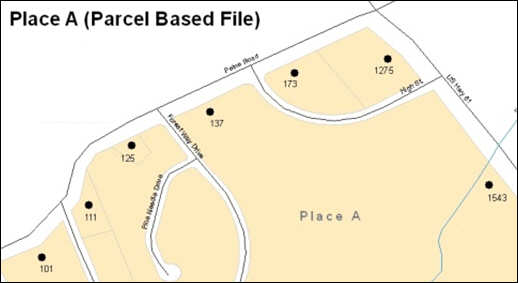
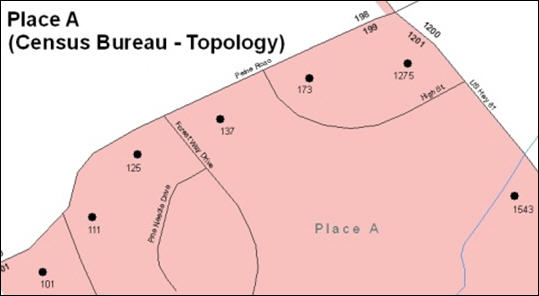
Example 5.3.5.1 Example 5.3.5.2
If geographic offsets are created, then individual change polygons for each geographic offset must also be created. Each change polygon must have the required attributes and corresponding change type populated, as seen in Table 5.3.5.1. In the NAME field, enter the name of the jurisdiction. In the RELATE field, indicate whether the change is adding IN or taking OUT (removing) the area represented as an offset.
Geographic Offsets
|
NAME |
CHNG_TYPE |
EFF_DATE |
DOCU |
AREA |
RELATE |
|
Geographic Offset |
X |
X(‘F’) |
|
|
|
X(’IN’, ‘OUT’) |
|
Table 5.3.5.1 Geographic Offsets (Note: ‘X’ = required field)
Census has included an “offset” shapefile in the BAS materials (bas_2013_offset_<ssccc>.shp), so that your jurisdiction can be checked for any existing corridors or offsets. While Census prefers that new offsets are not created, (see above), this information can be helpful in determining if current boundaries are correct.
5.4.1 Adding, Deleting, Renaming, and Recoding Linear Features
If linear feature modifications are needed, they may be submitted in a separate linear feature update layer. Each linear feature update must have the required attributes and corresponding change type populated, as seen in Table 5.4.1.1. In the TLID field, preserve the existing TLID for the feature.
Linear Feature Updates
|
CHNG_TYPE |
TLID |
FULLNAME |
MTFCC |
Add Feature |
X(‘AL’) |
|
X |
X |
Delete Feature |
X(‘DL’) |
X |
|
|
Rename Feature |
X(‘CA’) |
X |
X |
|
Recode Feature |
X(‘CA’) |
X |
|
X |
Table 5.4.1.1 Linear Feature Updates (Note: ‘X’ = Required field)
Note: A list of MTFCC codes can be found in Appendix 6.
5.4.2 Linear Feature Update Guidelines
If a road, subdivision, etc. is missing from the Census Bureau’s feature network, add the feature(s) and provide the name and MTFCC.
If a feature that does not exist is in the Census Bureau’s feature network, delete the feature.
If a feature is in the incorrect location in the Census Bureau’s feature network, delete the feature and re-add it in the correct location. Only do this if the feature is very far off or in the wrong position relative to boundaries or other features.
5.4.3 Address Range Updates
Address ranges may be submitted to the Census Bureau as part of the linear feature update layer. As with other linear feature updates, address ranges must have the required attributes and corresponding change type populated. As existing address ranges cannot be shown in our outgoing shapefiles, we recommend that participants generally only add address ranges to new features.
Address Ranges
|
CHNG_TYPE |
FULLNAME |
MTFCC |
LTOADD |
RTOADD |
LFROMADD |
RFROMADD |
Address Ranges |
X(‘CA’) |
|
|
X |
X |
X |
X |
Table 5.4.3.1 Address Ranges (Note: ‘X’ = Required field)
5.5.1 Area Landmark / Hydro Area Updates
Area landmarks and hydrographic areas are updated in a similar manner to legal boundary changes. However, area landmarks and hydro areas are not legal entities, so no documentation or effective dates are required.
In order to submit area landmark and hydro area updates, create a separate change polygon layer. Updates that can be made to area landmarks and hydro areas include:
boundary corrections (adding and removing area)
creating a new area landmark or hydro area
removing an area landmark or hydro area
changing the name
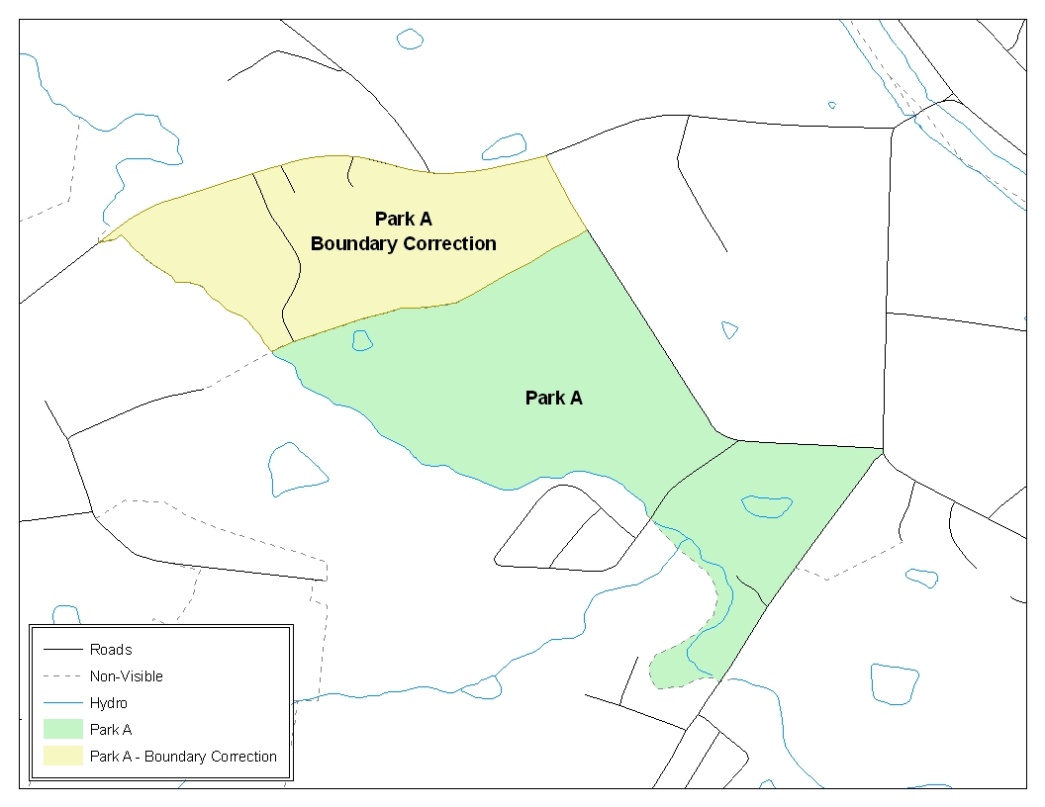
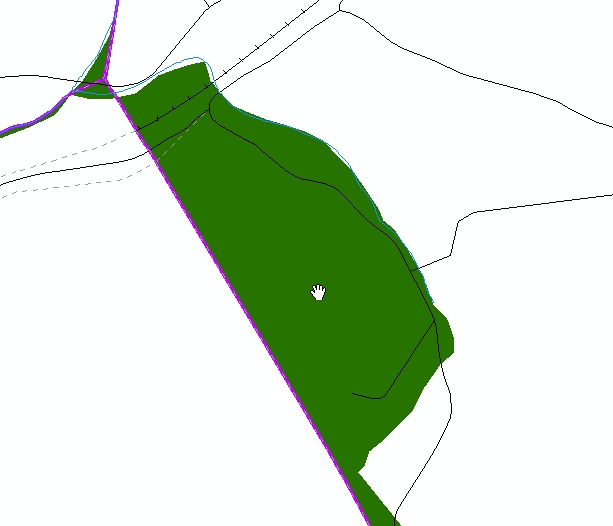
Example 5.5.1.1: This example shows a boundary correction to Park A. See Appendix 5 for more information on creating change polygons for area landmark and hydro areas.
Each area landmark or hydro area update must have the required attributes and corresponding change type populated. In the AREAID field, preserve the existing AREAID for the feature.
Landmarks and Hydro Areas
|
FULLNAME |
CHNG_TYPE |
RELATE |
MTFCC |
AREAID |
Boundary Correction (Add Area) |
X |
X(‘B’) |
X(‘IN’) |
|
X |
Boundary Correction (Remove Area) |
X |
X(‘B’) |
X(‘OUT’) |
|
X |
Delete Landmark |
|
X(‘D’) |
|
|
X |
Change Landmark Name |
X |
X(‘G’) |
|
|
X |
New Landmark |
X |
X(‘E’) |
|
X |
|
Table 5.5.1.2 Landmarks and Hydro Areas (Note: ‘X’ = Required field)
The examples in Appendices 5A and 5B provide information on how to create change polygons. While the sample processes are written for legal boundary changes, the same methods apply for creating change polygons for area landmarks and hydro areas.
When adding new area landmarks or hydro areas, only add the following types of areas:
water bodies
glaciers
airports
cemeteries
golf courses
parks
Census cannot add other types of areas at this time (although some may already exist in the database). The following are acceptable MTFCC codes for new area landmarks or hydro areas:
Area Landmark MTFCC codes
-
MTFCC
Description
H2030
Lake/Pond
H2040
Reservoir
H2041
Treatment Pond
H2051
Bay/Estuary/Gulf/Sound
H2060
Gravel Pit/Quarry filled with water
H2081
Glacier
H3025
Swamp/Marsh
K2180
Park
K2181
National Park Service Land
K2182
National Forest or Other Federal Land
K2183
Tribal Park, Forest, or Recreation Area
K2184
State Park, Forest, or Recreation Area
K2185
Regional Park, Forest, or Recreation Area
K2186
County Park, Forest, or Recreation Area
K2187
County Subdivision Park, Forest, or Recreation Area
K2188
Incorporated Place Park, Forest, or Recreation Area
K2189
Private Park, Forest, or Recreation Area
K2190
Other Park, Forest, or Recreation Area (quasi-public, independent park, commission, etc.)
K2451
Airport or Airfield
K2456
Airport – Intermodal Transportation Hub/Terminal
K2459
Runway/Taxiway
K2561
Golf Course
K2582
Cemetery
Table 5.5.1.3: Landmark area MTFCC codes
Due to heavy workloads for boundary changes to legal areas, changes to area landmarks and hydrographic areas may not be added to the database until after the next year’s BAS materials are created. It may take two BAS cycles in order to see these changes reflected in the materials.
5.5.2 Point Landmark Updates
Updates to point landmarks may also be made. In order to submit point landmark updates, create a separate point landmark update layer. Updates to point landmarks include:
adding a new point landmark
deleting an existing point landmark
renaming a point landmark
Each point landmark update must have the required attributes and corresponding change type populated. In the POINTID field, preserve the existing POINTID for the feature.
Point Landmarks
|
FULLNAME |
CHNG_TYPE |
MTFCC |
POINTID |
New Point Landmark |
X |
X(‘E’) |
X |
|
Delete Point Landmark |
|
X(‘D’) |
|
X |
Change Name |
X |
X(‘G’) |
|
X |
Table 5.5.2.1 Point Landmarks (Note: ‘X’ = Required field)
The following point landmark changes cannot be made due to Title 13 privacy concerns. Do not include any of the following types of landmarks in the point landmark changes file.
Restricted MTFCCs
-
MTFCC
Description
K1100
Housing Unit Location
K1121
Apartment Building or Complex
K1122
Rooming or Boarding House
K1223
Trailer Court or Mobile Home Park
K1226
Housing Facility/Dormitory for Workers
K1227
Hotel, Motel, Resort, Spa, Hostel, YMCA, or YWCA
K1228
Campground
K1229
Shelter or Mission
K1232
Halfway House/Group Home
K1233
Nursing Home, Retirement Home, or Home for the Aged
K1234
County Home or Poor Farm
K1235
Juvenile Institution
K1241
Sorority, Fraternity, or College Dormitory
K1251
Military Group Quarters
K1299
Other Group Quarters Location
K2100
Governmental
K2197
Mixed Use/Other Non-residential
K2300
Commercial Workplace
K2361
Shopping Center or Major Retail Center
K2362
Industrial Building or Industrial Park
K2363
Office Building or Office Park
K2364
Farm/Vineyard/Winery/Orchard
K2366
Other Employment Center
K2464
Marina
K2500
Other Workplace
K2564
Amusement Center
Table 5.5.2.2 Restricted MTFCCs
Census also cannot delete or modify any point landmarks that were imported from the USGS GNIS database. Changes submitted for the following types of landmarks may be left unchanged:
K2451 (Airport)
K2582 (Cemetery)
C3022 (Summit or Pillar)
C3081 (Locale or Populated Place)
C3061 (Cul-de-sacs)
Due to heavy workloads for boundary changes to legal areas, changes to point landmarks may not be added to the database until after the next year’s BAS materials are created. It may take multiple BAS cycles in order to see these changes reflected in local materials.
All changes must be reviewed to ensure that they are intentional and correct.
5.6.1 Boundary-to-Feature Relationships
Any changes must be reviewed to ensure that the correct boundary-to-feature relationships are being created or maintained. The Census Bureau is aware that many governments base their legal boundaries on cadastral (parcel-based) right-of-way mapping; however, Census bases maps on spatial data that is topologically integrated. Therefore, snap boundaries to street centerlines (or rivers, railroads, etc.) wherever applicable. This will help establish a more accurate population count for entities.
The following examples show situations where boundary changes should be snapped to existing linear features. The Census Bureau will snap boundary changes to any linear feature within thirty feet.
Example 5.6.1.1: These boundary corrections are not snapped to existing linear features in the MAF/TIGER database. Both boundary corrections should be snapped to centerlines or population may be assigned to incorrect entities.
Example 5.6.1.2: This is an example of an annexation that has been created without snapping to existing centerlines in the MAF/TIGER database. Unless the boundary is snapped to centerlines, some of the population may be assigned to an incorrect entity.
The Census Bureau will not accept boundary corrections that dissolve the current relationship between an existing boundary and linear feature, without specific instruction that the relationship is incorrect. Any boundary corrections that create thirty feet or less of gap or overlap between the existing linear feature and boundary will not be incorporated into the MAF/TIGER database. See below for examples of changes that will not be accepted.
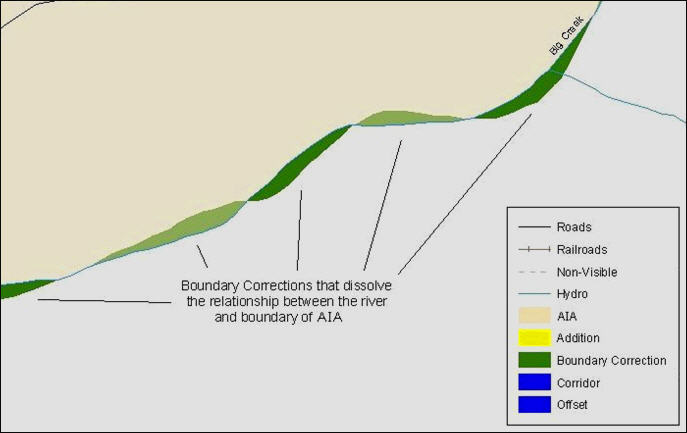
Example 5.6.1.3: Small spatial boundary corrections that dissolve the relationship with the river have been created. These boundary corrections will not be incorporated into the MAF/TIGER database.
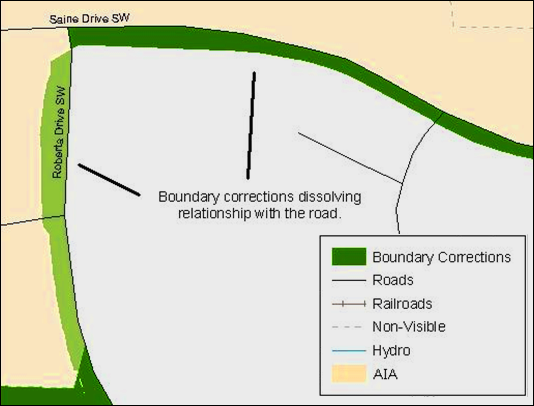
Example 5.6.1.4: Small spatial boundary corrections that dissolve the boundary-to-feature relationship with multiple streets have been created. Incorporating these changes would affect the population counts for the area. Therefore the Census Bureau will not accept these small boundary corrections.
5.6.2 Large Boundary Corrections
The Census Bureau will not accept large boundary corrections to an entity without the appropriate legal documentation numbers and effective dates. These large boundary corrections may be legal boundary changes that occurred in the past and were never reported to the Census Bureau. The appropriate legal documentation number and effective date must be submitted so that changes may be incorporated into the MAF/TIGER database.

Example 5.6.2.1: Without the appropriate documentation, Census will not accept large boundary corrections.
Note: There may be a few instances when large boundary corrections need to be made as a result of incorrect digitizing or where the boundary appears in the incorrect location due to other Census Bureau activities.
5.6.3 Including Required Attribute Information
It is important that each change polygon be reviewed to confirm that the correct attribute information is included. Without the correct attribute information, Census will be unable to process and incorporate the changes into the MAF/TIGER database. See Section 5.3 for the required attribute information and corresponding change type codes.
5.6.4 Including Appropriate Metadata (Projection Information)
It is important that the appropriate projection information is included. Each update layer submitted should contain a *.prj file so that the Census Bureau can convert the projection back to GCS_NAD83. If the GIS being used cannot create a *.prj file, include the projection information in metadata. This is critical for Census to be able to process the file and incorporate the updates into the MAF/TIGER database.
5.6.5 Linear Feature Updates
Linear feature changes should be reviewed to ensure that they align with the features currently in the MAF/TIGER database.
Note: The Census Bureau has improved the feature network using locally provided sources to assure connectivity and topology through the MAF/TIGER Accuracy Improvement Project (MTAIP).
If linear feature changes do not align with current MAF/TIGER linear features, the Census Bureau may not incorporate the submitted updates.


Example 5.6.5.1: The image on the left shows new road features that were added to the existing feature network, but do not connect to existing road features. The image on the right shows the correction connecting the new roads to the existing road features.
5.6.6 Additional Review Information
The Census Bureau will not make any boundary change that affects adjacent legal entities without the appropriate documentation. Review any change polygons that affect adjacent entities to determine if they are intentional, legal changes.
Note: Census Bureau will snap any annexation, deannexation, or boundary correction to a MAF/TIGER feature when it exists within thirty feet of that feature. This helps maintain the boundary-to-feature relationships in MAF/TIGER database and will ensure correct housing tabulation counts for entities.
If any changes are being reported, the Census Bureau requires that each participant submit at least one shapefile (change polygons). The total number of layers submitted depends on what types of changes need to be made. Following is a list of change layers that may need to be submitted:
Change Polygon Layers (County, Minor Civil Division, Incorporated Place, and Consolidated City)
These layers consist of the changes that the Census Bureau needs to make to entities.
A layer of change polygons should be created for each level of geography (county, MCD, place, etc.) that changes are being submitted for.
Whole Modified Entity Layer (County, Minor Civil Division, Incorporated Place, and Consolidated City)
These layers should only contain the complete and current boundary for the entity being updated.
A whole entity layer should be created for each level of geography that change polygons are being created for.
Local government feature network and boundary layers (optional)
These layers will help the Census Bureau resolve any questionable change polygons and establish the correct boundary-to-feature relationships.
Feature Update Layer (only if there are feature (road, river, railroad, etc.) additions, deletions, name changes, recodes, or address range updates)
Include a linear feature update layer with only feature segments that need to be corrected.
Area / Hydro Landmark Layer
Only if there are area and/or hydro landmark updates.
Point Landmark Layer
Only if there is point landmark updates.
5.7.1 County Submissions and Individual Entity Submissions (Change Polygons)
The following table provides change polygon naming conventions for county submissions, county subdivisions, incorporated places, and consolidated cities.
Change Polygons
Participant |
Changes Submitted For: |
Shape file Naming Conventions |
County |
County |
bas 13_<basID>_changes_county |
County |
Minor Civil Division |
bas13_<basID>_changes_cousub |
County |
Incorporated Place |
bas13_<basID>_changes_incplace |
Minor Civil Division |
Minor Civil Division |
bas13_<basID>_changes_cousub |
Incorporated Place |
Incorporated Place |
bas13_<basID>_changes_incplace |
Consolidated City |
Consolidated City |
bas13_<basID>_changes_concity |
Table 5.7.1.1: The change polygon layer naming conventions: <basID> represents your BAS entity ID, which can be found on the data CD or BAS form that you receive in the mail from the Census Bureau.
5.7.2 County Submissions and Individual Entity Submissions (Whole Entity Polygons)
The following table provides the whole entity polygon naming conventions for consolidated county submissions, county subdivisions, incorporated places, and consolidated cities.
Whole Entity Polygons
Participant: |
Changes Submitted For: |
Shapefile Naming Conventions |
County |
County |
bas13_<basID>_WholeEntity_county |
County |
Minor Civil Division |
bas13_<basID>_WholeEntity_cousub |
County |
Incorporated Place |
bas13_<basID>_WholeEntity_incplace |
Minor Civil Division |
Minor Civil Division |
bas13_<basID>_WholeEntity_cousub |
Incorporated Place |
Incorporated Place |
bas13_<basID>_WholeEntity_incplace |
Consolidated City |
Consolidated City |
bas13_<basID>_WholeEntity_concity |
Table 5.7.2.1: The whole entity polygon layer naming conventions: <basID> represents your BAS entity ID, which can be found on the data CD or BAS form that you receive in the mail from the Census Bureau.
5.7.3 Linear Feature, Area Landmark / Hydro Area, and Point Landmark Updates (Not
Required)
The following table provides the update layer naming conventions for the edges, area landmark, and point landmark update layers.
Optional Files
Participant: |
Changes Submitted For: |
Shapefile Naming Conventions |
All Participants |
Edges |
bas13_<basID>_LN_Changes |
All Participants |
Area / Hydro Landmarks |
bas13_<basID>_Alndk_Changes |
All Participants |
Point Landmarks |
bas13_<basID>_Plndk_Changes |
Table 5.7.3.1: The naming conventions for the edges, area landmark, and point landmark update layers: <basID> represents your BAS entity ID, which can be found on the data CD or BAS form that you receive in the mail from the Census Bureau.
5.7.4 Compressing the Digital Files
Compress ALL update materials (including change polygon shapefiles, whole entity shapefiles, linear feature updates, landmark updates, local government feature network and boundary layers, and a text or other file with your contact information).
Navigate to the directory with the shapefiles.
Note: Centerline files or any additional information that may be helpful for Census to process your file is optional. One example where this would be helpful is if a particular polygon was not snapped to a river or road because the boundary does not follow the river or road.
Select all files and right click on the selection.
Select WinZip, and then Add to Zip file.
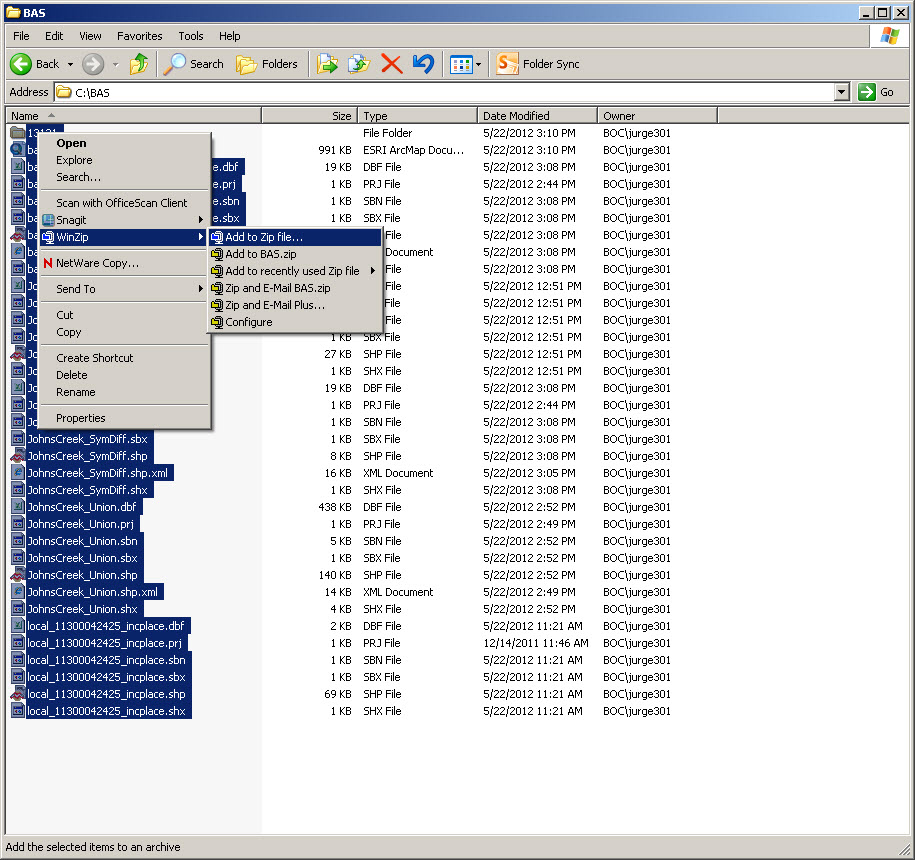
Example 5.7.4.1: Selecting and zipping return files.
Note: Versions of WinZip may vary so the interface may be slightly different. Software other than WinZip may be used to zip the return files.
In the Add window, in the Add to archive field, type the filename in the proper naming convention: bas<yy>_<basID>_return and then click Add.
Note: The basID numbers can be found on the Census Data disc or BAS form.
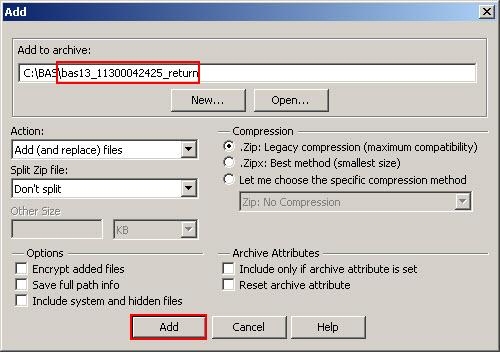
Example 5.7.4.2: Naming the zip file.
Check the folder where the zip file was saved to verify that it was created properly. If so, the return file is ready for submission.
Note: If assistance is needed with preparing or zipping the BAS return files, call the Census Bureau at 800-972-5651.
5.7.5 Submitting Digital Files via File Transfer Protocol (FTP)
It is requested that BAS zip files be submitted using the Census Bureau’s Send a File Utility site. Submit only the zip file. The Send a File Utility is located at: https://secure.census.gov/cgi-bin/sendfile
In a web browser, navigate to https://secure.census.gov/cgi-bin/sendfile.
In the password window:
In the User name field, enter: geobas
In the Password field, enter: GEO1upload2010!
Click OK
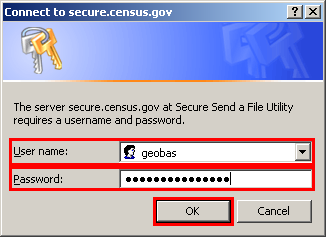
Example 5.7.5.1: Password window
Note: The login/password window may appear different from the example depending on the browser, but the User name and Password are always the same. Make sure to type them exactly as they appear in step 2 above.
In the Send a File Utility window, in the Source Information section; next to the File to Send field, click Browse.

Example 5.7.5.2: Source Information section Browse button.
In the Choose File window, navigate to the appropriate folder, select the zip file, and then click Open.
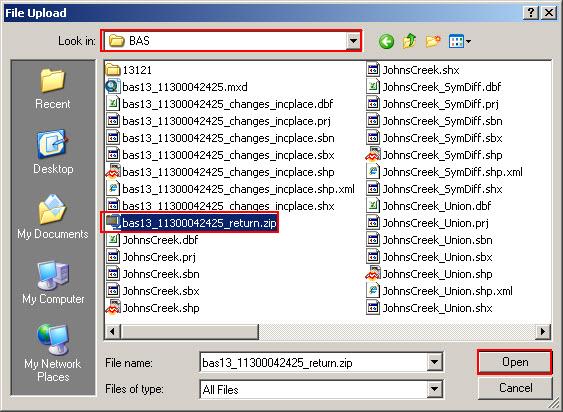
Example 5.7.5.3: Choose file window
In the Notify by E-mail section:
In the Sender’s Email Address field, enter your email address
In the Census Bureau Employee’s E-Mail Address field, enter ‘geo.bas@census.gov’
Click Upload
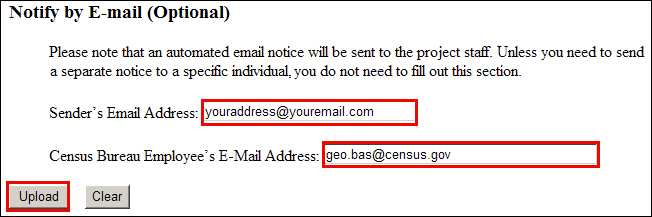
Example 5.7.5.4: Filling out the Notify by E-mail section
Note: Filling out the Notify by E-mail section will allow Census to send notice that the return zip file has been received. If there are any questions contact the Census Bureau at 800-972-5651 or email geo.bas@census.gov.
5.7.6 Additional Information
The Census Bureau recommends using FIPS codes to identify entities such as counties, minor civil divisions, and incorporated places. Using a standard coding scheme facilitates the digital exchange of data.
These codes can be found in the Census Bureau shapefiles or can be obtained at: http://geonames.usgs.gov/domestic/download_data.htm. If there are any questions or problems, contact the Census Bureau at 800-972-5651 or geo.bas@census.gov.
Due to limited staff, Census may not be able to make all updates this year. Census will prioritize updates in the following order: legal changes, boundary corrections, linear feature changes, and landmark changes. The earlier Census receives a submission, the greater the chance that Census will be able to make all of the updates. Only submit changes that occurred on or before Jan. 1, 2013. Census may not be able to make any updates effective after this date until next year’s BAS.
Appendix 1: Paperwork Reduction Project
The U.S. Census Bureau estimates that the BAS review will take most respondents from 1 to 8 hours to complete. This includes the time needed to read the instructions, assemble materials, organize and review the information, and report any needed changes. This estimate is based on 80 percent of all areas having few or no changes. However, for areas with many changes, it may take 20 hours or longer to complete the survey. Send comments regarding this burden estimate or any other aspect of this collection of information, including suggestions for reducing this burden, to:
Paperwork Project 0607-0151
U.S. Census Bureau
4600 Silver Hill Road
Room 3K138
Washington, DC 20233
Or you may e-mail comments to:
paperwork@census.gov
Note: Use “Paperwork Project 0607-0151” as the subject.
Include a copy of your message addressed to:
geo.bas@census.gov.
Appendix 2: State Arrangements and Agreements
The following states have special arrangements or agreements with the Census Bureau for conducting the BAS. These agreements are described in the special notes below. If you do not see your state listed below, then the Census Bureau does not maintain a formal Memorandum of Agreement with your state. Please see the Boundary and Annexation Survey website to see your state’s laws regarding boundary and status updates or changes. (http://www.census.gov/geo/www/bas/bashome.html)
Alaska
Georgia
Kentucky
Maine
Massachusetts
Michigan
Utah
_____________________________________________________________________________________________
Alaska
The Census Bureau maintains a Memorandum of Agreement with the Alaska Department of Labor and Workforce Development (DOLWD). Each year, the Census Bureau sends a letter to all entities within Alaska to notify that the state will be submitting a consolidated response for all entities during the next BAS cycle, and that any questions should be sent to the DOLWD. All legal boundary and status changes must be approved by the Local Boundary Commission. The state will provide a consolidated response to the BAS for all legal boundaries. Additionally, in all years ending in 0, the Census Bureau provides Boundary Validation Program (BVP) materials to each entity within the state for informational purposes.
If you have any questions or concerns regarding legal boundaries in Alaska, please contact the Alaska Department of Labor and Workforce Development by telephone at (907) 465-2439 or by e-mail at: ingrid_zaruba@labor.state.ak.us.
Georgia
The Census Bureau maintains a Memorandum of Agreement with the Georgia Department of Community Affairs (DCA), whereby the DCA has the authority to certify annexations reported to the State of Georgia and directs the governing authorities for any municipality annexing territory to report such changes to the Census Bureau’s Boundary and Annexation Survey (BAS). The DCA coordinates the delivery of the BAS by providing a list of annexing authorities for a particular year to the Census Bureau.
If you have any questions or concerns regarding legal boundaries in Georgia, please contact the Georgia Department of Community Affairs at (404) 679-4940 or by e-mail at: terry.jackson@dca.ga.gov.
Kentucky
The Census Bureau maintains a Memorandum of Agreement with the Kentucky Division of Geographic Information (KDGI). THE KDGI sends the Census Bureau a list of all entities within the state of Kentucky that have filed boundary changes with the Kentucky Secretary of State. The KDGI has the authority to direct any incorporated places experiencing boundary changes to submit a copy of the ordinance and a description and map defining the affected area to the Secretary of State. The KDGI uses the information reported to the Secretary of State to update the master incorporated city boundary Geographic Information System (GIS) layer and submit digital BAS responses for the entire state.
If you have any questions or concerns regarding legal boundaries in Kentucky, please contact the Kentucky Office of the Secretary of State by telephone at (502) 782-7408 or by e-mail at: kandie.adkinson@ky.gov.
Maine
The Census Bureau maintains a Memorandum of Agreement with the Maine Office of GIS (MEGIS), in which the state provides a list of entities with no boundary changes and submits a consolidated report of all boundary changes to the Census Bureau’s Boundary and Annexation Survey (BAS). Additionally, in all years ending in 0, the Census Bureau provides Boundary Validation Program (BVP) materials to each entity within the state for informational purposes.
If you have any questions or concerns regarding legal boundaries in Maine, please contact the Maine Office of GIS at by telephone at (207) 592-1765 or by e-mail at:
oit.customer-support@maine.gov.
Massachusetts
The Census Bureau maintains a Memorandum of Agreement with the Massachusetts Office of Geographic Information (MassGIS). Each year, the state submits a consolidated report of all changes in corporations and boundaries to the Census Bureau’s Boundary and Annexation Survey (BAS) and provides the Census Bureau with a list of entities in Massachusetts with no boundary changes. In years ending in 0, the Census Bureau provides Boundary Validation Program (BVP) materials to each entity within the state for information purposes. The package will instruct entities to contact MassGIS with any comments regarding the boundaries.
If you have any questions or concerns regarding legal boundaries in Massachusetts, please contact the Massachusetts Office of Geographic Information by telephone at (617) 626-4537 or by e-mail at massgismail@state.ma.us.
Michigan
The Census Bureau maintains a Memorandum of Agreement with the Michigan Department of Technology, Management and Budget (DTMB), which may direct any incorporated place experiencing boundary changes to report such changes to the Secretary of State. The DTMB receives a copy of all boundary changes from the Department of State and will use this data to periodically update the Boundary and Annexation Survey (BAS) edit table, which lists each place in Michigan.
If you have any questions or concerns regarding legal boundaries in Michigan, please contact the Michigan Department of Technology, Management and Budget by telephone at (517) 241-5671 or by e-mail at LewisB7@michigan.gov.
Utah
The Census Bureau maintains a Memorandum of Agreement with the Utah Automated Geographic Reference Center (AGRC). Each year, the state submits a consolidated report of all boundary changes to the Census Bureau’s Boundary and Annexation Survey (BAS), and provides the Census Bureau with a list of entities in Utah with no boundary changes. In years ending in 0, the Census Bureau provides Boundary Validation Program (BVP) materials to each entity within the state for information purposes. The package will instruct entities to contact the Utah AGRC with any comments regarding the legal boundaries.
If you have any questions or concerns regarding legal boundaries in Utah, please contact the Utah Automated Geographic Reference Center by telephone at (801) 731-2979 or by e-mail at agrc@utah.gov.
Appendix 3: Census Bureau Regional Offices - Contact Information
Census Regional Offices
Atlanta Regional Office 101 Marietta Street N.W., Suite 3200 Atlanta, GA 30303 Phone: (404) 331-1339 Fax: (404) 331-1570 Email: atlanta.geography@census.gov |
Chicago Regional Office 1111 W. 22nd Street, Suite 400 Oak Brook, IL 60523-1918 Phone: (630) 288-9245 Fax: (630) 288-9313 Email: chicago.geography@census.gov |
Denver Regional Office 6950 W Jefferson Ave, Suite 250 Denver, CO 80235 Phone: (720) 962-3880 Fax: (303) 969-6777 |
Los Angeles Regional Office 15350 Sherman Way, Suite 400 Van Nuys, CA 91406 Phone: (818) 267-1724 Fax: (818) 267-1700 |
New York Regional Office 395 Hudson Street, Suite 800 New York, NY 10014 Phone: (212) 584-3430 Fax: (212) 584-3419 |
Philadelphia Regional Office 833 Chestnut Street, Suite 504 Philadelphia, PA 19107-4405 Phone: (215) 717-1830 Fax: (215) 717-2589 |
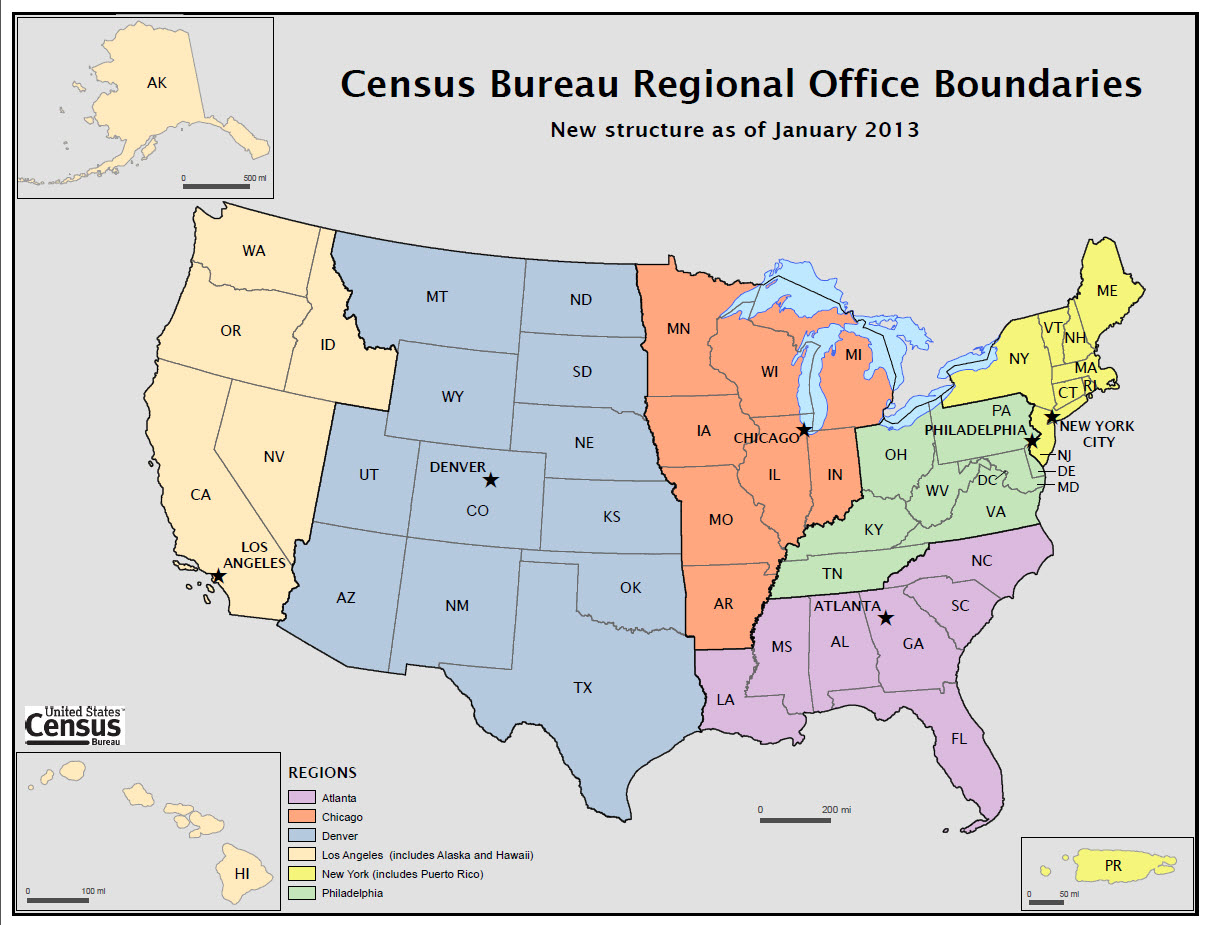
Figure A3: Census Regional Offices
Appendix 4: Data Dictionary
County and Equivalent Areas Shapefile
ATTRIBUTE FIELD |
LENGTH |
TYPE |
DESCRIPTION |
STATEFP |
2 |
String |
FIPS state code |
COUNTYFP |
3 |
String |
FIPS county code |
COUNTYNS |
8 |
String |
ANSI feature code for the county or equivalent feature |
NAMELSAD |
100 |
String |
Name with translated LSAD code |
LSAD |
2 |
String |
Legal/Statistical Area Description code |
FUNCSTAT |
1 |
String |
Functional status |
CLASSFP |
2 |
String |
FIPS 55 class code describing an entity |
CHNG_TYPE |
2 |
String |
Type of area update |
EFF_DATE |
8 |
Date |
Effective date or vintage |
DOCU |
120 |
String |
Supporting documentation |
FORM_ID |
4 |
String |
Record ID (MTPS only) |
AREA |
10 |
Double |
Area of update |
RELATE |
120 |
String |
Relationship description |
NAME |
100 |
String |
Entity name |
VINTAGE |
2 |
String |
Vintage of the data |
Table A41: County and Equivalent Areas Shapefile
County Subdivisions Shapefile
ATTRIBUTE FIELD |
LENGTH |
TYPE |
DESCRIPTION |
STATEFP |
2 |
String |
FIPS state code |
COUNTYFP |
3 |
String |
FIPS county code |
COUSUBFP |
5 |
String |
FIPS 55 county subdivision code |
NAMELSAD |
100 |
String |
Name with translated LSAD |
COUSUBNS |
8 |
String |
ANSI feature code for the county subdivision |
LSAD |
2 |
String |
Legal/Statistical Area Description |
FUNCSTAT |
1 |
String |
Functional status |
CLASSFP |
2 |
String |
FIPS 55 class code describing an entity |
CHNG_TYPE |
2 |
String |
Type of area update |
EFF_DATE |
8 |
Date |
Effective date or vintage |
DOCU |
120 |
String |
Supporting documentation |
FORM_ID |
4 |
String |
Record ID (MTPS only) |
AREA |
10 |
Double |
Area of update |
RELATE |
120 |
String |
Relationship description |
NAME |
100 |
String |
Entity name |
VINTAGE |
2 |
String |
Vintage of the data |
Table A42: County Subdivision Shapefile
Incorporated Place Shapefile
ATTRIBUTE FIELD |
LENGTH |
TYPE |
DESCRIPTION |
STATEFP |
2 |
String |
FIPS state code |
COUNTYFP |
3 |
String |
FIPS county code |
PLACEFP |
5 |
String |
FIPS 55 place code |
NAMELSAD |
100 |
String |
Name with translated LSAD |
PLACENS |
8 |
String |
ANSI feature code for the place |
LSAD |
2 |
String |
Legal / Statistical Area Description |
FUNCSTAT |
1 |
String |
Functional status |
CLASSFP |
2 |
String |
FIPS 55 class code describing and entity |
PARTFLG |
1 |
String |
Indicates if only part of a feature is represented |
CHNG_TYPE |
2 |
String |
Type of area update |
EFF_DATE |
8 |
Date |
Effective date or vintage |
DOCU |
120 |
String |
Supporting documentation |
FORM_ID |
4 |
String |
Record ID (MTPS only) |
AREA |
10 |
Double |
Area of update |
RELATE |
120 |
String |
Relationship description |
NAME |
100 |
String |
Entity name |
VINTAGE |
2 |
String |
Vintage of the data |
Table A43: Incorporated Place Shapefile
Consolidated City Shapefile
ATTRIBUTE FIELD |
LENGTH |
TYPE |
DESCRIPTION |
STATEFP |
2 |
String |
FIPS state code |
COUNTYFP |
3 |
String |
FIPS county code |
CONCITYFP |
5 |
String |
FIPS 55 place code |
NAMELSAD |
100 |
String |
Name with translated LSAD |
PLACENS |
8 |
String |
ANSI feature code for the place |
LSAD |
2 |
String |
Legal/Statistical Area Description |
FUNCSTAT |
1 |
String |
Functional status |
CLASSFP |
2 |
String |
FIPS 55 class code describing an entity |
PARTFLG |
1 |
String |
Indicates if only part of a feature is represented |
CHNG_TYPE |
2 |
String |
Type of area update |
EFF_DATE |
8 |
Date |
Effective date or vintage |
DOCU |
120 |
String |
Supporting documentation |
FORM_ID |
4 |
String |
Record ID (MTPS only) |
AREA |
10 |
Double |
Acreage of update |
RELATE |
120 |
String |
Relationship description |
NAME |
100 |
String |
Entity name |
VINTAGE |
2 |
String |
Vintage of the data |
Table A44: Consolidated City Shapefile
Edges Shapefile
ATTRIBUTE FIELD |
LENGTH |
TYPE |
DESCRIPTION |
STATEFP |
2 |
String |
FIPS state code |
COUNTYFP |
3 |
String |
FIPS county code |
TLID |
10 |
Double |
Permanent edge ID |
TFIDL |
10 |
Double |
Permanent face ID (left) |
TFIDR |
10 |
Double |
Permanent face ID (right) |
MTFCC |
5 |
String |
MAF/TIGER Feature Class Code |
FIDELITY |
1 |
String |
Indication to a respondent when their entity boundary has changed through spatial enhancement |
FULLNAME |
40 |
String |
Decoded feature name with abbreviated qualifier, direction, and feature type |
SMID |
22 |
String |
Spatial Theta ID |
BBSPFLG |
1 |
String |
Redistricting data project participant’s submitted request of an EDGE for selection as a block boundary |
CBBFLG |
1 |
String |
Indicates the status of an EDGE for a selection as a block boundary |
2010_BBSP |
1 |
String |
New BBSP flag |
CHNG_TYPE |
4 |
String |
Type of linear feature update |
LTOADD |
10 |
String |
Left To address |
RTOADD |
10 |
String |
Right To address |
LFROMADD |
10 |
String |
Left From address |
RFROMADD |
10 |
String |
Right From address |
ZIPL |
5 |
String |
Left zip code |
ZIPR |
5 |
String |
Right zip code |
Table A45: Edges Shapefile
Area Landmark Shapefile
ATTRIBUTE FIELD |
LENGTH |
TYPE |
DESCRIPTION |
STATEFP |
2 |
String |
FIPS State Code |
COUNTYFP |
3 |
String |
FIPS County Code |
MTFCC |
5 |
String |
MAF/TIGER Feature Class Code |
FULLNAME |
120 |
String |
Area landmark name |
AREAID |
22 |
String |
Object ID |
ANSICODE |
8 |
String |
ANSI code for area landmarks |
CHNG_TYPE |
2 |
String |
Type of area landmark update |
EFF_DATE |
8 |
Date |
Effective date or vintage |
RELATE |
120 |
String |
Relationship description |
BAG |
3 |
String |
Block area grouping |
Table A46: Area Landmark Shapefile
Hydro Area Shapefile
ATTRIBUTE FIELD |
LENGTH |
TYPE |
DESCRIPTION |
STATEFP |
2 |
String |
FIPS state code |
COUNTYFP |
3 |
String |
FIPS county code |
ANSICODE |
8 |
String |
ANSI code for hydrography area |
MTFCC |
5 |
String |
MAF/TIGER Feature Class Code |
FULLNAME |
120 |
String |
Hydro landmark name |
CHNG_TYPE |
2 |
String |
Type of hydro area update |
HYDROID |
22 |
String |
Object ID |
RELATE |
120 |
String |
Relationship description |
Table A47: Hydro Area Shapefile
Point Landmark Shapefile
ATTRIBUTE FIELD |
LENGTH |
TYPE |
DESCRIPTION |
STATEFP |
2 |
String |
FIPS state code |
COUNTYFP |
3 |
String |
FIPS county code |
POINTID |
22 |
String |
Object ID |
MTFCC |
5 |
String |
MAF/TIGER Feature Class Code |
FULLNAME |
120 |
String |
Point landmark name |
CHNG_TYPE |
2 |
String |
Type of point landmark update |
Table A48: Point Landmark Shapefile
Geographic Offset Shapefile
ATTRIBUTE FIELD |
LENGTH |
TYPE |
DESCRIPTION |
TFID |
20 |
Integer |
Permanent Face ID |
STATEFP |
2 |
String |
FIPS State Code |
COUNTYFP |
3 |
String |
FIPS County Code |
OFFSET |
1 |
String |
Geographic Offset / Corridor Flag |
ADDEXCLUDE |
1 |
String |
Address Exclusion Indicator |
CHNG_TYPE |
2 |
String |
Type of area update |
EFF_DATE |
8 |
Date |
Effective date or vintage |
RELATE |
120 |
String |
Relationship description |
Table A49: Geographic Offset Shapefile
Appendix 5A: 2013 Digital BAS – Example Process 1
Required Files:
A. Census Bureau Shapefiles
If Digital BAS materials were sent on CD, a zip file with all of the necessary shapefiles should be on the CD. Use these materials to create the Digital BAS submission for 2013.
If Digital BAS materials were downloaded from the Census website, the file names will be slightly different. The prefix will begin with PVS (e.g., PVS_12_v2_edges_<ssccc>.shp). Throughout this guide, Census uses the prefix of bas_2013, but the PVS files are exactly the same.
Note: Contact the Census Bureau at 800-972-5651 or geo.bas@census.gov with any questions.
Copy the data to a hard drive/server, and unzip the data to ensure that the correct data has been sent. For an incorporated place, these layers are critical:
bas_2013_place_<ssccc>.shp
bas_2013_edges_<ssccc>.shp
Note: <ssccc> represents the two-digit state code and three-digit county code.
The shapefiles should include the home county/counties as well as all adjacent counties.
Note: Census suggests that participants make an extra copy of the data in case an emergency backup is needed.
B. Local Data
The minimum data necessary is a jurisdiction polygon shapefile showing only the outer boundary or boundaries. Local parcel files are not acceptable for this method. If each jurisdiction’s boundaries are contiguous, the file should contain only one polygon for each entity; if some of the entities within the jurisdiction are non-contiguous, they may be saved as a multi-part polygon or consist of one polygon for each disjointed part. Other local data layers which may be helpful if available include centerline data, hydrological, railroad, or other linear feature data, and imagery.
Symbolizing layers in ArcGIS
The following are suggestions for symbolizing Census data in ArcGIS.
For the Edges layer, symbolize the linear features by grouping like MTFCC codes (codes sharing the same first character). See Table A5A.2.1:
Suggested MTFCC Symbolization
MTFCC 1st Character |
Linear Feature Type |
Symbol |
H |
Hydrology |
|
P |
Non-Visible Feature (boundary) |
|
R |
Railroad |
|
S |
Road |
|
Table A5A.2.1: MTFCC types and suggested symbolization.
Symbolizing geographic areas:
Symbolize the place layer using Fill Color of RGB (255,235,190) with no outline.
Note: County participants with many adjacent incorporated places may want to use different colors to distinguish one place from another.
Example A5A.2.2: Suggested map symbolization.
Extracting incorporated place or MCD data from Census shapefiles
Note: County participants submitting county boundary changes can skip this step. Use the bas_2013_county_<ssccc> shapefile which only contains the county boundary. Counties submitting for multiple incorporated places or MCDs skip ahead to Section 5.
Filtering the data.
In ArcMap, click Selection and then click Select by Attributes.
In the Select By Attributes window:
From the Layer dropdown, select bas_2013_{place|mcd}_<ssccc>.
Double click “NAME”
Left click the = button
Click the Get Unique Values button
In the list, locate and double click the name of the entity. (It will appear in the formula).
Click OK
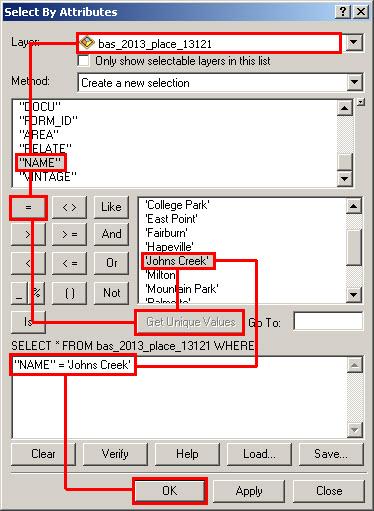
Example A5A.3.1.1: Filtering data
Exporting the data to a new shapefile
In the Table of Contents, right click the Incorporated Place or MCD layer, select Data, and then click Export Data.
In the Export Data window:
From the Export dropdown, choose Selected Features.
In the Output feature class field, enter a location to save the shapefile.
Click OK.
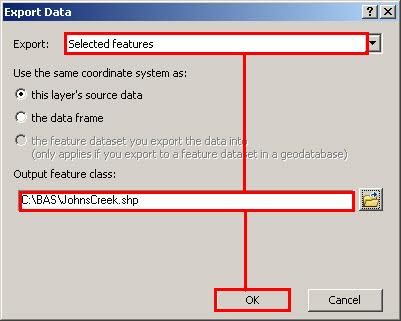
Example A5A.3.2.1: Export Data Window
Note: If the incorporated place being checked spans more than one county, it will need to be exported from each county’s place shapefile and merged. Follow the instructions in section 3.3 if the incorporated place needs to be merged, otherwise skip to section 3.4.
Merging multipart place data (See note above)
In ArcToolbox, double-click Data Management Tools, then double-click General, and then double-click Merge.
In the Merge window:
Next to the Input Datasets field, click the arrow and select each layer. (Or use the Browse button to the right of the field to find the layers.)
In the Output Dataset field, browse to and select a location to save the shapefile.
Name the shapefile Export_Output_Final or Merged, or anything easy to find/remember.
Click OK.
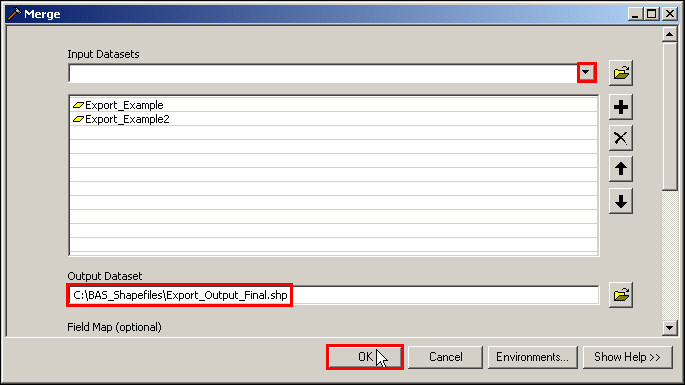
Example A5A.3.3.1: Finalizing the merge process.
Creating Change Polygons Using Symmetrical Difference
Note: If you do not have an ArcInfo license you may have to use the Union operation rather than the Symmetrical Difference operation. See section 5 if this is the case.
In ArcToolbox, double-click Analysis Tools, then double-click Overlay, and then double-click Symmetrical Difference.
In the Symmetrical Difference window:
In the Input Features field, click the arrow (or browse) and select the layer that was created in Section 3.
In the Update Features field, click the arrow (or browse) and select the local government boundary layer (your data).
In the Output Feature Class field, browse to and select a location to save the shapefile.
Name the shapefile Differences_between_BAS_local, Differences1, or anything easy to find/remember.
Click OK.
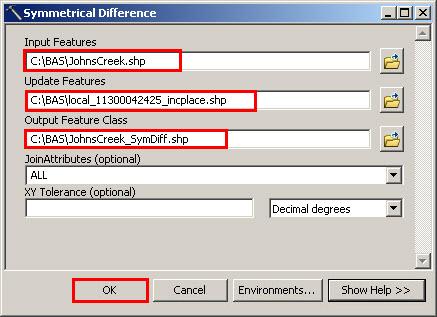
Example A5A.4.1: Finalizing the Symmetrical Difference process.
Note: This process creates a layer that contains all of the differences between Census Bureau and local boundaries. However, the Symmetrical Difference tool creates multipart polygons that need to be broken up and individually coded.
Turn on Editing (using the Editing dropdown in the Editor toolbar). Select all of the records in the layer that was created in the Symmetrical Difference step.
On the Advanced Editing toolbar, click the Explode tool
 .
The layer will now contain a separate record for each change.
.
The layer will now contain a separate record for each change.
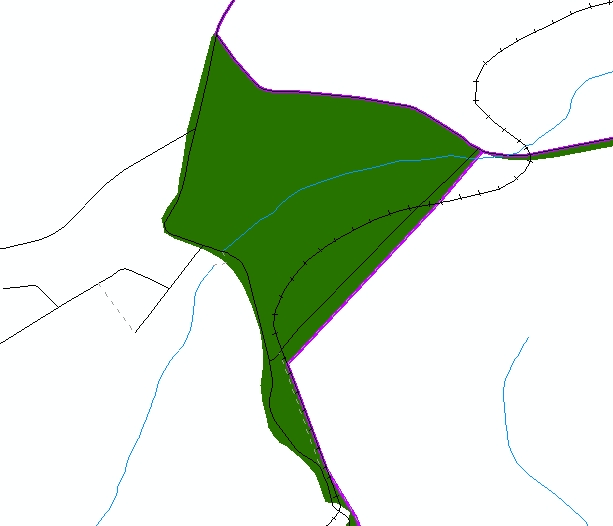
The created layer shows individual change polygons representing the differences between the Census Bureau and local government entity boundaries. These differences need to be reviewed and coded appropriately.
Skip to Section 6, Reviewing and Attributing Change Polygons.
Creating Change Polygons Using Union
Note: This method should be used by counties reporting for incorporated places or MCDs or by participants who do not have an ArcInfo license.
In ArcToolbox, double-click Analysis Tools, then double-click Overlay, and then double-click Union.
In the Union window:
In the Input Features field, click the arrow (or browse) and select bas_2013_{place|mcd}_<ssccc>, and the local incorporated place or MCD layer.
In the Output Feature Class, browse to and select a location to save the shapefile.
Name the shapefile Export_Output_union, or Union, or anything easy to find/remember.
Click OK.

Example A5A.5.1: Finalizing the Union process.
The union operation will create records that contain differences as well as areas that are in common between the Census Bureau and local government boundary layers.
The next step is selecting and deleting the areas in common between the Census Bureau and local government boundary layers.
On the Editor toolbar, click Editor, and then click Start Editing.
If a Start Editing window opens, in the top pane, click to highlight the union shapefile, and then click OK.
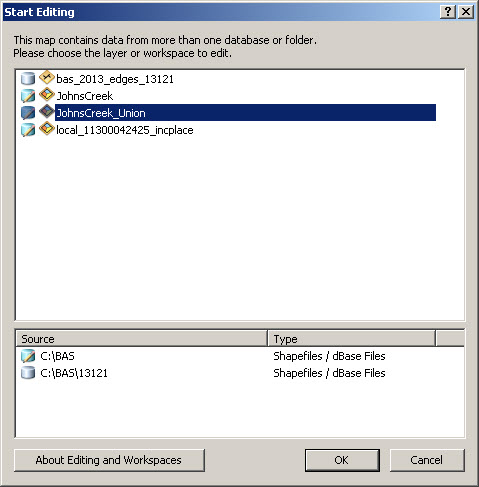
Example A5A.5.2: Locating the union shapefile.
In ArcMap, in the Tools toolbar, click the Select Features
 button.
Locate features on the map that the Census Bureau and the local government layers have in common.
Select each feature individually, or click and hold the left mouse button and drag a box to highlight the common features.
Press Delete.
Repeat these steps until only the features that have changed are left in the map.
Once all of the areas in common have been removed from the union shapefile, on the Editor toolbar, click Editor, and then click Save Edits.
Select all of the remaining records in the layer that was created in the Union step.
On the Advanced Editing toolbar, click the Explode tool
.
The layer will now contain a separate record for each change.
The new layer shows individual change polygons representing the differences between the Census Bureau and the local government’s representation of the boundaries. These differences need to be reviewed and coded appropriately. Continue to the next section.
Reviewing and Attributing Change Polygons
After the individual change polygons have been created, each must be reviewed and appropriately coded. When reviewing the polygons, be sure to frequently refer to Section 5.6 in the main part of this guide to look for polygons that should be deleted from your submission as well as those that should be snapped to nearby visible features to maintain boundary-to-feature relationships.
Examples
These examples show very small sliver polygons that should be deleted during review as they eliminate boundary-to-feature relationships with a river (left) and a road (right). Furthermore, these boundary corrections also are not located near legal changes or corridor/offset changes (type ‘A’, ‘D’, ‘C’, ‘F’), so they should be removed from consideration.
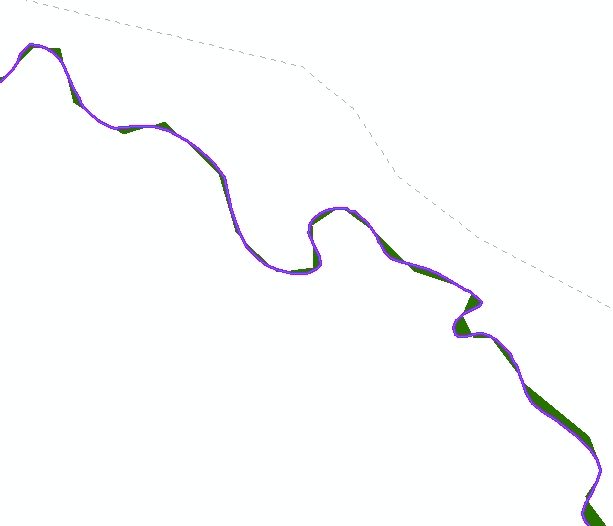
Example A5A.6.1.1: Small slivers that should be deleted.
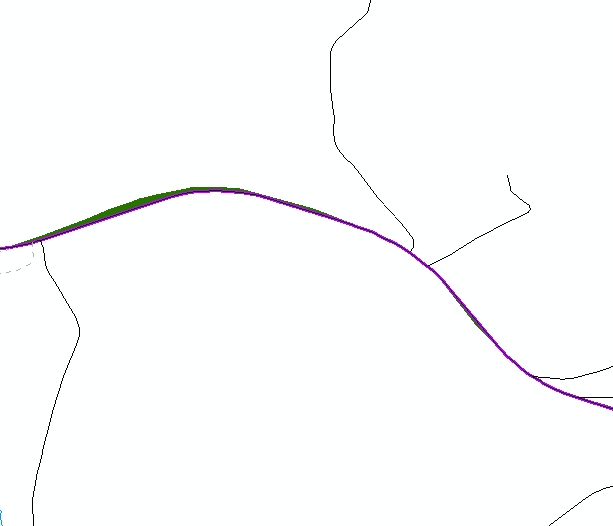
These examples show polygons that should be snapped to roads (left) or rivers (right)


Example A5A.6.1.2: Polygons that should be snapped to roads or rivers.
Attribute Information
Note: All updates MUST be attributed.
To begin updating attributes
On the Editor Toolbar, click Editor, and then click Start Editing.
Annexations
On the Editor Toolbar, click the Edit Tool
 button and select the annexation polygon.
On the Editor Toolbar, click the Attributes
 button.
In the Attributes window, fill out the mandatory fields required for an annexation.
NAME, CHNG_TYPE, DOCU and EFF_DATE.
The CHNG_TYPE for an annexation is A.
Deannexations
On the Editor Toolbar, click the Edit Tool
button and select the deannexation polygon.On the Editor Toolbar, click the Attributes
button.In the Attributes window, fill out the mandatory fields required for a deannexation.
NAME, CHNG_TYPE, DOCU and EFF_DATE.
The CHNG_TYPE for an annexation is D.
Corridors
On the Editor Toolbar, click the Edit Tool
button and select the corridor polygon.On the Editor Toolbar, click the Attributes
button.In the Attributes window, fill out the mandatory fields required for a corridor.
NAME, CHNG_TYPE, RELATE.
The CHNG_TYPE for a corridor changes is C.
In the RELATE field, enter IN if the change is adding corridor area to the place or OUT if the change is removing corridor area.
Offsets
On the Editor Toolbar, click the Edit Tool
button and select the offset polygon.On the Editor Toolbar, click the Attributes
button.In the Attributes window, fill out the mandatory fields required for an offset.
NAME, CHNG_TYPE, RELATE.
The CHNG_TYPE for an offset change is F.
In the RELATE field, enter IN if the change is adding offset area to the place or OUT if the change is removing offset area.
Boundary Corrections
On the Editor Toolbar, click the Edit Tool
button and select the boundary correction polygon.On the Editor Toolbar, click the Attributes
button.In the Attributes window, fill out the mandatory fields required for a boundary correction:
NAME, CHNG_TYPE, RELATE.
The CHNG_TYPE for a boundary correction is B.
In the RELATE field, enter IN if the boundary correction is adding area or OUT if the boundary correction is removing area.
Note: If a county is reporting for adjacent incorporated places or MCDs, and a boundary correction to one entity affects another, use RELATE = IN and NAME = <entity being added to>. This is due to the fact that RELATE = OUT leaves a question as to whether or not there should be a gap between the two entities.
To finish updating attributes
Once all of the attribute changes have been made, in the ArcMap menu, click Editor, and then click Stop Editing. (In the Save window, click Yes.)
Renaming and Finalizing Change Polygons
Renaming the shapefile
After creating and coding all change polygons, rename the change polygon layer that will be submitted to the Census Bureau. This process will need to be completed for each level of geography (county, place, MCD) that has changes.
In ArcMap, open the ArcCatalog
 tab.
tab.In ArcCatalog, navigate to shapefile, right-click and select Rename.
Save the output shapefile in the proper naming convention: bas13_<basID>_changes_<entity_type>.
Note: The basID numbers can be found on the Census Data disc or BAS form.
See section 5.7.4 for instructions on zipping updates.
Submitting the shapefile
It is requested that BAS zip files be submitted using the Census Bureau’s Send a File Utility site. Submit only the zip file. The Send a File Utility is located at: https://secure.census.gov/cgi-bin/sendfile
In a web browser, navigate to https://secure.census.gov/cgi-bin/sendfile.
In the password window:
In the User name field, enter: geobas
In the Password field, enter: GEO1upload2010!
Click OK
In the Send a File Utility window, in the Source Information section; next to the File to Send field, click Browse.
In the Choose File window, navigate to the appropriate folder, select the zip file, and then click Open.
In the Notify by E-mail section:
In the Sender’s Email Address field, enter your email address
In the Census Bureau Employee’s E-Mail Address field, enter ‘geo.bas@census.gov’
Click Upload
Note: Filling out the Notify by E-mail section will allow Census to send notice that the return zip file has been received. If there are any questions contact the Census Bureau at 800-972-5651 or email geo.bas@census.gov.
Appendix 5B: 2013 Digital BAS – Example Process 2
Note: This example uses an incorporated place. An MCD, county, or county reporting for incorporated places and MCDs may use the same process.
Required Files:
A. Census Bureau Shapefiles
If Digital BAS materials were sent on CD, a zip file with all of the necessary shapefiles should be on the CD. Use these materials to create the Digital BAS submission for 2013.
If Digital BAS materials were downloaded from the Census website, the file names will be slightly different. The prefix will begin with PVS (e.g., PVS_12_v2_edges_<ssccc>.shp). Throughout this guide, Census uses the prefix of bas_2013, but the PVS files are exactly the same.
Note: Contact the Census Bureau at 800-972-5651 or geo.bas@census.gov with any questions.
Copy the data to a hard drive/server, and unzip the data to ensure that the correct data has been sent. For an incorporated place, these layers are critical:
bas_2013_place_<ssccc>.shp
bas_2013_edges_<ssccc>.shp
Note: <ssccc> represents the two-digit state code and three-digit county code.
The shapefiles should include the home county/counties as well as all adjacent counties.
Note: Census suggests that participants make an extra copy of the data in case an emergency backup is needed.
B. Local Data
The minimum data necessary is a shapefile showing your jurisdiction boundary or annexations and deannexations. Other local data layers which may be helpful if available include centerline data, hydrological, railroad, or other linear feature data, and imagery.
Symbolizing layers in ArcGIS
The following are suggestions for symbolizing Census data in ArcGIS.
For the Edges layer, symbolize the linear features by grouping like MTFCC codes (codes sharing the same first character). See Table A5B.2.1:
Suggested MTFCC Symbolization
MTFCC 1st Character… |
Linear Feature Type |
Symbol |
H |
Hydrology |
|
P |
Non-Visible Feature (boundary) |
|
R |
Railroad |
|
S |
Road |
|
Table A5B.2.1: MTFCC types and suggested symbolization.
Symbolizing geographic areas:
Symbolize the place layer using Fill Color of RGB (255,235,190) with no outline.
Note: County participants with many adjacent incorporated places may want to use different colors to distinguish one place from another.
Example A5B.2.2: Suggested map symbolization.
Creating and Splitting Linear features
Creating new linear features
Some of the linear features that are needed to create change polygons may not exist in the MAF/TIGER database. Therefore it may be necessary to create and split lines when forming changes. The existing and newly created linear features will then be selected to define the boundary changes.
In ArcMap, right click the edges layer in the Table of Contents, click Selection, and then click Make This The Only Selectable Layer, so that the edges layer is the only one which can be selected while editing.
In the Editor toolbar, click Editor and then click Start Editing.
In the Create Features window, highlight a non-visible boundary symbolization under the edges layer: bas_2013_edges_<ssccc>.

Example A5B.3.1.1: Create Features window.
In the Editor toolbar, click Editor and then click Snapping, then Snapping Toolbar.
On the snapping toolbar, ensure that Point, Vertex, Edge, and End Snapping are all enabled. Drop down the Snapping menu, and ensure that Use Snapping is checked. Snapping will ensure that newly created lines will follow existing MAF/TIGER linear features.
![]()
Example A5B.3.1.2: Snapping toolbar
For any new boundary lines that do not follow existing edges, ensure that Line is suggested in the Construction Tools pane (see Example A5B.3.1.1), and in the Editor toolbar, click the Straight Segment Tool
 button and draw new features on the map by clicking to create a
line. Single clicking will add vertexes to the line, and
double-clicking will end the line and create the new feature. Any
new feature(s) will be highlighted.
button and draw new features on the map by clicking to create a
line. Single clicking will add vertexes to the line, and
double-clicking will end the line and create the new feature. Any
new feature(s) will be highlighted.
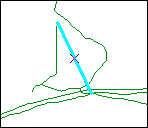
Example A5B.3.1.3: A newly created linear feature
Adding attribute data to new linear features
After creating new linear features:
In the Editor toolbar, click the Attributes
button.In the Attributes window, in the MTFCC field, add the appropriate MTFCC code (it should default to P0001, but can be changed if necessary).
Use P0001 if the feature is a non-visible political boundary.
If the feature is visible, see Appendix 6 for the appropriate codes.
Note: An MTFCC code must be added for each new feature. If larger scale linear feature changes are going to be submitted, it is best to create those in a separate layer. It is not necessary to submit linear feature changes for non-visible boundaries.
Click on Editor and then click Save Edits often so that work is not lost.
Once all lines are added, in the Editor toolbar, click Editor and then click Stop Editing (In the Save window, click Yes.)
Splitting linear features
In the Editor toolbar, click Editor and then click Start Editing.
In the Editor toolbar, click the Edit Tool
button and select a linear feature that needs to be split. The line
will be highlighted when it is selected.In the Editor toolbar, click the Split Tool
 button. Click the line where it needs to be split.
The following examples display why it may be necessary to split lines when creating change polygons.
The desired boundary change is indicated below. When selecting the lines to form the boundary change, sections of the linear features that are not a part of the boundary update are included (highlighted in blue).
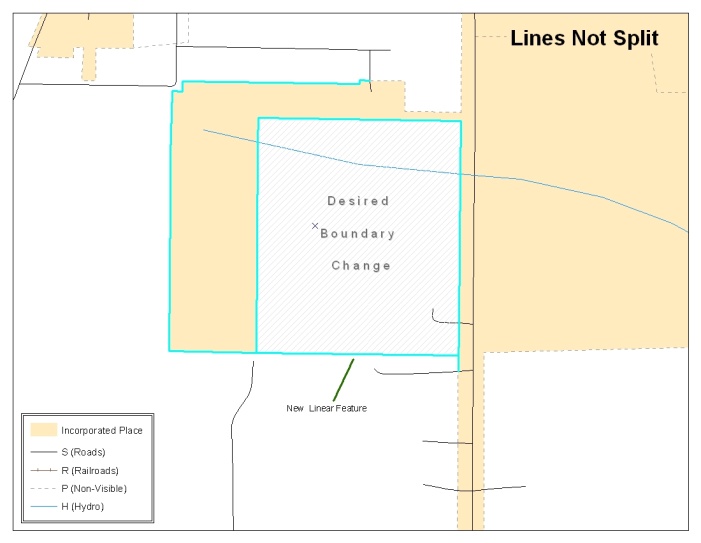
Example A5B.3.2.1: Linear feature selection before being split
The existing linear features can be split to prevent unwanted line segments from being selected as part of the boundary update.
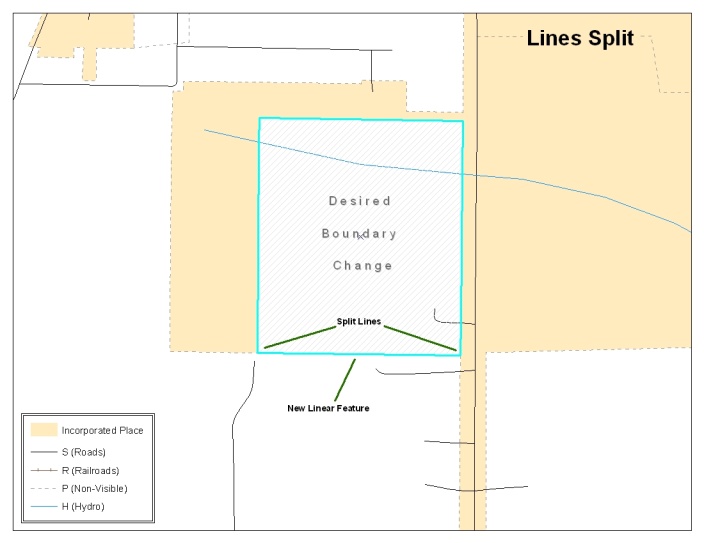
Example A5B.3.2.2: Linear feature selection after being split
Once all necessary splits are made, in the Editor toolbar, click Editor and then click Save Edits.
Selecting Lines and Creating Change Polygons
After creating and/ or splitting any necessary linear features, they must be selected to form change polygons. Each change polygon must be created and coded separately.
Creating change polygons
If the Topology toolbar is not active, click the Customize menu, select Toolbars, and then select Topology to activate it.
In the Editor toolbar, click Editor and then click Start Editing.
In the Create Features window, switch the highlighted feature to the place layer: bas_2013_place_<ssccc>.
In the Editor toolbar, click the Edit Tool
button and select the linear features that comprise the boundary of
a change polygon (i.e. an annexation, deannexation, or incorrect
area) by holding the Shift key while clicking each linear
feature segment.
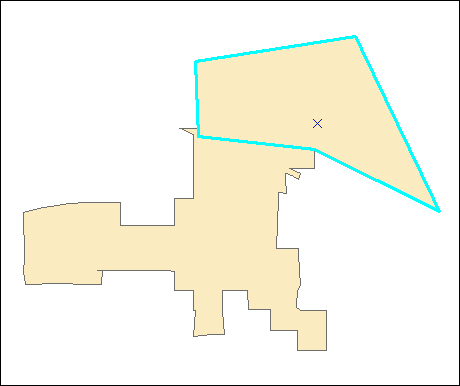
Example A5B.3.3.1: Selecting the linear features of a change polygon.
On the Topology toolbar, click the Construct Features
 button.
In the Construct Features dialog box, click OK. (The default Cluster Tolerance is acceptable.)
The polygon is now part of the incorporated place layer; however, it will not have any associated attribute values (see the next section).
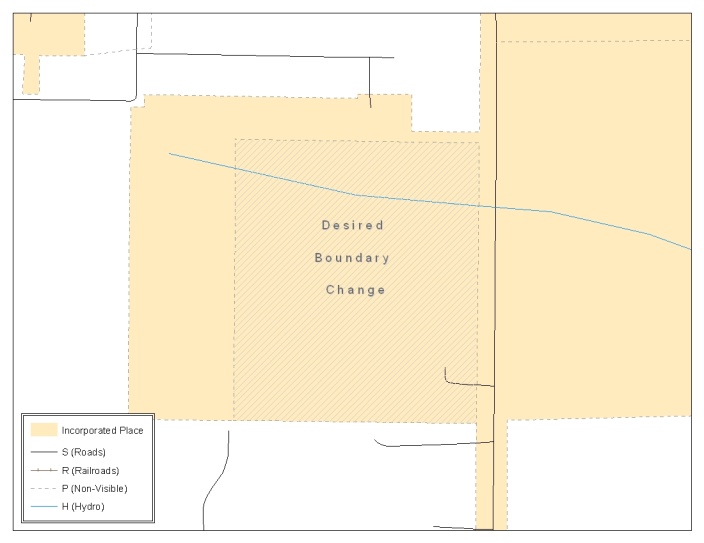
Example A5B.3.3.2: Newly created place feature.
Attributing Change Polygons
After each change polygon has been created, it must be correctly attributed so that the boundaries can be appropriately updated in the MAF/TIGER database. Another option is to update the attributes for each change polygon after creating all boundary changes. The following steps will explain which attributes are mandated for each type of boundary change.
Note: All updates MUST be attributed.
To begin updating attributes
In ArcMap, right click the place layer in the Table of Contents, click Selection, and then click Make This The Only Selectable Layer, so that the place layer is the only one which can be selected while editing.
On the Editor Toolbar, click Editor, and then click Start Editing.
Annexations
On the Editor Toolbar, click the Edit Tool
button and select the annexation polygon.On the Editor Toolbar, click the Attributes
button.In the Attributes window, fill out the mandatory fields required for an annexation.
NAME, CHNG_TYPE, DOCU and EFF_DATE.
The CHNG_TYPE for an annexation is A.
Deannexations
On the Editor Toolbar, click the Edit Tool
button and select the deannexation polygon.On the Editor Toolbar, click the Attributes
button.In the Attributes window, fill out the mandatory fields required for a deannexation.
NAME, CHNG_TYPE, DOCU and EFF_DATE.
The CHNG_TYPE for an annexation is D.
Corridors
On the Editor Toolbar, click the Edit Tool
button and select the corridor polygon.On the Editor Toolbar, click the Attributes
button.In the Attributes window, fill out the mandatory fields required for a corridor.
NAME, CHNG_TYPE, RELATE.
The CHNG_TYPE for a corridor changes is C.
In the RELATE field, enter IN if the change is adding corridor area to the place or OUT if the change is removing corridor area.
Offsets
On the Editor Toolbar, click the Edit Tool
button and select the offset polygon.On the Editor Toolbar, click the Attributes
button.In the Attributes window, fill out the mandatory fields required for an offset.
NAME, CHNG_TYPE, RELATE.
The CHNG_TYPE for an offset change is F.
In the RELATE field, enter IN if the change is adding offset area to the place or OUT if the change is removing offset area.
Boundary Corrections
On the Editor Toolbar, click the Edit Tool
button and select the boundary correction polygon.On the Editor Toolbar, click the Attributes
button.In the Attributes window, fill out the mandatory fields required for a boundary correction:
NAME, CHNG_TYPE, RELATE.
The CHNG_TYPE for a boundary correction is B.
In the RELATE field, enter IN if the boundary correction is adding area or OUT if the boundary correction is removing area.
Note: If a county is reporting for adjacent incorporated places or MCDs, and a boundary correction to one entity affects another, use RELATE = IN and NAME = <entity being added to>. This is due to the fact that RELATE = OUT leaves a question as to whether or not there should be a gap between the two entities.
To finish updating attributes
Once all of the attribute changes have been made, on the Editor toolbar, click Editor, and then click Stop Editing. (In the Save window, click Yes.)
Exporting Change Polygons
After creating and coding the change polygons, each level of geography (county, place, MCD) that has changes must be exported to a separate change polygon layer.
In ArcMap, click Selection and then click Select by Attributes.
In the Select By Attributes window:
Set the Layer dropdown to the incorporated place layer: bas_2013_place_<ssccc>.
Set the Method dropdown to Create a new selection.
In the Select * FROM box, type one of the following formulas:
“CHNG_TYPE” < > ‘ ’ This equation would select all change polygons that have any change type which have been created and coded.
“CHNG_TYPE” = ‘A’ OR “CHNG_TYPE” = ‘B’ OR… (etc.) This equation can be written to select each change type for polygons that were created and coded.
Click OK
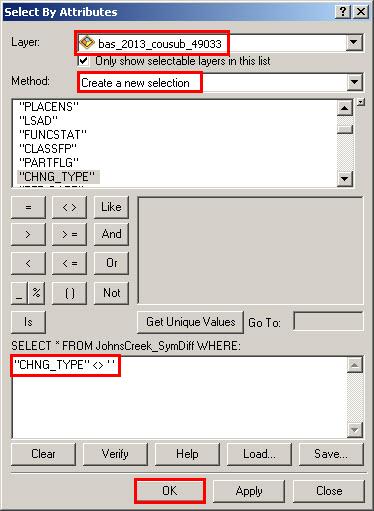
Example A5B.3.5.1: Select all change types formula
After clicking OK, each change polygon that that has been created and coded should be highlighted on the map and in the attribute table.
Optional: Open the attribute table and sort to verify that all change polygons with a change type code were selected.
Exporting the selected change polygons
In the ArcMap Table of Contents, right-click on the incorporated place layer (bas_2013_place_<ssccc>), select Data, and then click Export Data.
In the Export Data window:
From the Export dropdown, choose Selected Features.
In the Output shapefile or feature class: field, browse to and select a location to save the shapefile.
Name the shapefile bas13_<basID>_changes_incplace.shp.
Click OK.
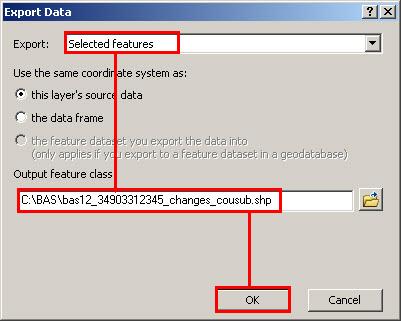
Example A5B.3.5.2: Exporting Data
Note: The basID numbers can be found on the Census Data disc or BAS form.
See section 5.7.4 for instructions on zipping updates.
Submitting the shapefile
It is requested that BAS zip files be submitted using the Census Bureau’s Send a File Utility site. Submit only the zip file. The Send a File Utility is located at: https://secure.census.gov/cgi-bin/sendfile
In a web browser, navigate to https://secure.census.gov/cgi-bin/sendfile.
In the password window:
In the User name field, enter: geobas
In the Password field, enter: GEO1upload2010!
Click OK
In the Send a File Utility window, in the Source Information section; next to the File to Send field, click Browse.
In the Choose File window, navigate to the appropriate folder, select the zip file, and then click Open.
In the Notify by E-mail section:
In the Sender’s Email Address field, enter your email address
In the Census Bureau Employee’s E-Mail Address field, enter ‘geo.bas@census.gov’
Click Upload
Note: Filling out the Notify by E-mail section will allow Census to send notice that the return zip file has been received. If there are any questions contact the Census Bureau at 800-972-5651 or email geo.bas@census.gov.
Appendix 6: MTFCC Codes
MTFCC Codes
MTFCC Code |
MTFCC Description (Short) |
MTFCC Description (Long) |
C3022 |
Mountain Peak or Summit |
Prominent elevation rising above the surrounding level of the Earth's surface |
C3023 |
Island |
Area of dry or relatively dry land surrounded by water or low wetland (archipelago, atoll, cay, hammock, hummock, isla, isle, key, moku, rock) |
C3024 |
Levee |
Natural or manmade embankment flanking a stream (bank, berm) |
C3026 |
Quarry (not water-filled), Open Pit Mine or Mine |
Place or area from which commercial minerals are or were removed from the Earth; not including oilfield |
C3027 |
Dam |
Water barrier or embankment built across the course of a stream or into a body of water to control and (or) impound the flow of water (breakwater, dike, jetty) |
C3061 |
Cul de sac |
A street that is closed at one end with a circular turnaround area and only one outlet |
C3062 |
Traffic Circle |
A circular intersection allowing for continuous movement of traffic at the meeting of roadways |
C3066 |
Gate |
A movable barrier across a road |
C3067 |
Toll booth |
A structure or barrier where a fee is collected for using a road |
C3070 |
Tower/beacon |
A manmade structure, higher than its diameter, generally used for observation, storage, or electronic transmission |
C3071 |
Lookout Tower |
A manmade structure, higher than its diameter used for observation |
C3072 |
Transmission Tower including cell, radio and TV |
A manmade structure, higher than its diameter used for electronic transmission |
C3073 |
Water Tower |
A manmade structure, higher than its diameter used for water storage |
C3074 |
Lighthouse Beacon |
A manmade structure, higher than its diameter used for transmission of light generally to aid in navigation |
C3075 |
Tank/Tank Farm |
A manmade structure(s), higher than its diameter used for liquid (other than water) or gas storage |
C3076 |
Windmill Farm |
A manmade structure(s) used to generate power from the wind |
C3077 |
Solar Farm |
A manmade structure(s) used to generate power from the sun |
C3078 |
Monument or Memorial |
A manmade structure to educate, commemorate, or memorialize an event, person, or feature |
C3079 |
Boundary Monument Point |
Material object placed on or near a boundary line to preserve and identify the location of the boundary line on the ground |
C3080 |
Survey Control Point |
Point on the ground whose position (horizontal or vertical) is known and can be used as a base for additional survey work |
C3081 |
Locality Point |
This feature represents points that identify locations and names of unbounded localities e.g., crossroads, community names, names from the Geographic Names Information System (GNIS). |
C3088 |
Landfill |
A disposal facility at which solid waste is placed on or in the land |
H2025 |
Swamp/Marsh |
A poorly drained Wetland, fresh or saltwater, wooded or grassy, possibly covered with open water (bog, cienega, marais, marsh, pocosin) |
H2030 |
Lake/Pond |
A natural body of inland water (backwater, lac, lagoon, laguna, pond, pool, resaca, waterhole) |
H2040 |
Reservoir |
An artificially impounded body of water (lake, tank) |
H2041 |
Treatment Pond |
An artificial body of water built to treat fouled water |
H2051 |
Bay/Estuary/Gulf/Sound |
A body of water partly surrounded by land (arm, bight, cove, inlet) |
H2053 |
Ocean/Sea |
Large body of salt water (gulf, ocean) |
H2060 |
Gravel Pit/Quarry filled with water |
A body of water in a place or area from which commercial minerals Were removed from the Earth |
H2081 |
Glacier |
A body or stream of ice moving outward and down slope from an area of accumulation; an area of relatively permanent snow or ice on the top or side of a mountain or mountainous area (ice field, ice patch, snow patch) |
H3010 |
Stream/River |
A linear body of water flowing on the Earth's surface (anabranch, awawa, bayou, branch, brook, creek, distributary, fork, kill, pup, rio, river, run, slough) |
H3013 |
Braided Stream |
A body of water flowing on the Earth's surface that is separated into multiple channels |
H3020 |
Canal, Ditch or Aqueduct |
A manmade waterway used by watercraft or for drainage, irrigation, mining, or water power (ditch, lateral) |
K1100 |
Housing Unit Location |
|
K1121 |
Apartment Building or Complex |
|
K1122 |
Rooming or Boarding House |
|
K1223 |
Trailer Court or Mobile Home Park |
|
K1225 |
Crew-of-Vessel Location |
|
K1226 |
Housing Facility/Dormitory for Workers |
|
K1227 |
Hotel, Motel, Resort, Spa, Hostel, YMCA, or YWCA |
|
K1228 |
Campground |
|
K1229 |
Shelter or Mission |
|
K1231 |
Hospital/Hospice/Urgent Care Facility |
One or more structures where the sick or injured may receive medical or surgical attention (infirmary) |
K1232 |
Halfway House/Group Home |
|
K1233 |
Nursing Home, Retirement Home, or Home for the Aged |
|
K1234 |
County Home or Poor Farm |
|
K1235 |
Juvenile Institution |
|
K1236 |
Local Jail or Detention Center |
|
K1237 |
Federal Penitentiary, State Prison, or Prison Farm |
|
K1238 |
Other Correctional Institution |
|
K1239 |
Convent, Monastery, Rectory, Other Religious Group Quarters |
|
K1241 |
Sorority, Fraternity, or College Dormitory |
|
K1251 |
Military Group Quarters |
|
K2100 |
Governmental |
|
K2110 |
Military Installation |
This feature represents areas owned and/or occupied by the Department of Defense for use by a branch of the armed forces, including the Army, Navy, Air Force, Marines, Coast Guard, and include state owned areas for the use of the National Guard. |
K2146 |
Community Center |
|
K2165 |
Government Center |
|
K2167 |
Convention Center |
|
K2180 |
Park |
This feature represents parklands defined and administered by Federal State and Local governments. |
K2181 |
National Park Service Land |
National Park Service Land |
K2182 |
National Forest or Other Federal Land |
National Forest or Other Federal Land |
K2191 |
Post Office |
An official facility of the U.S. Postal Service used for processing and distributing mail and other postal material |
K2193 |
Fire Department |
|
K2194 |
Police Station |
|
K2195 |
Library |
|
K2196 |
City/Town Hall |
|
K2197 |
Mixed Use/Other Non-residential |
|
K2300 |
Commercial Workplace |
|
K2361 |
Shopping Center or Major Retail Center |
|
K2362 |
Industrial Building or Industrial Park |
|
K2363 |
Office Building or Office Park |
|
K2364 |
Farm/Vineyard/Winery/Orchard |
Farm/Vineyard/Winery/Orchard |
K2366 |
Other Employment Center |
|
K2400 |
Transportation Terminal |
|
K2424 |
Marina |
|
K2432 |
Pier/Dock |
|
K2451 |
Airport or Airfield |
A manmade facility maintained for the use of aircraft (airfield, airstrip, landing field, landing strip) |
K2452 |
Train Station, Trolley or Mass Transit Rail Station |
|
K2453 |
Bus Terminal |
|
K2454 |
Marine Terminal |
|
K2455 |
Seaplane Anchorage |
|
K2456 |
Airport - Intermodal Transportation Hub/Terminal |
|
K2457 |
Airport - Statistical Representation |
|
K2458 |
Park and Ride Facility /Parking Lot |
|
K2459 |
Runway/Taxiway |
|
K2460 |
Helicopter Landing Pad |
|
K2500 |
Other Workplace |
|
K2545 |
Museum, Visitor Center, Cultural Center, or Tourist Attraction |
|
K2561 |
Golf Course |
|
K2564 |
Amusement Center |
|
K2582 |
Cemetery |
A place or area for burying the dead (burial, burying ground, grave, memorial garden) |
K2586 |
Zoo |
|
L4010 |
Pipeline |
|
L4020 |
Powerline |
|
L4040 |
Conveyor |
|
L4110 |
Fence Line |
|
L4121 |
Ridge Line |
|
L4125 |
Cliff/Escarpment |
A very steep or vertical slope (bluff, crag, head, headland, nose, palisades, precipice, promontory, rim, rimrock) |
L4130 |
Point-to-Point Line |
|
L4140 |
Property/Parcel Line (Including PLSS) |
|
L4165 |
Ferry Crossing |
|
P0001 |
Nonvisible Linear Legal/Statistical Boundary |
|
P0002 |
Perennial Shoreline |
|
P0003 |
Intermittent Shoreline |
|
P0004 |
Other non-visible bounding Edge (e.g., Census water boundary, boundary of an areal feature) |
|
R1011 |
Railroad Feature (Main, Spur, or Yard) |
Rail feature refers to a line of fixed rails or tracks that form railways or railroads, spurs, and rail yards. They are used for the transport of passengers and goods. |
R1051 |
Carline, Streetcar Track, Monorail, Other Mass Transit Rail |
Carline, Streetcar Track, Monorail, and other mass transit refer to various forms of rail transport that has one or more than one track on which monorails or streetcars run. These tracks are typically in urban areas. |
R1052 |
Cog Rail Line, Incline Rail Line, Tram |
Cog Rail Line, Incline Rail Line are railways with a special toothed rack rail or rack mounted on the railroad ties between the running rails. The trains are fitted with one or more cog wheels that mesh with this rack rail. This allows the trains to operate on steeply inclined slopes. A Tram is a cable car, especially one suspended from an overhead cable, or a wheeled vehicle that runs on rails and is propelled by electricity. |
S1100 |
Primary Road |
Primary Road |
S1200 |
Secondary Road |
Secondary Road |
S1400 |
Local Neighborhood Road, Rural Road, City Street |
Local Neighborhood Road, Rural Road, City Street |
S1500 |
Vehicular Trail (4WD) |
Vehicular Trail (4WD) |
S1630 |
Ramp |
Ramp |
S1640 |
Service Drive usually along a limited access highway |
Service Drive usually along a limited access highway |
S1710 |
Walkway/Pedestrian Trail |
Walkway/Pedestrian Trail |
S1720 |
Stairway |
Stairway |
S1730 |
Alley |
Alley |
S1740 |
Private Road for service vehicles (logging, oil fields, ranches, etc.) |
Private Road for service vehicles (logging, oil fields, ranches, etc.) |
S1750 |
Private Driveway |
Private Driveway |
S1780 |
Parking Lot Road |
Parking Lot Road |
S1820 |
Bike Path or Trail |
Bike Path or Trail |
S1830 |
Bridle Path |
Bridle Path |
S2000 |
Road Median |
Road Median |
Table A6: Select MTFCC codes
1 The use of brand names does not represent an endorsement of a company or its products by the U.S. government. Due to the wide use of ESRI products by our partners in the GIS community, and the ubiquitous use of the shapefile format as a medium for GIS data exchange, the Census Bureau is providing this data in shapefile format. There should be no problem when importing these shapefiles into local GIS software. However, if the GIS software being used does not contain a shapefile translator, contact the Census Bureau for further instructions (301-763-1099) or e-mail geo.bas@census.gov.
| File Type | application/msword |
| Author | cleme309 |
| Last Modified By | smith682 |
| File Modified | 2012-11-05 |
| File Created | 2012-09-11 |
© 2026 OMB.report | Privacy Policy