The Boundary and Annexation Survey (BAS)
The Boundary and Annexation Survey (BAS) & Boundary Validation Program (BVP)
13_RespondentGuide_MTPS_WorkingDraft_09_10_12
The Boundary and Annexation Survey (BAS)
OMB: 0607-0151
Boundary and Annexation Survey Respondent Guide: MAF/TIGER Partnership Software |
Issued January 2013 |
|
|
|
|
Table of Contents
1. Introduction to the Boundary and Annexation Survey (BAS) 2
1.2 Specific state arrangements and agreements 2
1.4 Key dates for BAS respondents 3
2. Installing MTPS and Census Bureau Data 3
2.1 Installing the MTPS program 4
2.2 Loading the Census Bureau data 6
3. Viewing and Updating Boundary Data Using MTPS 6
3.2 Computer Based Training (CBT) 7
3.3 Updating Participant Information 10
3.4 Customizing the map view 11
6. Submitting BAS Updates to the Census Bureau 35
6.1 Creating the return zip file 35
6.2 Returning BAS updates to the Census Bureau 37
Appendix 1: Paperwork Reduction Project 39
Appendix 2: Tool Explanations by Toolbox 40
The U.S. Census Bureau conducts an annual survey called the Boundary and Annexation Survey (BAS) to collect information about selected legally defined geographic areas, such as counties (and equivalent areas), incorporated places, minor civil divisions (MCDs), and federally recognized American Indian reservations (including off-reservation trust lands and tribal subdivisions). The BAS also provides an opportunity for participants to review the names and geographic relationships for these areas. Title 13, U.S. Census Code authorizes this survey.
BAS information is used to provide a record for reporting the results of the decennial and economic censuses, and to support the Population Estimates Program and the American Community Survey. Maintaining correct boundaries and boundary-to-feature relationships through the BAS helps ensure that the appropriate population is assigned to each entity.
In compliance with the Office of Management and Budget Circular A-16, the BAS supports the Census Bureau’s spatial data steward responsibilities for the Federal Geographic Data Committee and the Geo.Data.gov website by updating the inventory of, and boundaries for, governmental units. In addition, the BAS is the source of up-to-date information on boundaries, codes, and names for the U.S. Geological Survey’s (USGS) National Map and the Geographic Names Information System. The BAS is also the source for changes in the boundaries of incorporated places, minor civil divisions (MCDs), counties (and equivalent areas), and federally recognized American Indian Areas (AIAs), which include reservations and off-reservation trust lands.
The Census Bureau has established a number of arrangements or agreements with states for reporting boundary changes. Please visit the BAS program website at http://www.census.gov/geo/partnerships/bas.html or call (800) 972-5651 for information regarding state agreements.
If it comes to the Census Bureau’s attention that an area of land is in dispute between two or more jurisdictions, annexations or boundary corrections will not be made until the parties come to a written agreement, or there is a documented final court decision regarding the matter/dispute. If you have questions concerning this, please contact the Census Bureau Legal Office at 301-763-9844. For disputes involving tribal areas, the Census Bureau must defer to the Office of the Solicitor at the Department of the Interior for a legal opinion. Often complicated land issues require an extended period of time for resolution, and in those cases, the Census Bureau will retain the current boundary in the database until a legal opinion is issued by the Solicitor’s office.
1.4 Key dates for BAS respondents
All changes received by March 1 will be reflected in the Population Estimates Program and the American Community Survey. If the Census Bureau receives updates by May 31, they will be included in BAS materials next year.
To change the method of participation in BAS from MTPS to paper, the Census Bureau must be notified by February 15 (for updates going into the ACS) or April 15 (for updates to be reflected in the next year’s BAS materials). Contact the Census Bureau by phone at 800-972-5651 or by email at geo.bas@census.gov. (To change from MTPS to Digital BAS, simply use the shapefiles provided with MTPS and follow the instructions found in the Digital BAS Respondent Guide located on the data disc or the BAS website: http://www.census.gov/geo/www/bas/bashome.html.)
The MAF/TIGER Partnership Software (MTPS) was developed to allow participants to digitally update Census Bureau maps and local contact data without the need to purchase software.
The BAS package contains the MTPS program on a CD and one or more CDs or DVDs containing Census Bureau data. This section provides instructions for installing both the software and the data. If you have any problems installing or using the MTPS program or data, please contact the Census Bureau at 800-972-5651.
Warning: Installing the MAF/TIGER Partnership Software (MTPS) and the accompanying data will delete any previous MTPS data installations and any work already completed, regardless of Census program (BAS, LUCA, SDRP, RDP, etc.).
To prevent loss of data it is recommended that MTPS be installed on a separate computer from any previous MTPS installations, or that existing data folders be renamed prior to installation.
To rename existing MTPSData folders:
Before beginning the installation, navigate to the C:\MTPSData folder.
Rename the folder using the program initials so it can be easily identified later (e.g., C:\MTPSData_PSAP or C:\MTPSData_RDP).
Proceed with the installation; when the installation is complete, there will be a new folder titled C:\MTPSData which contains the BAS data.
If MTPS was used for a previous BAS submission and the MTPS version is older than 5.7, the old version will need to be uninstalled (to use version 5.7 with the 2012 BAS data, please delete or move the old data and copy the 2012 data to the C:\MTPSData folder):
In Windows, click the Start button, select Settings, and then click Control Panel.
In the Control Panel window, double-click Add or Remove Programs.
In the Add or Remove Programs window, find and select the MAF/TIGER Partnership Software, and then click Change/Remove.
Follow the prompts, choosing to uninstall the software.
To install the current version of MTPS:
Note: In order to ensure that the program installs correctly, it should be installed under an account with administrator privileges.
Insert the MTPS program CD into the CD-ROM drive.
Click the Start button, and then click Run.
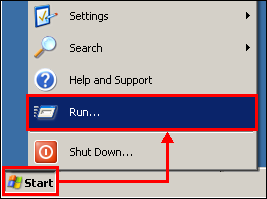
Example 2.1.1: Start, Run commands
In the Run window, type the location of the CD-ROM drive and the word setup (ex. D:\setup) and then click OK, or use the Browse button to locate and double-click the SETUP.EXE file on the program disc.
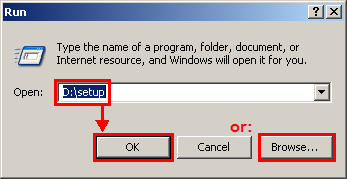
Example 2.1.2: Run window
In the Setup: Welcome window, click Next.
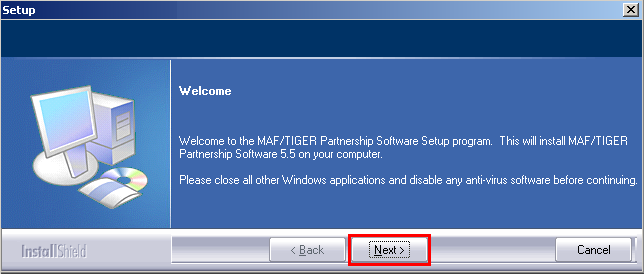
Example 2.1.3: Setup: Welcome window
In the Setup: Select Installation Type window, select Install MAF/TIGER Partnership Software and Data for a Single User and then click Next.
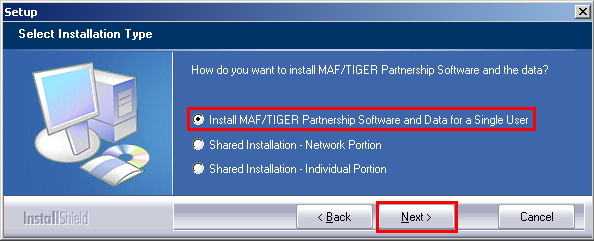
Example 2.1.4: Setup: Select Installation Type window
The setup program will continue through the installation process. It is recommended that the default settings be accepted in each step.
Note: If there is already data in the default directory, the setup program will ask if the files should be removed. If Yes is clicked, the files will be removed; if No is clicked, a different installation directory can be selected.
2.2 Loading the Census Bureau data
After the MTPS program has been installed, the installation software will ask that the first data disc be inserted into the CD-ROM drive, and will then load the data onto the computer.
Note: If more than one data disk was provided, the program will prompt for subsequent CDs until all of the data has been loaded.
To switch back to a previous MTPS Census program:
Rename the C:\MTPSData folder to C:\MTPSData_BAS (or another memorable name).
Rename the program folder to be used to C:\MTPSData.
Launching MTPS will now open that dataset.
After installation, MTPS can be opened by clicking Start, selecting Programs, selecting MAF-TIGER Partnership Software, and then clicking MAF-TIGER Partnership Software 5.7.
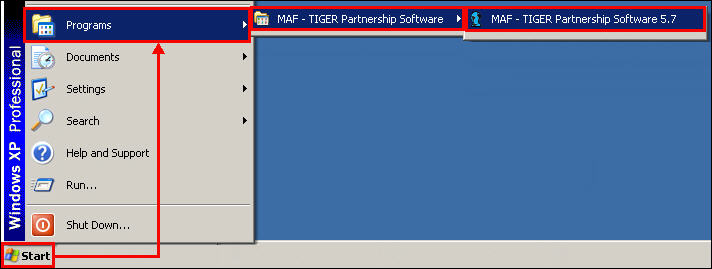
Example 3.1.1: Opening MTPS from the desktop
In the Please Log In window, in the User Name field, type bas (case-sensitive) and then click OK.
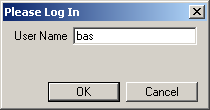
Example 3.1.2: MTPS BAS Log In window
Note: During the initial login, MTPS will load the BAS data files so that the program is able to read and edit them. For this step, any antivirus software should be turned off or temporarily disabled. The time required for the initial processing of files varies depending on the amount of data for the entity and the surrounding areas, and will only occur the first time MTPS is opened.
After login, the Startup Choices window will open:
Select Run the MAF/TIGER Partnership Software Computer Based Training and click OK to open the MTPS Computer Based Training (CBT).
Select Go directly to the MAF/TIGER Partnership Software program and click OK to begin using MTPS.
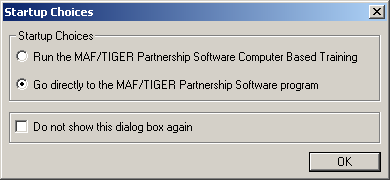
Example 3.1.3: MTPS Startup Choices
From the Startup Choices window, select Run the MAF/TIGER Partnership Software Computer Based Training (CBT) and then click OK to open the training. The CBT modules demonstrate how to use the software to make different types of updates, such as adding a line or adding areas to an entity.
Note: The Computer Based Training opens in an internet browser window, and can be left open while using MTPS.
The CBT modules can also be opened at any time by clicking Start, then selecting Programs, then selecting MAF-TIGER Partnership Software, and then clicking Computer Based Training for MAF-TIGER Partnership Software.
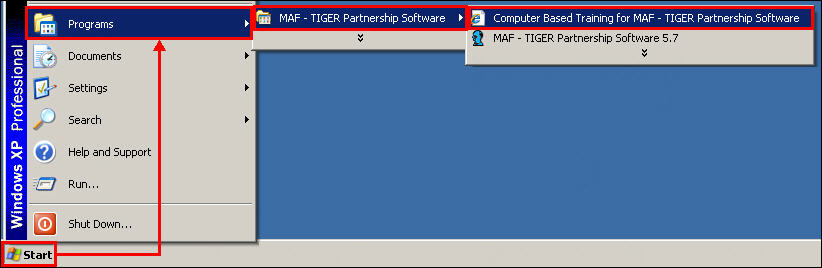
Example 3.2.1: Accessing MTPS Computer Based Training from the desktop.
The following CBT tutorials are recommended for review before continuing:
Creating additions/annexations, deletions/deannexations, and new entities
Editing linear features
Editing area features
Reporting and viewing your BAS changes
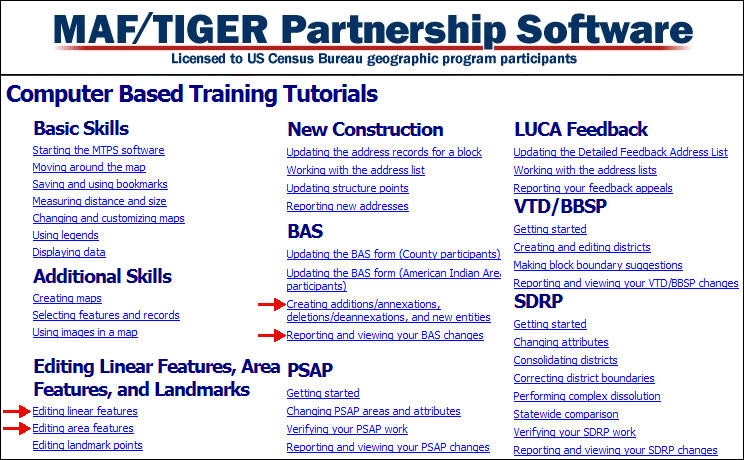
Example 3.2.2: Computer Based Training menu with recommended tutorials
The first time MTPS is opened, the Participant Information window will display. Verify and/or correct the contact information for the person responding to the BAS.
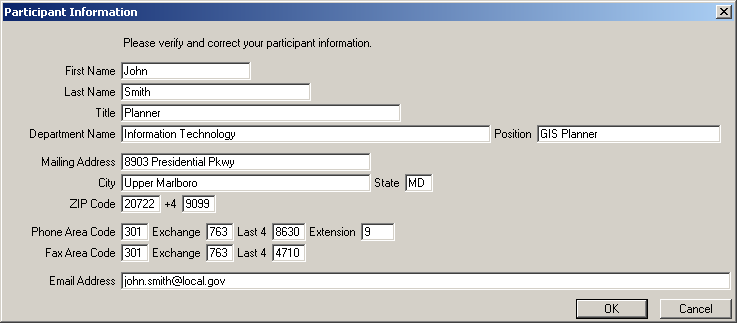
Example 3.3.1: Participant Information window
If the current participant contact information is wrong or missing, type over the incorrect data and update any empty fields. Once all changes are made, or if everything is correct, click OK.
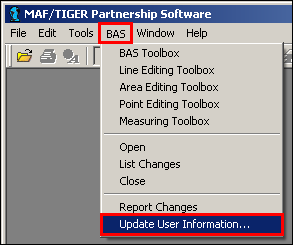
The Participant Information window can also be viewed in MTPS from the menu bar by clicking BAS and then clicking Update User Information.
Example 3.3.2: Opening the Participant Information window in MTPS
In MTPS, the various map layers can be rearranged or hidden as needed for the BAS review.
In the main toolbar, click the Map Layers tool
 to access the Layers window.
In the Layers window, select any layers that are not needed for the BAS review, and then click Hide Layer.
Note: Duplicate layers of the same data type(s) may exist in jurisdictions that receive multiple counties. It is recommended that any Census Tract and Census Block layers be hidden from the start of the project to prevent confusion.

Example 3.4.1: Hiding a visible layer
In the Layers window, select a Hidden layer, and click Show Layer to make it visible.
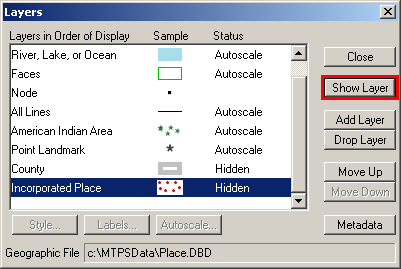
Example 3.4.2: Showing a previously hidden layer
In the Layer window, the Move Up and Move Down buttons may be used to rearrange the display order (top to bottom) of the layers.
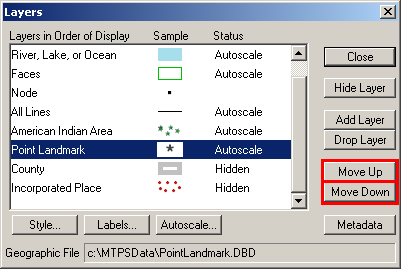
Example 3.4.3: Move Up/ Move Down buttons
Note: Be aware that in MTPS, the lower down a layer is in the Layers window, the higher up it will display on the map.
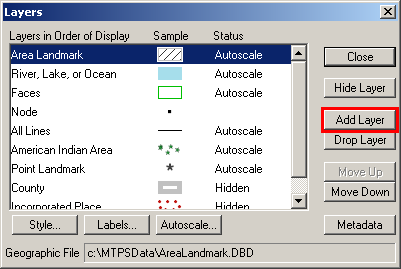
In the Layers window, the Add Layer button can be used to import additional shapefiles as reference layers.
Example 3.4.4: Add Layer button
Note: See the MTPS help topic To Add Layers from ESRI Shapefiles to an Existing Map for instructions on importing shapefiles into MTPS. The help topic Changing and Customizing Maps contains more information on changing the symbolization, labels, etc. for any layers in the map.
MTPS allows many types of updates to the map. The following subsections describe how to use the software to make map changes and detail the documentation needed for each type of change.
Map editing toolboxes
There are four map editing toolboxes: the BAS Toolbox, the Line Editing toolbox, the Area Editing toolbox, and the Point Editing toolbox. Table 3.5.1.1 describes the data that can be edited using the different toolboxes.
Toolbox |
Data Edited |
BAS Toolbox |
Boundaries of legally defined areas
|
Line Editing toolbox |
Linear features
|
Area Editing toolbox |
Boundaries of area landmarks
|
Point Editing toolbox |
Point landmarks
|
Table 3.5.1.1: Data that can be edited using the map editing toolboxes
In the main menu, click BAS to display a list of the toolboxes. The individual toolboxes can be turned on and off by clicking their names.
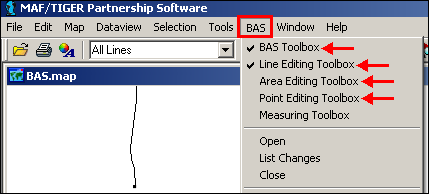
Example 3.5.1.1: Accessing BAS toolboxes
Note: Some sets of toolboxes cannot be open at the same time. When this happens, MTPS will display a note naming the toolbox that is causing the issue. Close the conflicting toolbox and try again.
Descriptions of all of necessary steps to complete each type of change are given in the following sections.
Appendix 4 contains tables explaining the tools contained within each toolbox.
See the CBT modules for visual demonstrations of how to complete map updates.
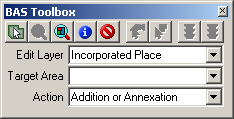
Using the BAS toolbox to make boundary changes
Changes to the boundaries of legal areas are made using the BAS Toolbox.
Example 3.5.2.1: BAS Toolbox
An explanation of these tools is given in Appendix 4, Table 2.
Section 3.5.2.1 describes the steps used to complete a boundary change using the BAS Toolbox (and if necessary, the Line Editing Toolbox).
Section 3.5.2.2 provides a series of tables describing the required documentation for each of the types of boundary changes.
Note: Although the software lists all of the change types for each data type, only specific types of changes will be processed for particular entities. See Appendix 5 for a list of allowable change types by entity type.
Creating boundary change polygons
To create a boundary change polygon:
In the BAS Toolbox, from the Edit Layer dropdown, select the level of geography to be changed.
Note: This step only applies to County or American Indian Area participants. All other participants will have a default selection already made.
Example 3.5.2.1.1: Edit Layer dropdown
From the Target Area dropdown, select the entity to be edited.
Note: This step only applies to County or American Indian Area participants. All other participants will have a default selection already made.
Example 3.5.2.1.2: Target Area dropdown
From the Action dropdown, select the appropriate change type.
Note: See Appendix 5 to determine the appropriate change type by entity.
Example 3.5.2.1.3: Action dropdown
The available change types are:
Addition or Annexation
Boundary Correction (add)
Boundary Correction (remove)
Geographic Corridor
Deletion or Deannexation
New Entity
Geographic Offset
Other
Note: Boundary Corrections are minor fixes of entity boundaries due to drafting or plotting errors. See Appendix 6 for explanations of Geographic Corridors and Geographic Offsets.
Zoom to the area where the change occurs by using the Zoom In tool
 on the Tools toolbox or the Zoom to Target Area tool
 on the BAS Toolbox.
Select the faces that make up the area to be changed. The Select by pointing
 and Select by shape
 tools on the BAS toolbox can be used to identify faces to be
changed.
tools on the BAS toolbox can be used to identify faces to be
changed.When using the Select by pointing tool, click inside each of the faces being selected.
When using the Select by shape tool, draw a box surrounding all of the faces to be selected. Only faces completely within the box will be selected. If a face is accidentally highlighted, it can be unselected by using the Select by pointing or the Select by shape tools while holding down the Ctrl key.
Example 3.5.2.1.4: Selecting a face to add to an incorporated place using the Select by pointing tool.
To select a portion of a current face, a line will need to be added to divide the face.
Note: See the Editing Linear Features CBT for a demonstration of this process.
In the BAS menu click Line Editing Toolbox.
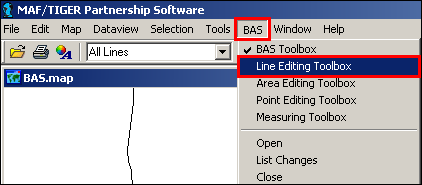
Example 3.5.2.1.5: Accessing the Line Editing Toolbox from the BAS menu
In the Line Editing toolbox click the Add line tool.
![]()
Example 3.5.2.1.6: Add line tool
Use the mouse to draw a line and double-click when finished.
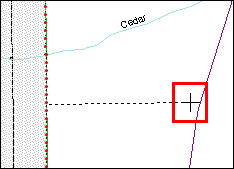
Example 3.5.2.1.7: Drawing a line in MTPS
In the Dataview window, from the MTFCC dropdown, select the type of feature added. In the FULLNAME field, add the name of the feature if possible (road, river, etc.). If the line is being added solely as a boundary and does not follow a visible feature, assign the line an MTFCC value of P0001-Nonvisible Legal/Statistical Boundary.
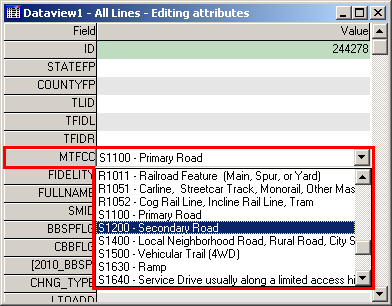
Example 3.5.2.1.8: Updating the MTFCC field
In the Line Editing toolbar, click the Save edits button
 to finish adding the new line. Once the added line has been saved,
MTPS will split the face(s) and the desired area can now be
selected.
to finish adding the new line. Once the added line has been saved,
MTPS will split the face(s) and the desired area can now be
selected.
Check to ensure that the correct faces were selected. Very small faces may exist in congested areas, so it is important to use the Zoom In tool
to view areas in detail and make sure that all of the intended
faces have been selected.Click the Save edits tool
on the BAS Toolbox.
Populating the BAS Entity Update form
The BAS Entity Update Form will open for entry of attribute information for the change.
Note: Boundary corrections (whether adding or removing area) and geographic offsets do not require any attribute information.
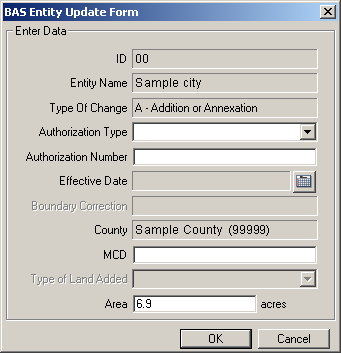
Example: 3.5.2.2.1: BAS Entity Update form
The BAS Entity Update Form includes the following updateable fields:
From the Authorization Type dropdown, select the type of legal action that was taken to change the boundary.
In the Authorization Number field, enter the record number (e.g. ordinance number, resolution number, etc.) associated with the legal action that changed the boundary.
In the Effective Date field, click the calendar icon, and choose the date the legal boundary change went into effect.
In the MCD field, enter the MCD the area was located in prior to the boundary update (for states with active MCDs).
From the Type of Land Added dropdown, select whether the land added is part of the reservation or off–reservation trust land (American Indian Areas only).
The Area field can be left as is, unless it is incorrect.
The information that is required for each type of change, excluding boundary corrections and geographic offsets, is displayed by entity type in Tables 3.5.2.2.1 – 3.5.2.2.3. Each field indicates whether the information is mandatory, as follows:
Y - the information is required
A - the information is optional
N - the field is not editable
Attribute Information Required for Additions or Annexations and Deletions or Deannexations |
|||||
|
Authorization Type |
Authorization Number |
Effective Date |
MCD |
Type of Land Added |
American Indian Areas |
Y |
Y |
Y |
N |
Y |
Tribal Subdivisions |
Y |
Y |
Y |
N |
Y |
Counties |
Y (except GA*) |
Y (except GA*) |
Y |
N |
N |
Minor Civil Divisions (MCD) |
Y |
Y |
Y |
N |
N |
Incorporated Places |
Y (except GA*) |
Y (except GA*) |
Y |
A** |
N |
Table 3.5.2.2.1
* Georgia state law does not require entities to report an Authorization Type or Authorization Number but it requires participants to submit the acreage of annexations. MTPS automatically calculates the acreage of the area and includes this information on the form, but the Area field can be changed it if the legal description does not agree exactly.
**The MCD field is only required when a change is made to an incorporated place in a state that has active MCDs. If such a change is made, please enter the MCD in which the area was located prior to the annexation or deannexation.
Attribute Information Required For Geographic Corridors |
|||||
|
Authorization Type |
Authorization Number |
Effective Date |
MCD |
Type of Land Added |
American Indian Areas |
A* |
A* |
A* |
A |
Y |
Minor Civil Divisions (MCD) |
A* |
A* |
A* |
A |
N |
Incorporated Places |
A* |
A* |
A* |
A |
N |
Table 3.5.2.2.2
* If the offset or corridor is a legal change (i.e. new annexation or deannexation), the Authorization Type, Authorization Number, and Effective Date fields are required.
Attribute Information Required for a New Entity |
|||
|
Entity Name |
Status |
Effective Date |
Tribal Subdivisions |
Y |
Y |
Y |
Incorporated Places |
Y |
N |
Y |
Table 3.5.2.2.3
Note: Legal documentation must be provided for each new entity added. If there are any questions about the required documentation, contact the Census Bureau by phone at 800-972-5651 or by email at geo.bas@census.gov.
The update cannot be saved until each required field is completed. Type Unknown in the field if information is not known for a required entry. The Census Bureau will review each record with an Unknown value to determine whether the update can be integrated into the MAF/TIGER database. If an issue arises, the Census Bureau will contact the person listed on the Participant Information form.
Deleting a change polygon after it has been finalized
If it is determined that a change polygon was created in error, complete the following steps to delete the change:
1. From the BAS Toolbox,
select the Delete a change
![]() tool.
tool.
2. Select the change polygon to be deleted.
3. In the Confirm window, click Yes.
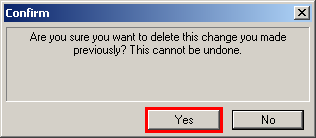
Example 3.5.2.3.1: Delete a change tool confirmation window
Linear feature updates
The Line Editing toolbox is used for the editing of linear features. An explanation of the tools in this toolbox is given in Appendix 4, Table 3.
![]()
Example 3.5.3.1: Line Editing Toolbox
Refer to the Editing linear features CBT module for instruction on how to add, delete, and modify features. This training will provide information on the steps necessary to create a feature and enter the required information. The Help menu in MTPS also provides a list of classification codes that can be selected when creating a line.
Street Update Guidelines
If a road, subdivision, etc. is missing from the Census Bureau’s linear feature network, add the feature(s) and provide the name and MTFCC.
If a feature that does not exist appears on the map, delete the feature.
If features are mislabeled, from the Line Editing toolbox, select the Edit Line Attributes
 button, and then click the line to be updated. In the Dataview
window, make the corrections, and then click the Save edits
button.
button, and then click the line to be updated. In the Dataview
window, make the corrections, and then click the Save edits
button.If features are incorrectly located or distorted, from the Line Editing toolbox, select the Copy and Delete line
 button, click the line to be moved or corrected, and then click the
Replace Copied line
button, click the line to be moved or corrected, and then click the
Replace Copied line
 button. In the BAS map, draw the feature as it should
appear, and then click the Save edits
button. Only do this if the feature is very far off or in the wrong
position relative to boundaries or other features.
button. In the BAS map, draw the feature as it should
appear, and then click the Save edits
button. Only do this if the feature is very far off or in the wrong
position relative to boundaries or other features.
Note: The original feature should appear as a red dotted line (deleted). The corrected line should appear where it was drawn and should have the same attributes as the original feature.
Area landmark updates
The Area Editing toolbox is used to make changes to the boundaries of area landmarks. The tools in this toolbox are explained in Appendix 4, Table 2.
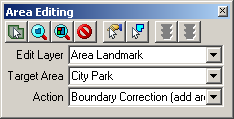
Example 3.5.4.1: Area Editing toolbox
Note: Due to heavy workloads for boundary changes to legal areas, changes to area landmarks and hydrographic areas may not be added to the database until after the next year’s BAS materials are created. It may take two BAS cycles in order to see these changes reflected in the materials.
Boundary corrections to area landmarks
Since area landmarks and water features are not legal entities, the only boundary changes that can be made to an existing landmark are Boundary Correction (add area) and Boundary Correction (remove area). To create boundary correction polygons complete the following steps:
In the Area Editing toolbox, from the Edit Layer dropdown, select Area Landmark or River, Lake, or Ocean.
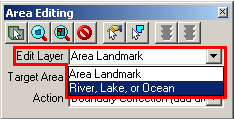
Example 3.5.4.1.1: Edit Layer dropdown
From the Target Area dropdown, select the area to be edited.

Example 3.5.4.1.2: Target Area dropdown
From the Action dropdown, select the type of change to be made: Boundary Correction (add area) or Boundary Correction (remove area).
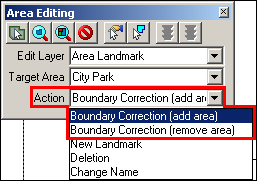
Example 3.5.4.1.3: Action Dropdown
Zoom to the area where the change occurs by using the Zoom In
tool on the Tools toolbox or the Zoom to Target Area
tool on the BAS toolbox.
Select the faces that make up the area to be changed. The Select by pointing
and Select by shape
tools on the Area Editing toolbox can be used to identify
faces to be changed.
When using the Select by pointing tool, click inside of the faces being selected.
When using the Select by shape tool, draw a box surrounding all of the faces to be selected. If a face is accidentally highlighted, it can be unselected by using the Select by pointing tool.
To select a portion of a current face, a line will need to be added to divide the face. See section 3.5.2.1 for details on splitting faces.
Check to ensure that the correct faces were selected. Very small faces may exist in congested areas, so it is important to use the Zoom In
tool to view areas in detail and make sure that all of the intended
faces have been selected.Click the Save edits
tool on the Area Editing toolbox.
Adding new Area Landmarks or water features
To create a new area landmark or water feature, complete the following steps:
Note: When adding new area landmarks or hydro areas, only add the following types of areas: water bodies, glaciers, airports, cemeteries, golf courses, and parks. Census cannot add other types of areas at this time (although some may already exist in our database).
In the Area Editing toolbox, from the Edit Layer dropdown, select Area Landmark or River, Lake, or Ocean, depending on which type of landmark is to be added.
Example 3.5.4.2.1: Edit Layer dropdown
From the Action dropdown, select New Landmark.
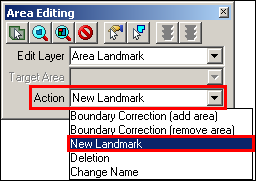
Example 3.5.4.2.2: Action dropdown
Zoom to the area in which the new landmark is located by using the Zoom In
tool on the Tools toolbox or the Zoom to Target Area
tool on the Area Editing toolbox.Select the faces that make up the area to be changed. The Select by pointing
and Select by shape
tools on the Area Editing toolbox can be used to identify
faces to be changed.
When using the Select by pointing tool, click inside of the faces being selected.
When using the Select by shape tool, draw a box surrounding all of the faces to be selected. If a face is accidentally highlighted, it can be unselected by using the Select by pointing tool.
To select a portion of a current face, a line will need to be added to divide the face. See section 3.5.2.1 for details on splitting faces.
Check to ensure that the correct faces were selected. Very small faces may exist in congested areas, so it is important to use the Zoom In
tool to view areas in detail and make sure that all of the intended
faces have been selected.Click the Save edits
tool on the Area Editing toolbox.
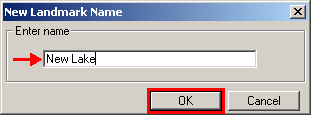
In the New Landmark Name window, enter the name of the landmark or water body, and then click OK.
Example 3.5.4.2.3: Enter name field
Removing Area Landmarks or water features
To remove an area landmark or water feature, complete the following steps:
In the Area Editing toolbox, from the Edit Layer dropdown, select Area Landmark or River, Lake, or Ocean, depending on the type of area to be removed.
Example 3.5.4.3.1: Edit Layer dropdown
From the Target Area dropdown, select the landmark or water feature to be deleted.
Example 3.5.4.3.2: Target Area dropdown
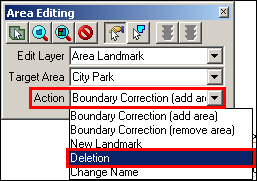
From the Action dropdown, select Deletion.
Example 3.5.4.3.3: Action dropdown
On the Area Editing toolbox, click the Save Edits
tool.
Changing the names of Area Landmarks or water features
To change the name of an area landmark or water feature, complete the following steps:
In the Area Editing toolbox, from the Edit Layer dropdown, select Area Landmark or River, Lake, or Ocean, depending on the type of area to be renamed.
Example 3.5.4.4.1: Edit Layer dropdown
From the Target Area dropdown, select the landmark or water feature to be renamed.
Example 3.5.4.4.2: Target Area dropdown
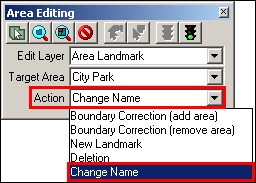
From the Action dropdown, select Change Name.
Example 3.5.4.4.3: Action dropdown
On the Area Editing toolbox, click the Save Edits
tool.In the Change Landmark Name window, enter the new name of the feature, and then click OK.
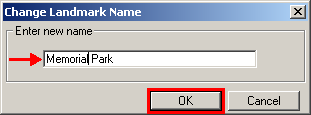
Example 3.5.4.4.4: Enter new name field
Point landmark updates
The Point Editing toolbox is used to make changes to point landmarks. An explanation of the tools in this toolbox is given in Appendix 4, Table 4.
![]()
Example 3.5.5.1: Point Editing toolbox
Adding a point landmark
To create a new point landmark, complete the following steps:
In the Point Editing toolbox, select the Add point
 tool.
tool.On the BAS map, click on the location where the point landmark is located.
In the Dataview window, from the MTFCC dropdown, select the appropriate landmark type. In the FULLNAME field, enter the name of the landmark, if applicable.
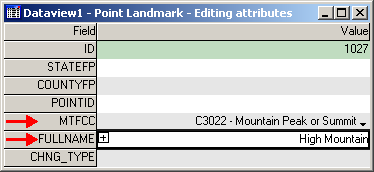
Example 3.5.5.1.1: MTFCC and FULLNAME fields
In the Point Editing toolbox, click the Save Edits
tool.
Note: Any point landmark with the following MTFCCs cannot be added to the MAF/TIGER database as a point landmark due to Title 13 privacy concerns. These are locations that could identify a residence or private business.
MTFCC |
Description |
K1100 |
Housing Unit Location |
K1121 |
Apartment Building or Complex |
K1122 |
Rooming or Boarding House |
K1223 |
Trailer Court or Mobile Home Park |
K1226 |
Housing Facility/Dormitory for Workers |
K1227 |
Hotel, Motel, Resort, Spa, Hostel, YMCA, or YWCA |
K1228 |
Campground |
K1229 |
Shelter or Mission |
K1232 |
Halfway House/Group Home |
K1233 |
Nursing Home, Retirement Home, or Home for the Aged |
K1234 |
County Home or Poor Farm |
K1235 |
Juvenile Institution |
K1241 |
Sorority, Fraternity, or College Dormitory |
K1251 |
Military Group Quarters |
K1299 |
Other Group Quarters Location |
K2100 |
Governmental |
K2197 |
Mixed Use/Other Non-residential |
K2300 |
Commercial Workplace |
K2361 |
Shopping Center or Major Retail Center |
K2362 |
Industrial Building or Industrial Park |
K2363 |
Office Building or Office Park |
K2364 |
Farm/Vineyard/Winery/Orchard |
K2366 |
Other Employment Center |
K2464 |
Marina |
K2500 |
Other Workplace |
K2564 |
Amusement Center |
Table 3.5.5.1.1: Restricted point landmark MTFCCs
Deleting a point landmark
To delete a point landmark, complete the following steps:
In the Point Editing toolbox, select the Delete point
 tool.
tool.On the BAS map, click on the existing point landmark to be deleted.
On the Point Editing toolbox, click the Save Edits
tool.
Note: If a point landmark is erroneously deleted, select the Undo geographic editing button near the top of the MTPS window.
![]()
Example 3.5.5.2.1: Undo geographic editing button
Census cannot delete or modify any point landmarks that were imported from the USGS GNIS database. Changes submitted for the following types of landmarks may be left unchanged:
K2451 (Airport)
K2582 (Cemetery)
C3022 (Summit or Pillar)
C3081 (Locale or Populated Place)
C3061 (Cul-de-sacs)
Recoding or renaming a point landmark
To recode or rename a point landmark, complete the following steps:
On the Point Editing toolbox, select the Edit Point Attributes
 tool.
tool.On the BAS map, click on the existing point landmark to be edited.
In the Dataview window, change the MTFCC code and/or FULLNAME fields as needed.
Example 3.5.5.3.1: MTFCC and FULLNAME fields
On the Point Editing toolbox, click the Save Edits
tool.
Adding address ranges
Address ranges can be added using the Line Editing toolbox. Explanations of the tools in this toolbox are given in Appendix 4, Table 3.
![]()
Example 3.5.6.1: Line Editing toolbox
Complete the following steps to add an address range to a street:
In the Line Editing toolbar, select the Show right/left direction arrows
 tool. Use the arrows on the line to determine the left and right
side of the road.
tool. Use the arrows on the line to determine the left and right
side of the road.
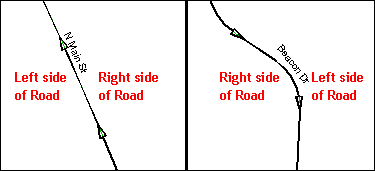
Example 3.5.6.2: Sides of roads for address ranges
From the Line Editing toolbar, select the Edit Line Attributes
 tool.
tool.
In the BAS map, select the line that the address range should be assigned to.
In the Dataview window, scroll down to the LTOADD, RTOADD, LFROMADD, and RFROMADD fields.
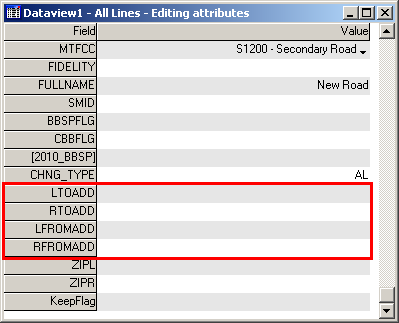
Example 3.5.6.3: Address range fields
In MAF/TIGER, each segment of road has four address range numbers: the start of the address ranges on the right and left sides of the road, (RFROMADD and LFROMADD) and the end of the address range on the right and left sides of the road segment (RTOADD and LTOADD). When a road intersects a BAS boundary, it is important that the address ranges be assigned to the correct sides of the boundary to insure the houses are assigned to correct jurisdictions.
In the LTOADD, RTOADD, LFROMADD, and RFROMADD fields, add or update the address ranges that are affected by boundary changes.
From the Line Editing toolbox, click the Save Edits
tool.
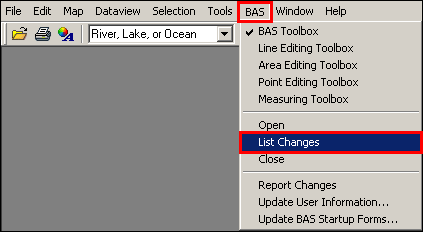
It is important that boundary updates to legal entities be reviewed before being submitted to the Census. The changes will be processed for inclusion in the MAF/TIGER database and will move the legal boundaries of the entities. The List Changes tool can be used to review changes made in MTPS.
In the main menu, select BAS and then click List Changes.
Example 4.1: Opening the List Changes tool
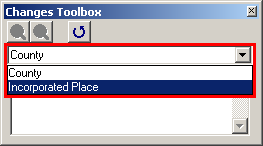
In the Changes Toolbox, from the dropdown menu, select an entity type to review (counties and AIAs only).
Example 4.2: Selecting an entity type
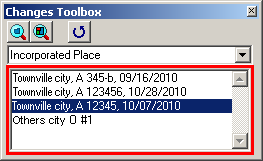
In the Changes Toolbox, from the list, select an update to begin the review.
Example 4.3: Selecting an update
In the Changes Toolbox, select the Zoom to Changes
 tool.
tool.
Zoom into the area of change and make sure all of the appropriate faces have been selected.
If faces are missing, or incorrect faces have been added, delete the change polygon using the Delete a Change
tool in the BAS toolbox and recreate the change polygon.
While zoomed into an area of change, ensure that any needed geographic offsets and corridors have been created (see Appendix 6 for more information on offsets and corridors). If they have not been created, use the BAS toolbox to create them.
Review the attribute information by selecting the Display BAS Form record
tool and clicking on the change polygon. The popup window will
appear and the attribute data can be corrected, if necessary.Ensure that boundary corrections do not dissolve relationships between features and boundaries. See below for illustrations of changes that would not be accepted.
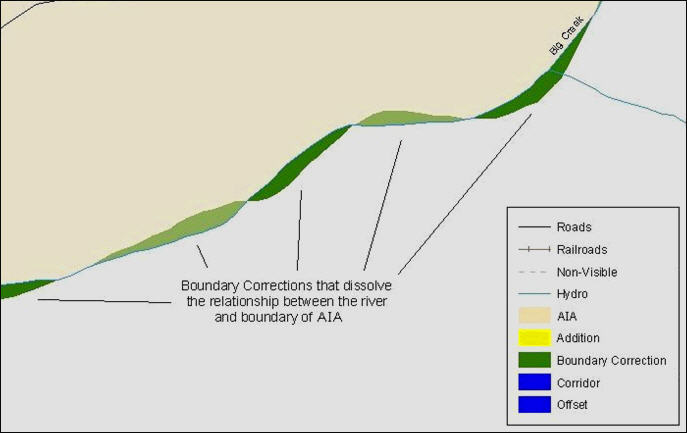
Example 4.4: Small spatial boundary corrections that dissolve the relationship with the river have been created. These boundary corrections will not be incorporated into the MAF/TIGER database.
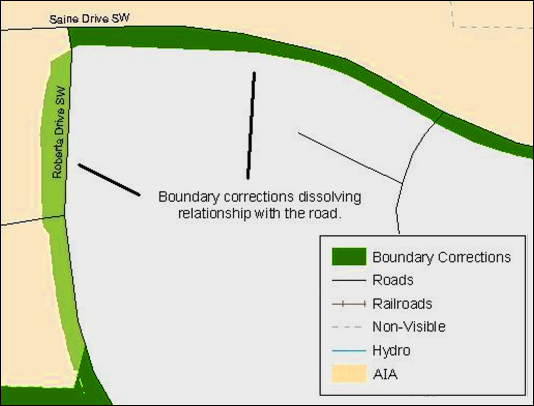
Example 4.5: Small spatial boundary corrections that dissolve the boundary-to-feature relationship with multiple streets have been created. Incorporating these changes would affect the population counts for the area. Therefore, the Census Bureau will not accept these small boundary corrections.
For assistance with printing BAS maps, review the Printing a Map section of the MTPS Help menu.
Once all BAS changes have been made and reviewed, a zip file of the changes needs to be created and sent to the Census Bureau.
6.1 Creating the return zip file
From the main menu, select BAS, and then click Report Changes.
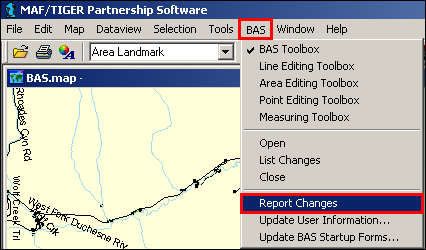
Example 6.1.1: Report Changes
In the Confirm window, click Yes.
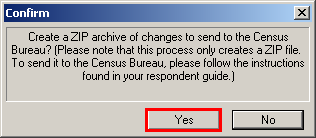
Example 6.1.2: Report Changes confirmation window
The Note window will display with the location of the file. Note the location and name of the file so it can be returned to the Census Bureau.
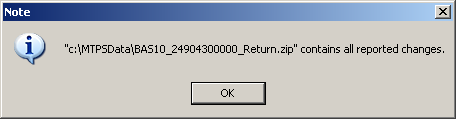
Example 6.1.3: Location of zip file
Note: If errors occur while creating the zip file, call the Census Bureau at 800-972-5651.
6.2 Returning BAS updates to the Census Bureau
It is requested that MTPS BAS zip files be submitted using the Census Bureau’s Send a File Utility site. Submit only the zip file created by the MTPS program. The Send a File Utility is located at: https://secure.census.gov/cgi-bin/sendfile
In a web browser, navigate to https://secure.census.gov/cgi-bin/sendfile.
In the password window:
In the User name field, enter: geobas
In the Password field, enter: GEO1upload2010!
Click OK
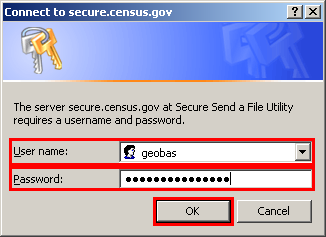
Example 6.2.1: Password window
Note: The login/password window may appear different from the example depending on the browser, but the User name and Password are always the same. Make sure to type them exactly as they appear in step 2 above.
In the Send a File Utility window, in the Source Information section; next to the File to Send field, click Browse.

Example 6.2.2: Source Information section Browse button.
In the Choose File window, navigate to the MTPSData folder, select the BAS12_<entity id>_Return zip file, and then click Open.
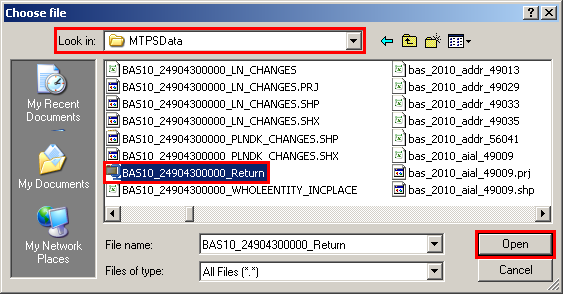
Example 6.2.3: Choose file window
In the Notify by E-mail section:
In the Sender’s Email Address field, enter your email address
In the Census Bureau Employee’s E-Mail Address field, enter ‘geo.bas@census.gov’ or ‘geo.aiana@census.gov’ (for tribal entities)
Click Upload
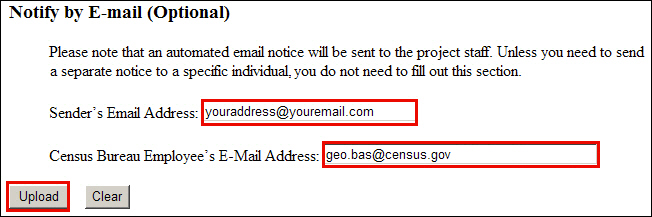
Example 6.2.4: Filling out the Notify by E-mail section
Note: Filling out the Notify by E-mail section will allow Census to send notice that the return zip file has been received. If there are any questions contact the Census Bureau at 800-972-5651 or email geo.bas@census.gov.
Appendix 1: Paperwork Reduction Project
The U.S. Census Bureau estimates that the BAS review will take most respondents from 1 to 8 hours to complete. This includes the time needed to read the instructions, assemble materials, organize and review the information, and report any needed changes. This estimate is based on 80 percent of all areas having few or no changes. However, for areas with many changes, it may take 20 hours or longer to complete the survey. Please send comments regarding this burden estimate or any other aspect of this collection of information, including suggestions for reducing this burden, to:
Paperwork Project 0607-0151
U.S. Census Bureau
4600 Silver Hill Road
Room 3K138
Washington, DC 20233
Or you may e-mail comments to:
paperwork@census.gov
Note: Use Paperwork Project 0607-0151 as the subject.
Please include a copy of your message addressed to:
Appendix 2: Tool Explanations by Toolbox
This appendix describes each tool that may be important for a BAS submission. The descriptions of the tools are organized by toolbox to ensure that participants are able to easily locate them when necessary. Refer back to the main portion of the Respondent Guide for detailed explanations of how to use these tools together to complete different types of changes.
Table 1 General toolbox |
||
Tool |
Function |
Instructions |
|
Zooming in to a specific area. |
|
|
Viewing a larger area of the map. |
|
|
Viewing a different portion of the map while keeping it at the same scale. |
|
|
Returning to the previous zoom or map scale level.
|
|
|
Returning to the extent of the map that was visible when the current session began. |
|
|
Obtaining attribute information for features or geographies. |
|
|
Measuring line distances on the map. |
|
|
Measuring areas on the map. |
|
Table 2 BAS and Area Editing toolboxes |
||
Tool |
Function |
Instructions |
|
Specifying the geography to be edited.
|
|
|
Specifying the governmental entity to be edited. |
|
|
Specifying the type of change to make to an entity.
|
|
|
Changing the selected target area by clicking an entity in the map.
|
|
Table 2 (Cont.) BAS and Area Editing toolboxes |
||
Tool |
Function |
Instructions |
|
Zooming to the area specified in the Target Area dropdown. |
|
|
Displaying the entire map.
|
|
|
Displaying BAS Form records. (BAS toolbox only) |
|
|
Deleting changes after they have been saved. |
|
|
Selecting faces as part (or all) of a change by clicking faces on the map.
|
|
|
Selecting faces as part (or all) of a change by drawing shapes around them. |
|
|
Canceling changes.
|
|
|
Saving changes. |
|
Table 3 Line Editing toolbox |
||
Tools |
Function |
Instructions |
|
Adding linear features. |
|
|
Deleting linear features. |
|
|
Splitting lines. |
|
|
Deleting lines while saving their attributes. |
|
|
Adding lines with attributes saved by the Copy and delete line tool. |
|
|
Editing line attributes. |
|
|
Displaying alternate line names. |
|
Table 3 (Cont.) Line Editing toolbox |
||
Tool |
Function |
Instructions |
|
Displaying alternate addresses |
|
|
Displaying directions of lines.
|
|
|
Canceling changes (before they are saved).
|
|
|
Saving changes. |
|
Table 4 Point Editing toolbox |
||
Tool |
Function |
Instructions |
|
Adding point landmarks. |
|
|
Deleting point landmarks. |
|
|
Editing the attributes of point landmarks.
|
|
|
Canceling changes (before they are saved).
|
|
|
Saving changes. |
|
Appendix 3: Available Change Types by Entity Type
Geography |
Available Change Types |
Incorporated Place |
Addition or Annexation Boundary Correction (add) Boundary Correction (remove) Geographic Corridor Deletion or Deannexation New Entity Geographic Offset Other |
County Subdivision |
Addition or Annexation Boundary Correction (add) Boundary Correction (remove) Deletion or Deannexation New Entity Geographic Offset |
County |
Addition or Annexation Boundary Correction (add) Boundary Correction (remove) Deletion or Deannexation |
Tribal Subdivision |
Addition or Annexation Boundary Correction (add) Boundary Correction (remove) Deletion or Deannexation New Entity Geographic Offset Other |
American Indian Area |
Addition or Annexation Boundary Correction (add) Boundary Correction (remove) Geographic Corridor Deletion or Deannexation New Entity Geographic Offset Other |
Appendix 4: Geographic Corridors and Geographic Offsets
Geographic Corridors
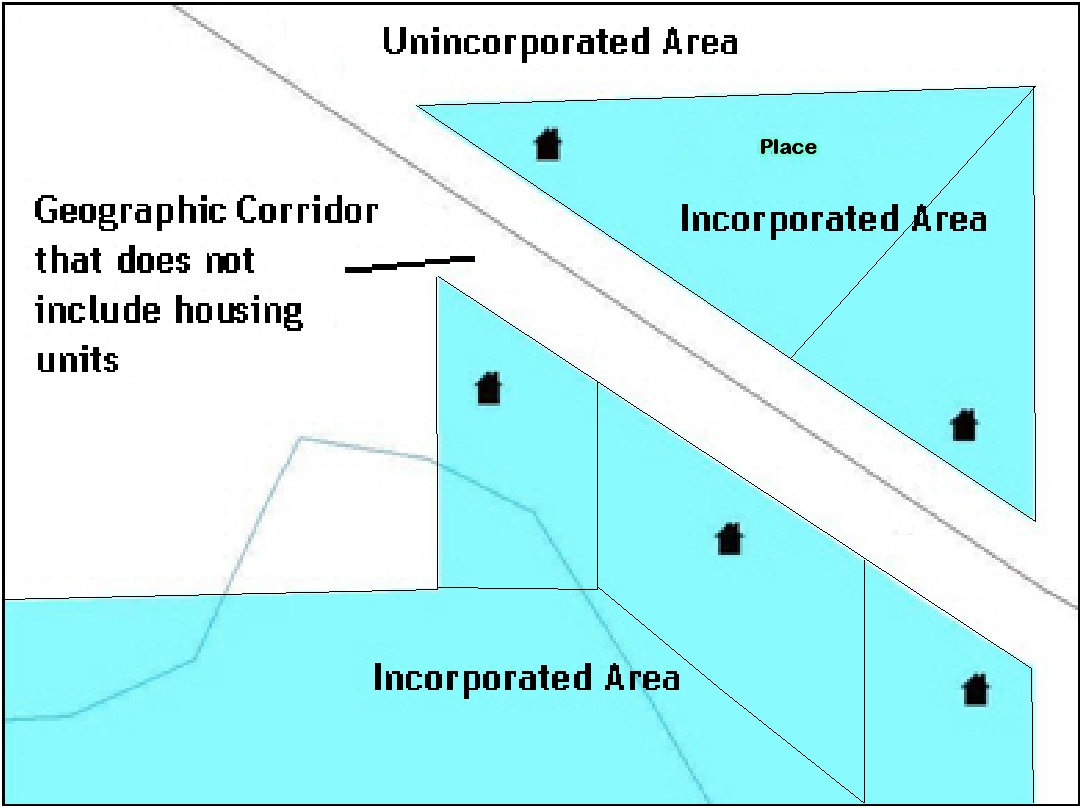
A geographic corridor is an area that includes only a road (or other feature) right-of-way and does not contain any structures addressed to either side of the street. Example A6.1 shows a corridor that has been created where the incorporated place or AIA owns the right-of-way, and wishes for that ownership to be displayed on the Census Bureau’s maps, but the housing units are not included in the incorporated place or AIA (shown in color). If it is important to the place or AIA that its ownership and/or maintenance of the road and/or its right-of-way be displayed on Census’ maps, a geographic corridor should be created. However, the Census does not require places and AIAs to report rights-of-way: maintaining geographic corridors in a nationwide database is difficult and impractical, and the right-of-way should only be included if it is crucial to the place or AIA, or if state or local laws require it. The Census Bureau would actually prefer that the area simply not be assigned to the place at all.
Example A6.2 shows that the right-of-way belongs in the unincorporated area, while the housing units are included in the incorporated place (shown in color). While depicting this corridor may be important for local purposes, it is not relevant for Census Bureau tabulations and is not easy to depict in the Census nationwide database. This type of corridor should not be included in a BAS response.
Please note that the Census Bureau does not require places or AIAs to display rights-of-way or road maintenance corridors that do not contain or potentially contain housing or population. If local or state law does not require depiction of these geographic features, the Census Bureau prefers that they be left off BAS submissions. However, if it is necessary for the place or AIA to depict them, then they must be submitted as a geographic corridor.
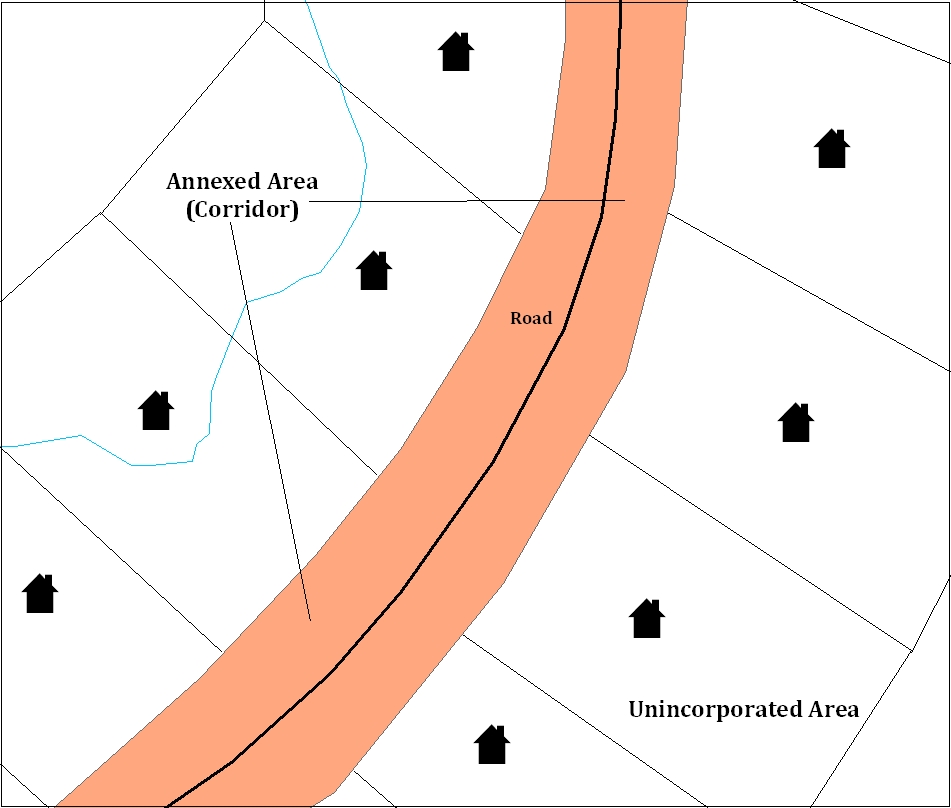
ExampleA6.1 Example A6.2
To recap, when a participant has a case where a road right of way is legally included in the boundary, but the adjacent parcels/houses are not, there are two options. You should either not include the area in the place at all (Scenario A in example A6.3 below), or include it in the place and flag it as a corridor (Scenario C below). What you should never do is include such areas within the place boundary without flagging them as corridors (Scenario B).
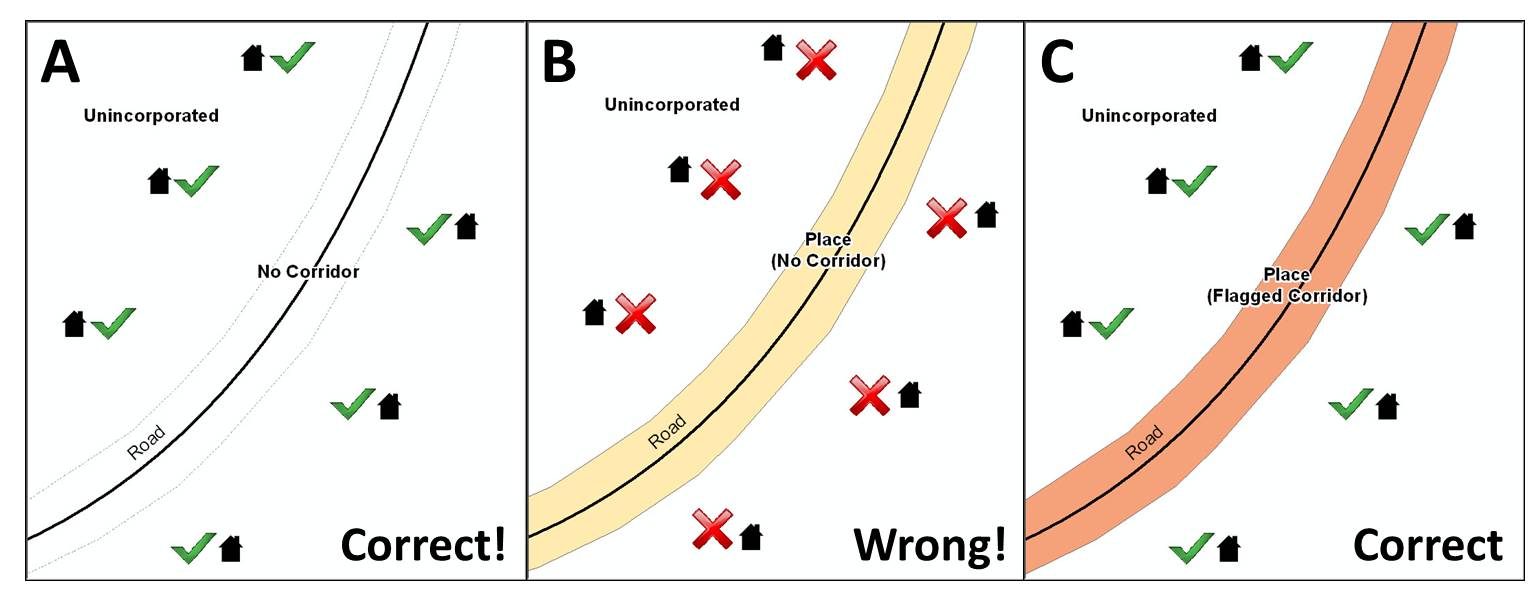
Example A6.3: (A): The respondent did not include place ownership of the road or the right-of-way, allowing houses along the road to be geocoded correctly. (B): The respondent chose to show place ownership of the road, but did not flag it as a corridor, causing houses along the road to be incorrectly geocoded. (C): The respondent chose to show place ownership of the road, and flagged that ownership as a corridor, allowing the houses to be geocoded correctly. Both A and C are acceptable.
If geographic corridors are created, then individual change polygons for each geographic corridor must also be created. Each change polygon must have the required attributes and corresponding change type populated, as seen in Table A6.4. In the NAME field, enter the name of the jurisdiction. In the RELATE field, indicate whether the change is adding IN or taking OUT (removing) the corridor.
|
NAME |
CHNG_TYPE |
EFF_DATE |
DOCU |
AREA |
RELATE |
Geographic Corridor |
X |
X(‘C’) |
|
|
|
X(’IN’, ‘OUT’) |
Table A6.4 Geographic Corridors (Note: ‘X’ = Required field)
Geographic Offsets
A geographic offset is an area (either within or outside of a geographic entity) that is only on one side of a road (unlike corridors, which involve both sides of the road) and does not include structures addressed to that side of the road. Much of the same guidelines regarding corridors also holds true for offsets.
The Census Bureau is aware that many governments base their legal boundaries on cadastral (parcel-based) right-of-way mapping. Census maps are based on spatial data that is topologically integrated which makes maintenance of geographic offsets inefficient. Using the road centerline wherever possible will help to establish more accurate population counts. If a boundary follows a front lot line, Census strongly prefers that the road centerline be used as the boundary. If a boundary is at the rear of a lot, then it should be depicted as such. If it is unclear whether a particular line is a front lot line or something else, please contact the BAS team for assistance. As a general rule, if a house or building could not conceivably be built in the area between the potential line and the centerline of the road, then the line can be considered to be a front lot line.
Example A6.5 depicts a cadastral (parcel-based) boundary map and Example A6.6 shows how the boundary should be represented when it is sent to the Census Bureau.
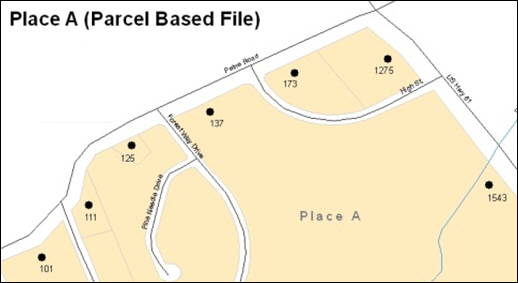
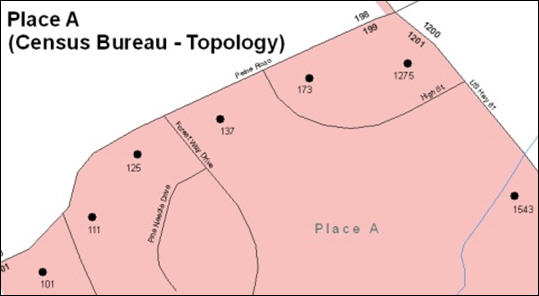
Example A6.5 Example A6.6
Example A6.7 below shows a situation in which the place boundary is along the front lot line. In this example, the respondent must either use the road centerline as the boundary (preferred), or create an offset. In Example A6.8, the place boundary is on the rear lot line, so the respondent should of course not use the road centerline or create an offset, but should rather digitize in a new boundary following the rear lot line.
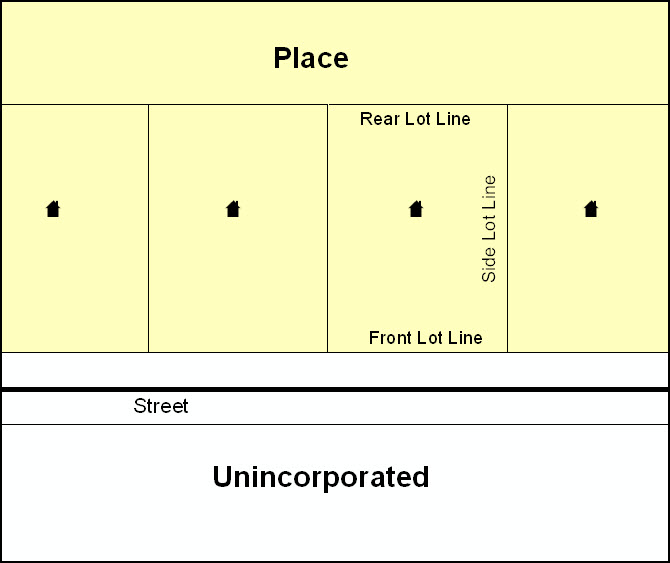
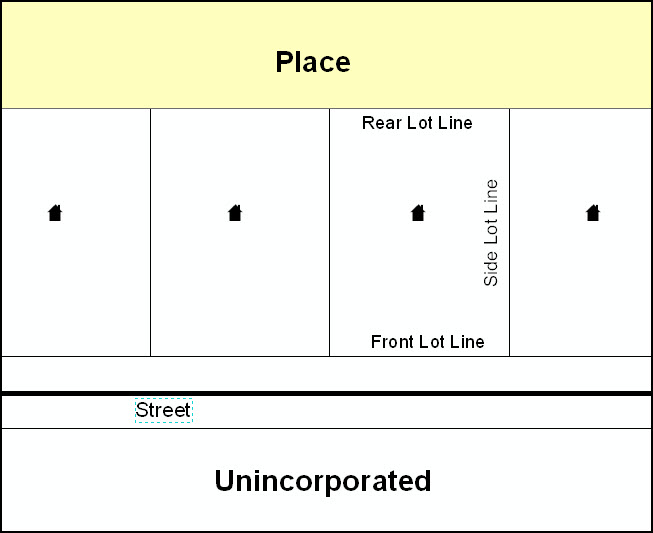
ExampleA6.7 Example A6.8
If geographic offsets are created, then individual change polygons for each geographic offset must also be created. Each change polygon must have the required attributes and corresponding change type populated, as seen in Table A6.9. In the NAME field, enter the name of the jurisdiction. In the RELATE field, indicate whether the change is adding IN or taking OUT (removing) the area represented as an offset.
|
NAME |
CHNG_TYPE |
EFF_DATE |
DOCU |
AREA |
RELATE |
|
Geographic Offset |
X |
X(‘F’) |
|
|
|
X(’IN’, ‘OUT’) |
|
Table A6.9 Geographic Offsets (Note: ‘X’ = required field)
The Census Bureau has included an “offset” shapefile in the BAS materials (bas_2013_offset_<ssccc>.shp), so that your jurisdiction can be checked for any existing corridors or offsets. While Census prefers that new offsets are not created, (see above), this information can be helpful in determining if current boundaries are correct.
| File Type | application/msword |
| Author | Bernadette Jenkinson |
| Last Modified By | smith682 |
| File Modified | 2012-11-05 |
| File Created | 2012-09-10 |
© 2026 OMB.report | Privacy Policy