Talking Points
Attachment C (d) - IDWebDiaryFRTalkingPoints_Final.docx
The Consumer Expenditure Surveys: The Quarterly Interview and the Diary
Talking Points
OMB: 1220-0050
CE Individual Web Diary Usability Test
FR Talking Points (v3. December 4, 2013)
Logging In to the CE Diary
Username and Password
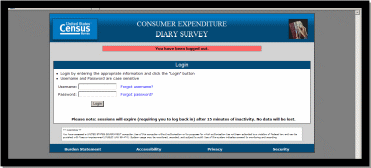
Logging in to the CE Diary requires a unique secure Username that is assigned to each eligible member in your household.
Enter your Username in the field after “Username” located in the middle of the screen at the CE Diary welcome page. Be sure to enter the Username exactly as it is written since it is case-sensitive. Enter your Password in the field after “Password”.
(Point out the Username field on the User Guide).
(Point out the Password field on the User Guide).

Note: It will be helpful to bookmark the URL for the CE Diary. This will make it easier to access each day as you are entering expenses.
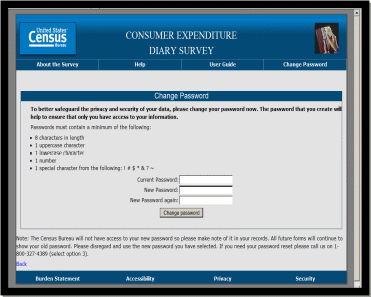
To better safeguard the privacy and security of their data, respondents will have the opportunity to change their password by following the steps on the “Change Password” screen.

Remind respondents that in the event they lose their initial log in credentials or cannot remember how to log in, to contact you for immediate assistance.
Start Date
This START DATE is the date that you begin entering all expenses for a two-week time period. (Note: remember to inform the reference person or other designated household member, that he or she is responsible for recording the expenses of any household members who are not keeping a diary, such as children under the age of 16 or other members without internet access).
You enter the START DATE by using the dropdown boxes to select the month, day, and year.

If your start date, for example, is November 15, 2013, you will record expenses that you made from November 15, 2013 through November 28, 2013. (Fourteen days). Do not record expenses that were incurred on November 14, 2013 or November 29, 2013.
Entering Expenses
General reminder: Do NOT record:
Expenses while you were away from home overnight.
Business or farm operating expenses
Sales tax for:
Food and Drinks for Home Consumption
Clothing, Shoes, Jewelry, and Accessories
All Other Products, Services, and Expenses
Do not abbreviate when entering expenses.
If you have receipts for expenses, we encourage you to use them to aid in entering expenses. We find receipts to be a useful review mechanism to ensure that all purchases have been entered. If you have receipts that contain 5 items or more, you may give the receipt (or a copy of it) to the Field Representative instead of entering individual items.
Food and Drink Away from Home
In the first tab, you will enter food and drink expenses made by you that were consumed outside of the home. This does not include expenses, such as groceries, that were intended for home consumption then ultimately consumed outside of the home (e.g., bringing lunch from home).
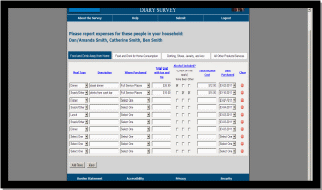
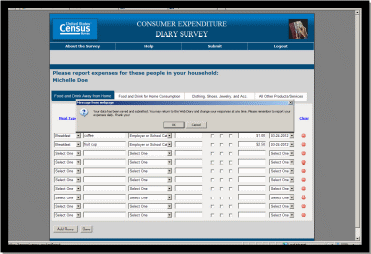
First, select whether the food or drink expense was for breakfast, lunch, dinner, or snack, by using the dropdown box in the “Meal Type” column. (Point out the column on the User Guide).
Next, you enter the description of what you purchased in the “Description” column. (Point out the column on the User Guide).
Note that you should use only one line for one item or meal. (Point out the column on the User Guide).
Next, in the “Where Purchased” column, you select the place that best matches the description of where your expenses was made, such as: a full service restaurant place; fast food, take-out, or concession; vending machine; or employer or school cafeteria. (Point out the column on the User Guide).
Next, you will enter the amount of the expense in dollars and cents, including tax and tip, in the column labeled “Total Cost with Tax and Tip”. (Point out the column on the User Guide).
If alcohol was included with the meal purchase, you may check any or all of the wine, beer, or other checkboxes in the “Alcohol Included?” column, as appropriate. Enter the separate cost of the alcohol in dollars and cents in the “Total Alcohol Cost” column on the same line as the rest of the meal, or simply leave blank if no alcohol was included with the meal purchase. (Point out these columns on the User Guide).


Finally, in the “Date Purchased” column, use the dropdown box to select the date when your expense was made. (Point out the column on the User Guide).
Clearing Expenses
For all sections of the CE Diary, you have the option to clear all entries for a row if necessary. Under the “Clear” column, simply click on the red icon at the end of a given row to clear the data for that row.
(Point out the column on the User Guide).
Add Rows
For all sections of the CE Diary, you will have the option to add rows if necessary. Simply click on the “Add Rows” button at the bottom of the screen to add additional rows. (Point out this button on the User Guide).
Food and Drink for Home Consumption
In the second tab, you will enter food and drink expenses that you made that were intended for home consumption or storage. Usually these expenses are at places like grocery stores, farmers’ markets, and similar stores.
First, you enter the description of your food or drink expense in the “What did you buy or pay for?” column. (Point out the column on the User Guide).
Note that we’ll need you to be specific when recording your expenses in this section. For example, for bread, we need to know the type of bread, such as: white, wheat, rye, etc. If you bought meat, we need to know the cut of the meat, such as: whole chicken, chicken legs, chicken wings, ground beef, round roast, whole ham, spare ribs, bacon, etc.
Next, you will select whether the item was either: fresh, frozen, or bottled/canned, using the dropdown box under the column “Is this item?”. (Point out the column on the User Guide).
Next, you will enter the amount of the expense in dollars and cents, without tax, in the column labeled “Total Cost without tax”. (Point out the column on the User Guide).
Next, in the column “Check here if purchased for someone not in household”, you will click in the checkbox if the expense was as such.
Finally, in the “Date Purchased” column, use the dropdown box to select the date when your expense was made. (Point out the column on the User Guide).
Clothing, Shoes, Jewelry, and Accessories
In the third tab, you will enter all clothing, shoes, jewelry, and accessories expenses that you made.
First, enter the description of what you bought in the “What did you buy or pay for?” column. (Point out the column on the User Guide). These descriptions should be similar to the ones in the examples found in the section header. (Point out the section header on the User Guide).
Next, you will enter the amount of the expense in dollars and cents, without tax, in the column labeled “Total Cost without tax”. (Point out the column on the User Guide).
Next, you will select whether the item was for a male or female, using the dropdown box under the column “Was the item for…”. (Point out the column on the User Guide).
Next, you will select whether the items were for someone: under 2 years old, 2 to 15 years old, or 16 years and over, using the dropdown box under the column “Age”.
Next, in the column “Check here if purchased for someone not in household”, you will click in the checkbox if the expense was as such.
Finally, in the “Date Purchased” column, use the dropdown box to select the date when your expense was made. (Point out the column on the User Guide).
All Other Products and Services
In the fourth tab, you will enter all other expenses made by you that are not included in the other three parts of the CE Diary.
First, enter the description of what you bought in the “What did you buy or pay for?” column. (Point out the column on the User Guide). You can refer to the examples in the section header for the types of items we’re looking for. (Point out the section header on the User Guide).
Next, you will enter the amount of the expense in dollars and cents, without tax, in the column labeled “Total Cost without tax”. (Point out the column on the User Guide).
Next, you will select whether the item was for a male or female, using the dropdown box under the column “Was the item for…”. (Point out the column on the User Guide).
Next, in the column “Check here if purchased for someone not in household”, you will click in the checkbox if the expense was as such.
Finally, in the “Date Purchased” column, use the dropdown box to select the date when your expense was made. (Point out the column on the User Guide).
Logging Out of the CE Diary
To help protect your privacy, the CE Diary will require you to log back in to the survey if the browser window has been inactive for more than 15 minutes. You can also log out at any time by clicking on the “logout” link in the top-right corner of the data entry page.
(Point out the ‘logout’ link on main dashboard page on the User Guide).
No data will be lost, though, if you are logged out for inactivity.
Submit Your Completed CE Diary
At the end of the two-week period, you may submit your completed CE Diary by clicking on the Submit button. (Please point out the Submit button on the User Guide).


Finally, if you have any questions or encounter any problems, just give me a call. Do you have any questions?
| File Type | application/vnd.openxmlformats-officedocument.wordprocessingml.document |
| Author | glost001 |
| File Modified | 0000-00-00 |
| File Created | 2021-01-28 |
© 2026 OMB.report | Privacy Policy