Appendix_R
Appendix_R.1 Biosample Shipping, Processing & Storage.doc
The Study to Explore Early Development (SEED)
Appendix_R
OMB: 0920-0741

Study to Explore Early Development (SEED)
Biologic Specimen Manual
Version 5.3
Updated: January 23, 2009
Centers for Autism and Developmental Disabilities Research and Epidemiology (CADDRE)
Core Laboratory Central Repository
Johns Hopkins Bloomberg School of Public Health
615 N. Wolfe Street, Room W6615B
Baltimore, MD 21205
Signature Page
Instructions: The original version of this manual must be reviewed by all applicable staff members. Staff members must sign the signature sheet after reviewing version 5.0 of the manual. All subsequent revisions and amendments must also be reviewed by applicable staff members and signed and dated accordingly.
Version no. |
|
Staff Member
|
Date |
Version no. |
|
Staff Member
|
Date |
Version no. |
|
Staff Member
|
Date |
Version no. |
|
Staff Member
|
Date |
Version no. |
|
Staff Member
|
Date |
Version no. |
|
Staff Member
|
Date |
Version no. |
|
Staff Member
|
Date |
Version no. |
|
Staff Member
|
Date |
Version no. |
|
Staff Member
|
Date |
Version no. |
|
Staff Member
|
Date |
Table of Contents
Section 1. Amendments and Revisions 5
Section 2. Purpose of SEED biologic specimen Manual 6
Section 3. SEED Emergency Contact List 7
Section 4. Tracking and Ordering Supply Inventory 8
Section 5. Sample Collection at Local SEED Sites 9
Section 5c. Collecting Blood Samples 13
Section 5d. Dried blood spot cards 17
Section 5e. Collecting Hair Samples 18
Section 5f. Site -Specific Collection Protocols 19
Section 6. Sample Distribution/Shipping 25
Section 6a. IATA Shipping Guidelines 25
Section 6b. Shipping from SEED sites to CLCR 28
Section 7. Sample Processing by the CLCR 30
Section 7a. Sample Processing and Storage Summary Flowchart 31
Section 7b. Overview of Processing and Storage 32
i. Children 32
ii. Parents 33
Section 7e. CPT Blue-Top Tubes 38
Section 7f. EDTA Purple/Pink Top Tubes 42
Section 7g. Dried blood spot card Blood Samples 44
Section 7h. Paxgene Blood RNA tube 45
Section 8. Data Entry and QC of Data 48
Section 9. CLCR Shipping Protocols 49
Section 10. Repository Protocol 50
Section 10a. Lymphocyte Transfer 50
Section 10b. Transfer of Cryoboxes to the Repository 52
Section 10c. Data Entry of Repository Information 53
Section 10d. Repository Quality Management 54
Section 11. Tracking Reports 56
Section 12. Good Laboratory Practices 57
Appendix A. Supplies and Ordering 59
Appendix B. Cheek Swab Kit Preparation 63
Appendix C. At-Home Cheek Swab Collection Instructions 66
Appendix D. Cheek Swab Transmittal Form 69
Appendix E. Centrifuge Operating Procedure 72
Appendix F. In-Clinic Transmittal Form 74
Appendix G. How to Collect Hair Samples 76
Appendix H. Holiday Calendar 78
Section 1. Amendments and Revisions
Note, this version dated, January 23, 2009, shall be considered the fifth with preliminary revisions (version 5.3). Any subsequent amendments or revisions to the subsections will be added where appropriate and noted in section 1. Staff members must sign the signature sheet after reviewing version 5.3 of the manual. All subsequent revisions and amendments must also be reviewed by applicable staff members and signed and dated accordingly.
Version 5.1: Inclusion of changes recommended by Matt Herr, University of North Carolina-Chapel Hill, North Carolina SEED site.
Version 5.2: Major revision of shipping instructions by Kaitlin Lovett and Shivam Chandan, Johns Hopkins Bloomberg School of Public Health, Core Laboratory Central Repository.
Version 5.3: Inclusion of changes recommended by Julie Rusyniak, Kennedy Kreiger Institute, Maryland SEED site.
Section 2. Purpose of SEED biologic specimen Manual
This manual serves to identify those involved with the CADDRE SEED / CLCR and to clarify standard operating procedures for work on this study. These procedures should be adhered to by all staff members and monitored by quality assurance and quality control activities.
Section 3. SEED Emergency Contact List
Site |
Primary Contact |
Phone |
|
Secondary Contact |
Phone |
|
CA |
Victoria Heffernan |
408-362-4326 (office) 510-414-9163 (cell) |
Jack Collins |
415-218-8694 (cell) 510-891-3696 (office) 510-620-8694 (office) |
||
CO |
Jen Baltz |
303-550-3799 (cell) 303-724-7638 (office) |
Andrea Cantarero |
303-724-7655 (office) |
||
GA |
Robin Tate-Sparks |
404-406-1185 (cell) |
Charmaine McKenzie |
404-498-3852 (office) 404-395-6322 (cell) |
||
Aimee Anido |
404-498-3870 (office) 404-931-9376 (cell) |
|||||
MD |
Corey Maas |
443-923-7598 (office) |
Julie Rusyniak |
443-923-7587 (office)
|
||
NC |
Matt Herr |
919-619-8166 (cell) 919-843-4675 (office) |
Chyrise Bradley |
919-966-0938 |
||
PA |
Casara Ferretti |
267-426-7844 (office) |
Lisa Young |
215-573-2469 (office) |
Section 4. Tracking and Ordering Supply Inventory
Some biosample collection supplies will be provided by CLCR. These include any items that will come in contact with the sample, e.g., blood tubes and shipping supplies. See Appendix A for a list of supplies.
Each CADDRE site is responsible for keeping track of their stock of supplies. Orders for additional supplies can be made by submitting an order form to the CLCR.
A future module in CIS will be developed to track inventory of supplies at the sites, subsequent requests for supplies, and shipment of supplies to the sites.
Section 5. Sample Collection at Local SEED Sites
Section 5a. Labeling
Purpose: To ensure all collected samples are labeled accurately and adequately.
By Whom: Local CADDRE site staff
Procedure:
Barcode labels for all biological samples can be printed via the online CADDRE Information System (CIS) website. Labels are composed of a scanable barcode and readable text containing the following information:
Abbreviated name of local CADDRE site
Participant identifier (PID)
Sample identifier

If CIS is unavailable, labels should be handwritten clearly in ink and should contain all of the above information.
Cheek Swab.
Labels for Cheek swab that are included in the Enrollment Packet are generated in the CIS Enrollment Packet module. Instructions on how to do this can be found in Chapter 21 of the CIS Documentation, “Compiling and Mailing the Enrollment Packet”. If Cheek swabs are collected during the clinic visit, labels can be printed from the CIS Clinic Visit Preparation module. Information on how to print these barcodes can be found in the CIS documentation, Chapter 25, “Clinical Visit Preparation”.
Each person’s cheek swab sample kit should be labeled appropriately for that person (e.g., affix ‘Mother’ label to the 6x9-inch manila envelope containing the brushes for the mother’s samples). The ‘Mother’, ‘Father’, and ‘Child’ labels will also be available via CIS. General instructions and recommendations on assembling the cheek swab kits are found in Appendix B.
Hair and Blood Samples
Labels for hair and blood samples are generated from the CIS Clinic Visit Preparation module. Information on how to print these barcodes can be found in the CIS documentation, Chapter 25, “Clinical Visit Preparation”.
Replicate Samples
Replicate samples collected for lab quality control will be labeled with a unique PID that will be different from the participant’s primary PID. The primary and replicate PIDs will be linked within CIS. This link will not be provided to CLCR. Labels for replicate samples are generated from their respective tasks, and can be accessed from the Participant Management module. For more information on accessing previously completed modules for a family, read Chapter 6 of the CIS Documentation, “Participant Management”.
S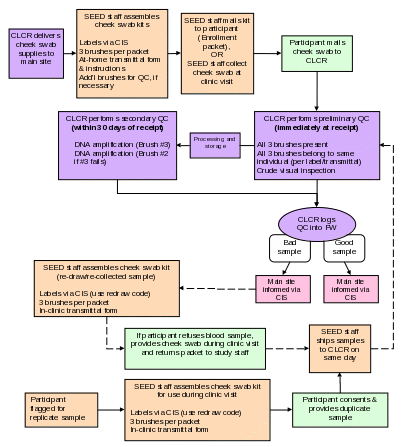 ection
5b. Collecting Cheek swab
Purpose: To ensure all Cheek swabs are collected in accordance with study protocols.
By Whom: Participant/Clinician
Procedure:
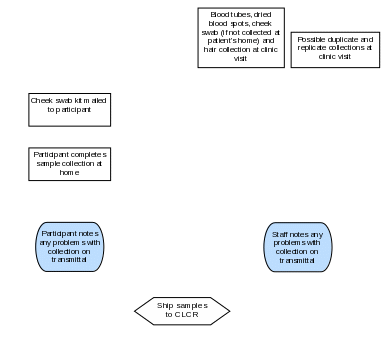
Cheek swab sample kits will be sent to study participants in the Enrollment Packet. Detailed instructions on preparing kits and collecting samples are included in Appendices B and C, respectively. Cheek swabs will be collected from child participants as well as their biological mother and father, when available. Participants will be instructed to return the samples directly to the CLCR using a stamped, addressed mailer provided in the Enrollment Packet. Alternatively, cheek swabs may be collected during the clinic visit. A sample record sheet will be included in the mailing for each participant (Appendix D). The record sheet must accompany the cheek swab samples when mailed to CLCR.
CLCR will perform DNA extraction and amplification on Cheek swabs within 30 days after receipt of the sample (see Section 8c for additional information). If a sample fails amplification, the participant will be requested to provide a replicate sample during the clinic visit. If a family has been asked to provide a duplicate sample when amplification fails, they will automatically be asked to provide a 2nd sample (replicate) as detailed below. Duplicate samples will be labeled using the same PID as the participant’s primary PID.
A randomly selected 2-3% of biological parents will be asked to provide a replicate sample for purposes of lab quality control. Local site study staff will be responsible for determining which parents will be approached for replicate samples. CIS will provide numerical data on what percentage of each sites’ participants have successfully provided replicates. Replicate samples will be labeled using a unique PID that is different from the participant’s primary PID.
General Guidelines and Handling Instructions
Participant completes cheek swab collection (3 brushes per person) at home, and ships the samples directly to the CLCR. Alternatively, cheek swabs are collected during the clinic visit.
If DNA can be successfully extracted from these samples, no further cheek swab sample will be necessary, unless the family is elected for a duplicate QC sample.
If DNA could not be successfully extracted from any of the cheek swab brushes, a second cheek swab kit will be provided for collection during the next clinic visit.
A consent form for the cheek swab sample will be included in the Enrollment Packet mailing. Participants will return the signed consent form in a sealed #10 envelope to the site.
Once a signed consent form for storage of biosamples is received by the local site, the site must notify the CIS, which will inform CLCR. CLCR will not store samples beyond 30 days unless a signed consent form is received by the site.
Section 5c. Collecting Blood Samples
Purpose: To ensure that venipunctures are performed following standard safety guidelines, and to ensure that blood samples are collected in the correct order and in accordance with study protocols.
By Whom: Phlebotomist/nurse
Procedure:
The following table summarizes draw order and volume for the collection of blood samples. Blood samples will be collected from child participants as well as their biological mother and father, when available.
Draw Order |
Tube Type (For Children) |
Tube Amount |
1 |
EDTA purple top |
3 ml |
2 |
EDTA purple top |
3 ml |
3 |
CPT blue top |
4 ml |
4 |
CPT blue top |
4 ml |
5 |
SST yellow top |
3.5 ml |
6 |
Paxgene |
2.5 ml |
7 |
Guthrie blood spot card |
<0.5 ml |
|
Total Volume |
20 ml |
Draw Order |
Tube Type (For Parents) |
Tube Amount |
1 |
EDTA pink top |
6 ml |
2 |
CPT blue top |
8 ml |
3 |
SST red-grey top |
6 ml |
4 |
Guthrie blood spot card |
<0.5 ml |
|
Total Volume |
20 ml |
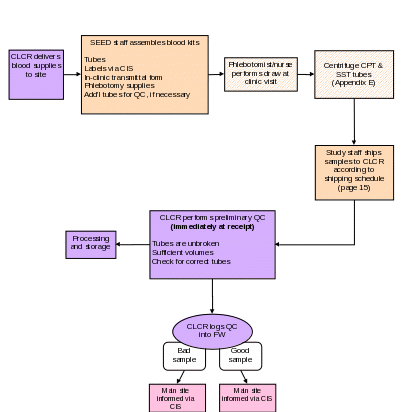
NOTE: After collecting the blood samples, the CPT tube should be centrifuged within 2 hours of collection according to instructions in Appendix E. The SST tube should be allowed to clot for 30 minutes then centrifuged according to instructions in Appendix E.
A transmittal form (Appendix F) must be prepared by the phlebotomist/nurse while collecting the blood samples. The form must be shipped with the samples to the CLCR. The sites should retain a carbon copy of the transmittal form before shipping.
A randomly selected 2-3% of biological parents will be asked to provide a replicate draw for purposes of quality control. Local site study staff will be responsible for determining which parents will be approached for replicate draws. CIS will provide numerical data on what percentage of each sites’ participants have successfully provided replicates. Replicate samples will be labeled using a unique PID that is different from the participant’s primary PID. Participants selected to provide a replicate blood sample will also be asked to provide a replicate cheek swab. A second transmittal form should be used for replicate draws.
General Guidelines and Handling Instructions
All specimens must be shipped with a copy of the transmittal form. Refer to Section 6 of this manual for shipping instructions.
Venipunctures must be performed by an experienced phlebotomist or nurse during clinic visits following standard safety guidelines.
Biological parents and child participants will be asked to provide venous blood samples in the same quantities for genetic and other analyses.
Blood draws should be performed at the end of the clinical visit using a butterfly needle and vacutainer adapter.
Any abnormalities or difficulties in collection or any other remarkable comments must be documented in the comments section of the transmittal form.
All blood tubes must be inverted 8-10 times immediately after blood is collected and samples must be shipped on the date of draw for receipt on the following day by CLCR. CPT and PaxGene tubes are to be shipped at ambient (room) temperature in an insulated shipper, which will be provided by the CLCR. SST and EDTA tubes will be shipped at cold temperatures using cold packs.
Additional Guidelines for Child Venipuncture
Study staff should discuss the blood draw with the parent prior to the visit in order to assess any special needs of the child and to seek input on approaches that have been successful in similar situations in the past.
The parent should be asked to bring any materials that might facilitate the procedure (toys, games, videos etc). It is also important to have such materials available at the clinic.
A local topical anesthetic should be available to the child (with parental consent).
Child blood draws must be performed by a phlebotomist or nurse having prior experience drawing blood from children between the ages of 2.5 and 5.
The parent and other staff must be present during the procedure to assist with gentle restraint and distraction.
No more than 2 attempts at blood collection should be made during a clinical visit.
Collection and shipment of blood samples
Draw day
|
Ship day |
CLCR receipt day |
CLCR processing day |
Type of Shipper to be used |
Monday - Thursday |
Same day as sample collection |
Day following sample collection |
Same day as sample receipt |
Regular |
Monday – Thursday* |
Day following sample collection |
2 days following sample collection |
Same day as sample receipt |
Regular |
Friday - Saturday** |
Same day as sample collection |
Monday |
Monday |
Special |
Sunday* |
Monday |
Tuesday |
Tuesday |
Regular |
*Inability to ship on day of blood draw
Every effort should be made to ship the blood samples on the day of collection to protect the full integrity of the biosample.
In rare cases where a clinic site is unable to ship the blood samples to the CLCR lab on the draw day and the draw day is Sunday - Thursday, the following procedure should be followed:
Please notify CLCR via email so the samples can be flagged in the Freezerworks database.
Store CPT and PaxGene tubes overnight at ambient temperatures and SST & EDTA tubes at refrigerated temperature (2-8º Celsius).
Ship the tubes the following day using a regular shipper and the shipping protocol described in section 6b.
** Friday – Saturday blood draw
All Friday and Saturday blood draws are viewed as an absolute last resort and should not be offered to the participants unless they absolutely cannot attend on Mon - Thurs.
When participants cannot present to the clinic site on a Sunday – Thursday, the following procedure should be followed:
Please notify CLCR via email so the samples can be flagged in the Freezerworks database.
Ship blood sample on the day of the visit using a special shipper to protect the samples from extreme external temperatures during the shipping delay. All clinic sites will be provided with one special shipper to have on-location. The special shipper will be returned to the site within 3 business days when received at CLCR. If additional special shippers are needed, CLCR requires at least 72 hours advanced notice.
Enter the shipment into CIS.
Ship the tubes using a special shipper and the shipping protocol described in Appendix J.
Blood draws on two or more families in one day
In the event that two or more families have blood drawn on the same day, blood tubes from two families can be shipped in one regular shipper. Two cold containers (one per family) and one cold pack should be placed horizontally in the cold portion of the regular shipper while all tubes from both families can be placed in the large ambient container. Please remember to include all appropriate transmittal forms!
Section 5d. Dried blood spot cards
Purpose: To ensure all dried blood spot card samples are collected in accordance with study protocols.
By Whom: Phlebotomist/Clinician
Procedure:
The dried blood spot card sample should be collected after the venous blood collection using residual blood.
When finished filling vacutainer release tourniquet from extremity. Remove vacutainer from end of butterfly tubing.
Next remove needle from extremity and slide safety cap up over the needle.
Hold tubing in a U shaped formation end to end. Unscrew or pull out rubber covered puncture tip along with shield for vacutainer from end of butterfly tubing maintaining end to end positioning.
Once an open system exists, drop the end of tubing which has cannula (not capped needle) and allow blood to flow via gravity onto filter paper spots.
Note that if the needle is removed from the arm while the vacutainer is still attached, the blood remaining in the tubing will be pulled into the vacutainer especially if the vacutainer is not completely filled.
Approximately 0.5 ml of residual blood should be blotted against the pretreated filter paper. Use one card per participant (5 spots per card)
Any abnormalities or difficulties in collection or any other remarkable comments must be written in the comments section of the specimen transmittal.
The card will be allowed to air dry overnight at room temperature. The blood spot cards should have been allowed to air dry away from direct sunlight or sources of heat overnight, prior to shipment.
Place each card in a separate 3 ml bag to provide a barrier against gasses and water vapor, and cross contamination.
Add a desiccant pack and a humidity indicator card to each bag.
Dried blood spot cards will be shipped to the CLCR at room temperature.
Before shipping, check the humidity indicators. If an indicator has turned pink, replace the desiccant pack and the indicator prior to shipment. If no color change is detected, there is no need to change the desiccant pack or indicator prior to shipment.
Section 5e. Collecting Hair Samples
Purpose: To ensure all hair samples are collected in accordance with study protocols.
By Whom: Local site study staff
Procedure:
Detailed instructions on collecting the hair sample are included in Appendix G. Hair samples will be collected only from child participants.
General Guidelines and Handling Instructions
A hair sample will be collected by study staff during the clinical visit. Refer Appendix G for instructions on how to collect the sample.
Approximately 50 hairs should be taken from the occipital region of the head, and should be cut as close to the scalp as possible using stainless steel scissors.
The hair sample must consist of at least one inch of untreated and un-dyed hair.
Whenever possible, the hairs should be placed together keeping the root ends aligned.
If there is not enough hair to take from the same region, hair samples can be taken from various regions of the head, ensuring that the root ends are kept aligned.
Any abnormalities or difficulties in collection or any other remarkable comments must be written in the comments section of the specimen transmittal.
The hair may be stored at room temperature in a labeled plastic bag until shipped to the CLCR. Hair samples can be included with the next shipment of blood or Cheek swab, or can be held and batch shipped at a later date (within 1 month of collection).
Section 5f. Site -Specific Collection Protocols
i. California
Purpose: To indicate specimen collection and/or shipping protocols specific to the California CADDRE site.
Site-specific Details:
Blood draw supplies should be shipped to:
Victoria Heffernan
Kaiser, ASD Clinic
175 Bernal Rd. Ste. 230
San Jose, CA. 95119.
(408) 362-4326
Buccal Swab kits should be sent to:
Karen Smith
Environmental Health Investigations Branch
850 Marina Bay Parkway
Building P, 3rd Floor
Richmond, CA 94804-6403
(510) 620-3705
ii. Colorado
Purpose: To indicate specimen collection and/or shipping protocols specific to the Colorado CADDRE site.
Site-specific Details:
Jen Baltz
JFK Partners
13121 E 17th Ave, C234
Building L28, Room 5218
P.O. Box 6511
Aurora, CO 80045
Phone: (303) 724-7638
iii. Georgia
Purpose: To indicate specimen collection and/or shipping protocols specific to the Georgia CADDRE site.
Site-specific Details:
Biosample collection supplies can be delivered to:
Aimee Anido
Project
Coordinator
Centers for Disease Control and Prevention
National
Center on Birth Defects and Developmental Disabilities
Attn:
Aimee Anido Rm 3rd flr - 3091
1825 Century Center Blvd,
NE
Atlanta, GA 30345
Clinic visits and phlebotomy can take place at Clayton County Developmental Clinic, the Marcus Institute, or in the study participant’s home.
Biosamples collected will be handled and processed as instructed in this manual and packed for shipping on the same day they are collected. The staff responsible for processing and packing blood samples must complete appropriate OSHA Blood Borne Pathogens training and CDC training on Shipping of Infectious Substances.
iv. Maryland
Purpose: To indicate specimen collection and/or shipping protocols specific to the Maryland CADDRE site.
Site-specific Details:
Buccal swab kits should be sent to:
Tanisha Mitchell
Project Coordinator
Johns Hopkins Bloomberg School of Public Health
615 N. Wolfe Street, Room E6033
Baltimore, MD 21205
Phone: (443) 287-3562
Clinic visits will take place at the Greenspring Campus of the Kennedy Krieger Institute at the Center for Autism and Related Disorders (CARD) under the supervision of:
Julie Rusyniak
Clinic Coordinator
Center for Autism and Related Disorders
Kennedy Krieger Institute
3901 Greenspring Avenue
Baltimore, MD 21211
Phone: (443) 923-7587
Biosample collection supplies will also be delivered to Ms. Julie Rusyniak at the above address.
Biosamples collected at CARD will be shipped via FedEx to CLCR. Samples arriving at CLCR on the same day they were collected will be held for 24 hours prior to processing to remain consistent with other CADDRE sites. Biosamples collected after CLCR hours will be hand delivered to the Project Coordinator on the same day they are collected. The biosamples will be stored in a locked cabinet in a locked room and hand-delivered to the CLCR the next morning.
Blood draws that occur on Saturdays or Sundays will be stored in “special shippers” according to the protocol and hand delivered to the CLCR on Monday.
The staff responsible for processing and packing blood samples must complete appropriate Blood Borne Pathogens trainings along with DOT Hazardous Materials/IATA Dangerous Good Course: Infectious substances and Diagnostic Specimens.
v. North Carolina
Purpose: To indicate specimen collection and/or shipping protocols specific to the North Carolina CADDRE site.
Site-specific Details:
Biosample
collection supplies can be delivered to:
Matt Herr
Clinic Coordinator
UNC-Chapel
Hill
116a S. Merritt Mill Rd
Chapel Hill, NC 27516
Clinic
visits will take place at the UNC Clinical Center for the Study of
Development and Learning (CDL). Blood drawing may occur at either the
CDL or the phlebotomy services lab at the UNC Women's &
Children's Hospital. The CDL is located at:
1450
Raleigh Rd
Chapel Hill, NC 27517
Phone: (919) 966-4806
UNC Women's and Children's Hospital is located at:
101 Manning Drive
Chapel Hill, NC 27514
Biosamples
collected at UNC Hospitals will be hand carried by study staff to the
CDL for processing and packaging for shipment to CLCR. Samples
will be handled and processed as instructed in this manual and
packaged for shipping on the same day they are collected. Those staff
responsible for processing and packaging blood samples must complete
appropriate OSHA Blood Borne Pathogens training and UNC Environmental
Health and Safety department training on shipping of biologic
material.
vi. Pennsylvania
Purpose: To indicate specimen collection and/or shipping protocols specific to the Pennsylvania CADDRE site.
Site-specific Details:
Primary Contact:
Casara Jean Ferretti
Research Coordinator, M.S.
Regional Autism Center
The Children’s Hospital of Philadelphia
3535 Market Street
8th Floor, Suite 860, Room 839
Philadelphia, PA 19104
Phone: (267) 426-7844 (ext. 67844)
Secondary Contact:
Lisa Young
Project Manager
University of Pennsylvania School of Nursing
Center for Autism and Developmental Disabilities Research and Epidemiology
418 Curie Blvd., 445 Claire M. Fagin Hall
Philadelphia, PA 19104-6096
Phone: (215) 573-2469
Section 6. Sample Distribution/Shipping
Section 6a. IATA Shipping Guidelines
Purpose: To ensure that all packages meet IATA guidelines for safe shipping.
By Whom: Site/ CLCR staff members
Disclaimer: This information is provided to each site as a quick reference to IATA shipping guidelines. Some portions of these guidelines may not apply to shipping for CADDRE-SEED study.
Procedure: The shipper, not the transport company, is responsible for determining the hazard class and properly packaging and marking the hazard information on the shipment.
DIAGNOSTIC SPECIMENS
A diagnostic specimen is any human or animal material including, but not limited to, excreta, secreta, blood and its components, tissue fluids, and body parts being transported for research, diagnosis, investigational activities, disease treatment or prevention.
Diagnostic specimens transported under the IATA regulations are assigned the UN identification number 3373, and are subject to Packing Instructions 650. Any specimens shipped in dry ice must be labeled with the UN identification number 1845.
Labeling of shipping box:
All diagnostic specimens must be labeled with a white diamond on point UN 3373 BIOLOGICAL SPECIMENS label.
If the shipper contains dry ice, there must be a Class 9 diamond on point label on the face of the shipper, as well as a DRY ICE UN 1845 label that includes the approximate weight (in kgs) of the dry ice included.
The consignee and the shipper must be identified clearly on the face of the box.
PACKING INSTRUCTION 650
STATE VARIATIONS: DOG-03
OPERATOR VARIATIONS: AF-04, AO-03, AS-08, CO-07, CS-07, FX-09, LA-07, LH-12, OF-03
General Requirements
Diagnostic specimens must be packed in good quality packagings, which must be strong enough to withstand the shocks and loadings normally encountered during transport, including trans-shipment between transport units and warehouses as well as any removal from a pallet or over pack for subsequent manual or mechanical handling. Packagings must be constructed and closed so as to prevent any loss of contents when prepared for transport which might be caused under normal conditions of transport, by vibration, or by changes in temperature, humidity or pressure.
Primary receptacles must be packed in secondary packagings in such a way that, under normal conditions of transport, they cannot break, be punctured or leak their contents into the secondary packaging. Secondary packagings must be secured in outer packagings with suitable cushioning material. Any leakage of the contents must not substantially impair the protective properties of the cushioning material or of the outer packaging. Packages must be prepared as follows:
(a) For Liquids:
The primary receptacle(s) must be leak proof and must not contain more than 500 ml.
There must be absorbent material placed between the primary receptacle and the secondary packaging. If several fragile primary receptacles are placed in a single secondary packaging, they must be either individually wrapped or separated so as to prevent contact between them. The absorbent material, such as cotton wool, must be in sufficient quantity to absorb the entire contents of the primary receptacles and there must be a secondary packaging that must be leak proof.
The primary receptacle or the secondary packaging must be capable of withstanding, without leakage, an internal pressure producing a pressure differential of not less than 95 kPa in the range of -40°C to +55°C (-40°F to 130°F).
The outer packaging must not contain more than 4 L.
(b) For Solids:
The primary receptacle(s) must be sift-proof and must not contain more then 500 g.
If several fragile primary receptacles are placed in a single secondary packaging, they must be either individually wrapped or separated so as to prevent contact between them and there must be a secondary packaging which must be leak proof.
The outer packaging must not contain more than 4 kg.
An itemized list of contents must be enclosed between the secondary packaging and the outer packaging.
Each completed package must be capable of successfully passing the drop test described in 6.6.1 except that the height of the drop must not be less than 1.2 m.
Packages must have one side with dimensions of not less than 100 mm x 100 mm (4 in x 4 in) or packages must be in an over pack that has one side with dimensions of not less than 100 mm x 100 mm (4 in x 4 in).
Each package and the "Nature and Quantity of Goods" box of the air waybill must show the text "DIAGNOSTIC SPECIMENS". Each package may also be marked in accordance with 7.1.5.8 to indicate that the shipper has determined that the packaging meets the applicable air transport requirements. The marking must be applied adjacent to the words "Diagnostic Specimens".
A Shipper's Declaration for Dangerous Goods is not required.
Provided diagnostic specimens are packed in accordance with this Packing Instruction, no other requirements of these Regulations apply except for the definition in 3.6.2.1.4 and the reporting of dangerous goods accidents and incidents in 9.6.1. However, where carbon dioxide, solid (dry ice) or liquid nitrogen is used to keep specimens cold, all applicable requirements of these Regulations must be met.
Substances shipped refrigerated or frozen (wet ice, prefrozen packs, Carbon dioxide, solid [dry ice]): Ice Carbon dioxide, solid (dry ice) or other refrigerant must be placed outside the secondary packaging(s) or alternatively in an over pack with one or more completed packages. Interior support must be provided to secure the secondary packaging(s) or packages in the original position after the ice or Carbon dioxide, solid (dry ice) has been dissipated. If ice is used the packaging must be leak-proof. If Carbon dioxide, solid (dry ice) is used the outer packaging must permit the release of carbon-dioxide gas. The primary receptacle must maintain its containment integrity at the temperature of the refrigerant as well as at the temperatures and pressure of air transport to which the receptacle could be subjected if refrigeration were to be lost.
Substances shipped in liquid nitrogen: Plastic capable of withstanding very low temperatures must be used instead of glass receptacles. Secondary packaging must also withstand very low temperatures and in most cases will need to be fitted over individual primary receptacles. If multiple primary receptacles are placed in a single secondary packaging, they must be separated and supported to ensure that contact between them is prevented. Requirements for shipment of liquid nitrogen must also be observed. The primary receptacle must maintain its containment integrity at the temperature of the refrigerant 'used as well as at the temperatures and pressure of air transport to which the receptacle could be subjected if refrigeration were to be lost.
Lyophilized substances: Primary receptacles must be either flame-sealed glass ampoules or rubber-stoppered glass vials with metal seals.
Section 6b. Shipping from SEED sites to CLCR
Purpose: To ensure samples are correctly packaged and shipped according to specimen needs, study protocol, and IATA guidelines.
By Whom: Site research assistant
General Procedure:
Technicians must be familiar with IATA guidelines outlined in Section 6a.
Cheek swab
If cheek swabs are collected during clinical visit, they can be shipped with blood tubes at ambient temperature.
Hair Samples
Hair samples are placed in plastic bags, which are then placed with blood tubes in the ambient vessel.
Blood Tubes
Packaging of blood tubes must consist of three components:
a leak-proof primary receptacle (blood tubes),
leak-proof secondary packaging and absorbent material to protect primary receptacle (biohazard bag and absorbent sheet), and
an outer container (polystyrene shipper).
CPT and Paxgene tubes should be shipped at ambient temperature.
SST and EDTA tubes will be shipped in cold temperature using cold packs.
Secondary packaging
Ensure that each blood tube is wrapped individually to prevent contact between the tubes. This can be best done by wrapping each tube individually in absorbent material and placing them in a blood transport canister.
Place enough absorbent material between the primary receptacle and the secondary packaging to absorb the entire contents of the primary receptacles.
Outer containers
Use Styrofoam-insulated corrugated fiberboard containers (available through SafTPak and other venders).
Place a layer of cushioning (card board with canister cut out) at the bottom of the shipper.
Insert secondary containers, followed by additional cushioning (foam brick).
Try to limit the space for movement of the secondary containers within the outer packaging.
Identify and label the shipper according to IATA packing instructions 650 (section 6a.).
Diagrammatic Representation of the Dual Shipper
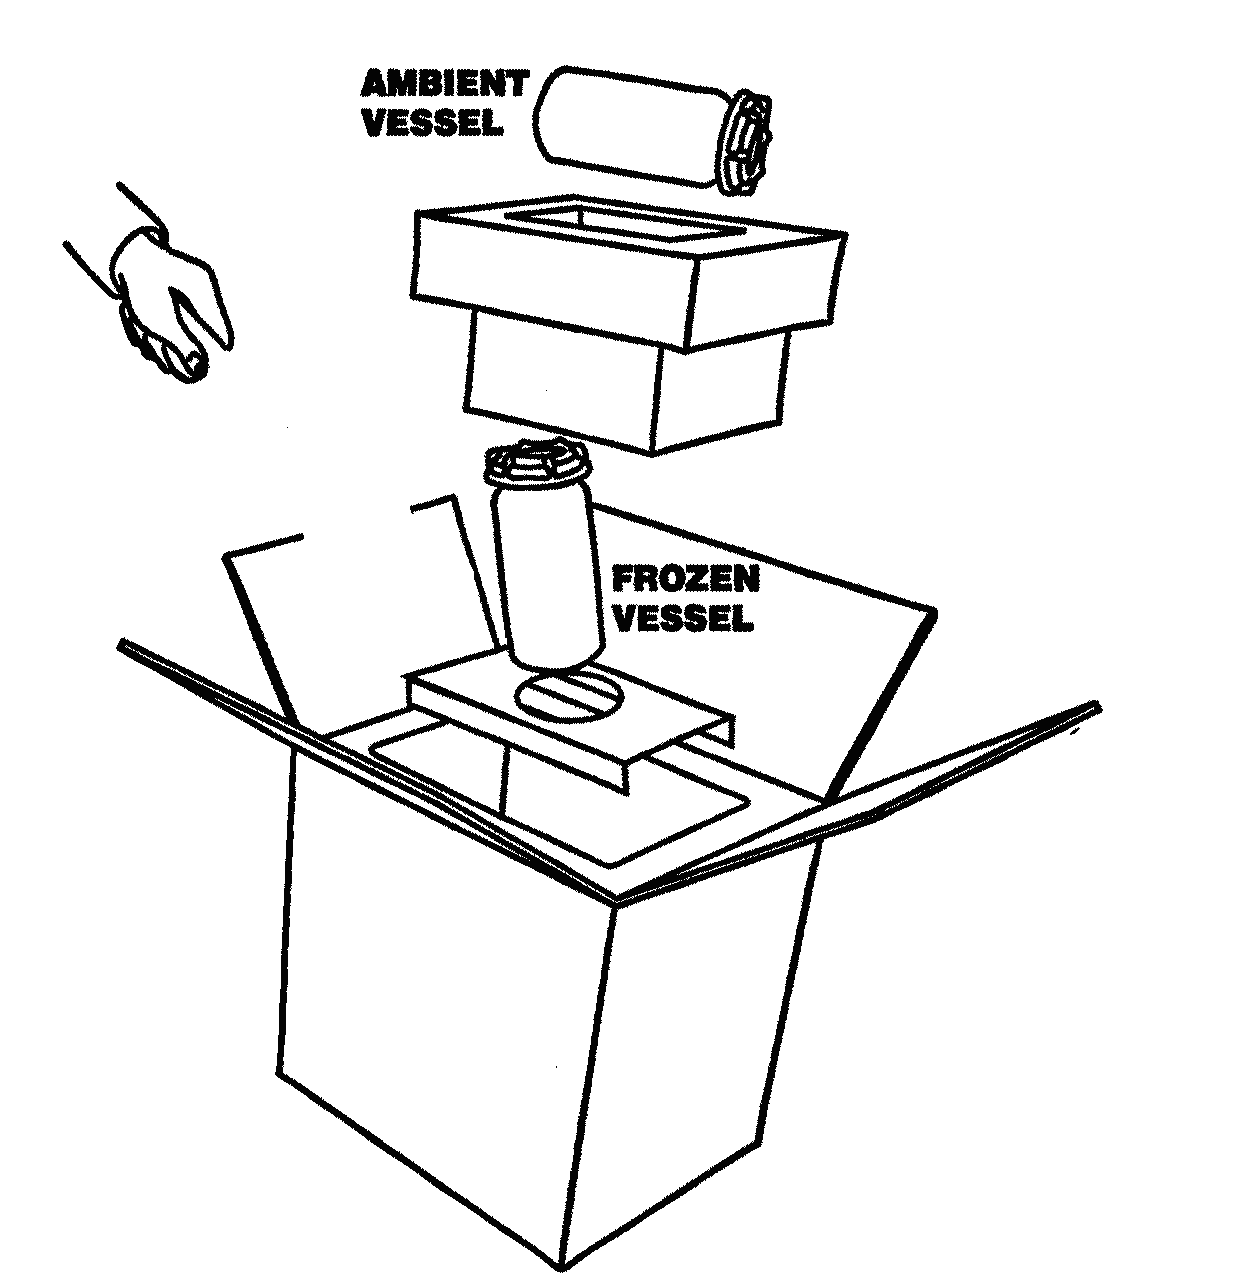
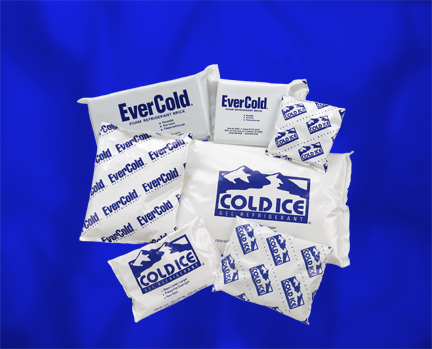
Ambient Vessel:
Cheek swab
Hair sample
CPT tube/s
Paxgene tube
Transmittal Form
Frozen Vessel:
EDTA tube/s
SST tube/s
Section 7. Sample Processing by the CLCR
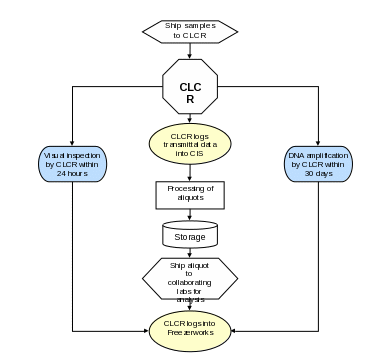
Section 7a. Sample Processing and Storage Summary Flowchart
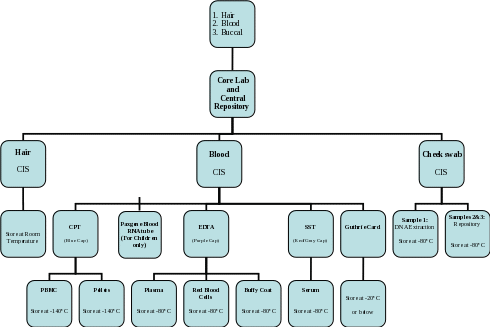
Section 7b. Overview of Processing and Storage
Sample |
Label Names |
# of Labels |
Aliquot # |
Aliquot volume |
Freezing Temp. |
Cheek swab |
cytobrush |
3 |
n/a |
-80º |
|
DNA |
1 |
1 |
20 ul |
-80º |
|
Yellow-top SST Tubes
(3.5 ml) |
Serum |
3 |
1 |
0.5 ml |
-80º |
2 |
0.5 ml |
||||
3 |
0.5 ml |
||||
Blue-top CPT Tubes
(2 x 4 ml) |
PBMCs |
3 |
1 |
5x10⁶ cells |
-140º |
2 |
|||||
3 |
|||||
Purple-top EDTA Tubes
(2 x 3 ml) |
Plasma |
2 |
1 |
1.0 ml |
-80º |
2 |
1.0 ml |
||||
Buffy Coat |
2 |
1 |
0.5 ml |
-80º |
|
2 |
0.5 ml |
||||
Dried blood spot card |
Dried blood spot card |
1 |
40 ul in each spot |
room temp
|
|
Hair Sample |
Hair Sample |
1 |
n/a |
room temp |
|
Paxgene blood RNA tube (2.5ml) |
Paxgene |
1 |
store the entire tube prior to RNA isolation |
-80º
|
|
Sample |
Label Names |
# of Labels |
Aliquot # |
Aliquot volume |
Freezing Temp. |
Cheek swab |
cytobrush |
3 |
n/a |
-80º |
|
DNA |
1 |
1 |
20 ul |
-80º |
|
Red/grey-top SST Tubes
(6 ml) |
Serum |
3 |
1 |
1.0 ml |
-80º |
2 |
1.0 ml |
||||
3 |
1.0 ml |
||||
Blue-top CPT Tubes
(8 ml) |
PBMCs |
3 |
1 |
5x10⁶ cells |
-140º |
2 |
|||||
3 |
|||||
Pink-top EDTA Tube
(1 x 6 ml) |
Plasma |
2 |
1 |
1.0 ml |
-80º |
2 |
1.0 ml |
||||
Buffy Coat |
2 |
1 |
0.5 ml |
-80º |
|
2 |
0.5 ml |
||||
Dried blood spot card |
Dried blood spot card |
1 |
40 ul in each spot |
room temp
|
|
Hair Sample |
Hair Sample |
1 |
n/a |
room temp |
|
Section 7c. Cheek swabs
Purpose: To ensure all Cheek swab samples are processed and stored according to study protocol.
By Whom: Serology Laboratory Technicians (CLCR)
Procedure:
The repository staff will notify the Data Center and study site staff via the CIS system upon receipt of the Cheek swab. If Cheek swab has not been received at the repository by the time of the clinical visit, or if DNA could not be extracted from the samples, the sample will be retaken at the clinic.
Technician must complete bottom portion of specimen transmittal (Appendices D).
Samples are then entered into Freezerworks, and logged onto CIS.
Enter all sample information into an excel spreadsheet (a template will be located on the Desktop)
Sign on to Freezerworks© .
Import the excel spreadsheet for that day.
Run a query on the date and all samples should appear.
Print labels according to the table below.
-
Sample
Label Names
# of Labels
Aliquot #
Aliquot volume
Cheek swab
Cytobrush
3
n/a
DNA
1
1
20 ul
Upon receipt of the sample, cytobrush number 1 and 2 will be labeled, cataloged and stored in the repository at -80ºC. The remaining cytobrush number 3 will undergo DNA extraction according to the protocol outlined below.
One aliquot will then be sent to the Fallin Lab for QC analyses. If the sample fails to meet QC standards, DNA will be extracted from cytobrush #2. If the sample fails QC analysis again, the clinic site will be contacted to retake the Cheek swab.
DNA Isolation from a Cheek swab cytobrush
DNA may be isolated immediately, or, samples may be stored on the collection brush for at least 1 month at room temperature.
DNA Isolation
Expected Yield: 0.2 -2 ug DNA
Cell Lysis
Place 300 µl Cell Lysis Solution in a 1.5 microfuge tube.
Place swab in tube and allow it to sit for 5 minutes.
Dip swab up and down 10 times. The solution will become foamy.
Squeeze out excess from tip.
Place tubes into centrifuge, hinges outward. Centrifuge foam down.
Combine contents of tubes from same patients.
Add 1.5 µl Proteinase K Solution (20 mg/ml). We used a Proteinase K Solution of 15.6 mg/ml. Therefore, we used 1.9 µl.
Mix by inverting 25 times.
Incubate sample at 55°C for 15.60 minutes.
RNase Treatment
Add 1.5 µl RNase A Solution to the cell lysate.
Mix the sample by inverting the tube 25 times and incubate at 37°C for 15-60 minutes.
Protein Precipitation
Cool sample to room temperature.
Add 100 µl Protein Precipitation Solution to the cell lysate.
Vortex vigorously at high speed for 20 seconds to mix the Protein Precipitation Solution uniformly with the cell lysate.
Place tube in an ice bath for 5 minutes.
Centrifuge at 13,000 - 16,000 x g for 3 minutes (remember to place hinges outward). The precipitated proteins should form a tight, white pellet. If the protein pellet is not tight, repeat steps 3, 4, and 5.
DNA Precipitation
Place 300 µl 100% Isopropanol (2-propanol) and .5 µl Glycogen Solution (20 mg/ml, Gentra catalog number R-501 0) into a new 1.5 ml microfuge tube.
Pour the supernatant containing the DNA (leaving behind the precipitated protein pellet) into the new 1.5 microfuge tube.
Mix by inverting gently 50 times and incubate at room temperature for at least 5 minutes.
Centrifuge at 13,000 -16,000 x g for 5 minutes. The DNA may or may not be visible as a small white pellet depending on the yield.
Pour off supernatant and drain tube on clean absorbent paper. Be careful not to turn tube back to upright position while draining.
Add 300 µl 70% Ethanol and invert tube several times to wash DNA.
Centrifuge (hinges outward) at 13,000 - 16,000 x g for 1 minute. Carefully pour off the ethanol. Pellet may be loose, so pour slowly.
Keeping tube in an inverted position, place tube on absorbent paper and allow to air dry.
DNA Hydration
Add 10 µl DNA Hydration Solution (20 µl will give a concentration of 50 ng/µl the yield is 1 µg DNA).
Tap tube periodically to aid in dispersing the DNA.
Rehydrate DNA by incubating overnight at room temperature.
*The DNA samples are then cataloged and frozen at -80ºC.
Section 7d. SST Tubes
Purpose: To ensure all SST tubes are processed and stored according to study protocol.
By Whom: Intake Laboratory Technician (CLCR)
Procedure:
Samples should be entered into Freezerworks and logged into CIS.
Enter all sample information into an excel spreadsheet (a template will be located on the Desktop)
Sign on to Freezerworks© .
Import the excel spreadsheet for that day.
Run a query on the date and all samples should appear.
Print labels according to the table below.
-
Sample
Label Name
# of Labels
Aliquot #
Aliquot volume
Yellow-top SST Tube
(For Children)
(3.5 ml)
Serum
3
1
0.5 ml
2
0.5 ml
3
0.5 ml
Red/grey-top SST Tube
(For Adult)
(6 ml)
Serum
3
1
1.0 ml
2
1.0 ml
3
1.0 ml
Properly label the cryovials using the NUNC™ CryoTube™ vials (1.0 ml)
Prepare the Biological Safety Cabinet (BSC) for processing:
Place a blue absorbent pad in the working area
Place a sealable bag to dispose of the empty draw tubes.
Restock pipettes
Pour a 1:10 bleach solution in plastic beakers for pipette disposal.
Aliquot the sample in 0.25 ml aliquots.
Aliquoted specimens are then placed into the appropriate cryobox and gridded in the appropriate grid sheet.
Cryoboxes are placed in the appropriate -80ºC freezer.
Section 7e. CPT Blue-Top Tubes
Purpose: To ensure all sample EDTA plama, PBMCs and cell pellets are processed and stored in a standardized manner according to study protocol.
By Whom: Immunology Laboratory Technician (CLCR)
Procedure:
Transfer the cell-plasma suspension from blue-top tubes into a single 50ml conical tube for each sample ID, add PBS to bring volume to 50ml, and centrifuge the tube at 1500 RPM for 10 minutes.
While specimens are being centrifuged, samples should be entered into Freezerworks and logged into CIS.
Enter all sample information into an excel spreadsheet (a template will be located on the Desktop)
Sign on to Freezerworks©.
Import the excel spreadsheet for that day, or manually enter the sample information into the database.
Run a query on the date and all samples should appear.
See the table below that lists the sample types, number of labels needed and label name.
-
Sample Tube
Sample Type/ Label Name
# of Labels
Aliquot #
Aliquot Volume
Blue-top Tubes (For Children)
(2 x 4 ml)
PBMCs
3
1
5 x10⁶ cells
2
3
Blue-top Tubes (For Adult)
(8 ml)
PBMCs
3
1
5 x10⁶ cells
2
3
Properly label the cryovials:
For all samples 0.5 ml or under, use the NUNC™ CryoTube™ vials (1.0 ml)
For all samples between 0.5 ml and 1.8 ml, use ™ CryoTube™ vials (1.8 ml)
Prepare the BSC for processing:
Place a blue absorbent pad in the working area
Place a sealable bag to dispose of the empty draw tubes.
Restock pipettes
Pour a 1:10 bleach solution in plastic beakers for pipette disposal.
Aspirate the PBS with a 2 ml serological pipette, using a new pipette for each tube. Leave approximately 120 µl of supernatant.
Vortex the pellet gently
Bring the volume up to 30 ml with sterile PBS.
Centrifuge at 1500 RPM for 10 minutes.
Repeat steps 7 and 8.
With a 5 ml pipette, bring the volume up to 4 ml with PBS. Follow protocol for counting cells.
Counting Cells Using Coulter Counter
Make sure waste jar is empty (will contain blue Coulter Clenz as waste from counting) and Isoton II jar is full.
Turn on power to Z1 and prime aperture. Do this by pressing the FUNCTIONS key, scrolling to “Prime Aperture” and pressing START twice.
Fill accuvettes (from drawer under counter) with 20 ml Isoton II. Add 6 drops of Zap-O-Globin to lyse the red cells before counting.
Add 40 µl from the 4 ml cell suspension (step 12 of lymphocyte separation) to the accuvette.
Put the accuvette containing the specimen on the stage and lift the stage to the highest position.
Press SET-UP key to switch to counting mode, then press START/STOP. This starts the counting.
Make sure the aperture (visible on screen) is clear. If aperture is blocked, an error message will appear on the display screen. Press the UNBLOCKED key and the counter will automatically clear the aperture and resume counting. The machine should complete the count in about 12 seconds.
Multiply the count by 103 to obtain the number of cells/ml. Then, multiply that count by the dilution factor.
To count another specimen, put the new specimen in an accuvette on the sampling stand and repeat.
At the end of the day, place an accuvette containing 20 ml of Coulter Clenz on the stage and run the count 10 times. This cleans the system by filtering the waste through the aperture and into the waste jar.
Turn off the counter.
Bring the volume of the cell suspension up to 25 ml with PBS for the final wash. Centrifuge for 5 minutes at 500 G (1500 RPM). Follow freezing procedures.
Freezing Procedures
After obtaining the coulter count for each participant (cells per 1 ml), calculate the number of cells per 4 ml.
Round this number off to the closest figure on the table below. Calculate how many tubes are needed to place 106 cells in the 0.5 ml tube and the volume of medium needed for re-suspension.
Coulter Reading Cell Count
|
Cell Count (106/ml) |
Medium (ml) |
# Tubes |
250 |
1 |
0.5 |
1 |
500 |
2 |
1.0 |
2 |
750 |
3 |
1.5 |
3 |
1,000 |
4 |
2.0 |
4 |
1,250 |
5 |
2.5 |
5 |
1,500 |
6 |
3.0 |
6 |
1,750 |
7 |
3.5 |
7 |
2,000 |
8 |
4.0 |
8 |
2,250 |
9 |
4.5 |
9 |
2,500 |
10 |
5.0 |
10 |
3,000 |
12 |
6.0 |
12 |
3,500 |
14 |
7.0 |
14 |
4,000 |
16 |
8.0 |
16 |
4,500 |
18 |
9.0 |
18 |
Label the appropriate number of PBMC tubes (using Freezerworks©).
Label three tubes for each sample with a cell pellet label.
Wheaton cryovials should be labeled so that the top of the label starts on the edge of the white area of the cryovial and edge of the label is even with the top of the tube, just beneath the lid.
Aspirate the PBS and re-suspend the cells with the appropriate amount of 20% medium according to the table above. The medium is prepared by combining the following:
500 ml RPMI – 1640
125 ml FCS (Fetal Calf Serum)
0.625 ml PS (Penicillin Streptomycin)
Place the labeled cryovial tubes on ice and open the lids under a hood and aliquot 0.5 ml of freezing solution in each tube, except for the cell pellet tubes.
Aliquot 0.5 ml of the cell suspension into each tube. Do this for each row of tubes and replace caps. Always check the participant # on the tube to be sure you are putting the cells in the correct tubes.
For the cell pellet tubes, remove an aliquot of 0.5 ml of the cell suspension and divide into 4 tubes as follows:
Tube #1- 0.125 ml
Tube #2- 0.125 ml
Tube #3- 0.125 ml
Tube #4- 0.125 ml
Replace all caps and centrifuge for 5 minutes at 2500 RPM. A cell pellet will form at the bottom of the tube. Carefully aspirate medium from each tube, without disturbing the cell pellet. Freeze at -80º C.
Invert the tubes to mix the two layers of medium.
Place the vials into freezing cans in numerical order by participant. Insert as many vials as possible into the cans without separating tubes from the same participant. Freezing cans are labeled with a letter (A-Z) and stored in the lab at room temperature.
Place the freezing cans in the -80 freezer.
After 24 hours, transfer the vials to a freezer box in the -140º freezer for long term storage. All specimen numbers must be checked and recorded on a grid sheet, according to their location in the box and freezer.
Mediums and Freezing solution
20% FCS/PS MEDIUM
500 ml RPMI – 1640
125 ml FCS (Fetal Calf Serum)
0.625 ml PS (Penicillin Streptomycin)
PS MEDIUM
500 ml rpmi – 1640
0.5 Penicillin Streptomycin
FREEZING SOLUTION
40 ml PS MEDIUM
10 ml DMSO
Section 7f. EDTA Purple/Pink Top Tubes
Purpose: To ensure all sample plasmas, buffy coats, and red blood cells are processed and stored in a standardized manner according to study protocol.
By Whom: Immunology Laboratory Technician (CLCR)
Procedure:
Samples should be entered into Freezerworks and logged into CIS.
Enter all sample information into an excel spreadsheet (a template will be located on the Desktop)
Sign on to Freezerworks©.
Import the excel spreadsheet for that day, or manually enter the sample information into the database.
Run a query on the date and all samples should appear.
See the table below that lists the sample types, number of labels needed and label name.
-
Sample Tube
Sample Type/ Label Name
# of Labels
Aliquot #
Aliquot Volume
Purple-top EDTA Tube
(For Children)
(2 x 3 ml)
or
Pink-top EDTA Tube
(For Adult)
(1 x 6ml)
Plasma
2
1
1.0 ml
2
1.0 ml
Buffy Coat
2
1
1.0 ml
2
1.0 ml
Properly label the cryovials:
For all samples 0.5 ml or under, use the NUNC™ CryoTube™ vials (1.0 ml)
For all samples between 0.5 ml and 1.8 ml, use ™ CryoTube™ vials (1.8 ml)
Prepare the BSC hood for processing:
Place a blue absorbent pad in the working area
Place a sealable bag to dispose of the empty draw tubes.
Restock pipettes
Pour a 1:10 bleach solution in plastic beakers for pipette disposal.
Centrifuge the sample tube at 2500 rpm for 15 minutes.
Aliquot the plasma from the top of the centrifuge tube into 1.0 ml aliquots.
Using a 1 ml pipet, carefully remove the cloudy white layer (buffy coat) above the red cells but below the plasma. Some plasma and red blood cells may be collected. Aliquot in 2X0.5 ml aliquots
Grid and store the samples at -80°C.
Section 7g. Dried blood spot card Blood Samples
Purpose: To ensure all dried blood spot cards are processed and stored in a standardized manner.
By Whom: Immunology Laboratory Technician (CLCR)
Collection
Use blood from anti-coagulated tube (EDTA purple/pink top). Be sure blood collection tube is completely filled to the recommended volume so anti-coagulant is at the proper dilution.
Use blood up to 3 days old to make dried blood spots (DBS).
Use one card per participant (5 spots per card).
Mix blood by gently inverting 25 times and spot the first circle. Mix gently between applications to each of the 5 spots so that even amounts of blood components are applied.
For each circle on the card, pipette 40 μl of blood with a plugged pipette tip (see above supply information).
The blood spot must dry for a minimum of 24 hours at room temperature before long-term storage.
Storage
DBS should be stored in a low-gas-permeable bag with desiccant/humidity indicator (1 gram per bag – see supply instructions).
Only one filter card should be placed in each bag.
Place the bags in a 3 inch freezer box, one filter behind the other.
In the LDMS (Laboratory Data Management System), use box location 1,1 for the first filter; 1,2 for the second; 1,3 for the third, and so on, using only 1 column.
Storage at -80O C or below is recommended for long-term storage.
Section 7h. Paxgene Blood RNA tube
Purpose: To ensure the paxgene blood RNA tubes are processed and stored in a standardized manner.
By Whom: Immunology Laboratory Technician (CLCR)
Procedure:
Upon receipt of the paxgene samples, the tubes are labeled in Freezerworks© and logged into CIS
Stand the paxgene blood RNA tubes upright in a wire rack and store at -20° C for 24 hours.
After 24 hours, transfer the tubes to -80º freezer for long term storage. All specimen numbers must be checked and recorded on a grid sheet, according to their location in the box and freezer.
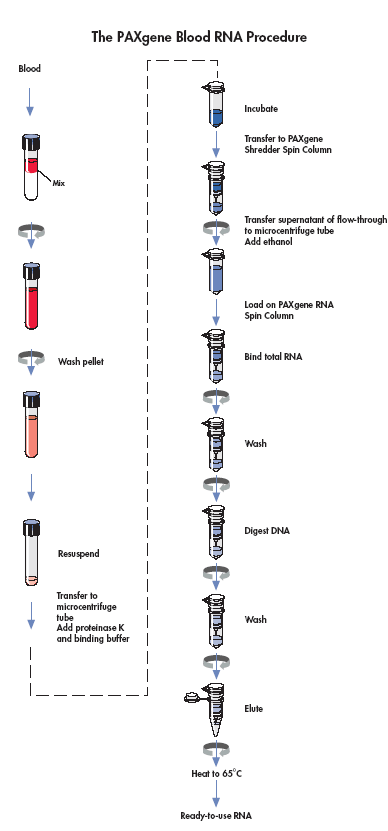
Section 7i. Isolation and Purification of RNA from Human Whole Blood collected into Paxgene Blood RNA tube
Purpose: To ensure the RNA isolation and purification from paxgene blood RNA tubes is done in a standardized manner.
By Whom: Immunology Laboratory Technician (CLCR)
Refer the Paxgene Blood RNA kit Handbook for the complete protocol of RNA purification.
Section 7j. Hair Samples
Purpose: To ensure all hair samples are processed and stored in a standardized manner.
By Whom: Immunology Laboratory Technician (CLCR)
Procedure:
Upon receipt of the hair samples, the samples are labeled in Freezerworks© and logged into CIS
Enter all sample information into an excel spreadsheet (a template will be located on the Desktop)
Sign on to Freezerworks©.
Import the excel spreadsheet for that day.
Run a query on the date and all samples should appear.
Print one label for each bag of samples.
Bags should be stored in card catalogue drawer according to date of processing.
Store at ambient temperature.
Section 8. Data Entry and QC of Data
Purpose: To ensure all sample processing data is entered in a standardized manner.
By Whom: Intake Laboratory Technician (CLCR)
Procedure:
When samples are processed, they are labeled as listed above in Freezerworks©.
When grid sheets for processed samples are completed as noted above they are entered into the database by the Intake Laboratory Technician.
Quality Control of Data Entry
When grid sheets are entered weekly, they are checked against specimen database generated transmittals.
Quality control should occur along every step on specimen collection and processing to ensure everything is labeled accurately, the proper tubes have been drawn and data entry has been done accurately.
Section 9. CLCR Shipping Protocols
Purpose: To ensure that incoming samples are handled according to protocol prior to processing, and to ensure that the correct samples are distributed following IATA guidelines (Section 6a.) and study protocol to the correct labs for analysis.
By Whom: CLCR Technician
General Procedure:
Incoming Shipments
Central lab will immediately destroy/shred shipping labels upon receipt of biosample packages.
The samples are sent to Intake for processing and storage according to study protocols.
Note: All consent forms in the enrollment packet (including the Cheek swab consent form) must be mailed to the site, not the CLCR.
Outgoing Shipments
Obtain a 9x9 grid sheet
Label a 2” box on the top and front of the lid with:
Study name
Collaborating lab
Box number
Transfer the specimens from the working freezer to newly labeled shipping box, filling in the specimen information as you go.
Choose the shipper required for the number of boxes being shipped and the temperature at which they are to be shipped.
For serum, plasma, or any other samples stored in the repository at -80ºC, use a dry ice diagnostic shipper. These are available for sale through SafTPak Inc.
For lymphocytes use a liquid nitrogen diagnostic shipper. Liquid Nitrogen (LN2) Dry Shippers MUST be properly cooled and handled before shipment. Please follow instructions supplied by the manufacturer.
Correctly package and label the shipping box according to IATA guidelines (section 6a.).
Section 10. Repository Protocol
Purpose: To identify those involved with repository management and maintenance, and clarify standard operating procedures for work with the repository in order to ensure proper storage of and adequate facilities for study samples.
By Whom: Laboratory Technicians
Section 10a. Lymphocyte Transfer
Purpose: The properly transfer study specimens to cryoboxes for storage.
By Whom: Laboratory Staff
Procedure:
Obtain pink transmittal sheets from the Immunology lab on the metal strip above the black bench top.
The Immunology lab will put the cell boxes in order on the rack with the last rows being the most recent to be pulled.
Place dry ice from ice chest in room W6620 into a container large enough to fit one lymphocyte can.
Go to the freezer #1 in room E1205 (-80º C). First look at the pink sheets to see what lettered can is the first can for the lymphocytes. Take that can out of the freezer, place it on dry ice and take it to freezer #1 in 1205 (-60º C to -90º C).
Place the can immediately into the dry ice container and take it over to the –135oC freezer quickly.
Open the lid of the freezer and pull up the rack in the center of the freezer in the last row. All lymphocyte boxes are labeled on the top of the lid, the front of the lid and the front of the box.
The first 5 boxes in the transfer rack are the most current. Any filled box, does not stay in this rack, it is moved to a different location.
Pull out the lymphocyte box and open it. Open the can that was brought over.
Starting with the #1 slot in the can, pull out the lymphocyte tube being careful not to touch the bottom of the tube because any body heat will start to melt the tube.
Place lymphocytes from left to right, front to back in the lymphocyte box. The order that the tubes are placed in the box follows the pink transmittal. Check the ID, date and number of tubes for each participant as they are placed in the box against this pink transmittal.
Follow the same procedure for any other cans that contain samples from the study.
When all lymphocytes from are placed in the box, note the last grid slot (x,y) on the pink sheet and initial. Also, check against gridding to verify the accuracy of the grid sheet.
Grid the lymphocytes in the lymphocytes grid book. The grid sheets for a given study will be under the corresponding tab.
Section 10b. Transfer of Cryoboxes to the Repository
Purpose: To document the location of various samples within cryoboxes.
By Whom: Laboratory Staff
Procedure:
After samples are obtained and processed, they are gridded in the relevant cryoboxes and placed in the appropriate freezers.
When a box or boxes are filled, they are transferred to the relevant repository freezer. This is usually done on a Wednesday.
Freezer choice is based on space, freezer organization and sample type. All of these should be verified with the repository database before transfer.
Section 10c. Data Entry of Repository Information
Purpose: To create an up-to-date database of all repository samples
By Whom: Laboratory staff
Procedure:
The cryobox grid sheets will be entered in the Core laboratory.
The grid sheets will also be entered in electronic format into Freezerworks©.
The grid sheets will be returned after entry and filed in the Core laboratory.
The sheets indicating cryobox locations within repository freezers will be entered in a similar manner.
Section 10d. Repository Quality Management
Purpose: Ongoing quality control and assurance activities to ensure the quality of the repository and its respective databases.
By Whom: All CLCR staff members
Quality Control
Procedure for Grid sheets:
On a daily basis the repository monitor notes any discrepancies between the sample grid sheets and the database.
Every Friday these changes are sent to the data house for correction.
The grid sheets are returned for filing after the relevant changes have been made.
Quality Assurance
Procedure:
Every Wednesday from 9-11 am, routine quality control activities will be performed.
A schedule of those activities planned will be distributed indicating which samples need to be audited.
The audit activities will be performed in teams of two or individually.
First, pull the appropriate manifest sheets.
Locate relevant sample boxes in freezers using the freezer inventory.
Compare sample labels in boxes to sheet.
Note discrepancies by crossing out the incorrect information in pen with a single line, initialing and dating. Mark any changes on the comments line.
Highlight missing samples on the sheet, but not in the box.
If a sample previously thought to be missing is found, enter the letters “TF” where highlighted.
Staff members’ initials and date must be written on all sheets when finished.
Any manifest sheets requiring correction will be sent to the data house for entry.
Manifest sheets will be returned and filed.
Other activities: Corrections sent regularly to the data house (Friday with rest of data)
Section 11. Tracking Reports
Purpose: Monthly tracking reports aid to monitor workload, and are a part of quality control procedures.
By Whom: All CLCR staff members
Procedure:
On a monthly basis, CLCR will be responsible for generating a tracking report to be sent to PCs and Clinic Sites that should include the following information:
# of samples (per month)
# of subject ID
This information will be generated through Freezerworks©.
In addition, the report will also include the following information
Intake reports: total # of samples received (per month and cumulative) and # of samples received broken down by CADDRE site (per month and cumulative)*
Repository report: summary of repository broken down by sample type
Shipping reports: report will include manifests of all outgoing shipments
Preliminary QC reports: this section will note the quality of the samples that we receive in intake (adequate volume, correct tubes, etc.)
Section 12. Good Laboratory Practices
Purpose: To train all staff members in good laboratory practice and ensure these are followed in all laboratory activities.
By Whom: All laboratory staff members
Eating, drinking, smoking, applying cosmetics, and handling contact lenses are prohibited in the laboratory working areas.
Standard precautions should always be followed. Personal protective equipment (gown, gloves, eye protection) should be worn in the laboratory when handling and processing specimens and performing diagnostic testing.
Biological Safety Cabinets (BSCs) or other physical containment devices should be used for all manipulations that may cause splashes or droplets of infectious materials.
Mouth pipetting is forbidden.
Contaminated materials must be disposed of in appropriate biohazard containers.
Work surfaces must be decontaminated after any spill of potentially dangerous material using a bleach solution. Work surfaces and equipment should be decontaminated after specimens are processed.
Personnel must wash their hands often – especially after handling infectious materials, before leaving the laboratory working areas, and before eating.
Personal protective equipment must be removed before leaving the laboratory.
Section 13. Appendices
Supplies and Ordering
Instructions for Preparing Cheek Swab Kits
How To Collect Cheek Swab Samples (At-home Instructions)
Cheek Swab Sample Record Sheet (At-home Transmittal)
Centrifuge Operating Procedure
In-Clinic Sample Transmittal Form
How to Collect Hair Samples
Holiday Calendar
Clinic Quick Reference Guide
Appendix A. Supplies and Ordering
Biosample Collection Supplies
Item Name |
Supplier |
Catalog Number |
Unit |
Est. Unit Cost ($) |
Supplied by |
Venipuncture |
|
|
|
|
|
Purple top EDTA tubes, 3 ml |
VWR |
BD367841 |
case of 10x100 |
245.90 |
CLCR |
Pink top EDTA tubes, 6 ml |
VWR |
BD367899 |
case of 10x100 |
210.53 |
CLCR |
Red-Gray SST tubes, 6 ml |
VWR |
BD367974 |
pack of 100 |
38.04 |
CLCR |
Fold SST tubes, 3.5 ml |
VWR |
BD367983 |
pack of 100 |
46.94 |
CLCR |
Blue top CPT tubes, 4 ml |
VWR |
BD362760 |
pack of 60 |
374.00 |
CLCR |
Blue top CPT tubes, 8 ml |
VWR |
BD362761 |
pack of 60 |
397.00 |
CLCR |
Paxgene Blood RNA tube |
VWR |
762165 |
each tube |
7.65 |
CLCR |
Butterfly needles, 21 G |
VWR |
BD367281 |
case of 4x50 |
249.75 |
Site |
Butterfly needles, 23 G |
VWR |
BD367283 |
case of 4x50 |
249.75 |
Site |
Butterfly needles, 25 G |
VWR |
BD367285 |
case of 4x50 |
249.75 |
Site |
Tourniquets (reusable) |
VWR |
VT367203 |
case of 20x25 |
186.95 |
Site |
Gauze |
VWR |
82004-740 |
case of 5000 |
126.54 |
Site |
Lidocaine |
local pharmacy |
|
|
|
Site |
Bandage |
VWR |
56612-996 |
case of 12 x 100 |
62.02 |
Site |
Alcohol pads |
VWR |
15648-981 |
case of 15x200 |
91.81 |
Site |
Sharps container |
VWR |
BD305490 |
|
8.08 |
Site |
Plastic biohazard bags for transport |
VWR |
11215-684 |
case of 500 |
75.36 |
Site |
Hair |
|
|
|
|
|
Stainless steel scissors, blunt-ended |
Office Depot/Staples |
|
|
4.00 |
Site |
Barbisol |
local vendor |
|
|
4.00 |
Site |
Post-it notes |
Office Depot/Staples |
|
|
|
Site |
Plastic Ziplock bags, snack size |
Local vendor |
|
|
|
Site |
Cheek swab |
|
|
|
|
|
Cheek swab brushes |
Medical Packaging Corp |
CYB-1 |
Box of 500 |
|
CLCR |
Envelopes, brushes, 6” x 9” clasp |
Office Depot |
330744 |
Box of 100 |
7.39 |
Site |
Envelopes, consent, #10 self-seal |
Office Depot/local vendor |
633984 |
Box of 500 |
18.39 |
Site |
Envelopes, mailing, 9” x 13” self-seal |
Office Depot |
254607 |
box of 100 |
11.79 |
Site |
Labels printed from CIS |
|
|
|
|
Site |
|
|
|
|
|
|
Shipping Materials |
|
|
|
|
|
Shipper-ambient |
Saf-T-Pak |
STP 210 |
case of 10 |
30.47 |
CLCR |
Bubble wrap pouch for blood tubes |
Saf-T-Pak |
STP 600 |
case of 36 |
9.21 |
CLCR |
Shipper address labels |
Saf-T-Pak |
STP 807 |
|
37.35 |
CLCR |
Consignee labels |
Saf-T-Pak |
STP 808 |
|
36.88 |
CLCR |
Blockout labels |
Saf-T-Pak |
STP 810 |
|
55.61 |
CLCR |
UN 3373 labels |
Saf-T-Pak |
STP 818 |
|
18.83 |
CLCR |
Absorbent material |
Saf-T-Pak |
STP 152 |
case of 250 |
64.83 |
CLCR |
Tyvek envelope and inner bag |
Saf-T-Pak |
STP 700 |
case of 50 |
85.53 |
CLCR |
FedEx airbill |
FedEx |
|
|
|
CLCR |
|
|
|
|
|
|
Hamilton Bell™ Vanguard Centrifuge |
MarketLab |
JL9576 |
|
359.00 |
Site |
|
|
|
|
|
|
Laboratory Supplies and Equipment Vendors |
||
Vendor |
Type of supplies |
Contact Information |
VWR |
General Laboratory |
1-800-932-5000 |
Fisher |
General Laboratory |
1-800-766-7000 |
Office Depot |
Office Supplies |
1-800-GO-DEPOT |
Thomas Scientific |
General Laboratory |
1-800-345-2100 |
Whatman |
Blood Spot Cards and Supplies |
|
Supply Order Form
Study to Explore Early Development
Indicate the quantity of items needed and email or fax this form to:
CADDRE CLCR
Email: smeyerer@jhsph.edu and schandan@jhsph.edu
Fax: (410) 614-2640
Item |
Unit |
Est. Unit Cost ($) |
Unit Quantity Requested |
Quantity Shipped (CLCR use) |
Biosample collection supplies |
|
|
|
|
Purple top EDTA tubes, 3 ml |
case of 100 |
245.90 |
|
|
Pink top EDTA tubes, 6 ml |
case of 100 |
210.53 |
|
|
Red-Gray SST tubes, 6 ml |
pack of 100 |
38.04 |
|
|
Gold SST tubes, 3.5 ml |
pack of 100 |
46.94 |
|
|
Blue top CPT tubes, 4 ml |
pack of 100 |
394.00 |
|
|
Blue top CPT tubes, 8 ml |
pack of 100 |
482.72 |
|
|
Paxgene Blood RNA tube |
each tube |
7.65 |
|
|
Guthrie cards |
pack of 100 |
126.14 |
|
|
Humidity indicators |
box of 100 |
12.45 |
|
|
Desicant |
|
|
|
|
Cheek swab brushes |
Box of 500 |
|
|
|
Shipping Materials |
|
|
|
|
Dual Shipper (cold + ambient) |
each |
|
|
|
Bubble wrap pouch for blood tubes |
case of 36 |
9.21 |
|
|
UN 3373 labels |
|
18.83 |
|
|
Absorbent material |
case of 250 |
64.83 |
|
|
FedEx airbill |
|
|
|
|
Transmittal |
|
|
|
|
Ship supplies to:
Name: |
|
Address: |
|
|
|
|
|
Phone: |
|
|
|
Date Shipped: |
|
CLCR Tech: |
|
Appendix B. Cheek Swab Kit Preparation
Study to Explore Early Development
Instructions for Preparing Cheek Swab Kits
The following items are needed for preparing the cheek swab kits that will be mailed to participants in the enrollment packet.
|
Item |
Quantity (per mailing address) |
|
|
|
|
|
Sterile cheek swab brushes
|
3 per person |
|
|
Consent forms, 1 copy to sign + 1 copy to keep
|
|
|
|
Double-sided copy of document titled Cheek Swab Sample Transmittal Form
|
1 per person |
|
|
Double-sided copy of document titled How to Collect Cheek Swab Samples
|
1 |
|
|
Small (6” x 9”) manila envelope with clasp closure
|
1 per person |
|
|
#10 envelope, stamped and pre-addressed to site
|
1 |
|
|
Medium (9” x 12”) manila envelope, stamped and pre-addressed to CLCR
|
1 |
|
|
Large (10” x 13”) blue envelope - or - Blue folder (labeled “Cheek Swab Kit”)
|
1 |
Labels printed from CIS: |
|
|
|
|
For cheek swabs
|
3 per person |
|
|
For Cheek Swab Sample Transmittal Form
|
1 per person |
|
|
For 6” x 9” manila envelope
|
1 per person |
|
|
For consent forms
|
|
|
|
Mailing address to site
|
1 |
|
|
Mailing address to CLCR
|
1 |
M ock-up
of backing for cheek swab brush sterile packaging
General instructions for preparing cheek swab kits.
Determine the number of participants (mother, father, and/or child) living at the recipient’s address.
Print labels from CIS.
Prepare the first set of swabs for one of the participants.
Affix the appropriate label on the back of each cheek swab package as in diagram above. Be sure to keep all 3 swabs belonging to each individual separate from the others.
Place all 3 swabs into one 6” x 9” envelope. Label the envelope for the individual family member (i.e., mother, father, or child).
Prepare the appropriate version of the Cheek Swab Sample Transmittal Form.
Biological mother – yellow form
Biological father – blue form
Child – green form
Affix the appropriate labels to the form.
Barcode label on the right
Family member identifier (mother, father, child) on the left
Fold the form in half and place in the 6” x 9” envelope.
Prepare the other sets of swabs for each of the other participants as in Step 3 above.
Close the 6” x 9” envelopes (but do not seal) and place into the large 10” x 13” envelope.
Affix the appropriate labels onto each consent form. Add to the large envelope.
Stamp/affix postage to the #10 and the 9” x 12” envelopes. Affix the return address labels to the envelopes
#10 – address to return to site
9” x 12” – address to return to CLCR
Place both envelopes into the large 10” x 13” envelope.
Enclose 1 copy of each consent form for parent to sign plus 1 copy for them to keep.
On one copy of the instructions How to Collect Cheek Swab Samples, write the names and relationship of each person who has a cheek swab kit in this package. Place the form into the 10” x 13” envelope.
Appendix C. At-Home Cheek Swab Collection Instructions
Study to Explore Early Development
H ow
to Collect Cheek Swab Samples
Thank you for agreeing to provide cheek swab samples. This kit contains the following items:
Consent forms
Envelope containing brushes (three brushes per person)
Cheek Swab Sample Record form (one form per person)
Large postage paid, addressed envelope
Small addressed envelope
Please read this document before you start collecting the cheek cell samples.
We need samples from each of the family members listed below.
Family Member |
|
Name |
|
|
|
|
|
|
|
|
Wait at least one hour after eating before you collect the samples. For children, a good time to collect the sample might be before tooth brushing.
If more than one person is listed above, please try to do the samples for everyone on the same day.
Completed samples should be mailed back to us within 24 hours.
Each person named above should follow the steps on the back of this page when collecting the cheek swab samples. You may want to have your child watch you give your sample before you take a sample from him/her. It might be helpful to show your child the brush and tell him/her that it is “like a special toothbrush for the cheeks.” If you can’t get all three samples from your child, please return the ones you are able to get.
Please read all the directions on the back of this page before you start collecting the cheek swab samples.
E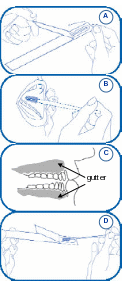 ach
adult should read and sign one copy of the enclosed consent forms.
Check the form carefully to make sure that you sign the right form.
Put the signed forms into the smaller pre-addressed envelope and seal
the envelope. Please call us if you have any questions.
Take out the envelope that is labeled for you. For example, if you are the child’s biological mother, you should use the envelope labeled “Mother.” Inside you will find a sheet titled Cheek Swab Sample Transmittal Form. Answer the three questions in Section A.
Note: If this envelope is for your child’s sample, the Cheek Swab Sample Record should be green. If this is for the biological mother, the sheet should be yellow. If this is for the biological father, the sheet should be blue.
Take out the plastic pouch labeled Brush #1. Slowly tear part of the backing of the pouch – start where is says “peel at arrow” and peel back to the beginning of the barcoded label. Carefully take the brush out of the pouch. Be sure NOT to touch the brush end. See Figure A.
Hold the brush handle in one hand and place the brush end inside your mouth, against your cheek. Place your other hand on the outside of the cheek. Twirl the brush firmly against the inside of the cheek and your cheek’s “gutter” for 30 seconds. Use the other hand to apply gentle pressure from the outside. The gutter is the area between your gums and cheek. See Figures B and C.
If you are collecting your child’s sample, you may want to do the brushing for him/her. Ask your child to open his/her mouth wide. Remember to use your other hand to gently apply pressure from the outside of the cheek.
Put the brush back in the pouch, brush end first. Do not re-use the brush. See Figure D.
Answer the questions in Section B of the Cheek Swab Sample Transmittal Form for Brush #1.
Repeat steps 3 through 6 with Brush #2 – this time use the other side of your cheek and gutter.
Repeat steps 3 through 6 with Brush #3 – this time twirling for about 15 seconds on both sides of the mouth and gutter.
After collecting all 3 samples, complete Section C of the Cheek Swab Sample Transmittal Form. Put all 3 completed cheek samples back into the envelope they came in. Complete Section D of the Cheek Swab Sample Transmittal Form and put it inside the envelope with the brushes.
All other family members listed on the front of this sheet should follow steps 2-9 using the brushes labeled for them.
After everyone has finished steps 1-10, put all samples in the larger self-addressed, stamped envelope. Also include the smaller envelope that has the consent forms. Seal the large return envelope and send it to us by US mail. Remember, samples should be mailed within 24 hours of collecting them.
Appendix D. Cheek Swab Transmittal Form
Study to Explore Early Development
Cheek Swab Sample Transmittal Form
Please complete this form while collecting your cheek swab samples. Use one form per person. See the instructions on the sheet titled “How to Collect Cheek Swab Samples” for more information.
Section A
Please answer these questions about the person giving these samples. Give both the date and time.
When did they last eat food? |
___ ___ / ___ ___ / 20 ___ ___ ___ ___ : ___ ___ AM PM M M D D Y Y (circle one) |
When did they last brush their teeth? |
___ ___ / ___ ___ / 20 ___ ___ ___ ___ : ___ ___ AM PM M M D D Y Y (circle one) |
When were the samples collected? |
___ ___ / ___ ___ / 20 ___ ___ ___ ___ : ___ ___ AM PM M M D D Y Y (circle one) |
Section B
Please answer all 3 questions about each of the 3 brushes used to collect the samples.
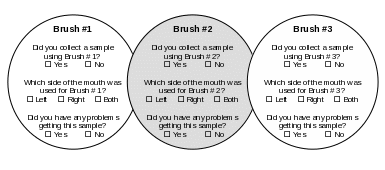
Section C
Tell us if you had any problems when collecting the samples. The first one is given as an example.
Brush # |
Description of problems and other comments |
|
2 |
Example: |
My child did not let me put the brush in his mouth at first, then he bit the brush. |
|
|
|
|
|
|
|
|
|
Section D
See the directions on the sheet titled “How to Collect Cheek Swab Samples” on how to package and mail the samples to us. Please answer this final question.
When are you mailing the samples to us? |
___ ___ / ___ ___ / 20 ___ ___ M M D D Y Y |
Thank You!
Appendix E. Centrifuge Operating Procedure
P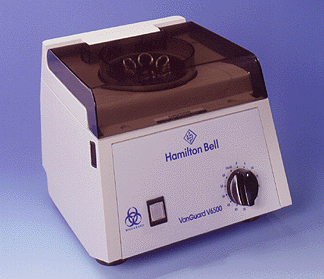 urpose:
To
ensure proper centrifugation of samples prior to shipment to CLCR.
By Whom: Phlebotomist/Clinician/Research Assistant/Nurse
***NOTE: While allowing the SST tube to clot at room temperature for 30 minutes, perform the procedure for CPT tubes.
Procedure for CPT tubes:
Remix the blood sample immediately prior to centrifugation by gently inverting the tubes 8 to 10 times.
Simultaneously depress both fasteners located at the top front of each side of the centrifuge unit just below the transparent cover. The top cover will pop up enough to allow you to manually raise the cover to its upright resting position.
Place the first tube in any position in the centrifuge. Place the second tube of the same volume directly across/opposite of the first tube to ensure that the centrifuge is balanced. Here are the acceptable centrifuge arrangements:

Close transparent cover and make sure both latches lock.
Spin tubes for 20 minutes at 1500 to 1800 ×g.
After centrifugation, re-suspend the cells in the plasma by gently inverting the unopened CPT tube 5 to 10 times.
Procedure for SST tubes:
After obtaining the SST sample, allow sample to clot 30 minutes in a vertical position.
Following Steps 2 – 4 above, load the SST tubes in the centrifuge.
Spin tubes for 15 minutes at 1000 to 1300 ×g.
Precautions*:
•
Operate
VanGuard Centrifuge only with transparent cover locked closed.
•
Operate VanGuard Centrifuge only with a balanced load.
•
Never unlock and/ or open transparent cover while centrifuge is
operating. (Should you do so, power will automatically shut off.)
•
Never unlock and/ or open transparent cover before rotor comes to a
complete stop.
*Adapted from Vanguard’s Operators Manual
Appendix F. In-Clinic Transmittal Form
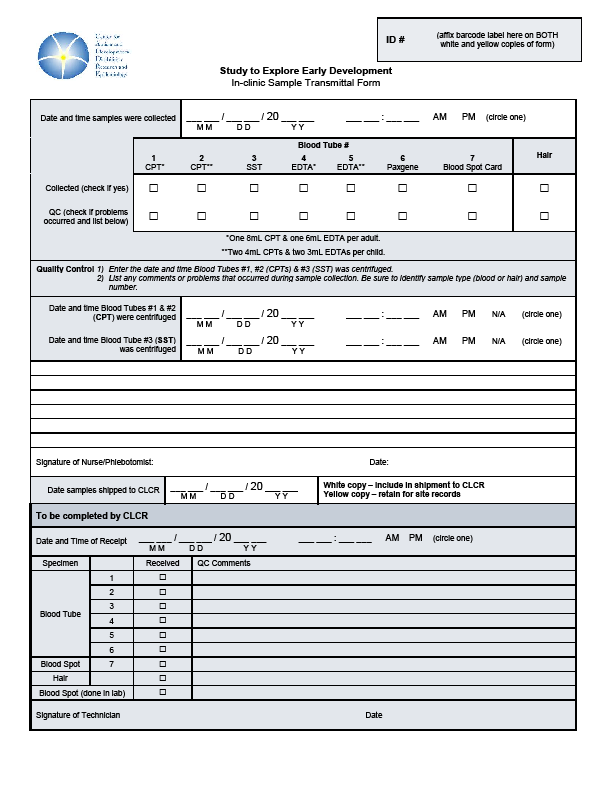
Appendix G. How to Collect Hair Samples
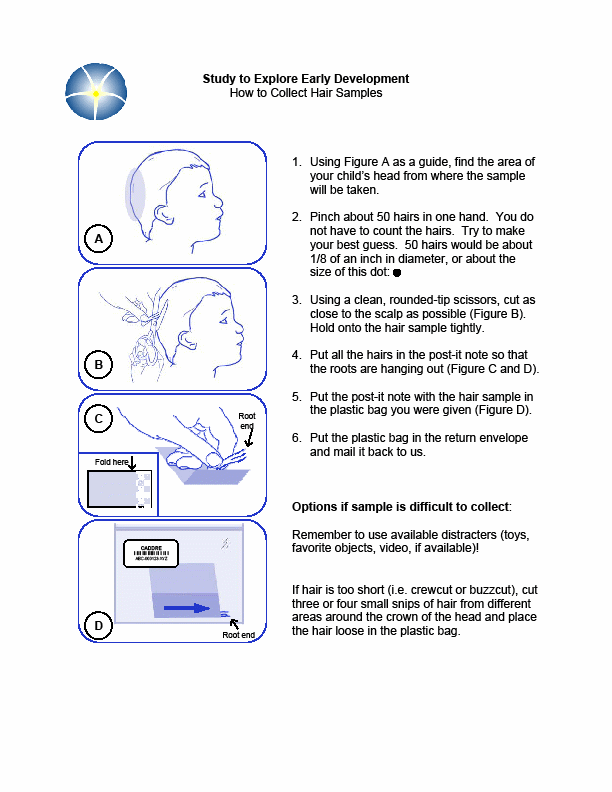
Appendix H. Holiday Calendar
2009 |
|
New Year's Day |
Thursday, January 1 Do not ship on Dec 30 – Jan 1 |
Martin Luther King's Birthday |
Monday, January 19 |
President's Day |
Monday, February 16 |
Memorial Day |
Monday, May 25 |
Independence Day |
Friday, July 3 Do not ship on July 2 – July 3 |
Labor Day |
Monday, September 7 |
Thanksgiving Day |
Thursday, November 26 Do not ship on Nov 25 – Nov 27 |
Day after Thanksgiving |
Friday, November 27 Do not ship on Nov 25 – Nov 27 |
Holiday Preparation |
1/2 day in December |
1/2 Day, Christmas Eve |
Thursday, December 24 Do not ship on Dec 23 – Dec 25 |
Christmas Day |
Friday, December 25 Do not ship on Dec 23 – Dec 25 |
1/2 Day, New Year's Eve |
Thursday, December 31 Do not ship on Dec 30 – Jan 1 |
2010 |
|
New Year's Day |
Friday, January 1 |
Appendix I. Clinic Quick Reference Guide
SEED Clinic Quick Reference Guide
Draw Order |
Tube Type (Children) |
Tube Amount |
1 |
EDTA purple top |
3 ml |
2 |
EDTA purple top |
3 ml |
3 |
CPT blue top |
4 ml |
4 |
CPT blue top |
4 ml |
5 |
SST yellow top |
3.5 ml |
6 |
Paxgene |
2.5 ml |
7 |
Blood spot card |
<0.5 ml |
|
Total Volume |
20 ml |
Draw Order |
Tube Type (Parents) |
Tube Amount |
1 |
EDTA pink top |
6 ml |
2 |
CPT blue top |
8 ml |
3 |
SST red-grey top |
6 ml |
4 |
Blood spot card |
<0.5 ml |
|
Total Volume |
20 ml |

B
EDTA
Paxgene
CPT
Refrigerate
EDTA
tube
at
2-8ºC
for
storage
&
shipping
Invert 5-10
times
Make
Blood
Spot
Card (40uL
per
blood
spot)
Dry
Blood
Spot
Card
for 24hrs
Ambient
temperature Cheek
swab Hair
sample Blood
spot card CPT
tube/s Paxgene
tube Transmittal
Form
2-8ºC EDTA
tube/s SST
tube/s
Storage
&
Shipping:
Ambient
temperature
for
storage
&
shipping
Ambient
temperature
for
storage
&
shipping
Blood
from syringe
or butterfly needle tubing
Invert
8-10 times
Centrifuge
20min
1500-1800
x g (Appendix
E)
Ambient temperature
for
storage
&
shipping


Shipping Protocol:
Draw day
|
Ship day |
CLCR receipt & processing day |
Type of Shipper to be used |
Monday - Thursday |
Same day as sample collection |
Day following sample collection |
Regular |
Sunday – Thursday* |
Day following sample collection |
2 days following sample collection |
Regular |
Friday - Saturday** |
Same day as sample collection |
Monday |
Special |
*Inability to ship on day of blood draw
Every effort should be made to ship the blood samples on the day of collection to protect the full integrity of the biosample.
In rare cases where a clinic site is unable to ship the blood samples to the CLCR lab on the draw day and the draw day is Sunday - Thursday, the following procedure should be followed:
Please notify CLCR via email so the samples can be flagged in the Freezerworks database.
Store CPT and PaxGene tubes overnight at ambient temperatures and SST & EDTA tubes at refrigerated temperature (2-8º Celsius).
Ship the tubes the following day using a regular shipper and the shipping protocol described in section 6b.
** Friday – Saturday blood draw
All Friday and Saturday blood draws are viewed as an absolute last resort and should not be offered to the participants unless they absolutely cannot attend on Mon - Thurs.
When participants cannot present to the clinic site on a Sunday – Thursday, the following procedure should be followed:
Please notify CLCR via email so the samples can be flagged in the Freezerworks database.
Ship blood sample on the day of the visit using a special shipper to protect the samples from extreme external temperatures during the shipping delay. All clinic sites will be provided with one special shipper to have on-location. The special shipper will be returned to the site within 3 business days when received at CLCR. If additional special shippers are needed, CLCR requires at least 72 hours advanced notice.
Enter the shipment into CIS.
Ship the tubes using a special shipper and the shipping protocol described in Appendix J.
Blood draws on two or more families in one day
In the event that two or more families have blood drawn on the same day, blood tubes from two families can be shipped in one regular shipper. Two cold containers (one per family) and one cold pack should be placed horizontally in the cold portion of the regular shipper while all tubes from both families can be placed in the large ambient container. Please remember to include all appropriate transmittal forms!
Appendix J. Special Shipper Instructions
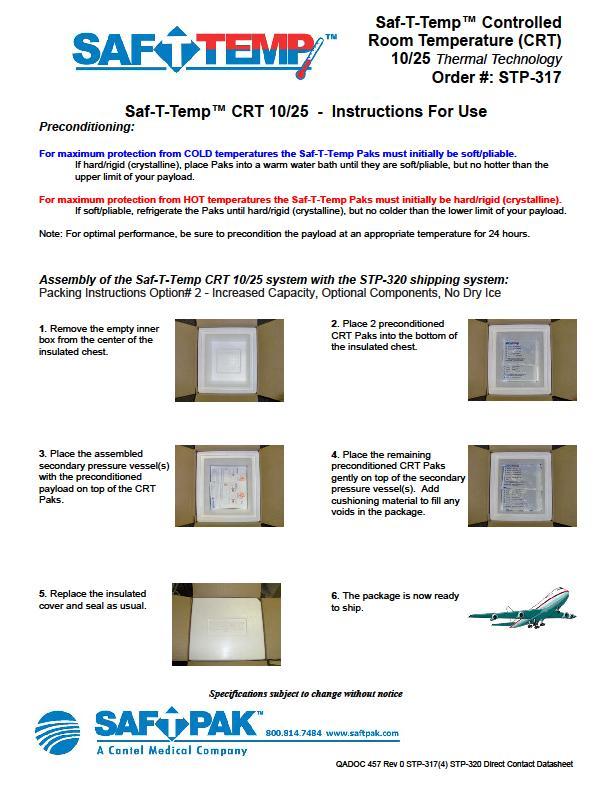
NOTES:
Study
to Explore Early Development Page
Biologics Manual Revision, January 23, 2009
| File Type | application/msword |
| File Title | Novel Circulating Biomarkers in Autism |
| Author | mmarks |
| Last Modified By | zhv7 |
| File Modified | 2009-08-28 |
| File Created | 2009-08-28 |
© 2026 OMB.report | Privacy Policy
