The Boundary and Annexation Survey (BAS)
The Boundary and Annexation Survey (BAS)
06_Attachment D3_MTPS
The Boundary and Annexation Survey (BAS)
OMB: 0607-0151
Boundary and Annexation Survey Respondent Guide: MAF/TIGER Partnership Software |
Issued June 2007 |
|
|
|
|
Table of Contents
1. Introduction to the Boundary and Annexation Survey 1
1.2 Specific state arrangements and agreements 1
1.4 Key dates for BAS respondents 1
2. Installing MTPS and Census Bureau Data 2
2.2 Loading the Census Bureau data 2
3. Viewing and Updating Boundary Data and BAS Forms Using MTPS 3
3.2 Computer Based Training (CBT 3
3.3 Updating your contact information 4
3.4 Reviewing and updating the BAS forms 5
3.6 Customizing the map view 17
5. Printing Maps of your Updates 28
6. Submitting Updates to the Census Bureau 28
Appendix 1: Paperwork Reduction Project 31
Appendix 2: State arrangements and agreements 32
Appendix 3: Census Bureau Regional Offices - Contact information 38
Appendix 4: Tool explanations by toolbox 39

The Census Bureau conducts an annual survey called the Boundary and Annexation Survey (BAS) to collect information about selected legally defined geographic areas, such as counties (and equivalent areas), incorporated places, minor civil divisions (MCDs), as well as federally recognized American Indian reservations, including off-reservation trust lands and tribal subdivisions. The BAS also provides an opportunity for participants to review the names and geographic relationships for these areas. Title 13, U.S. Census Code authorizes this survey.
BAS information is used to provide a record for reporting the results of the decennial and economic censuses, and to support the Population Estimates Program and the American Community Survey. Maintaining correct boundaries and boundary-to-feature relationships through the BAS helps ensure that the appropriate population is assigned to each entity.
In compliance with the Office of Management and Budget Circular A-16, the BAS supports the Census Bureau’s spatial data steward responsibilities for the Federal Geographic Data Committee and the Geospatial One-Stop by updating the inventory of, and boundaries for, governmental units. In addition, the BAS is the source of up-to-date information on boundaries, codes, and names for the U.S. Geological Survey’s (USGS) National Map and the Geographic Names Information System. The BAS is also the source for changes in the boundary of incorporated places, MCDs, counties (and equivalent areas), and federally recognized American Indian Areas (AIAs), which include reservations and off-reservation trust lands.
The Census Bureau has established a number of arrangements or agreements with states for reporting boundary changes. It is very important that you review Appendix 2 to see if your state has special requirements.
If it comes to our attention that areas of land are in dispute between two or more jurisdictions, we will not make annexations or boundary corrections until the parties come to a written agreement, or there is a documented final court decision regarding the matter/dispute. If you have questions concerning this, please contact the Census Bureau Legal Office at 301-763-2918.
All changes received by April 1st, will be reflected in the Population Estimates Program and the American Community Survey. If the Census Bureau receives your updates by May 31st, they will be included in your BAS materials next year.
To change your method of participation in BAS from MTPS to either paper or Digital BAS, you must notify the Census Bureau by February 15th. You can contact the Census Bureau by phone at (800) 972-5651 or by email at geo.bas@census.gov.
The MTPS was developed as a way for participants to digitally update Census Bureau maps and forms, as well local contact data, without the need to purchase software. If you would like to speak with someone at the Census Bureau regarding any issues you are experiencing with the software, please call 1-800-972-5651.
In your BAS package, you will receive a CD containing the MTPS program and one or more CDs or DVDs containing the Census Bureau data. This section of the Participant’s Guide will provide instruction on how to install both the software and the data. If you have any problems installing either MTPS or the data, please contact the Census Bureau at 1-800-972-5651.
To install MTPS do the following:
Start Windows.
Insert the Program CD into your CD-ROM drive.
Choose the Run command from the Start menu.
Type the location of your CD-ROM drive plus the word setup (ex. D:\setup) or use the Browse button to locate the SETUP.EXE file.
Click OK. The installation program will appear on your screen.
On the Welcome screen, click Next.
Click Yes to accept the Software License Agreement.
For Installation Type, choose Single User.
The setup program guides you through the installation process, asking questions and making suggestions along the way. It is best to accept the default settings.
Note: If there are already files in the default directory, the setup program will ask if you want to remove these files. If you click Yes, the files will be removed; if you click No, you can choose a different directory.
2.2 Loading the Census Bureau data
After the MTPS has been installed, the installation software will ask you to insert the first data CD into your CD-ROM drive and will load the data onto your computer. Upon completion, the program will ask you to insert the next CD, if more than one CD was provided. You will be prompted to insert subsequent CDs until all the data has been loaded.
When you installed MTPS on your computer it was added to the list of software on the Programs folder in the Start menu. The software can be initiated by selecting the MAF/TIGER Partnership Software from the Programs folder.
The program will open and will ask for your username and password. They are located in the Special Instructions section of your paper BAS form. You will be asked for this username and password each time you sign onto the program. Select the OK button when you have completed entering both pieces of information. The program will tell you if the entered information has an error.
Note: The username and password fields are case sensitive. This means that if the username is uppercase it needs to be entered as such into the software.
After your username and password is accepted by the program, the data files that you loaded in the previous step will be indexed so that the program is able to read and edit them. For this step the antivirus on your computer must be turned off. This step will take much longer if it is on. The time required for indexing the files varies depending on the size and amount of features in your entity and the surrounding areas.
After you have logged onto the MTPS, a window will appear asking you if you would like to view the CBTs or if you would like to go straight to the update software. The Computer Based Trainings demonstrate how to use the software to make different types of updates, such as adding a line or area to your entity.
The CBTs can be viewed at any time from the Programs folder in the Start menu. The window asking if you would like to view the CBTs will also appear the next time you log onto the software.
We strongly recommend that you review the following tutorials in the CBT before continuing:
Creating additions/annexations, deletions/deannexations, and new entities
Editing linear features
Editing area features
Editing landmark points
Reporting your BAS changes
The first time you enter the MTPS, a window will appear asking you to verify and/or correct the contact information for the person responding to the BAS. Example 2.3.1 shows an example of the contact information box.

Example 2.3.1: Participant Information Window
If the contact information for the person completing the submission is different from what is populated in the form, please type over the incorrect data. The Census Bureau tries to have complete contact data for each entity, but if we are missing data, such as a fax number or e-mail address, please populate the appropriate fields with the information. Click the OK button in the bottom right corner after you have completed making the necessary updates.
If you determine the respondent’s contact data is correct and complete, click the OK button to verify.
The Participant Information window can be viewed at any time while you are logged on to the MTPS by selecting BAS from the general toolbar and then selecting Update User Information (see Example 2.3.2).
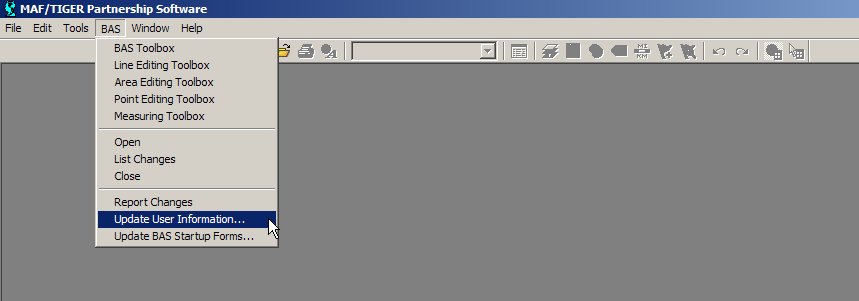
Example 2.3.2: Opening the Participant Information window after initial logon
The BAS forms are important because they allow the local participants to review the geographic relationship information and previously submitted legal boundary change data. Included in your package is a paper BAS form. This form is provided only as a reference. The Census Bureau has developed a unique form for each entity type included in the BAS. There are four form types: incorporated place, MCD, county, and AIA.
The forms can be accessed at any time while you are logged on to the MTPS by selecting BAS from the main toolbar at the top of the screen and then select Update BAS Startup Forms (Example 3.4.1).
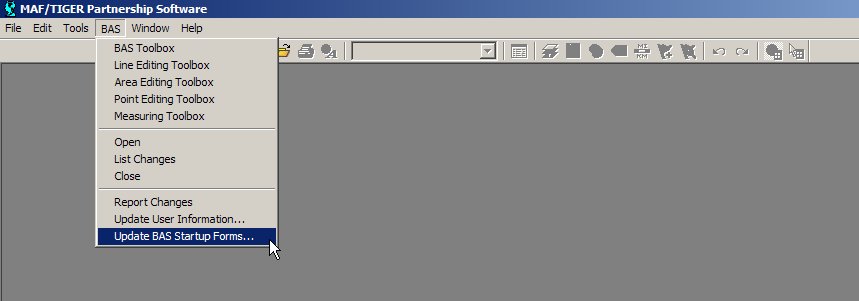
Example 3.4.1: Opening the BAS forms after initial logon
The following subsections will provide an explanation of the necessary steps to complete each type of form:
3.4.1 Incorporated Place
3.4.2 MCD
3.4.3 County
3.4.4 American Indian Area
Incorporated Place form
The BAS Form 1 screen shows the name and geographic relationship information for the place and asks the participant to verify the information.
The following information is provided in the Title and Entity section:
Part A lists the incorporated place name, FIPS code, type, and state.
Part B list the counties that contain the incorporated place.
Part C lists the MCDs that contain or correspond with the incorporated place, if applicable. If your incorporated place is located in a state where MCDs do not exist or are not active Part C will state “None listed”.
Please review the information provided in the Title and Entity section (Example 3.4.1.1).

Example 3.4.1.1: Reviewing the first screen of the Place form
The Modifications section includes questions about the validity of the information provided in the Title and Entity section. The default answer to each question is yes.
If you have changes to report for Question a, complete the following steps:
Select the radio button next to No.
Key in the correct name and/or type into the appropriate field.
Select the calendar under the Effective Date of Change to choose a date. An effective date is required for all name and type changes, with the exception of spelling corrections.
If you have changes to report for Question b, complete the following steps:
Select the radio button next to No. This selection will activate Question c.
To add or delete a county or MCD from the list, select the Add New Change tool (
 ). Multiple rows can be added using this tool.
After a record has been added, select A for Add or D for Delete from the Add/Del dropdown and type the name of the county or MCD that needs to be added or removed from the list in the appropriate column.
If a legal boundary change resulted in your entity being added or removed from a county or MCD double click in the field under Date and select the effective date from the provided calendar. A date is not required if your entity was listed in the county or place erroneously.
If you add a row and would like to remove it use the Drop Change tool (
 ).
).

Example 3.4.1.2: Correcting or updating the counties and MCDs your incorporated place is located within
If
your entity supplied the Census Bureau with boundary changes during
the previous BAS cycle, select the Next button (![]() )
at the bottom of the screen to proceed to the BAS Table Review
screen. This screen displays data submitted for each boundary change
that was reported for your entity during the previous BAS cycle.
)
at the bottom of the screen to proceed to the BAS Table Review
screen. This screen displays data submitted for each boundary change
that was reported for your entity during the previous BAS cycle.
Note: If your entity did not supply the Census Bureau with any boundary changes, an OK button will appear at the bottom of the BAS Form 1 screen. Select the OK button to complete the form review. The next step to submitting your BAS is to review and update the boundaries on the maps. Skip to section 3.5 of this document for an explanation on how to open the BAS map in the MPTS.
On the BAS Table Review screen, please look at each field to ensure that the data was accurately recorded (Example 3.4.1.3).
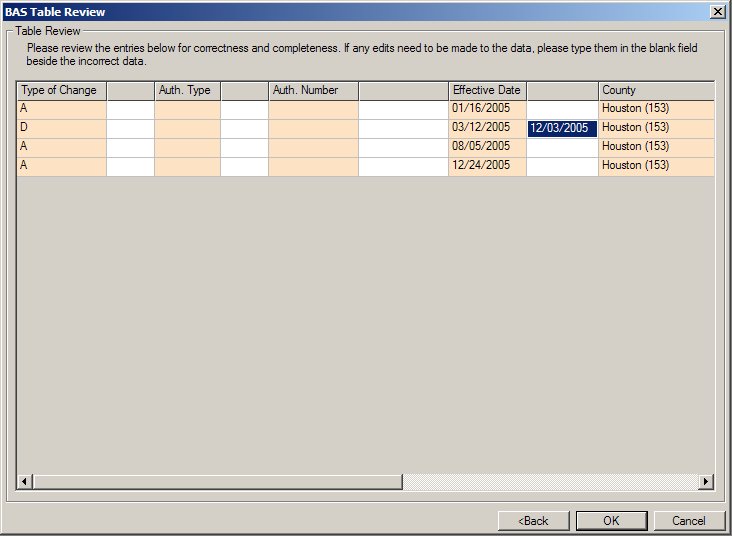
Example 3.4.1.3: Reviewing boundary change data
The values that may be present in the Type of Change field are A (Addition), B (Boundary Correction), D (Deletion), and O (Other). Table 3.4.1.1 explains the values that may be present in the Auth. Type field.
Code |
Definition |
O |
Ordinance |
R |
Resolution |
L |
Local Law |
S |
State Level Action |
X |
Other Type |
Table 3.4.1.1: Auth. Type Codes
If you determine that a field needs to be modified, complete the following step:
Enter the correct data into the white field to the right of the column that requires the correction. The fields next to Type of Change and Auth. Type require a value to be chosen from a dropdown menu. If you wish to make a change to the effective date double click in the field next to Date and a calendar will appear for you to choose the correct date. Note: additional fields exist for each record that are not viewable unless you scroll to the right.
When you have completed reviewing both portions of the form, select the OK button to complete your form review. The next step to submitting your BAS is to review and update the boundaries on the maps. Skip to section 3.5 of this document for an explanation on how to open the BAS map in the MPTS.
Minor Civil Division (MCD) form
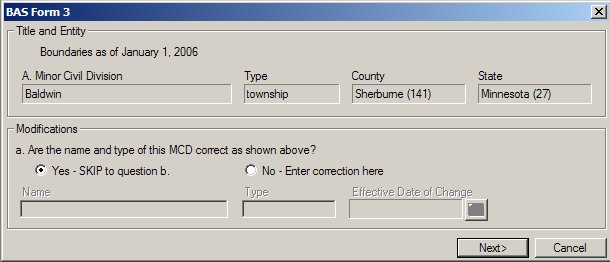
The BAS Form 3 screen shows information about the Minor Civil Division and requests the participant to verify the information.
The following information is provided in the Title and Entity section:
Part A lists the MCDs name, type, county, and state.
Please review the information provided in the Title and Entity section (Example 3.4.2.1).
Example 3.4.2.1: Reviewing the first screen of the MCD form
The Modifications section includes a question about the validity of the information provided in the Title and Entity section (Example 3.4.2.2). The default answer is yes.
If you have a change to report for Question a, complete the following steps:
Select the radio button next to No.
Key in the correct name and/or type into the appropriate field.
Select the calendar under the Effective Date of Change to choose a date. An effective date is required for all name and type changes, with the exception of spelling corrections.
Example 3.4.2.2: Updating or correcting the name and type of your MCD
If
your entity supplied the Census Bureau with legal boundary changes
during the previous BAS cycle, select the Next button (![]() )
at the bottom of the screen to proceed to the BAS Table Review
screen. This screen displays data submitted for each boundary change
that was reported for your entity during the previous BAS cycle.
)
at the bottom of the screen to proceed to the BAS Table Review
screen. This screen displays data submitted for each boundary change
that was reported for your entity during the previous BAS cycle.
Note: If your entity did not supply the Census Bureau with any legal boundary changes, an OK button will appear at the bottom of the first screen. Select the OK button to complete the form review. The next step to submitting your BAS is to review and update the boundaries on the maps. Skip to section 2.5 of this document for an explanation on how to open the BAS map in the MPTS.
On the BAS Table Review screen, please review each field to ensure that the data was accurately recorded (Example 3.4.2.3).

Example 3.4.2.3: Reviewing legal boundary change data
The values that may be present in the Type of Change field are A (Addition), B (Boundary Correction), D (Deletion), and O (Other). Table 3.4.2.1 explains the values that may be present in the Auth. Type field.
Code |
Definition |
O |
Ordinance |
R |
Resolution |
L |
Local Law |
S |
State Level Action |
X |
Other Type |
Table 3.4.2.1: Auth. Type Codes
If you determine that a field needs to be modified, complete the following steps:
Enter the correct data into the white field to the right of the column that requires the correction. The fields next to Type of Change and Auth. Type require a value to be chosen from a dropdown menu. If you wish to make a change to the effective date double click in the field next to Date and a calendar will appear for you to choose the correct date. Note: additional fields exist for each record that are not viewable unless you scroll to the right.
When you have completed reviewing both portions of the form, select the OK button to complete your form review. The next step to submitting your BAS is to review and update the boundaries on the maps. Skip to section 3.5 of this document for an explanation on how to open the BAS map in the MPTS.
County form
The BAS Form 2 screen provides a list of the entities located within your county (Example 3.4.3.1). Please review this list to determine if, as of the date listed at the top of the screen, all of the entities located within your county are present on the list, if their status and type are correct, and if their name is spelled correctly. All active entities will be listed first followed by, if any, inactive entities.
Example 3.4.3.1: County Form entity list review
If an entity’s name or type is incorrect, complete the following steps:
Key in the correct name and/or type in the white column to the right of the applicable column.
Enter a date into the Date field by double clicking in the field and selecting a date from the calendar that appears. An effective date is required if the change is due to a legal name or type change. If the change is due to a spelling error, an effective date is not required.
![]()
Example 3.4.3.2: Correcting the spelling of an entity’s name
If an entity’s status is different from what is present on the list, such as it disincorporated or the entity never existed in your county, complete the following steps:
Check the appropriate box for the type of change.
Enter a date into the Date field by double clicking in the field and selecting a date from the calendar that appears. All status changes, other than “Incorporated place or MCD never existed”, require an effective date to be recorded in the Date field.

Example 3.4.3.3: Changing an entity’s status
If an entity needs to be added to the list, complete the following steps:
Press the Add New Change tool (
)
at the bottom of the screen. A line will be added under New
Entities and the check box for New incorporated place or MCD will be
checked.
Enter the entity’s name and type in the appropriate fields
Enter the effective date of the incorporation or create into the Date field by double clicking in the field and selecting a date from the calendar that appears.

Example 3.4.3.4: Adding a New Entity
When you have completed reviewing this table, press the OK button at the bottom of the window to complete the form review. The next step to submitting your BAS is to review and update the boundaries on the maps. Skip to section 3.5 of this document for an explanation on how to open the BAS map in the MPTS.
American Indian Areas form
The BAS Form 5 screen shows the name and geographic relationship information for the American Indian reservation and/or off-reservation trust land and asks the participant to verify the information.
The following information is provided in the Title and Entity section:
Part A lists the name of the American Indian reservation and/or off-reservation trust land.
Part B lists the names of counties where the American Indian reservation and/or off-reservation trust land is located.
Part C lists the FIPS codes for the reservation/off-reservation trust lands by state.
Please review the information provided in the Title and Entity section (Example 3.4.4.1).
Example 3.4.4.1: Reviewing the first screen of the American Indian Areas form
The Modifications section includes questions about the validity of the information provided in the Title and Entity section. The default answer to each question is yes.
If you have changes to report for Question a, complete the following steps:
Select the radio button next to No.
Type in the new or correct name into the field below. You must submit supporting documentation such as a tribal resolution when reporting a name change.
Please disregard questions b and c on this form.
If
your entity supplied the Census Bureau with legal boundary changes
during the previous BAS cycle, select the Next button (![]() )
at the bottom of the first screen to proceed to the BAS Table Review
screen. This screen displays data submitted for each legal boundary
change that was reported for your entity during the previous BAS
cycle.
)
at the bottom of the first screen to proceed to the BAS Table Review
screen. This screen displays data submitted for each legal boundary
change that was reported for your entity during the previous BAS
cycle.
Note: If your entity did not supply the Census Bureau with any legal boundary changes, the Next> button will bring you to the Tribal Subdivisions screen. This will list the tribal subdivisions within your reservation/off-reservation trust land.
If your American Indian reservation and/or off-reservation trust land did not supply the Census Bureau with any legal boundary change information during the previous BAS cycle and the Census Bureau does not have any record of tribal subdivisions for your entity an OK button will appear at the bottom of the first screen. Press the OK button to complete your form review. The next step to submitting your BAS is to review and update the boundaries on the maps. Skip to section 3.5 of this document for an explanation on how to open the BAS map in the MPTS.
On the BAS Table Review screen, please look at each field to ensure that the data was accurately recorded (Example 3.4.4.3).
Example 3.4.4.3: Reviewing legal boundary change data
The values that may be present in the Type of Change field are A (Addition), B (Boundary Correction), D (Deletion), and O (Other). Table 3.4.4.1 explains the values that may be present in the Auth. Type field. There are two possible values for the Type Added column: R (Reservation) and T (Off-reservation trust land).
Code |
Definition |
A |
Act of Congress, Statute, or Federal Law |
C |
Federal Court Decision |
D |
Deed Placing Land into Trust |
N |
Federal Register Notice or Notice Published in a Local Newspaper by the Federal Government |
X |
Other Type |
Table 3.4.4.1: Auth. Type Codes
If you determine that a field needs to be modified, complete the following step:
Enter the correct data into the white field to the right of the column that requires the correction. The fields next to Type of Change, Auth. Type, and Type Added require a value to be chosen from a dropdown menu. If you wish to make a change to the effective date double click in the field next to Date and a calendar will appear for you to choose the correct date. Note: additional fields exist for each record that are not viewable unless you scroll to the right.
When you have completed reviewing the BAS Table Review screen, press the Next>button to continue to the Tribal Subdivisions screen.
Note: If the Census Bureau does not have any record of tribal subdivisions for your entity, an OK button will appear at the bottom of the first screen. Press the OK button to complete your form review. The next step to submitting your BAS is to review and update the boundaries on the maps. Skip to section 3.5 of this document for an explanation on how to open the BAS map in the MPTS.
The Tribal Subdivisions screen provides a list the tribal subdivisions located within your reservation/off-reservation trust land (Example 3.4.4.4). Please review this list to determine if, as of the date listed at the top of the screen, all of the tribal subdivisions located within your reservation/off-reservation trust land are present on the list, if their type is correct, and if their name is spelled correctly. The type describes if they are A (active) or I (inactive). All active subdivisions will be listed first followed by, if any, inactive subdivisions.

Example 3.4.4.4: Tribal subdivision list review
If a tribal subdivision’s name or type is incorrect, complete the following steps:
Type the correct information in the white column beside name. You must submit supporting documentation such as a tribal resolution when reporting a name change.
Enter a date into the Date field by double clicking in the field and selecting a date from the calendar that appears. A change to a tribal subdivision name requires an effective date. If the change is due to a spelling error, an effective date is not required. (Example 3.4.4.5)
![]()
Example 3.4.4.5: Correcting the spelling of an entity’s name
If a tribal subdivision’s status is different from what is present on the list, such as it has been deleted or the subdivision never existed, complete the following steps:
Check the appropriate box for the type of change.
Enter a date into the Date field by double clicking in the field and selecting a date from the calendar that appears. All status changes, other than “Tribal subdivision never existed” and “Boundary correction”, require an effective date to be recorded in the Date field.

Example 3.4.4.7: Changing an entity’s status
If an entity needs to be added to the list, complete the following steps:
Select the Add New Subdivision tool (
)
at the bottom of the screen. A line will be added under New
Entities and the check box for New subdivision will be checked.
Enter the entity’s name and type in the appropriate fields
Double click in the Date field to select the effective date of the creation.

Example 3.4.4.8: Adding a New Entity
When you have completed reviewing this table, press the OK button at the bottom of the window to complete the form review. The next step to submitting your BAS is to review and update the boundaries on the maps. Skip to section 3.5 of this document for an explanation on how to open the BAS map in the MPTS.
To open the boundary update component of the software, select BAS from the general toolbar and then select Open (Example 3.5.1).
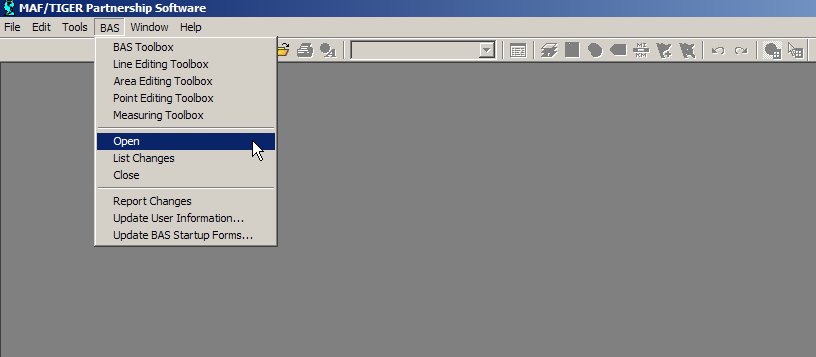
Example 3.5.1: Opening the map
If you determine that there is data being displayed that will not be helpful to you as you make your boundary updates, such as tract or block boundaries, you may hide the data. To make a type of data, or layer, hidden from your view, select the Map Layers tool (Example 3.6.1) in the main toolbar.
![]()
Example 3.6.1: Map Layers tool
For each layer that you do not wish to view, select it from the list and click the Hide Layer button (Example 3.6.2). If multiple layers exist for a data type (such as Census Block, Census Block 1), select each layer and click the Hide Layer button. A data type is listed more than once if you have received information for multiple counties.
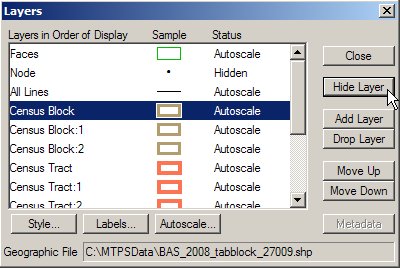
Example 3.6.2: Hiding Layers Previously Viewable
This tool can also be used if a layer is hidden and you wish to view the data. To show a layer that is currently hidden, select the layer and click the Show Layer button (Example 3.6.3).
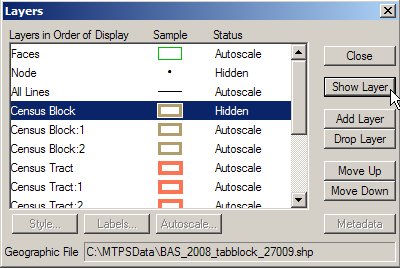
Example 3.6.3: Showing Layers Previously Hidden
The MTPS allows you to make many types of updates to the map (eg. add a new incorporation, add an addition or annexation, modify an area landmark, adding a new street, etc.). The following subsections will describe the how to use the software to make the changes to the map and the documentation needed for each type of change.
Map editing toolboxes
There are four map editing toolboxes: the BAS toolbox, Line Editing toolbox, Area Editing toolbox, and Point Editing toolbox. Table 3.7.1.1 describes the data that is able to be edited using the different toolboxes.
Toolbox |
Data Edited |
BAS toolbox |
Boundaries of legally defined areas
|
Line Editing toolbox |
Features
|
Area Editing toolbox |
Boundaries of an Area Landmark
|
Point Editing toolbox |
Point landmarks
|
Table 3.7.1.1: Data Edited Using Each Toolbox
These toolboxes can be accessed by clicking on BAS on the main toolbar at the top of the screen and then selecting the toolbox of interest (Example 3.7.1.1).
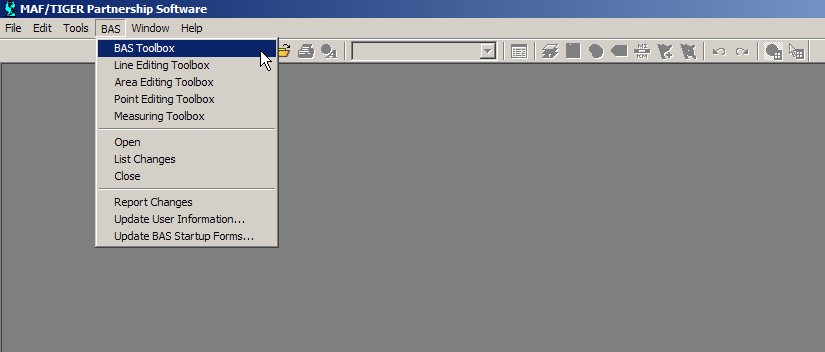
Example 3.7.1.1: Opening the BAS toolbox
Note: Some toolboxes can not be open at the same time, such as the BAS toolbox and the Area Editing toolbox. If you receive a message that a toolbox can not be opened due to another toolbox being open, please close the conflicting toolbox and try again.
Appendix 4 contains tables showing the tools contained within each toolbox and their functionality. Although these tables describe each of the tools and how to use them, an in depth description on all of the necessary steps to complete each type of change will be described in the following sections. The Computer Based Trainings also offer visual demonstrations of how to complete map updates.
Boundary changes using the BAS toolbar
As stated in Table 3.7.1.1, changes to the boundaries of legal areas are made through the BAS toolbox. An explanation of the tools in this toolbox is given in Appendix 4 Table 2. Although the different kinds of boundary changes require different types of documentation, the steps to complete the map updates are similar. Section 3.7.2.1 will describe the steps to completing a boundary change using the BAS toolbox, and potentially the Line Editing toolbox. Section 3.7.2.2 will provide a series of tables describing the required documentation for each of the types of boundary changes.
Note: Although the software lists all of the change types for each entity type (American Indian Reservation, Incorporated Place), only specific types of changes will be processed for entity type. Please see Appendix 5 for a list of acceptable types of change by entity type.
The CBT provides visual demonstrations of how to perform boundary updates. These demonstrations will be helpful in showing the different tools and steps to complete a change on the map. Please ensure that you have reviewed these demonstrations before completing boundary updates.
Creating boundary change polygons
To create boundary change polygon, complete the following steps:
Select the level of geography that the change is being made to from the Edit Layer dropdown menu on the BAS toolbox. This step only applies to county or American Indian area participants. All other participants will have the selection set for them.
Select the entity you wish to edit from the Target Area dropdown menu on the BAS toolbox. This step only applies to county or American Indian area participants. All other participants will have the selection set for them.
Select the appropriate type of change from the Action dropdown menu on the BAS toolbox1. The available types of change are:
Note: Boundary Corrections are fixes to the representation of our boundary that are not related to a new or unreported legal action. These are what in a paper environment were referred to as drafting corrections.
Zoom to the area of change by using the Zoom In tool (
 )
on the General Toolbox or the Zoom to Target Area tool (
)
on the General Toolbox or the Zoom to Target Area tool (
 )
on the BAS toolbox.
)
on the BAS toolbox.Select the faces that make up the area of change. The Select by Pointing tool (
 )
and Select by Shape tool (
)
and Select by Shape tool (
 )
on the BAS toolbox can both be used to identify an area of change.
If a face is accidentally selected you may unselect the face by
using the Select by Pointing tool.
)
on the BAS toolbox can both be used to identify an area of change.
If a face is accidentally selected you may unselect the face by
using the Select by Pointing tool.If you would like to select only a portion of a current face, you will need to add a line to divide the face. Please refer to the Editing Linear Features CBT for instruction on how to add a line to divide the face. If the line is being added as a boundary and a feature does not exist there, give the line a MTFCC of T1100. Type the word Boundary into the fullname field. Once your added line has been saved, MTPS will split the face into two separate faces. You will then be able to select the desired area.
Check to ensure that the correct faces were selected. Small faces may occur in congested areas, so it is important that you use the Zoom In tool to view an area in detail and check that you have selected all of the area you intended.
Click the Save Edits tool (
 )
on the BAS toolbox.
)
on the BAS toolbox.
Populating the BAS Entity Update form
After the edit is saved, a popup box will appear requesting the attribute information for the change. Boundary correction, either in or out, and geographic offsets do not require any attribute information.
The following fields are present on the Update Form:
Authorization Type
This field is requesting for the type of legal action that was taken to change the boundary. A drop down menu is available for the appropriate Authorization Type to be chosen.
Authorization Number
This field is asking for the record number associated with the legal action that changed the boundary.
Effective Date
This field requests date in which the boundary change was in effect. A calendar is available to choose the date.
MCD
This field is asking information regarding the MCD the area was in prior to the boundary update.
Type of Land Added
This field has a drop down menu listing the appropriate types for American Indian Area boundary updates.
The information that is required for each type of change, excluding boundary correction and geographic offset, is displayed by entity type in the Tables 3.7.2.2.1 – 3.7.2.2.3. Each field indicates if the information is mandatory, using the following characters:
Y means that the information is required
N means that the field is uneditable
A means that the field is editable but the information is not required
Attribute Information Required For Additions or Annexations And Deletions or Deannexations |
|||||
|
Authorization Type |
Authorization Number |
Effective Date |
MCD |
Type of Land Added |
American Indian Areas |
Y |
Y |
Y |
N |
Y |
Tribal Subdivisions |
Y |
Y |
Y |
N |
Y |
Counties |
Y (except GA*) |
Y (except GA*) |
Y |
N |
N |
Minor Civil Divisions (MCD) |
Y |
Y |
Y |
N |
N |
Incorporated Places |
Y (except GA*) |
Y (except GA*) |
Y |
A** |
N |
Table 3.7.2.2.1
* GA state law does not require entities to record an Authorization type or number but it requires participant to submit the acreage of annexations. The MTPS automatically calculates the acreage of the area and inputs it into the form.
**The MCD field only needs to be entered when a change is made to an incorporated place in a state that has MCDs. If such a change is made, please enter the MCD that contained the area prior to the annexation.
Attribute Information Required For Geographic Corridors |
|||||
|
Authorization Type |
Authorization Number |
Effective Date |
MCD |
Type of Land Added |
American Indian Areas |
A |
A |
A |
A |
Y |
Minor Civil Divisions (MCD) |
A |
A |
A |
A |
N |
Incorporated Places |
A |
A |
A |
A |
N |
Table 3.7.2.2.2
Attribute Information Required for New Entity |
|||
|
Entity Name |
Status |
Effective Date |
Tribal Subdivisions |
Y |
Y |
Y |
Incorporated Places |
Y |
N |
Y |
Table 3.7.2.2.3
The update will not be able to be finalized until each required field in completed. If you do not have information, for a required field, place the word Unknown in the field. The Census Bureau will review each record with an Unknown to determine if the update can be integrated into MAF/TIGER database. If an issue arises with such a record the person listed on the Participant Information form will be contacted.
Deleting a change polygon after it has been finalized
If you determine that a change polygon was created in error, complete the following steps to delete the change:
1. Select the Delete a Change
(
![]() )
tool from the BAS toolbox.
)
tool from the BAS toolbox.
2. Select the change polygon that you wish to delete.
3. The software will ask you to verify that you wish to delete the change. Answer yes.
Linear feature updates
As stated in Table 3.7.1.1, the editing of linear features is made using the Line Editing toolbox. An explanation of the tools in this toolbox is given in Appendix 4 Table 3.
Refer to the Editing Linear Features CBT for instruction on how to add, delete, and modify features. These instructional demonstrations will provide information on the steps to create a feature and the required information. The Help menu in the MTPS also provides a list of classification codes that can be selected when creating a line.
Area landmark updates
As stated in Table 3.7.1.1, changes to the boundaries of area landmarks are made through the Area Editing toolbox. An explanation of the tools in this toolbox is given in Appendix 4 Table 2. The following sections will describe the types of changes that can be made to area landmarks, the steps to complete those changes, and the required information that must accompany the map update, if any.
Boundary corrections to area landmarks
Since area landmarks and water features are not legal entities, the only types of boundary change that can be done to an existing landmark are boundary correction (add) and boundary correction (remove). To create boundary correction change polygons complete the following steps:
Select the type of geography that the change is being made to from the Edit Layer dropdown menu on the Area Editing toolbox. The choices will be either “Area Landmark” or “River, Lake, or Ocean”.
Select the geography you wish to edit from the Target Area dropdown menu on the Area Editing toolbox.
Select the type of change you want to make from the Action dropdown menu on the Area Editing toolbox. The available types of change that relate to adjusting a boundary are:
Boundary Correction (add)
Boundary Correction (remove)
Zoom to the area in which the change is located by using the Zoom In tool (
)
on the General toolbox or the Zoom to Target Area tool (
)
on the Area Editing toolbox.Select the faces that make up the area of change. The Select by Pointing tool (
)
and the Select by Shape tool (
)
on the Area Editing toolbox can both be used to identify an area of
change. If a face is accidentally selected you may unselect the
face by using the Select by Pointing tool.If you would like to select only a portion of a current face, you will need to add a line to divide the face. Please refer to the Editing Linear Features CBT for instruction on how to add a line to divide the face. If the line is being added as a boundary and a feature does not exist there, give the line a MTFCC of T1100. Type the word Boundary into the fullname field. Once your added line has been saved, MTPS will split the face into two separate faces. You will then be able to select the desired area.
Check to ensure that the correct faces were selected. Small faces may occur in congested areas, so it is important that you use the Zoom In tool to view an area in detail and check that you have selected all of the area you intended.
Click the Save Edits tool (
)
on the Area Editing toolbox.
Boundary corrections do not require any additional information to be completed. This means that a popup box, such as the ones that appeared when an annexation was made to a legal boundary, will not appear when the Save Edits tool is used to complete the change.
New area landmark
New area landmarks and water features can be added to the map using the Area Editing toolbox. To create a new area landmark or water feature, complete the following steps:
Select the type of geography that the change is being made to from the Edit Layer dropdown menu on the Area Editing toolbox. The choices will be either “Area Landmark” or “River, Lake, or Ocean”.
Select New Landmark from the Action dropdown menu on the Area Editing toolbox.
Zoom to the area in which the new landmark is located by using the Zoom In tool (
)
on the General toolbox.Select the faces that make up the new landmark. The Select by Pointing tool (
)
and the Select by Shape tool (
)
on the Area Editing toolbox can both be used to identify an area of
change. If a face is accidentally selected you may unselect the
face by using the Select by Pointing tool.If you would like to select only a portion of a current face, you will need to add a line to divide the face. Please refer to the Editing Linear Features CBT for instruction on how to add a line to divide the face. If the line is being added as a boundary and a feature does not exist there, give the line a MTFCC of T1100. Type the word Boundary into the fullname field. Once your added line has been saved, MTPS will split the face into two separate faces. You will then be able to select the desired area.
Check to ensure that the correct faces were selected. Small faces may occur in congested areas, so it is important that you zoom in close to the area and check that you have selected all of the area you intended.
Click the Save Edits tool (
)
on the Area Editing toolbox.A window will appear asking for the name of the geography. Type the name into the box and select OK.
Removing area
Area landmarks and water features can be removed from the map if they no longer exist or if they are erroneous. To remove an area landmark or water feature, complete the following steps:
Select the type of geography that the change is being made to from the Edit Layer dropdown menu on the Area Editing toolbox. The choices will be either “Area Landmark” or “River, Lake, or Ocean”.
Select the geography you wish to delete from the Target Area dropdown menu on the Area Editing toolbox.
Select Deletion or Deannexation from the Action dropdown menu on the Area Editing toolbox.
Click the Save Edits tool (
)
on the Area Editing toolbox.
The deletion of an area landmark or water feature does not require any additional information to be completed. This means that a popup box will not appear when the Save Edits tool is used to complete the change.
Changing the name
The names of area landmarks and water features can be updated if the name has changed or if the name appears incorrectly on the map. To change the name of an area landmark or water feature, complete the following steps:
Select the type of geography that the change is being made to from the Edit Layer dropdown menu on the Area Editing toolbox. The choices will be either “Area Landmark” or “River, Lake, or Ocean”.
Select the geography whose name has changed from the Target Area dropdown menu on the Area Editing toolbox.
Select Change Name from the Action dropdown menu on the Area Editing toolbox.
Click the Save Edits tool (
)
on the Area Editing toolbox.A window will appear asking for the new name of the geography. Type the name into the box and select OK.
Point landmark updates
As stated in Table 3.7.1.1, changes to point landmarks are made through the Point Editing toolbox. An explanation of the tools in this toolbox is given in Appendix 4 Table 4. The following sections will describe the types of changes that can be made to point landmarks, the steps to complete those changes, and the required information that must accompany the map update, if any.
Adding a point landmark
New point landmarks can be added to the map using the Point Editing toolbox. To create a new point landmark, complete the following steps:
Select the Add Point tool (
 ).
).Click in the location where the point landmark is located.
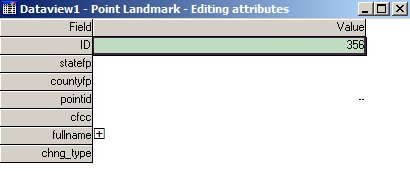
A window will appear with fields where the attribute information for the landmark can be filled (Example 2.5.4.1.1). Click in the white area next to MTFCC. A list of point landmark types will appear. Select the appropriate type. Type the name of the point landmark in the white area next to fullname. If the point landmark does not have a name, click the plus sign next to fullname.
Select the Save Edits tool (
)
to finalize the change.
Example 2.5.4.1.1: Attribute window for Point Landmarks
Deleting a point landmark
Point landmarks that exist on the map can also be deleted using the Point Editing toolbox. To delete a point landmark, complete the following steps:
Select the Delete Point tool (
 ).
).Click on the existing point landmark.
Select the Save Edits tool (
)
to finalize the change.
If a point landmark is erroneously deleted, select the undo button at the top of the MTPS screen.
Renaming or recoding a point landmark
Point landmarks that exist on the map can also be renamed or recoded using the Point Editing toolbox. To rename or recode a point landmark, complete the following steps:
Click on the existing point landmark.
Change the name and/or code of the landmark.
Select the Save Edits tool (
)
to finalize the change.
Adding address range breaks
An address range break is a notation indicating the addresses that fall within the boundaries of a government. This information will not be displayed on your map but should be inserted when you move a boundary that intersects a street or you add a street that intersects a boundary. This will help the Census Bureau assign the correct addresses to your jurisdiction.
As stated in Table 3.7.1.1, address ranges can be added using the Line Editing Toolbar. An explanation of the tools in this toolbox is given in Appendix 4 Table 3. Complete the following steps to add an address break to a street.
Select the Show Left/Right Direction Arrows tool (
 )
from the Line Editing toolbar. Use the arrows on the line to
determine which side of the road is the left and which is the right.
)
from the Line Editing toolbar. Use the arrows on the line to
determine which side of the road is the left and which is the right.
Select the Edit Line Attributes tool (
 )
from the Line Editing toolbar.
)
from the Line Editing toolbar.
Select the line which the address break should be assigned to. This will cause the attribute information for that line to be visible.
Scroll to ltoadd and rtoadd fields.
Add the address that is on the left side of the road closest to the boundary to the ltoadd.
Add the address that is on the right side of the road closest to the boundary to the rtoadd.
It is very important that you review each boundary update you made to a legal entity before submitting your changes to the Census Bureau. The changes that you make using MTPS will be processed for inclusion in to the MAF/TIGER database and will move the legal boundaries of the entities you specified. A very helpful tool to use for the review of boundary changes to legal boundaries is the List Changes tool. This tool can be accessed by selecting BAS from the MTPS toolbar and then select List Changes (Example 4.1)
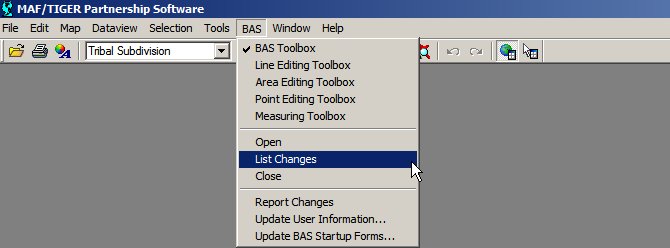
Example 4.1: Opening the List Changes Tool
Use this review tool to complete the following steps for the review of your changes:
Select the level of geography you would like to review from the dropdown.
Select the change you would like to review from the list.
Select the zoom to change tool (
 )
located at the top of the window.
)
located at the top of the window.Zoom into the area of change and make sure all of the appropriate faces have been selected.
If faces are missing or incorrect faces have been added, delete the change polygon using the Delete a Change tool (
)
on the BAS toolbox and recreate the change polygon.
While zoomed into an area of change, ensure that any needed geographic offsets and corridors have been created. If they have not been created, use your BAS toolbox to do so.
Review the attribute information by selecting the information tool (
 )
and clicking on the change polygon. The popup window will appear
and the attribute data can be corrected, if necessary.
)
and clicking on the change polygon. The popup window will appear
and the attribute data can be corrected, if necessary.Ensure that boundary corrections do not dissolve relationships between features and the boundary.
If you would like to retain a printed copy of the changes you made while using the MTPS, please review the Printing a Map section of the Help menu.
Once you have completed creating and reviewing the changes you would like to made to your BAS maps, you are ready to create a ZIP file and send it to the Census Bureau.
Creating the ZIP file
To submit your changes, select BAS on the main toolbar at the top of the screen and then select Report Changes (Image 6.1)
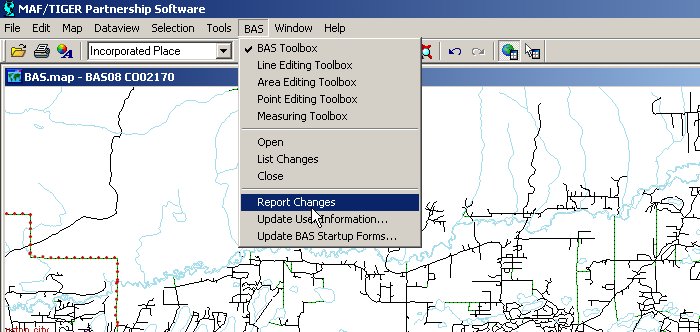
Image 6.1: Report Changes
A confirmation box will appear after you have selected Report Changes (Image 6.2). Once you have confirmed your desire to submit the changes, a ZIP file will be created. This zip file will contain all of the files the Census Bureau needs for your submission.
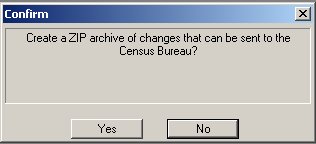
Image 6.2: Report Changes confirmation box
After the zip file has been created, a box will appear telling you the location of the file (Image 6.3). Please note the location so that you are able to find it on your computer.

Image 6.3: Location of ZIP file
Returning the Changes to the Census Bureau
Your BAS changes may be returned to the Census Bureau via CD or FTP. Please submit only the ZIPed file created by the MTPS.
Note: If you are participating in BAS in conjunction with any other Census Bureau program, please review that programs documentation to determine their FTP procedures. Some programs require all data to be returned to the Census Bureau via CD due to Title 13 issues.
If you are returning your data via CD, please label the CD with the name of the zip file. This will ensure that your CD is correctly tracked when it is received by the Census Bureau. Enclosed in your package is a padded envelope for you to return the CD. Please use this envelope because it will protect the CD from any damage that could occur during shipping and it has the return address pre-printed.
The BAS homepage (http://www.census.gov/geo/www/bas/bashome.html) will have a link to the Census Bureau FTP site. You will be able to upload your data using Internet Explorer.
Appendices
Appendix 1: Paperwork Reduction Project
The U.S. Census Bureau estimates that the BAS review will take most respondents from 1 to 6 hours to complete. This includes the time needed to read the instructions, assemble materials, organize and review the information, and report any needed changes. This estimate is based on 80 percent of all areas having few or no changes. However, for areas with many changes, it may take 20 hours or longer to complete the survey. Please send comments regarding this burden estimate or any other aspect of this collection of information, including suggestions for reducing this burden, to:
Paperwork Project 0607-0151
U.S. Census Bureau
4600 Silver Hill Road
Room 3K138
Washington, DC 20233
Or you may e-mail comments to:
paperwork@census.gov
Note: Use “Paperwork Project 0607-0151” as the subject.
Please include a copy of your message addressed to:
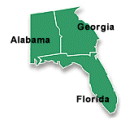
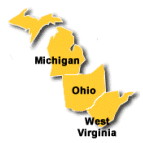
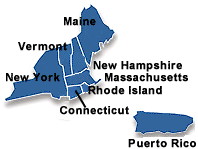
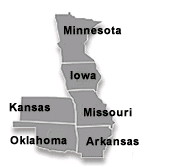
Appendix 2: State arrangements and agreements
The following the states have special arrangements or agreements with the Census Bureau for conducting the BAS. There agreements are described in the special notes below. Additional agreements may be posted to our BAS website if they are finalized after printing this guide.
Alaska
California
Georgia
Kentucky
Louisiana
Michigan
Minnesota
New York
Puerto Rico
Virginia
West Virginia
Wisconsin
Alaska
Alaska Statutes (AS 29 and AS 44) stipulate the Local Boundary Commission be involved in the development of all boundary changes to incorporated places including annexations, incorporations, or dissolutions. The Local Boundary Commission within the Alaska Department of Commerce, Community and Economic Development has designated the Alaska Department of Labor and Workforce Development as the agency to provide the Census Bureau with boundary changes through the annual Boundary and Annexation Survey.
The Census Bureau and the Alaska Department of Labor and Workforce Development are working together to consolidate the updates of legal boundaries in Alaska. This ensures the Census Bureau will obtain the boundary information it needs from a single source.
Please note that any governmental boundary changes, incorporations, dissolutions, and mergers for your borough or city effective on or before January 1st, will be submitted by the Alaska Department of Labor and Workforce Development.
If you have any questions or concerns regarding legal boundaries for your borough or city you may contact Ingrid Zaruba at 907-465-2439 or by email at: ingrid_zaruba@labor.state.ak.us
California
The California State Board of Equalization serves as the Certifying Official for all local governments in California. The Board certifies to the Census Bureau the legality of boundary changes made by California municipalities. To assist them, please enter the final resolution number adopted by the city council as approved by the Local Agency Formation Commission (LAFCO) for each boundary change in the Authorization Number field on the BAS Entity Update Form. Do not report the resolution number that initiated the action. Also, please enter the date on the certificate of completion issued by the LAFCO in the Effective Date field on the BAS Entity Update Form.
Georgia
The Georgia Code stipulates that all annexations and deannexations to incorporated places be reported to the Georgia Department of Community Affairs. The Census Bureau has an ongoing working relationship with this state agency to conduct the annual Boundary and Annexation Survey. A list of entities that reported boundary changes to the Georgia Department of Community Affairs is provided to the Census Bureau each year. The Census Bureau uses this list to determine who should get a BAS package.
Please ensure that all annexation and deannexation information has been reported to the Department of Community Affairs, per the Georgia Code. The Georgia Code is available at http://www.legis.state.ga.us/. You may report your boundary changes to the Department of Community Affairs online or print a boundary change report form at http://www.georgiaplanning.com/annex.htm. Printed forms can be mailed to Annexation Reports- Georgia Department of Community Affairs- 60 Executive Park South, NE- Atlanta, Georgia- 30329-2231.
The Department of Community Affairs (DCA) serves as the Certifying Official for all local governments in Georgia. DCA certifies to the Census Bureau the legality of boundary changes made by Georgia municipalities. To assist them, please enter the final resolution or ordinance number adopted by the city for each boundary change, as it was reported to DCA. If no resolution or ordinance number was assigned by your city then use the DCA-ID number assigned by DCA to your annexation report. Enter the number in the Authorization Number field on the BAS Entity Update Form. Also, please enter the effective date, as officially recorded by DCA; into the Effective Date field on the same form. The DCA-ID number and official effective date for annexations can be obtained at http://www.GeorgiaPlanning.com/annex.htm. If you have any concerns about this data, contact Terry Jackson at 404-679-4946.
The Census Bureau has also entered into a cooperative agreement with the State of Georgia Municipal Association to provide two sets of maps to each government surveyed through the BAS. Please return one set of maps to the Census Bureau; the other set can be marked and retained for your records.
Kentucky
The Kentucky Revised Statutes stipulate that all boundary changes to incorporated places within Kentucky be reported to the office of the Secretary of State. Reports of boundary changes are forwarded by the Secretary of State to the Division of Geographic Information for mapping. The Census Bureau has an ongoing working relationship with this state agency to conduct our annual Boundary and Annexation Survey. The Kentucky Division of Geographic Information provides a list of incorporated places, which reported boundary changes, to the Census Bureau each year. The Census Bureau uses this list to determine who should get a BAS package.
Please ensure that boundary change information has been reported to the Office of the Secretary of State, per the Kentucky Revised Statutes. The Kentucky Revised Statutes are available at http://www.lrc.ky.gov/statrev/frontpg.htm. All boundary changes should be submitted to The Land Office Division, Secretary of State, Room T40, Capitol Annex, 700 Capital Ave., Frankfort, KY, 40601.
If you would like to review the data, which the Kentucky Division of Geographic Information has for your entity, please visit http://kygeonet.ky.gov/. If you have any concerns about this data, contact Kim Anness at 502-564-1450.
Louisiana
The MCD used in Louisiana for Census Bureau data tabulations is the parish governing authority district. These districts are the same as the Police Jury Districts or the Parish Council Districts used for the election of members of the police jury or parish council. Please review the boundaries of the parish subdivisions in your parish carefully to ensure that the names and boundaries conform to these districts. Do not report election precincts or election districts or any other areas that are not used in apportioning the representatives of the police jury or parish council. If you have a question about which MCDs you are to report, please contact:
Bill Blair
Director of Demographic Services (House and Senate)
P.O. Box 44486
Baton Rouge, LA 70804
Telephone: 225-342-2591
Fax: 225-342-0768
E-mail: blairb@legis.state.la.us
If you report changes or corrections to the districts in your parish, please ensure that you also report the effective date of the change.
Michigan
Michigan law stipulates that all boundary changes to incorporated places and minor civil divisions within Michigan be reported to the office of the Secretary of State. The Census Bureau has an ongoing working relationship with a state agency to conduct our annual Boundary and Annexation Survey. The state agency provides a list of incorporated places and minor civil divisions, which reported boundary changes, to the Census Bureau each year. The Census Bureau uses this list to determine who should get a BAS package.
Minnesota
Minnesota statutes stipulate that all boundary changes to incorporated places and minor civil divisions within Minnesota be reported to the office of Strategic and Long-Range Planning. The Census Bureau has an ongoing working relationship with a state agency to conduct our annual Boundary and Annexation Survey. The state agency provides a list of incorporated places and minor civil divisions, which reported boundary changes, to the Census Bureau each year. The Census Bureau uses this list to determine who should get a BAS package.
New York
The New York Department of State, Division of Corporations and State Records serves as the Certifying Official for all local governments in New York. The Division certifies to the Census Bureau the legality of boundary changes made by New York municipalities. Please be advised that the state can certify only those boundary change actions enacted by Local Law pursuant to Section 714 of the General Municipal Law. To assist them, please enter select “L – Local Law” from the Authorization Type drop down to indicate that this action is a local law. Enter the final Local Law number for each boundary change in the Authorization Number field on the BAS Entity Update Form, rather than the municipal ordinance or resolution number that initiated the action. Finally, please enter the date the annexation was filed with the Secretary of State in the Effective Date field on the same form.
Puerto Rico
Under Puerto Rico law, boundary changes to municipios and barrios are reported to the Census Bureau by the Puerto Rico Planning Board only. The Puerto Rico Planning Board will report all boundary changes, approved by the Puerto Rico Government, effective on or before January 1 of each year
The Census Bureau and the Puerto Rico Planning Board collaborate to consolidate the updating of legal boundaries at the commonwealth level, after they have been approved by the Puerto Rico Legislature. The Planning Board maintains the most up-to-date boundary information for all municipios and barrios in Puerto Rico.
If you would like to review the boundary data that the Puerto Rico Planning Board has for your municipio and/or barrios, please visit http://www.jp.gobierno.pr. If you have any concerns about this data, contact Ms. Lillian Torres-Aguirre at 787-723-6200 ext. 2501.
Virginia
The minor civil divisions (MCDs) used in Virginia for Census Bureau data tabulations is the district used for the election of a representative to the County Board of Supervisors. These districts usually are termed magisterial districts, but can have other designations, such as election or supervisor districts. Please review the boundaries of the MCDs in your county carefully to ensure that the names and boundaries conform to the areas functioning as districts for the election of county supervisors.
Do not report taxing districts, districts used for the recording of land titles, or any other type of district that is not used in apportioning the representatives of the county board. If these districts are not called magisterial districts, put the correct description of the areas above the first data line showing the “NAME OF MUNICIPALITY OR MINOR CIVIL DIVISION” in Question 3. If you have a question about which MCDs you are to report, please contact:
U.S. Census Bureau
Geography Division
Geographic Entity Programs Branch
Legal Areas Team
Washington, DC 20233-7400
Telephone: 301-763-1099
Fax: 301-457-4710
E-mail: geo.bas@census.gov
If you report changes or corrections to the districts in your county, please ensure that you also report the effective date of the change.
West Virginia
The MCD used in West Virginia for Census Bureau data tabulations is the magisterial district. Magisterial districts are the divisions of the county used for the election of county commissioners and members of the school board. Please review the boundaries of the county subdivisions in your county carefully to ensure that the names and boundaries conform to the areas called magisterial districts. Do not report taxing districts, districts used for the recording of land titles, or any other type of district that is not used in apportioning the representatives of the county board. If you have a question about which MCDs you are to report, please contact:
Patricia Hamilton
Certified Association Executive
West Virginia Association of Counties
2211 Washington Street East
Charleston, WV 25311
Telephone: 304-346-0591
Fax: 304-346-0592
E-mail: wvaco@wvaco.org
If you report changes or corrections to the districts in your county, please ensure that you also report the effective date of the change.
Wisconsin
Wisconsin law stipulates that all boundary changes to incorporated places and minor civil divisions within Wisconsin be reported to the office of Secretary of State. The Census Bureau has an ongoing working relationship with a state agency to conduct our annual Boundary and Annexation Survey. The state agency provides a list of incorporated places and minor civil divisions, which reported boundary changes, to the Census Bureau each year. The Census Bureau uses this list to determine who should get a BAS package.
Appendix 3: Census Bureau Regional Offices - Contact information
|
Atlanta Regional Office 101
Marietta Street, N.W., Ste. 3200 (404) 730-3832 or (800) 424-6974 TDD: (404) 730-3964 FAX: (404) 730-3835 E-mail: |
Detroit
Regional Office (313) 259-1158 or (800) 432-1495 TDD: (313) 259-5169
Fax:
(313) 259-5045 |
|
|
Boston Regional Office 4 Copley Place, Ste. 301 P.O.
Box 9108 (617) 424-4500 or (800) 562-5721 TDD: (617) 424-0565 FAX:
(617) 424-0547 |
Kansas
City Regional Office (913) 551-6728 or (800) 728-4748 TDD: (913) 551-5839
Fax:
(913) 551-6789 |
|
|
Charlotte
Regional Office (704) 424-6400 or (800) 331-7360 TDD: (704) 344-6114 Fax:
(704) 424-6944 |
Los
Angeles Regional Office (818) 267-1700 or (800) 992-3530
TDD:
(818) 904-6249 |
|
|
Chicago
Regional Office Oak Brook, IL 60523-1918 (630)
288-9200 or (800) 865-6384 |
New
York Regional Office New York, NY 10014 (212) 584-3400 or (800) 991-2520 TDD: (212) 478-4793 Fax: (212) 478-4800 E-mail: |
|
|
Dallas
Regional Office Dallas, TX 75247 (214) 253-4401 or (800) 835-9752 TDD:
(214) 655-5363 |
Philadelphia
Regional Office (215) 717-1800 or (800) 262-4236 TDD: (215) 717-0894
Fax:
(215) 717-0755 |
|
|
Denver
Regional Office (303) 264-0202 or (800) 852-6159 TDD:
(303) 969-6767 |
Seattle
Regional Office (206)
381-6200 or (800) 233-3308 Fax
(206) 381-6310 |
|


Appendix 4: Tool explanations by toolbox
This appendix will describe each tool that is important to a BAS submission. The description of the tools will be organized by toolbox to ensure that you are able to locate them when necessary. Please refer back to the main portion of the User’s Guide for the explanation of how use these tools together to complete different types of changes.
Table 1 General toolbox |
||
Tool |
Example Situation |
Instruction |
|
You wish to zoom into a specific area. |
|
|
You would like to see a larger area than is currently in view. |
|
|
You would like to view a different portion of the map while keeping it the same scale. |
|
|
While navigating the map you may accidentally change the scale. |
|
|
After working in the MTPS you may be interested in seeing the extent of the map which was visible when you first opened it that day. |
|
|
You are interested in learning about the attribute information of different features or geographies. |
|
|
You are adding an annexation or addition and you know that it begins a certain distance down a road from an intersection. |
|
|
You know the area of the annexation, as well as the distance that the annexation spans along the road but you do not know how far the annexation goes into a field.
|
|
Table 2 BAS and Area Editing toolboxes: tools to identify government and type of change |
||
Tool |
Function |
Instruction |
|
To specify the level of geography that you wish to edit.
|
|
|
To specify the government you wish to edit. |
|
|
To specify the type of change you would like to make to an entity. |
|
|
To change the target area in the toolbox by clicking on an entity, after selecting the appropriate Edit Layer.
|
|
Table 2 (Cont.) BAS and Area Editing toolboxes: tools to identify entity and type of change |
||
Tool |
Function |
Instruction |
|
To zoom to the area that you have specified in the Target Area. |
|
|
To identify the attributes of a face. |
|
|
To delete a change after it has been saved. |
|
|
To select a face as part, or all, of an area of change. |
|
|
To select an area of faces as an area of change. |
|
|
To complete a change and save it. |
|
|
To cancel a change before it is saved. |
|
Table 3 Line Editing toolbox |
||
Tools |
Function |
Instructions |
|
To add a feature. |
|
|
To delete a feature. |
|
|
To split a feature. |
|
|
To delete a feature but save the attributes. |
|
|
To add a feature and add the saved attributes. |
|
|
To edit a feature’s attributes. |
|
Table 3 (Cont.) Line Editing toolbox |
||
Tool |
Function |
Instructions |
|
To display a feature’s alternative names. |
|
|
To display the direction of the line. |
|
|
To save an edit. |
|
|
To cancel an edit. |
|
Table 4 Point Editing toolbox |
||
Tool |
Function |
Instructions |
|
To add a point landmark. |
|
|
To delete a point landmark. |
|
|
To edit the attributes a point landmark.
|
|
|
To cancel an edit.
|
|
|
To save an edit. |
|
Appendix 5: Acceptable changes by entity type
Geography |
Available Change Types |
Place |
Addition or Anenxation Boundary Correction (in) Boundary Correction (out) Deletion or Deannexation Geographic Corridor Geographic Offset New Entity Other |
County Subdivision |
Addition or Anenxation Boundary Correction (in) Boundary Correction (out) Deletion or Deannexation Geographic Offset New Entity |
County |
Addition or Anenxation Boundary Correction (in) Boundary Correction (out) Deletion or Deannexation |
Tribal Subdivision |
Addition or Anenxation Boundary Correction (in) Boundary Correction (out) Deletion or Deannexation Geographic Offset New Entity Other |
American Indian Area |
Addition or Anenxation Boundary Correction (in) Boundary Correction (out) Deletion or Deannexation Geographic Corridor Geographic Offset New Entity Other |
Appendix 6: Geographic offsets and geographic corridors
The MAF/TIGER database is a street centerline file. Using this approach, we geocode all addresses on one side of the street to an entity. If doing this would misrepresent the housing count for your entity, then we request that you provide additional information. As appropriate you should identify Geographic Offsets and Geographic Corridors.
The Census Bureau defines a geographic offset and a geographic corridor as follows:
Geographic Offset: An area that is claimed by an entity that is only on one side of the road and does not contain any structures addressed to that side of the road
Geographic Corridor: An area that includes only road right-of-way and does not contain any structures addressed to either side of the road.
As you update your map, be aware of and document circumstances where a geographic offset or geographic corridor exists. If these are not identified correctly as part of your BAS submission, the Census Bureau may not accurately assign the addresses to the correct geographic areas (and therefore population counts and estimates may be affected). When a geographic offset or corridor is identified please be sure to create an geographic offset or geographic corridor change polygon to represent these areas. Detailed instructions on how to create a geographic offset or geographic corridor change using the BAS toolbox will be given in Section 2.7.2. Making these change polygons will help to eliminate confusion as to where offsets and corridors occur in relation to both annexations and boundary corrections. Please refer to examples A6.1 through A6.3 for a visual description of a geographic offset and corridor.
ExampleA6.1: This example depicts an addition or annexation made to a Census Bureau shapefile that is not coincident with the feature (Buena Vista Road). This addition or annexation was created in accordance with a local boundary map that is parcel based.
Example A6.2: The image on the left shows that the Census Bureau geocodes its addresses and establishes its population counts based on the centerline. Without creating a geographic offset polygon, the residential structures on the north side of the road will be assigned to unincorporated area rather than the jurisdiction to which they belong. The image on the right depicts how the Census Bureau will handle the addresses if the participant creates a geographic offset polygon. A geographic offset can be identified by creating a change polygon for the area and selecting geographic offset as the change type. After creating a geographic offset change polygon, residential structures on the north side of the road would be assigned to the place rather than to unincorporated area.
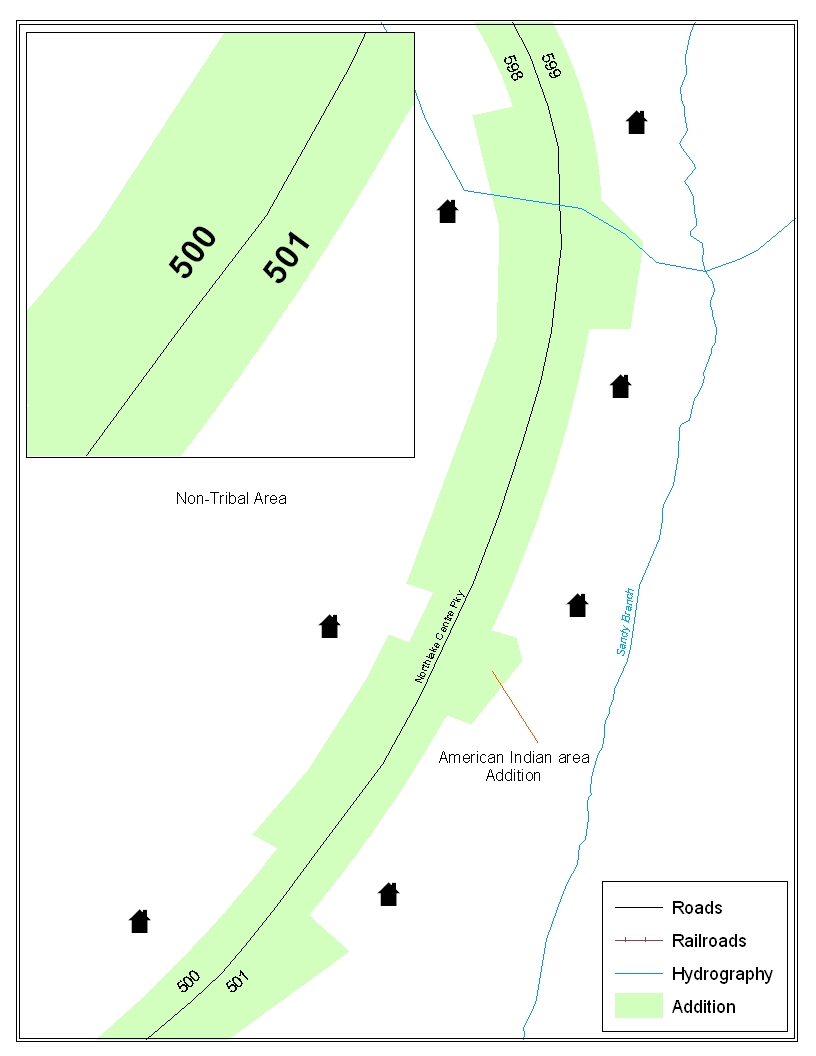
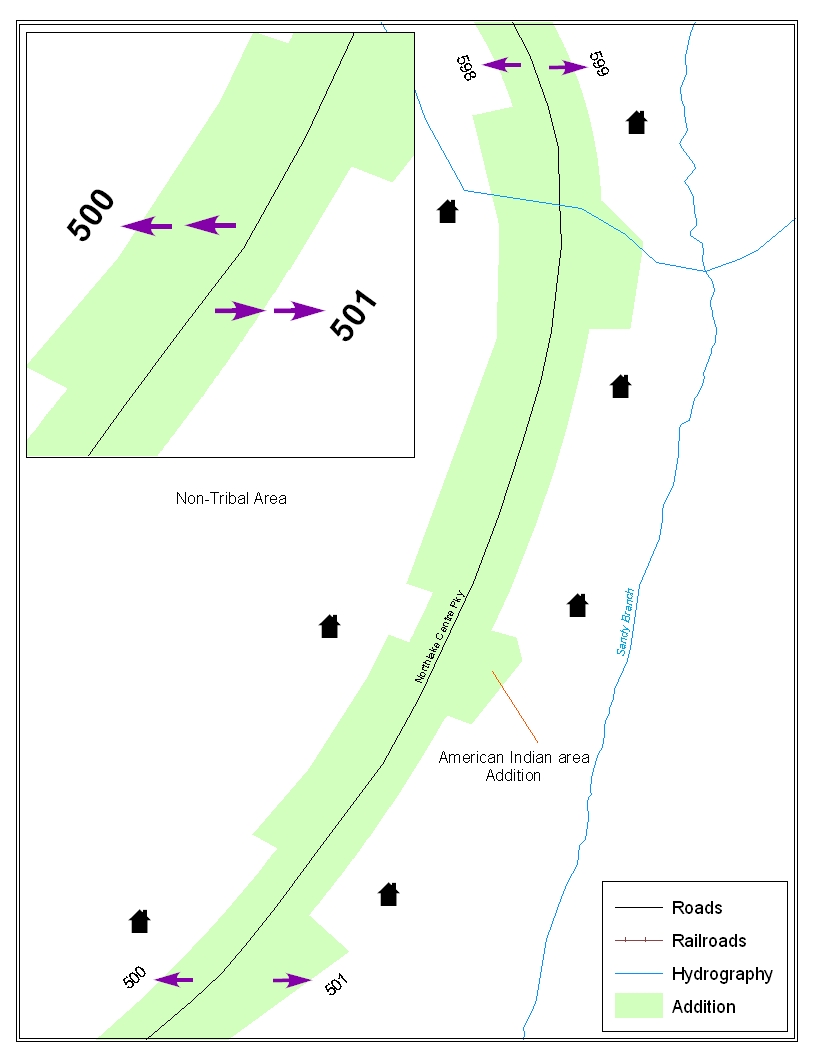
Example A6.3: The images above depict a geographic corridor. For the example on the left, if no geographic corridor change polygon is created, the addresses are geocoded to the American Indian area, even though the housing units are located outside of the American Indian area in a non-tribal area. The example on the right shows a geographic corridor change polygon that is created and assigned the correct change type. Because of this, the addresses will be assigned to the area which matches the correct location of the housing units. The residential structures and associated population are then assigned to the correct geography.
1 Please review Appendix 5 to determine which change types should be used for your entity.
2 Please see Appendix 6 for an explanation on Geographic Corridors and Geographic Offsets.
| File Type | application/msword |
| Author | Bernadette Jenkinson |
| Last Modified By | Bureau Of The Census |
| File Modified | 2007-05-15 |
| File Created | 2007-03-21 |
© 2026 OMB.report | Privacy Policy